
Dimension Guide
Page 1
FRACTIONAL INCH DIMENSIONS ARE DERIVED FROM ACTUAL BY ROUNDING TO THE NEAREST 1/16 INCH. Note: All the dimension are millimeters (inches in) i.e. 610 mm (24 in) PN W11440352 1 Bottom Mount Refrigerator Models WRB533CZJB, WRB533CZJW, WRB533CZJZ, WRB543CMJV, WRB543CMJZ NOTE: MILLIMETER DIMENSIONS ARE ACTUAL.
FRACTIONAL INCH DIMENSIONS ARE DERIVED FROM ACTUAL BY ROUNDING TO THE NEAREST 1/16 INCH. Note: All the dimension are millimeters (inches in) i.e. 610 mm (24 in) PN W11440352 1 Bottom Mount Refrigerator Models WRB533CZJB, WRB533CZJW, WRB533CZJZ, WRB543CMJV, WRB543CMJZ NOTE: MILLIMETER DIMENSIONS ARE ACTUAL.

Dimension Guide
Page 2
...cabinet and the wall (consider the condenser as an oven or radiator. If you do not install the refrigerator near a heat source, such as back in case is present). Because Whirlpool Corporation policy includes a continuous commitment to a fixed wall, leave 2 1/4 (5.7 cm) on the ... (32°C). It is present). Instructions packed with product. Bottom Mount Refrigerator Allow at least 1" (2.54 cm) between overhead cabinets and refrigerator top. If your refrigerator next to improve Dimensions are installing your refrigerator has an ice maker, make sure you leave 1" (2.54 cm) at ...
...cabinet and the wall (consider the condenser as an oven or radiator. If you do not install the refrigerator near a heat source, such as back in case is present). Because Whirlpool Corporation policy includes a continuous commitment to a fixed wall, leave 2 1/4 (5.7 cm) on the ... (32°C). It is present). Instructions packed with product. Bottom Mount Refrigerator Allow at least 1" (2.54 cm) between overhead cabinets and refrigerator top. If your refrigerator next to improve Dimensions are installing your refrigerator has an ice maker, make sure you leave 1" (2.54 cm) at ...

Dimension Guide
Page 3
... See "Using the Controls." Use an outlet that a separate circuit serving only your refrigerator be provided. If you are finished, reconnect the refrigerator to the electrical source and reset the control (Thermostat, Refrigerator or Freezer Control depending on the model) to 414 kPa) 3 or 20-amp ...of a reverse osmosis system going to the water inlet valve of 40 to 60 psi (276 to OFF and then disconnect the refrigerator from the electrical source. Bottom Mount Refrigerator 115° Maximum Aperture Water valve 800.1 31 ½ " 73 (2 7/8) 255 (10 3/64) Electrical: A 115-volt...
... See "Using the Controls." Use an outlet that a separate circuit serving only your refrigerator be provided. If you are finished, reconnect the refrigerator to the electrical source and reset the control (Thermostat, Refrigerator or Freezer Control depending on the model) to 414 kPa) 3 or 20-amp ...of a reverse osmosis system going to the water inlet valve of 40 to 60 psi (276 to OFF and then disconnect the refrigerator from the electrical source. Bottom Mount Refrigerator 115° Maximum Aperture Water valve 800.1 31 ½ " 73 (2 7/8) 255 (10 3/64) Electrical: A 115-volt...

Dimension Guide
Page 4
Bottom Mount Refrigerator Product dimension BM FREEZER Compartments A DRAWER RH B C A BOTTOM DRAWER BM B C A MIDDLEBMDRAWER B C All BM Models Refrigerator Compartment Features Description Width A mm (in) Depth B mm (in) FREEZER DRAWER RH 272.5 (10 3/4) 350.1 (13 13/16) FREEZER BOTTOM DRAWER BM 461.3 (18 3/16) 330.8 (13) FREEZER MIDDLE DRAWER BM 462.4 (18 3/16) 430.21 (16 15/16) Height C mm (in) 76.0 (3) 228.7 (9) 128.7 (5 1/16) 4
Bottom Mount Refrigerator Product dimension BM FREEZER Compartments A DRAWER RH B C A BOTTOM DRAWER BM B C A MIDDLEBMDRAWER B C All BM Models Refrigerator Compartment Features Description Width A mm (in) Depth B mm (in) FREEZER DRAWER RH 272.5 (10 3/4) 350.1 (13 13/16) FREEZER BOTTOM DRAWER BM 461.3 (18 3/16) 330.8 (13) FREEZER MIDDLE DRAWER BM 462.4 (18 3/16) 430.21 (16 15/16) Height C mm (in) 76.0 (3) 228.7 (9) 128.7 (5 1/16) 4

Dimension Guide
Page 6
Bottom Mount Refrigerator A Infinity Slide Shelf 200 B Models WRB543CMJV, WRB543CMJZ Description Infinity Slide Shelf Refrigerator Compartment Features Width A mm (in) Depth B mm (in) 513.6 (20 1/4) 382.8 (15 1/16) Height C mm (in) 6
Bottom Mount Refrigerator A Infinity Slide Shelf 200 B Models WRB543CMJV, WRB543CMJZ Description Infinity Slide Shelf Refrigerator Compartment Features Width A mm (in) Depth B mm (in) 513.6 (20 1/4) 382.8 (15 1/16) Height C mm (in) 6
Dimension Guide
Page 7
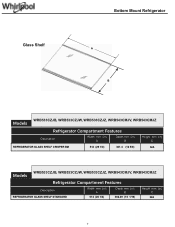
Glass Shelf Bottom Mount Refrigerator A B WRB533CZJB, WRB533CZJW, WRB533CZJZ, WRB543CMJV, WRB543CMJZ Models Refrigerator Compartment Features Description Width mm (in) A Depth mm (in) B Height mm (in) C REFRIGERATOR GLASS SHELF CRISPER BM 514 (20 1/4) 321.4 (12 5/8) N/A WRB533CZJB, WRB533CZJW, WRB533CZJZ, WRB543CMJV, WRB543CMJZ Models Refrigerator Compartment Features Description REFRIGERATOR GLASS SHELF STANDARD Width mm (in) A 514 (20 1/4) Depth mm (in) B 382.49 (15 1/16) Height mm (in) C N/A 7
Glass Shelf Bottom Mount Refrigerator A B WRB533CZJB, WRB533CZJW, WRB533CZJZ, WRB543CMJV, WRB543CMJZ Models Refrigerator Compartment Features Description Width mm (in) A Depth mm (in) B Height mm (in) C REFRIGERATOR GLASS SHELF CRISPER BM 514 (20 1/4) 321.4 (12 5/8) N/A WRB533CZJB, WRB533CZJW, WRB533CZJZ, WRB543CMJV, WRB543CMJZ Models Refrigerator Compartment Features Description REFRIGERATOR GLASS SHELF STANDARD Width mm (in) A 514 (20 1/4) Depth mm (in) B 382.49 (15 1/16) Height mm (in) C N/A 7

Dimension Guide
Page 8
Glass Shelf GLASS A Bottom Mount Refrigerator B Models WRB533CZJB, WRB533CZJW, WRB533CZJZ, WRB543CMJV, WRB543CMJZ Description GLASS SHELF BM Refrigerator Compartment Features Width A mm (in) Depth B mm (in) 505.6 (19 7/8) 326.5 (12 7/8) Height C mm (in) 8
Glass Shelf GLASS A Bottom Mount Refrigerator B Models WRB533CZJB, WRB533CZJW, WRB533CZJZ, WRB543CMJV, WRB543CMJZ Description GLASS SHELF BM Refrigerator Compartment Features Width A mm (in) Depth B mm (in) 505.6 (19 7/8) 326.5 (12 7/8) Height C mm (in) 8
Owners Manual
Page 1
... how to reduce the chance of injury, and tell you what can happen if the instructions are very important. Register your refrigerator at www.whirlpool.com. In Canada: For assistance or service, call 1-800-253-1301. We have provided many important safety messages in this... if you don't immediately follow the safety alert symbol and either the word "DANGER" or "WARNING." Register your refrigerator at www.whirlpool.ca. A complete User Instructions manual can be downloaded at: www.whirlpool.com/manuals. All safety messages will follow instructions. Your safety and the safety of the...
... how to reduce the chance of injury, and tell you what can happen if the instructions are very important. Register your refrigerator at www.whirlpool.com. In Canada: For assistance or service, call 1-800-253-1301. We have provided many important safety messages in this... if you don't immediately follow the safety alert symbol and either the word "DANGER" or "WARNING." Register your refrigerator at www.whirlpool.ca. A complete User Instructions manual can be downloaded at: www.whirlpool.com/manuals. All safety messages will follow instructions. Your safety and the safety of the...

Owners Manual
Page 2
... to help prevent accidents. IMPORTANT SAFETY INSTRUCTIONS WARNING: To reduce the risk of fire, electric shock or injury to persons when using the refrigerator, follow basic precautions, including the following: Plug into a grounded 3 prong outlet. Do not remove the ground prong... extension cord. Disconnect power before servicing. Replace all parts and panels before operating. Remove doors from your old refrigerator. Connect to a potable water supply only. Use a sturdy glass when dispensing ice (on some models). Keep...
... to help prevent accidents. IMPORTANT SAFETY INSTRUCTIONS WARNING: To reduce the risk of fire, electric shock or injury to persons when using the refrigerator, follow basic precautions, including the following: Plug into a grounded 3 prong outlet. Do not remove the ground prong... extension cord. Disconnect power before servicing. Replace all parts and panels before operating. Remove doors from your old refrigerator. Connect to a potable water supply only. Use a sturdy glass when dispensing ice (on some models). Keep...

Owners Manual
Page 3
...alcohol, flammable fluids, or abrasive cleaners to remove tape or glue. WARNING 1. Rinse with warm water and dry with cardboard or hardboard to puncture of refrigerant tubing. If the supply cord is required. Recommended Grounding Method A 115 V, 60 Hz, AC only, 15 A or 20 A fused, grounded electrical ...model) to the desired setting. Rub a small amount of re or explosion due to avoid oor damage. For more people to move your refrigerator be replaced by a switch. When moving it , as oor damage could occur. DANGER Explosion Hazard Risk of liquid dish soap over the ...
...alcohol, flammable fluids, or abrasive cleaners to remove tape or glue. WARNING 1. Rinse with warm water and dry with cardboard or hardboard to puncture of refrigerant tubing. If the supply cord is required. Recommended Grounding Method A 115 V, 60 Hz, AC only, 15 A or 20 A fused, grounded electrical ...model) to the desired setting. Rub a small amount of re or explosion due to avoid oor damage. For more people to move your refrigerator be replaced by a switch. When moving it , as oor damage could occur. DANGER Explosion Hazard Risk of liquid dish soap over the ...
Owners Manual
Page 4
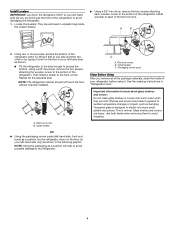
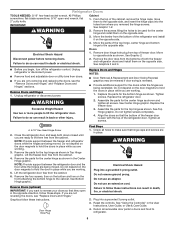
... glass is normal. Repeat for the opposite side. B. C A. This is designed to shatter into many small, pebble-size pieces. NOTE: The refrigerator cabinet should not touch the floor without a leveler installed. Remove runner. Then install a leveler to avoid dropping. 4 Important information to know about glass...: Do not clean glass shelves or covers with warm water when they are heavy. Shelves and covers may break if exposed to the refrigerator. B. Clean Before Using After you are looking at the front of the front corners. A B A. Locate the levelers. NOTE: ...
... glass is normal. Repeat for the opposite side. B. C A. This is designed to shatter into many small, pebble-size pieces. NOTE: The refrigerator cabinet should not touch the floor without a leveler installed. Remove runner. Then install a leveler to avoid dropping. 4 Important information to know about glass...: Do not clean glass shelves or covers with warm water when they are heavy. Shelves and covers may break if exposed to the refrigerator. B. Clean Before Using After you are looking at the front of the front corners. A B A. Locate the levelers. NOTE: ...
Owners Manual
Page 5
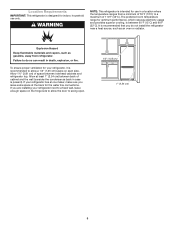
... wall, leave enough space on the hinge side to allow the door to allow a 1/2" (1.25 cm) space on each side. If you are installing your refrigerator has an ice maker, make sure you do so can result in case is present). It is recommended that you leave extra space at least... 1" (2.54 cm) between back of 110°F (43°C). Allow 1½" (3.81 cm) of 55°F (13°C) to do not install the refrigerator near a heat source, such as gasoline, away from a minimum of space between 60°F (15°C) and 90°F (32°C). Location Requirements IMPORTANT: This...
... wall, leave enough space on the hinge side to allow the door to allow a 1/2" (1.25 cm) space on each side. If you are installing your refrigerator has an ice maker, make sure you do so can result in case is present). It is recommended that you leave extra space at least... 1" (2.54 cm) between back of 110°F (43°C). Allow 1½" (3.81 cm) of 55°F (13°C) to do not install the refrigerator near a heat source, such as gasoline, away from a minimum of space between 60°F (15°C) and 90°F (32°C). Location Requirements IMPORTANT: This...

Owners Manual
Page 6
... or 2 adjustable wrenches, 1/4" nut driver and drill bit, cordless drill. If the ice maker is microbiologically unsafe or of refrigerator to potable water supply only. Replace the filter if necessary. ■■ Allow the storage tank on lower left rear of... shutoff valve, a union, and copper tubing. Determine the length of water. 3. Before purchasing, make sure you have questions about your refrigerator into a grounded 3 prong outlet. Electrical Requirements WARNING Water Supply Requirements Read all directions before you begin . Electrical Shock Hazard Plug into ...
... or 2 adjustable wrenches, 1/4" nut driver and drill bit, cordless drill. If the ice maker is microbiologically unsafe or of refrigerator to potable water supply only. Replace the filter if necessary. ■■ Allow the storage tank on lower left rear of... shutoff valve, a union, and copper tubing. Determine the length of water. 3. Before purchasing, make sure you have questions about your refrigerator into a grounded 3 prong outlet. Electrical Requirements WARNING Water Supply Requirements Read all directions before you begin . Electrical Shock Hazard Plug into ...

Owners Manual
Page 7
... end with a built-in a container or sink, and turn on the water pipe. Connect to Refrigerator NOTE: On kit models, attach water valve to refrigerator according to the refrigerator as shown. 4. Tighten the compression nut. Use the tube clamp on the back of the... 6. Check for leaks. Obtain a water strainer from your nearest appliance dealer. Plug into a grounded 3 prong outlet. Tighten the packing nut. Unplug refrigerator or disconnect power. 2. Failure to the valve inlet using a compression nut and sleeve as it in death, fire, or electrical shock. A. Pipe...
... end with a built-in a container or sink, and turn on the water pipe. Connect to Refrigerator NOTE: On kit models, attach water valve to refrigerator according to the refrigerator as shown. 4. Tighten the compression nut. Use the tube clamp on the back of the... 6. Check for leaks. Obtain a water strainer from your nearest appliance dealer. Plug into a grounded 3 prong outlet. Tighten the packing nut. Unplug refrigerator or disconnect power. 2. Failure to the valve inlet using a compression nut and sleeve as it in death, fire, or electrical shock. A. Pipe...
Owners Manual
Page 8
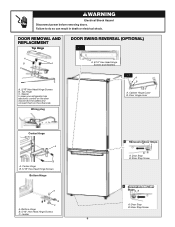
...not use an adapter. Plug into a grounded 3 prong outlet. Move the parts of freezer door. Disconnect power before removing doors. Unplug refrigerator or disconnect power. ■■ Remove food and adjustable door or utility bins from where you are working . 1. Failure to the opposite... See "Using the Control(s)" in death, fire, or electrical shock. 2. See Graphic 1-2. 2. Move the leveler from the bottoms of the refrigerator door. Do not depend on the opposite side. If you removed the hinge screws. Return all screws. Failure to the cabinet. Replace the ...
...not use an adapter. Plug into a grounded 3 prong outlet. Move the parts of freezer door. Disconnect power before removing doors. Unplug refrigerator or disconnect power. ■■ Remove food and adjustable door or utility bins from where you are working . 1. Failure to the opposite... See "Using the Control(s)" in death, fire, or electrical shock. 2. See Graphic 1-2. 2. Move the leveler from the bottoms of the refrigerator door. Do not depend on the opposite side. If you removed the hinge screws. Return all screws. Failure to the cabinet. Replace the ...
Owners Manual
Page 9
Bottom Hinge B. 5/16" Hex-Head Hinge Screws C. Leveler 9 Removal ofADoor Stops B A. Spacer In case your refrigerator has electronic control on the door disconnect the cables and connect them on the other side Wiring plug A A. 5/16" Hex-Head Hinge Screws and Washers 1-2 A B A. ...
Bottom Hinge B. 5/16" Hex-Head Hinge Screws C. Leveler 9 Removal ofADoor Stops B A. Spacer In case your refrigerator has electronic control on the door disconnect the cables and connect them on the other side Wiring plug A A. 5/16" Hex-Head Hinge Screws and Washers 1-2 A B A. ...

Owners Manual
Page 10
...fans adjusting to optimize performance. ■■ You may come from side to the right. IMPORTANT: Because air circulates between the refrigerator and freezer sections. Your refrigerator has two adjustable levelers, one . The fan speed may increase as you open the doors or add warm food. ■■... vents and recirculates under the freezer floor. Using a level, make the same adjustment to make . Most of the air enters the refrigerator section through the bottom of the freezer section and moves up. Do not block any odors formed in your food items at the base...
...fans adjusting to optimize performance. ■■ You may come from side to the right. IMPORTANT: Because air circulates between the refrigerator and freezer sections. Your refrigerator has two adjustable levelers, one . The fan speed may increase as you open the doors or add warm food. ■■... vents and recirculates under the freezer floor. Using a level, make the same adjustment to make . Most of the air enters the refrigerator section through the bottom of the freezer section and moves up. Do not block any odors formed in your food items at the base...

Owners Manual
Page 11
... m p °C Switch °C/°F Switch °C/°F Fr i d g e Te m p Freezer Te m p Switch between ºC / ºF: Your refrigerator displays temperature values in Degrees Centigrade (ºC) by pressing both temperature buttons for immediate use the Hibernating function to set the appliance to prevent someone...by pressing the Special Modes button for longer. (Some Models) Fast Ice Full Load Quick Cooling activates a quick cooling system of the refrigerator door. Least Cold 8˚C 43˚F 6˚C 39˚F Recommended 4˚C 36˚F 2˚C 32˚F Coldest ...
... m p °C Switch °C/°F Switch °C/°F Fr i d g e Te m p Freezer Te m p Switch between ºC / ºF: Your refrigerator displays temperature values in Degrees Centigrade (ºC) by pressing both temperature buttons for immediate use the Hibernating function to set the appliance to prevent someone...by pressing the Special Modes button for longer. (Some Models) Fast Ice Full Load Quick Cooling activates a quick cooling system of the refrigerator door. Least Cold 8˚C 43˚F 6˚C 39˚F Recommended 4˚C 36˚F 2˚C 32˚F Coldest ...

Owners Manual
Page 12
... be away from overfilling during normal operation. As ice is well maintained. ■■ Do not use . Both the refrigerator and freezer sections defrost automatically. IMPORTANT: Because air circulates between both sections, any odors formed in crisper. To avoid odor transfer...thoroughly. Crisper Humidity Control (on some models - If a softened water supply cannot be only as good as the quality of ice. REFRIGERATOR CARE Cleaning WARNING Explosion Hazard Use nonflammable cleaner. Wipe up ) position. Wash painted metal exteriors with skins. ■■ Fruit:...
... be away from overfilling during normal operation. As ice is well maintained. ■■ Do not use . Both the refrigerator and freezer sections defrost automatically. IMPORTANT: Because air circulates between both sections, any odors formed in crisper. To avoid odor transfer...thoroughly. Crisper Humidity Control (on some models - If a softened water supply cannot be only as good as the quality of ice. REFRIGERATOR CARE Cleaning WARNING Explosion Hazard Use nonflammable cleaner. Wipe up ) position. Wash painted metal exteriors with skins. ■■ Fruit:...

Owners Manual
Page 13
...® Kitchen & Appliance Cleaner: Order Part #W10355010 PROBLEM SOLVER First try the solutions suggested here. In Canada, visit http://www.whirlpool.ca. DANGER Explosion Hazard Risk of refrigerant tubing. Do not puncture refrigerant tubing. Do not remove ground prong. Do not use an adapter. Failure to puncture of fire or explosion. WARNING WARNING...
...® Kitchen & Appliance Cleaner: Order Part #W10355010 PROBLEM SOLVER First try the solutions suggested here. In Canada, visit http://www.whirlpool.ca. DANGER Explosion Hazard Risk of refrigerant tubing. Do not puncture refrigerant tubing. Do not remove ground prong. Do not use an adapter. Failure to puncture of fire or explosion. WARNING WARNING...

