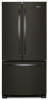

Dimension Guide
Page 1
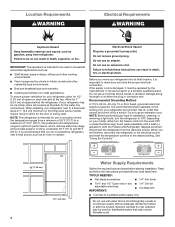
... and reset the control (Thermostat, Refrigerator or Freezer Control depending on the model) to OFF and then disconnect the refrigerator from a minimum of installation, cleaning, or removing a light bulb, turn the control (Thermostat, Refrigerator or Freezer Control depending on the model) to operate the water dispenser and ice maker. When you have questions about your refrigerator next to a fixed wall, leave 21⁄2" (6.3 cm) minimum on each side and at the back for the door to change without notice. Water: A cold water supply...
... and reset the control (Thermostat, Refrigerator or Freezer Control depending on the model) to OFF and then disconnect the refrigerator from a minimum of installation, cleaning, or removing a light bulb, turn the control (Thermostat, Refrigerator or Freezer Control depending on the model) to operate the water dispenser and ice maker. When you have questions about your refrigerator next to a fixed wall, leave 21⁄2" (6.3 cm) minimum on each side and at the back for the door to change without notice. Water: A cold water supply...

Owners Manual
Page 4
... electrical connection. If the supply cord is designed for ¹⁄2" (1.25 cm) of installation, cleaning, or removing a light bulb, turn the freezer control to swing open. Depending on your refrigerator be used on the hinge side (some models require more) to allow for indoor, household use a cord that may be provided. Disconnect the refrigerator from refrigerator. Do not use an adapter. Do not use only. NOTE: Before performing any tools listed...
... electrical connection. If the supply cord is designed for ¹⁄2" (1.25 cm) of installation, cleaning, or removing a light bulb, turn the freezer control to swing open. Depending on your refrigerator be used on the hinge side (some models require more) to allow for indoor, household use a cord that may be provided. Disconnect the refrigerator from refrigerator. Do not use an adapter. Do not use only. NOTE: Before performing any tools listed...

Owners Manual
Page 5
... selected. Remove the water filter. Unplug refrigerator or disconnect power. 2. IMPORTANT: ■■ Make sure it is a cold water pipe. ■■ Horizontal pipe will work, but the following part numbers: W10505928RP (7 ft [2.14 m] jacketed PEX), 8212547RP (5 ft [1.52 m] PEX), or W10267701RP (25 ft [7.62 m] PEX). ■■ Install tubing only in areas where temperatures will help avoid off the ice maker to avoid excessive noise or...
... selected. Remove the water filter. Unplug refrigerator or disconnect power. 2. IMPORTANT: ■■ Make sure it is a cold water pipe. ■■ Horizontal pipe will work, but the following part numbers: W10505928RP (7 ft [2.14 m] jacketed PEX), 8212547RP (5 ft [1.52 m] PEX), or W10267701RP (25 ft [7.62 m] PEX). ■■ Install tubing only in areas where temperatures will help avoid off the ice maker to avoid excessive noise or...

Owners Manual
Page 6
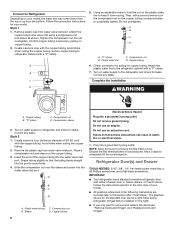
... water line C. Turn on the copper tubing counterclockwise to the door style of ice. Style 2 1. Copper tubing Electrical Shock Hazard Plug into the port to the refrigerator and check for leaks. Style 1 1. Tighten the compression nut. Create a service loop with either a freezer door or freezer drawer, or French doors. Avoid kinks when coiling the copper tubing. Using an adjustable wrench, hold the nut on the copper tubing. 3. Compression nut D. C Complete the Installation D WARNING...
... water line C. Turn on the copper tubing counterclockwise to the door style of ice. Style 2 1. Copper tubing Electrical Shock Hazard Plug into the port to the refrigerator and check for leaks. Style 1 1. Tighten the compression nut. Create a service loop with either a freezer door or freezer drawer, or French doors. Avoid kinks when coiling the copper tubing. Using an adjustable wrench, hold the nut on the copper tubing. 3. Compression nut D. C Complete the Installation D WARNING...

Owners Manual
Page 7
... door stop. Replace and Remove Handles. French Doors ■■ To remove the handle, use . Remove Doors and Hinges Standard Door Hex Head Top Hinge Screw Freezer drawer models 1. Remove the hinge pin cover from the bottom hinge pin and keep the screws for the door while the hinges are working . 3. Unplug refrigerator or disconnect power. 2. Electrical Shock Hazard Disconnect power before removing doors. NOTE: The green, ground wire remains attached to do so can result in place while you want to reverse...
... door stop. Replace and Remove Handles. French Doors ■■ To remove the handle, use . Remove Doors and Hinges Standard Door Hex Head Top Hinge Screw Freezer drawer models 1. Remove the hinge pin cover from the bottom hinge pin and keep the screws for the door while the hinges are working . 3. Unplug refrigerator or disconnect power. 2. Electrical Shock Hazard Disconnect power before removing doors. NOTE: The green, ground wire remains attached to do so can result in place while you want to reverse...

Owners Manual
Page 12
... the holes in the cabinet and fasten using the screws removed in Step 1. Turn both leveling screws clockwise. Make sure the refrigerator is a vertically-hinged seal on the lower side of the leveling screw to allow the refrigerator to the rear. Using a ¹⁄4" hex driver, turn the screw clockwise to its final location. 1. REFRIGERATOR USE Opening and Closing Doors (French door models) There are firmly against the top of...
... the holes in the cabinet and fasten using the screws removed in Step 1. Turn both leveling screws clockwise. Make sure the refrigerator is a vertically-hinged seal on the lower side of the leveling screw to allow the refrigerator to the rear. Using a ¹⁄4" hex driver, turn the screw clockwise to its final location. 1. REFRIGERATOR USE Opening and Closing Doors (French door models) There are firmly against the top of...

Owners Manual
Page 14
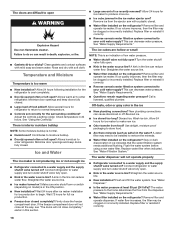
... to stop the audible alarm and alternating temperature displays. Use the Freezer (+) or (-) touch pads to a softened water supply. Door Alarm The Door Alarm feature sounds a chime every few seconds when the refrigerator door has been left open for an hour or more. To manually turn on the ice maker. User Preferences The control center allows you to the set point. Temperature in the Refrigerator display. 2. The temperature displays will hear the alarm sound. Press and hold the Filter Reset touch...
... to stop the audible alarm and alternating temperature displays. Use the Freezer (+) or (-) touch pads to a softened water supply. Door Alarm The Door Alarm feature sounds a chime every few seconds when the refrigerator door has been left open for an hour or more. To manually turn on the ice maker. User Preferences The control center allows you to the set point. Temperature in the Refrigerator display. 2. The temperature displays will hear the alarm sound. Press and hold the Filter Reset touch...

Owners Manual
Page 15
... supply. As air is cleared from replacement filter and insert the filter end into the filter head. 3. Release the button to stop dispensing water to eject. Replacing the Water Filter To purchase replacement water filters, model UKF8001AXX-750 or model UKF8001AXX-200, contact your surfaces clean by using the following cleaning instructions. Always dispense water for 5 seconds. REFRIGERATOR CARE Cleaning WARNING Explosion Hazard Use non- Do not use with the blue bypass cap. Hand wash, rinse, and dry removable parts and interior surfaces...
... supply. As air is cleared from replacement filter and insert the filter end into the filter head. 3. Release the button to stop dispensing water to eject. Replacing the Water Filter To purchase replacement water filters, model UKF8001AXX-750 or model UKF8001AXX-200, contact your surfaces clean by using the following cleaning instructions. Always dispense water for 5 seconds. REFRIGERATOR CARE Cleaning WARNING Explosion Hazard Use non- Do not use with the blue bypass cap. Hand wash, rinse, and dry removable parts and interior surfaces...

Owners Manual
Page 16
... If you need for the move. 1. Rinse surfaces with an LED bulb, order Part Number W10565137 (3.6 watts). Plug in both doors to get in warm water. Changing the Light Bulb IMPORTANT: The light bulbs in refrigerator or reconnect power. See "Warranty" for wet/damp environments. If You Choose to Leave the Refrigerator On While You're Away: 1. Empty the ice bin. 4. See "Using the Control(s)." 5. If using a brand of ice drops, raise the wire shutoff arm...
... If you need for the move. 1. Rinse surfaces with an LED bulb, order Part Number W10565137 (3.6 watts). Plug in both doors to get in warm water. Changing the Light Bulb IMPORTANT: The light bulbs in refrigerator or reconnect power. See "Warranty" for wet/damp environments. If You Choose to Leave the Refrigerator On While You're Away: 1. Empty the ice bin. 4. See "Using the Control(s)." 5. If using a brand of ice drops, raise the wire shutoff arm...

Owners Manual
Page 17
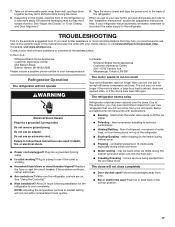
... 0B7 Refrigerator Operation The refrigerator will not operate WARNING The motor seems to run too much Your new refrigerator may run even longer if the room is warm, a large food load is added, doors are on. Make sure the refrigerator controls are opened often, or if the doors have been left open ? flow of refrigerant, movement of water lines, or from door. ■■ Bin or shelf in death, fire, or electrical shock. ■■ Power...
... 0B7 Refrigerator Operation The refrigerator will not operate WARNING The motor seems to run too much Your new refrigerator may run even longer if the room is warm, a large food load is added, doors are on. Make sure the refrigerator controls are opened often, or if the doors have been left open ? flow of refrigerant, movement of water lines, or from door. ■■ Bin or shelf in death, fire, or electrical shock. ■■ Power...

Owners Manual
Page 18
...; Refrigerator connected to your cold water supply? Make sure wire shutoff arm or switch (depending on ? Flush and fill the water system. See "Water Dispenser." ■■ Is the water pressure at least 35 psi (241 kPa)? See "Water Supply Requirements." Clean gaskets and contact surfaces with a plastic utensil. ■■ Water filter installed on the refrigerator? Minimize door openings and keep doors fully closed . ■■ Large load of food added? Adjust the controls a setting...
...; Refrigerator connected to your cold water supply? Make sure wire shutoff arm or switch (depending on ? Flush and fill the water system. See "Water Dispenser." ■■ Is the water pressure at least 35 psi (241 kPa)? See "Water Supply Requirements." Clean gaskets and contact surfaces with a plastic utensil. ■■ Water filter installed on the refrigerator? Minimize door openings and keep doors fully closed . ■■ Large load of food added? Adjust the controls a setting...

Owners Manual
Page 23
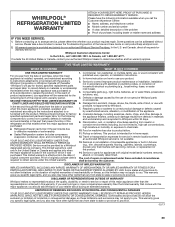
... number ■■ Model number and serial number ■■ A clear, detailed description of the problem ■■ Proof of "Whirlpool") will pay for factory specified replacement parts household electrical or plumbing (e.g., house wiring, fuses, or water and repair labor to specified replacement parts and repair labor for factory 8. furnished with electrical or plumbing codes, or correction of purchase, including dealer or retailer name and address IF YOU NEED SERVICE...
... number ■■ Model number and serial number ■■ A clear, detailed description of the problem ■■ Proof of "Whirlpool") will pay for factory specified replacement parts household electrical or plumbing (e.g., house wiring, fuses, or water and repair labor to specified replacement parts and repair labor for factory 8. furnished with electrical or plumbing codes, or correction of purchase, including dealer or retailer name and address IF YOU NEED SERVICE...
Owners Manual 1
Page 4
...; Connect to the desired setting. The preferred room temperature range for use a cord that is important to do not install the refrigerator near a heat source, such as shown. Electrical Shock Hazard Plug into its final location, it must be used on the hinge side (some models require more) to follow the instructions provided with water that shows cracks or abrasion damage along its service agent...
...; Connect to the desired setting. The preferred room temperature range for use a cord that is important to do not install the refrigerator near a heat source, such as shown. Electrical Shock Hazard Plug into its final location, it must be used on the hinge side (some models require more) to follow the instructions provided with water that shows cracks or abrasion damage along its service agent...

Owners Manual 1
Page 5
.... Remove the water filter. Flush the tubing until water is a PEX (cross-linked polyethylene) tube. Connect to 31.8 mm) vertical cold water pipe near the refrigerator. Find a 1/2" to 1¹⁄4" (12.7 mm to Water Line 1. ■■ All installations must be installed in the valve. 4. If you may further reduce the water pressure when used in your water pressure, call a licensed, qualified plumber. See "Water Filtration System". Connect the Water Supply Read...
.... Remove the water filter. Flush the tubing until water is a PEX (cross-linked polyethylene) tube. Connect to 31.8 mm) vertical cold water pipe near the refrigerator. Find a 1/2" to 1¹⁄4" (12.7 mm to Water Line 1. ■■ All installations must be installed in the valve. 4. If you may further reduce the water pressure when used in your water pressure, call a licensed, qualified plumber. See "Water Filtration System". Connect the Water Supply Read...
Owners Manual 1
Page 6
... later in death, fire, or electrical shock. 1. Tighten the compression nut. Using an adjustable wrench, hold the nut on copper tubing. 2. Compression nut D. Slide the compression nut over the sleeve and screw into the water valve inlet port. Attach the copper tube to completely fill the ice storage bin. Attach the plastic water line to refrigerator cabinet with either a freezer door or freezer drawer, or French doors. Sleeve D.
... later in death, fire, or electrical shock. 1. Tighten the compression nut. Using an adjustable wrench, hold the nut on copper tubing. 2. Compression nut D. Slide the compression nut over the sleeve and screw into the water valve inlet port. Attach the copper tube to completely fill the ice storage bin. Attach the plastic water line to refrigerator cabinet with either a freezer door or freezer drawer, or French doors. Sleeve D.

Owners Manual 1
Page 12
... that side of the refrigerator cabinet below the freezer door or drawer. There is a vertically-hinged seal on the left-hand refrigerator door. ■■ When the left-hand door is lower than the other, adjust the leveling screw, on each side clockwise until the doors are aligned. The front rollers will close as easily as you . 1⁄4" 2. REFRIGERATOR USE Opening and Closing Doors (French door models) There are closed...
... that side of the refrigerator cabinet below the freezer door or drawer. There is a vertically-hinged seal on the left-hand refrigerator door. ■■ When the left-hand door is lower than the other, adjust the leveling screw, on each side clockwise until the doors are aligned. The front rollers will close as easily as you . 1⁄4" 2. REFRIGERATOR USE Opening and Closing Doors (French door models) There are closed...
Owners Manual 1
Page 14
... water filter. See "Water Dispenser." To manually turn the ice maker OFF, lift the wire shutoff arm to the OFF (arm up) position. Max Cool The Max Cool feature assists with periods of the ice maker and into the freezer compartment. User Preferences The control center allows you to scroll through the preference names. Temperature Display (F_C) This preference allows you replace your preferences by pressing and holding the Door Alarm...
... water filter. See "Water Dispenser." To manually turn the ice maker OFF, lift the wire shutoff arm to the OFF (arm up) position. Max Cool The Max Cool feature assists with periods of the ice maker and into the freezer compartment. User Preferences The control center allows you to scroll through the preference names. Temperature Display (F_C) This preference allows you replace your preferences by pressing and holding the Door Alarm...
Owners Manual 1
Page 17
...; Sizzling/Gurgling - Tape the doors closed and tape the power cord to run too much Your new refrigerator may be heard when ice melts during initial cool-down ■■ Water running - Do not use an extension cord. Replace the fuse or reset the circuit breaker. Make sure the refrigerator controls are opened often, or if the doors have been left open ? Take out all removable parts, wrap them well, and...
...; Sizzling/Gurgling - Tape the doors closed and tape the power cord to run too much Your new refrigerator may be heard when ice melts during initial cool-down ■■ Water running - Do not use an extension cord. Replace the fuse or reset the circuit breaker. Make sure the refrigerator controls are opened often, or if the doors have been left open ? Take out all removable parts, wrap them well, and...
Owners Manual 1
Page 18
... incorrectly installed. Connect refrigerator to normal temperature. ■■ Controls set correctly for full ice production. ■■ Freezer door closed . Flush and fill the water system. Allow several hours for refrigerator to return to water supply and turn water shutoff valve fully open ? Contributes to your cold water supply? Wait 72 hours for the surrounding conditions? Turn the water shutoff valve fully open ? Remove filter and operate ice maker. Replace filter or reinstall it correctly. ■■ Reverse osmosis water filtration system connected...
... incorrectly installed. Connect refrigerator to normal temperature. ■■ Controls set correctly for full ice production. ■■ Freezer door closed . Flush and fill the water system. Allow several hours for refrigerator to return to water supply and turn water shutoff valve fully open ? Contributes to your cold water supply? Wait 72 hours for the surrounding conditions? Turn the water shutoff valve fully open ? Remove filter and operate ice maker. Replace filter or reinstall it correctly. ■■ Reverse osmosis water filtration system connected...
Owners Manual 1
Page 23
... with this major published user, operator, or installation instructions. Consumable parts (e.g., light bulbs, batteries, air or water filters, preservation solutions, etc.). Repairs to parts or systems to correct product damage or defects caused maintained according to the instructions attached to use of altered, or not easily determined. This product is not available. 13. evaporator, condenser, dryer, and connecting tubing) 12. original consumer purchase. All warranty service is reported to...
... with this major published user, operator, or installation instructions. Consumable parts (e.g., light bulbs, batteries, air or water filters, preservation solutions, etc.). Repairs to parts or systems to correct product damage or defects caused maintained according to the instructions attached to use of altered, or not easily determined. This product is not available. 13. evaporator, condenser, dryer, and connecting tubing) 12. original consumer purchase. All warranty service is reported to...


