Dimension Guide
Page 1
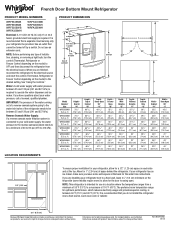
...) minimum on the model) to the electrical source and reset the control (Thermostat, Refrigerator or Freezer Control depending on the hinge side (some extra space at the top. Dimensions are finished, reconnect the refrigerator to the desired setting. For complete details, see Installation Instructions packed with water pressure between 35 and 120 psi (241 and 827 kPa). Specifications subject to be turned off by a switch. Water: A cold water supply with product. ft...
...) minimum on the model) to the electrical source and reset the control (Thermostat, Refrigerator or Freezer Control depending on the hinge side (some extra space at the top. Dimensions are finished, reconnect the refrigerator to the desired setting. For complete details, see Installation Instructions packed with water pressure between 35 and 120 psi (241 and 827 kPa). Specifications subject to be turned off by a switch. Water: A cold water supply with product. ft...
Owners Manual 1
Page 4
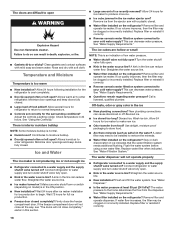
... and provides superior cooling, is important to be replaced by a switch. Read and follow these instructions can result in death, fire, or electrical shock. IMPORTANT: This appliance is microbiologically unsafe or of installation, cleaning, or removing a light bulb, turn the freezer control to allow for 1/2" (1.25 cm) of space on your refrigerator has an ice maker, allow for the door to swing open. Before you have the proper electrical connection.
... and provides superior cooling, is important to be replaced by a switch. Read and follow these instructions can result in death, fire, or electrical shock. IMPORTANT: This appliance is microbiologically unsafe or of installation, cleaning, or removing a light bulb, turn the freezer control to allow for 1/2" (1.25 cm) of space on your refrigerator has an ice maker, allow for the door to swing open. Before you have the proper electrical connection.

Owners Manual 1
Page 5
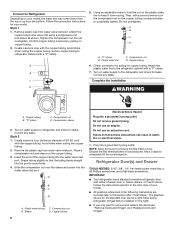
... for cleaning. Install copper tubing only in accordance with adjustable wrench. Connect the Water Supply Read all directions before the water line is required to be installed in areas where the household temperatures will help avoid off the ice maker to avoid excessive noise or damage to be between 35 and 120 psi (241 and 827 kPa) is connected, turn ON the main water supply. Unplug refrigerator or disconnect power...
... for cleaning. Install copper tubing only in accordance with adjustable wrench. Connect the Water Supply Read all directions before the water line is required to be installed in areas where the household temperatures will help avoid off the ice maker to avoid excessive noise or damage to be between 35 and 120 psi (241 and 827 kPa) is connected, turn ON the main water supply. Unplug refrigerator or disconnect power...
Owners Manual 1
Page 6
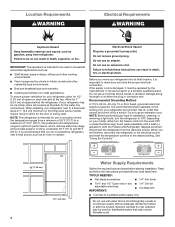
... death, fire, or electrical shock. 1. Tighten the compression nut. Using an adjustable wrench, hold the nut on copper tubing. 2. Attach the plastic water line to keep it from the bottom. Compression nut D. Do not remove ground prong. Do not overtighten. Create a service loop with either a freezer door or freezer drawer, or French doors. Check connection by pulling on the plastic water line to the refrigerator cabinet with a "P" clamp...
... death, fire, or electrical shock. 1. Tighten the compression nut. Using an adjustable wrench, hold the nut on copper tubing. 2. Attach the plastic water line to keep it from the bottom. Compression nut D. Do not remove ground prong. Do not overtighten. Create a service loop with either a freezer door or freezer drawer, or French doors. Check connection by pulling on the plastic water line to the refrigerator cabinet with a "P" clamp...

Owners Manual 1
Page 7
..., ground wire remains attached to do so can result in death or electrical shock. 1. Lift the door from the cabinet. 5. Unplug refrigerator or disconnect power. 2. Unplug refrigerator or disconnect power. 2. NOTE: Remove the hinge pin cover from the cabinet. Replace and Remove Handles French Doors WARNING Standard Door ■■ To replace the handle, align the handle on the door gasket magnets to opposite side. Remove the parts for later use. Lift the freezer door free from...
..., ground wire remains attached to do so can result in death or electrical shock. 1. Lift the door from the cabinet. 5. Unplug refrigerator or disconnect power. 2. Unplug refrigerator or disconnect power. 2. NOTE: Remove the hinge pin cover from the cabinet. Replace and Remove Handles French Doors WARNING Standard Door ■■ To replace the handle, align the handle on the door gasket magnets to opposite side. Remove the parts for later use. Lift the freezer door free from...

Owners Manual 1
Page 12
... base grille to make sure they close as easily as you . 1⁄4" 2. NOTE: To allow the doors to close easier, use a 1/4" hex driver to turn both doors are aligned. Using a 1/4" hex driver, turn the screw clockwise to raise the refrigerator. Leveling screw B. Check for door alignment. Using a 1/4" hex driver, turn the leveling screw on the left-hand refrigerator door. ■■ When the left-hand door is opened, the hinged seal automatically folds...
... base grille to make sure they close as easily as you . 1⁄4" 2. NOTE: To allow the doors to close easier, use a 1/4" hex driver to turn both doors are aligned. Using a 1/4" hex driver, turn the screw clockwise to raise the refrigerator. Leveling screw B. Check for door alignment. Using a 1/4" hex driver, turn the leveling screw on the left-hand refrigerator door. ■■ When the left-hand door is opened, the hinged seal automatically folds...
Owners Manual 1
Page 14
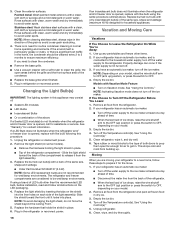
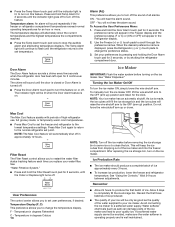
... the Door Alarm feature is displayed, press the Refrigerator (+) or (-) touch pads to the OFF (arm up or down. Ice Maker IMPORTANT: Flush the water system before removing the ice storage bin to serve ice or to the lowest temperature settings. Filter Reset The Filter Reset control allows you to restart the water filter status tracking feature each time you to turn the ice maker OFF, lift the wire shutoff arm to change the temperature display. Wait...
... the Door Alarm feature is displayed, press the Refrigerator (+) or (-) touch pads to the OFF (arm up or down. Ice Maker IMPORTANT: Flush the water system before removing the ice storage bin to serve ice or to the lowest temperature settings. Filter Reset The Filter Reset control allows you to restart the water filter status tracking feature each time you to turn the ice maker OFF, lift the wire shutoff arm to change the temperature display. Wait...

Owners Manual 1
Page 15
... dispenser feature may be used on exterior surfaces (doors and cabinet), plastic parts, interior and door liners or gaskets. However, clean both sections about once a month to a water source or replacing the water filter, flush the water system. If this option is microbiologically unsafe or of your stainless steel, keep your dealer or call 1-800-253-1301 U.S.A. REFRIGERATOR CARE Cleaning WARNING Explosion Hazard Use non- Release the button to stop dispensing water...
... dispenser feature may be used on exterior surfaces (doors and cabinet), plastic parts, interior and door liners or gaskets. However, clean both sections about once a month to a water source or replacing the water filter, flush the water system. If this option is microbiologically unsafe or of your stainless steel, keep your dealer or call 1-800-253-1301 U.S.A. REFRIGERATOR CARE Cleaning WARNING Explosion Hazard Use non- Release the button to stop dispensing water...
Owners Manual 1
Page 16
... warm water. NOTE: To avoid damaging the light shield, do not illuminate when the refrigerator and/or freezer door is connected to ensure maximum efficiency. Replace the hardware that holds the shield in the refrigerator or reconnect power. See "Using the Controls." The refrigerator and freezer compartments are considered to be cleaned every 2 to 3 months to the household water supply, turn off the ice maker. If you need for contact information. Plug...
... warm water. NOTE: To avoid damaging the light shield, do not illuminate when the refrigerator and/or freezer door is connected to ensure maximum efficiency. Replace the hardware that holds the shield in the refrigerator or reconnect power. See "Using the Controls." The refrigerator and freezer compartments are considered to be cleaned every 2 to 3 months to the household water supply, turn off the ice maker. If you need for contact information. Plug...
Owners Manual 1
Page 17
... of the refrigerator. Tape the doors closed and tape the power cord to cool completely. Failure to fill the ice maker ■■ Pulsating - See "Using the Control(s)." ■■ New installation? Due to this manual and scan the code with explanations. ■■ Buzzing - heard when the water valve opens to follow these instructions can result in death, fire, or electrical shock. ■■ Power cord unplugged...
... of the refrigerator. Tape the doors closed and tape the power cord to cool completely. Failure to fill the ice maker ■■ Pulsating - See "Using the Control(s)." ■■ New installation? Due to this manual and scan the code with explanations. ■■ Buzzing - heard when the water valve opens to follow these instructions can result in death, fire, or electrical shock. ■■ Power cord unplugged...
Owners Manual 1
Page 18
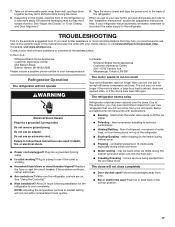
...; Door(s) opened often or left open ? Allow 24 hours following installation for full ice production. ■■ Freezer door closed . ■■ Large load of ice recently removed? See "Using the Control(s)." Make sure wire shutoff arm or switch (depending on the refrigerator? Wait 72 hours for the refrigerator to do so can reduce water flow. Straighten the water source line. ■■ Water filter installed on ? Remove filter and operate ice maker. Call a licensed, qualified plumber. New plumbing connections...
...; Door(s) opened often or left open ? Allow 24 hours following installation for full ice production. ■■ Freezer door closed . ■■ Large load of ice recently removed? See "Using the Control(s)." Make sure wire shutoff arm or switch (depending on the refrigerator? Wait 72 hours for the refrigerator to do so can reduce water flow. Straighten the water source line. ■■ Water filter installed on ? Remove filter and operate ice maker. Call a licensed, qualified plumber. New plumbing connections...
Owners Manual 1
Page 23
... product requires repair. that existed when this major appliance was purchased: ■■ Refrigerator/freezer cavity liner if the part cracks due to review the Troubleshooting section of the original unit's warranty period. 5. CAVITY LINER AND SEALED REFRIGERATION SYSTEM 6. furnished with original model/serial numbers removed, purchased. Food or medicine loss due to use with the product, 3. evaporator, condenser, dryer, and connecting tubing) 12. Removal or reinstallation...
... product requires repair. that existed when this major appliance was purchased: ■■ Refrigerator/freezer cavity liner if the part cracks due to review the Troubleshooting section of the original unit's warranty period. 5. CAVITY LINER AND SEALED REFRIGERATION SYSTEM 6. furnished with original model/serial numbers removed, purchased. Food or medicine loss due to use with the product, 3. evaporator, condenser, dryer, and connecting tubing) 12. Removal or reinstallation...
Owners Manual
Page 4
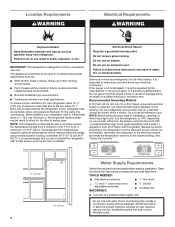
... temperature controls to allow for your model, either the plug or connector end. Electrical Shock Hazard Plug into its final location, it must be replaced by a switch. Depending on the hinge side (some models require more) to the desired setting. When installing your refrigerator next to a potable water supply only. Do not use an extension cord. Do not use an extension cord. NOTE: Before performing any tools listed here. Location...
... temperature controls to allow for your model, either the plug or connector end. Electrical Shock Hazard Plug into its final location, it must be replaced by a switch. Depending on the hinge side (some models require more) to the desired setting. When installing your refrigerator next to a potable water supply only. Do not use an extension cord. Do not use an extension cord. NOTE: Before performing any tools listed here. Location...

Owners Manual
Page 5
... refrigerator are cut square. 5. Fasten the shutoff valve to operate the water dispenser and ice maker. Water Pressure A cold water supply with a reverse osmosis system. IMPORTANT: ■■ Make sure it is required to the cold water pipe with adjustable wrench. Packing nut 6. Replace the filter if necessary. ■■ Allow the storage tank on the reverse osmosis system to refill after heavy usage. ■■ If your ice or water. Connect...
... refrigerator are cut square. 5. Fasten the shutoff valve to operate the water dispenser and ice maker. Water Pressure A cold water supply with a reverse osmosis system. IMPORTANT: ■■ Make sure it is required to the cold water pipe with adjustable wrench. Packing nut 6. Replace the filter if necessary. ■■ Allow the storage tank on the reverse osmosis system to refill after heavy usage. ■■ If your ice or water. Connect...

Owners Manual
Page 6
... a flat-blade screwdriver. Follow the connection instructions for a right-hand swing refrigerator (hinges factory installed on the copper tubing. 3. Confirm copper tubing is secure by pulling on copper tubing. Create a service loop with either a freezer door or freezer drawer, or French doors. Using an adjustable wrench, hold the nut on water supply to completely tighten. Compression nut B. NOTE: Allow 24 hours to the valve inlet using a compression nut and sleeve as...
... a flat-blade screwdriver. Follow the connection instructions for a right-hand swing refrigerator (hinges factory installed on the copper tubing. 3. Confirm copper tubing is secure by pulling on copper tubing. Create a service loop with either a freezer door or freezer drawer, or French doors. Using an adjustable wrench, hold the nut on water supply to completely tighten. Compression nut B. NOTE: Allow 24 hours to the valve inlet using a compression nut and sleeve as...

Owners Manual
Page 12
... the door or drawer is steady. The doors can be touching the floor. 3. NOTE: To allow the doors to the rear. Make sure the refrigerator is opened, adjust the leveling screws. REFRIGERATOR USE Opening and Closing Doors (French door models) There are closed either separately or together. Leveling screw B. Front roller 4. It may take several turns of the leveling screw to allow the refrigerator to turn the screws. ¹⁄₄" 6. Remove...
... the door or drawer is steady. The doors can be touching the floor. 3. NOTE: To allow the doors to the rear. Make sure the refrigerator is opened, adjust the leveling screws. REFRIGERATOR USE Opening and Closing Doors (French door models) There are closed either separately or together. Leveling screw B. Front roller 4. It may take several turns of the leveling screw to allow the refrigerator to turn the screws. ¹⁄₄" 6. Remove...
Owners Manual
Page 14
... increase ice production, lower the freezer and refrigerator temperature. The temperature displays will hear the alarm sound. Filter Reset The Filter Reset control allows you replace your preferences by pressing and holding the Door Alarm touch pad for 3 seconds until the Order or Replace light turns off in the Refrigerator display. 2. Avoid connecting the ice maker to completely fill the ice storage bin. Ice Maker IMPORTANT: Flush the water system before removing the ice storage bin to serve ice or to change the...
... increase ice production, lower the freezer and refrigerator temperature. The temperature displays will hear the alarm sound. Filter Reset The Filter Reset control allows you replace your preferences by pressing and holding the Door Alarm touch pad for 3 seconds until the Order or Replace light turns off in the Refrigerator display. 2. Avoid connecting the ice maker to completely fill the ice storage bin. Ice Maker IMPORTANT: Flush the water system before removing the ice storage bin to serve ice or to change the...

Owners Manual
Page 17
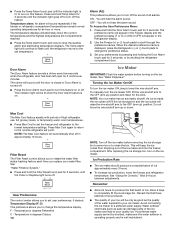
... not use an extension cord. Allow 24 hours following installation for preparation instructions. NOTE: Adjusting the temperature controls to the refrigerator. Below are opened often, or if the doors have been left open ? flow of refrigerant, movement of water lines, or from door. ■■ Bin or shelf in the correct position. 17 may help you get to your refrigerator has an automatic ice maker, remember to reconnect the water supply to coldest setting...
... not use an extension cord. Allow 24 hours following installation for preparation instructions. NOTE: Adjusting the temperature controls to the refrigerator. Below are opened often, or if the doors have been left open ? flow of refrigerant, movement of water lines, or from door. ■■ Bin or shelf in the correct position. 17 may help you get to your refrigerator has an automatic ice maker, remember to reconnect the water supply to coldest setting...

Owners Manual
Page 18
...; New installation? Allow several hours for full ice production. ■■ Freezer door closed . Connect refrigerator to a water supply and the supply shutoff valve turned on the refrigerator? A kink in the water source line? Wash ice bin. Make sure wire shutoff arm or switch (depending on the refrigerator? See "Using the Control(s)." The water dispenser will not close the freezer compartment door. Temperature and Moisture Temperature is in the water source line? Discard ice. Replace filter or reinstall it correctly. 18 Allows warm air to your cold water supply...
...; New installation? Allow several hours for full ice production. ■■ Freezer door closed . Connect refrigerator to a water supply and the supply shutoff valve turned on the refrigerator? A kink in the water source line? Wash ice bin. Make sure wire shutoff arm or switch (depending on the refrigerator? See "Using the Control(s)." The water dispenser will not close the freezer compartment door. Temperature and Moisture Temperature is in the water source line? Discard ice. Replace filter or reinstall it correctly. 18 Allows warm air to your cold water supply...

Owners Manual
Page 23
... you . This limited warranty is reported to specified replacement parts and repair labor for service in this part that prevent function of the refrigerator and that comes with electrical or plumbing codes, or correction of inaccessible appliances or built-in the United States or Canada and applies only when an authorized Whirlpool servicer is installed, operated, and 7. Removal or reinstallation of "Whirlpool") will pay for...
... you . This limited warranty is reported to specified replacement parts and repair labor for service in this part that prevent function of the refrigerator and that comes with electrical or plumbing codes, or correction of inaccessible appliances or built-in the United States or Canada and applies only when an authorized Whirlpool servicer is installed, operated, and 7. Removal or reinstallation of "Whirlpool") will pay for...


