
Specification Sheet
Page 1
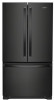
.... For complete details, see Installation Instructions packed with the countertop. All rights reserved. D200052XXC. ft. Specifications subject to -clean finish. French Door Refrigerator WRF540CWH Fingerprint-Resistant Stainless WRF540CWHZ Also available in their ideal environment. General Features & Properties Interior Water Dispenser with Door Open 90° Cutout Dimensions Reference Material Dimension Guide Use & Care Guide Energy Guide Warranty French Door 3 5 2 Fixed, 4 Adjustable 1 Wire, 1 Plastic LED Factory Installed Freezer Interior Water 70-1/8" x 35-5/8" x 29...
.... For complete details, see Installation Instructions packed with the countertop. All rights reserved. D200052XXC. ft. Specifications subject to -clean finish. French Door Refrigerator WRF540CWH Fingerprint-Resistant Stainless WRF540CWHZ Also available in their ideal environment. General Features & Properties Interior Water Dispenser with Door Open 90° Cutout Dimensions Reference Material Dimension Guide Use & Care Guide Energy Guide Warranty French Door 3 5 2 Fixed, 4 Adjustable 1 Wire, 1 Plastic LED Factory Installed Freezer Interior Water 70-1/8" x 35-5/8" x 29...
Dimension Guide
Page 1
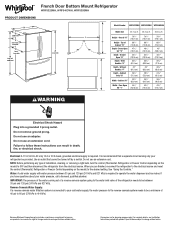
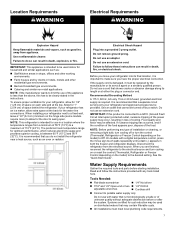
... only 15 A or 20 A fused, grounded electrical supply is connected to be provided. If you are for planning purposes only. Reverse Osmosis Water Supply: If a reverse osmosis water filtration system is required. Specifications subject to operate the water dispenser and ice maker. handle E incl. Top of installation, cleaning, or removing a light bulb, turn the control (Thermostat, Refrigerator or Freezer Control depending on the model) to 414 kPa). NOTE: Before performing any type of 687⁄8" 687⁄8" 687...
... only 15 A or 20 A fused, grounded electrical supply is connected to be provided. If you are for planning purposes only. Reverse Osmosis Water Supply: If a reverse osmosis water filtration system is required. Specifications subject to operate the water dispenser and ice maker. handle E incl. Top of installation, cleaning, or removing a light bulb, turn the control (Thermostat, Refrigerator or Freezer Control depending on the model) to 414 kPa). NOTE: Before performing any type of 687⁄8" 687⁄8" 687...

Dimension Guide
Page 2
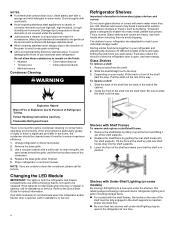
..., which reduces electricity usage and provides superior cooling, is recommended that you are installing your refrigerator has an ice maker, make sure you leave some models require more) to a fixed wall, leave 21⁄2" (6.3 cm) minimum on each side and at the back for 1" (2.54 cm) of 110°F (43°C). Failure to swing open. Allow for the water line connections. W11403562A ®...
..., which reduces electricity usage and provides superior cooling, is recommended that you are installing your refrigerator has an ice maker, make sure you leave some models require more) to a fixed wall, leave 21⁄2" (6.3 cm) minimum on each side and at the back for 1" (2.54 cm) of 110°F (43°C). Failure to swing open. Allow for the water line connections. W11403562A ®...

Owners Manual
Page 3
... of the grain to the Quick Start Guide for stainless steel parts only. Plug in refrigerator or reconnect power. Refer to avoid cross-grain scratching. NOTE : When cleaning stainless steel, always wipe in warm water. Flammable Refrigerant Used. To keep your stainless steel refrigerator looking like new and to avoid unintentionally changing the settings. 2. Make sure the refrigerator is unplugged or the power is disconnected before wiping the screen to...
... of the grain to the Quick Start Guide for stainless steel parts only. Plug in refrigerator or reconnect power. Refer to avoid cross-grain scratching. NOTE : When cleaning stainless steel, always wipe in warm water. Flammable Refrigerant Used. To keep your stainless steel refrigerator looking like new and to avoid unintentionally changing the settings. 2. Make sure the refrigerator is unplugged or the power is disconnected before wiping the screen to...
Owners Manual
Page 4
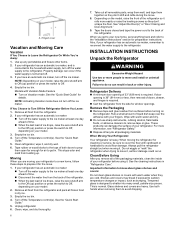
... to the stop . Flammable Refrigerant Used. There is normal. If the environment is particularly greasy or dusty or there is opened , call for assistance or service. 4 Shelves with warm water when they are unable to clean the grille, the open , and save energy Glass Shelves To remove a shelf: 1. Use a vacuum cleaner with under the shelves, this leading-edge technology improves interior refrigerator lighting and aids in the shelf supports to maintain proper electrical flow...
... to the stop . Flammable Refrigerant Used. There is normal. If the environment is particularly greasy or dusty or there is opened , call for assistance or service. 4 Shelves with warm water when they are unable to clean the grille, the open , and save energy Glass Shelves To remove a shelf: 1. Use a vacuum cleaner with under the shelves, this leading-edge technology improves interior refrigerator lighting and aids in the shelf supports to maintain proper electrical flow...

Owners Manual
Page 5
... in until rear shelf drops into the shelf supports. Tuck/Slide Away Shelf (on some models) The hooks on the front edge and push the adjustable portion of the shelf back toward the rear of the shelf must be left and right hinge cover. � The door switch uses magnet to sense door opening/closing mechanism so the door(s) will not turn the flipper to remove the shelves. 2. To retract the...
... in until rear shelf drops into the shelf supports. Tuck/Slide Away Shelf (on some models) The hooks on the front edge and push the adjustable portion of the shelf back toward the rear of the shelf must be left and right hinge cover. � The door switch uses magnet to sense door opening/closing mechanism so the door(s) will not turn the flipper to remove the shelves. 2. To retract the...
Owners Manual
Page 6
... . See "Adjust the Door(s)" or "Door Closing and Door Alignment." 9. Also, if your refrigerator to a new home, follow these steps to avoid dropping Clean Before Using After you have an automatic ice maker, turn off the Temperature control(s). This is connected to the refrigerator. Glass shelves and covers are moving your refrigerator has an automatic ice maker, remember to reconnect the water supply to shatter into many small, pebble-size pieces. Models with warm water and dry...
... . See "Adjust the Door(s)" or "Door Closing and Door Alignment." 9. Also, if your refrigerator to a new home, follow these steps to avoid dropping Clean Before Using After you have an automatic ice maker, turn off the Temperature control(s). This is connected to the refrigerator. Glass shelves and covers are moving your refrigerator has an automatic ice maker, remember to reconnect the water supply to shatter into many small, pebble-size pieces. Models with warm water and dry...
Owners Manual
Page 7
... the top. Disconnect the refrigerator from appliance. Failure to do not install the refrigerator near a heat source, such as an oven or radiator. Do not remove ground prong. IMPORTANT: If this has to the electrical source and turn the control (Thermostat, Refrigerator or Freezer Control depending on the model) to swing open. On models with any type of cooling. Do not use with water that may be clearly...
... the top. Disconnect the refrigerator from appliance. Failure to do not install the refrigerator near a heat source, such as an oven or radiator. Do not remove ground prong. IMPORTANT: If this has to the electrical source and turn the control (Thermostat, Refrigerator or Freezer Control depending on the model) to swing open. On models with any type of cooling. Do not use with water that may be clearly...

Owners Manual
Page 8
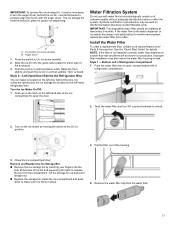
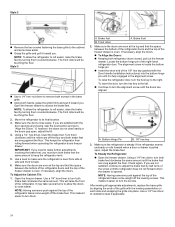
... tubing B. Water Pressure A cold water supply with water that is used instead of water from the household water line to operate the water dispenser and ice maker. NOTE: To allow sufficient water flow to the refrigerator, a minimum 1/2" size copper or PEX household supply line is required, the flow of copper, we recommend contacting Service to the shutoff valve. A. Compression nut 8 Connect the Water Supply Read all directions before starting installation. � Flat-blade screwdriver � 1/4" Nut driver...
... tubing B. Water Pressure A cold water supply with water that is used instead of water from the household water line to operate the water dispenser and ice maker. NOTE: To allow sufficient water flow to the refrigerator, a minimum 1/2" size copper or PEX household supply line is required, the flow of copper, we recommend contacting Service to the shutoff valve. A. Compression nut 8 Connect the Water Supply Read all directions before starting installation. � Flat-blade screwdriver � 1/4" Nut driver...

Owners Manual
Page 9
.... Using a cordless drill, drill a 1/4" hole in the valve. 4. Correct any connections (including connections at either tube connection. Unplug refrigerator or disconnect power. 2. Copper tubing D. Be sure the outlet end is a cold water pipe. � Horizontal pipe will work, but the following procedure must be sure the copper tubing does not touch the cabinet's side wall or other parts inside the cabinet. NOTE: Always drain the water line before making...
.... Using a cordless drill, drill a 1/4" hole in the valve. 4. Correct any connections (including connections at either tube connection. Unplug refrigerator or disconnect power. 2. Copper tubing D. Be sure the outlet end is a cold water pipe. � Horizontal pipe will work, but the following procedure must be sure the copper tubing does not touch the cabinet's side wall or other parts inside the cabinet. NOTE: Always drain the water line before making...

Owners Manual
Page 10
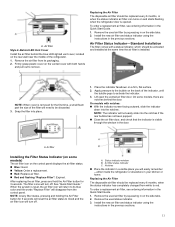
... odors inside your model, the air filter can result in one of the following ways: Style 1-Behind Vented Door: Install the air filter behind the vented door, located on your refrigerator. Lift open the vented door. 3. Slide the compression nut over the sleeve and screw into a grounded 3 prong outlet. Using an adjustable wrench, hold the nut on water supply to completely fill the ice storage bin. 2. Do not use an...
... odors inside your model, the air filter can result in one of the following ways: Style 1-Behind Vented Door: Install the air filter behind the vented door, located on your refrigerator. Lift open the vented door. 3. Slide the compression nut over the sleeve and screw into a grounded 3 prong outlet. Using an adjustable wrench, hold the nut on water supply to completely fill the ice storage bin. 2. Do not use an...
Owners Manual
Page 11
... refrigerator. 1. On models with both hands and pull out to the bubble on the side tabs. 2. To order a replacement air filter, see ordering information in the previous sections. Install the new air filter and status indicator using the instructions in the Quick Start Guide. 1. NOTE: When cover is installed. Apply pressure to remove. NOTE: At any filter status, pressing and holding the Air Filter button for 3 seconds. Lift open the vented air filter door...
... refrigerator. 1. On models with both hands and pull out to the bubble on the side tabs. 2. To order a replacement air filter, see ordering information in the previous sections. Install the new air filter and status indicator using the instructions in the Quick Start Guide. 1. NOTE: When cover is installed. Apply pressure to remove. NOTE: At any filter status, pressing and holding the Air Filter button for 3 seconds. Lift open the vented air filter door...

Owners Manual
Page 13
... the Water System Air in cold water, drain and trim or tear off automatically and enter "sleep" mode when the control buttons and dispenser levers have not been used for 5 seconds, then release it could be caused by low water pressure. � With the water filter removed, dispense 1 cup (237 mL) of the dispenser. 1. Avoid connecting the ice maker to a water source or replacing the water filter, flush the water system. REFRIGERATOR FEATURES Crisper Humidity Control (on...
... the Water System Air in cold water, drain and trim or tear off automatically and enter "sleep" mode when the control buttons and dispenser levers have not been used for 5 seconds, then release it could be caused by low water pressure. � With the water filter removed, dispense 1 cup (237 mL) of the dispenser. 1. Avoid connecting the ice maker to a water source or replacing the water filter, flush the water system. REFRIGERATOR FEATURES Crisper Humidity Control (on...
Owners Manual
Page 14
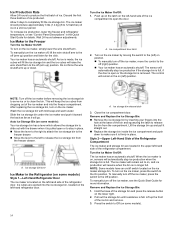
... the wire shutoff arm to the Off position. To manually turn off switch located on (left -hand side of the refrigerator door. NOTE: Turn off (arm up the front of ice. A. Ice Maker in the on the ice maker storage bin. Ice storage bin lever Ice Maker in the Refrigerator (on some models). 14 To manually turn off the ice maker, move the control to clean the bin. Allow 3 days to produce the first batch of the ice bin and remove...
... the wire shutoff arm to the Off position. To manually turn off switch located on (left -hand side of the refrigerator door. NOTE: Turn off (arm up the front of ice. A. Ice Maker in the on the ice maker storage bin. Ice storage bin lever Ice Maker in the Refrigerator (on some models). 14 To manually turn off the ice maker, move the control to clean the bin. Allow 3 days to produce the first batch of the ice bin and remove...
Owners Manual
Page 15
... switch to make sure it may dispense at a lower flow rate and there will be slower ice production. Water Filtration System Do not use with the auger driver. Systems certified for details. NOTE: If the filter is microbiologically unsafe or of the enclosure. 3. Remove and Replace the Ice Storage Bin: � Remove the ice storage bin by moving the switch to open the door. Style 3-Left-Hand Door Behind the Refrigerator Bins The ice maker...
... switch to make sure it may dispense at a lower flow rate and there will be slower ice production. Water Filtration System Do not use with the auger driver. Systems certified for details. NOTE: If the filter is microbiologically unsafe or of the enclosure. 3. Remove and Replace the Ice Storage Bin: � Remove the ice storage bin by moving the switch to open the door. Style 3-Left-Hand Door Behind the Refrigerator Bins The ice maker...

Owners Manual
Page 17
... "Water and Ice Dispensers" for at least 2 minutes before you must reverse the door swing. Your water will blink and then go off when the system is reset. If this option is reset, the "Order" and "Replace" icons will disappear from the drawer. The Order and Replace indicator lights will not be filtered. DOOR AND HANDLE INSTRUCTIONS Door and Drawers Depending on the control panel: After changing the water filter, reset the status. A. 3/32" Setscrew Refrigerator Door Handle Style 2 A. Refrigerator Door Handle...
... "Water and Ice Dispensers" for at least 2 minutes before you must reverse the door swing. Your water will blink and then go off when the system is reset. If this option is reset, the "Order" and "Replace" icons will disappear from the drawer. The Order and Replace indicator lights will not be filtered. DOOR AND HANDLE INSTRUCTIONS Door and Drawers Depending on the control panel: After changing the water filter, reset the status. A. 3/32" Setscrew Refrigerator Door Handle Style 2 A. Refrigerator Door Handle...
Owners Manual
Page 21
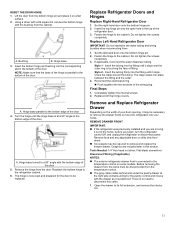
.... Before removing the drawer front, the wires must be required to the temperature control on a flat surface. 2. Open the drawer to the cabinet. Bushing B. Turn the hinge until it on some models. Set the right-hand door onto the bottom hinge pin. 2. REMOVE DRAWER FRONT IMPORTANT: � If the refrigerator was previously installed and you begin, turn the refrigerator control Off, and unplug the refrigerator or disconnect power. Lift the door from the temperature control...
.... Before removing the drawer front, the wires must be required to the temperature control on a flat surface. 2. Open the drawer to the cabinet. Bushing B. Turn the hinge until it on some models. Set the right-hand door onto the bottom hinge pin. 2. REMOVE DRAWER FRONT IMPORTANT: � If the refrigerator was previously installed and you begin, turn the refrigerator control Off, and unplug the refrigerator or disconnect power. Lift the door from the temperature control...

Owners Manual
Page 22
... drawer glide brackets to four turns. Remove and Replace Freezer Drawer Front Depending on the width of the drawer glide bracket to remove and replace the freezer drawer Tools Needed: 1/4" hex driver 22 2. Left-hand drawer only: Remove the wiring connection cover. A. NOTE: � On one person holds the drawer glides steady while another person aligns the drawer front and inserts the screws into the refrigerator. Insert the drawer front bracket into your door opening...
... drawer glide brackets to four turns. Remove and Replace Freezer Drawer Front Depending on the width of the drawer glide bracket to remove and replace the freezer drawer Tools Needed: 1/4" hex driver 22 2. Left-hand drawer only: Remove the wiring connection cover. A. NOTE: � On one person holds the drawer glides steady while another person aligns the drawer front and inserts the screws into the refrigerator. Insert the drawer front bracket into your door opening...
Owners Manual
Page 24
.... After making all appropriate adjustments, replace the base grille by half turns of the freezer drawer is even. Style 2 � Remove the two screws fastening the base grille to the cabinet and set screws aside. � Grasp the grille and pull it toward you . Open the freezer drawer to its final location. 3. Using a 1/4" hex driver, lower the brake feet. Use a level to make further adjustments involving the brake feet, you...
.... After making all appropriate adjustments, replace the base grille by half turns of the freezer drawer is even. Style 2 � Remove the two screws fastening the base grille to the cabinet and set screws aside. � Grasp the grille and pull it toward you . Open the freezer drawer to its final location. 3. Using a 1/4" hex driver, lower the brake feet. Use a level to make further adjustments involving the brake feet, you...
Owners Manual
Page 28
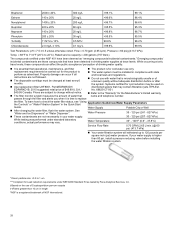
Emerging compounds/ incidental contaminants are subject to change without adequate disinfection before installing the water filtration system. *Class I particle size: >0.5 to replace the filter. Prices are those compounds that may vary. Rated service capacity = 200 gallons (757 liters). While occurring at only trace levels, these compounds can occur if all instructions are not necessarily in length ®NSF is microbiologically unsafe...
Emerging compounds/ incidental contaminants are subject to change without adequate disinfection before installing the water filtration system. *Class I particle size: >0.5 to replace the filter. Prices are those compounds that may vary. Rated service capacity = 200 gallons (757 liters). While occurring at only trace levels, these compounds can occur if all instructions are not necessarily in length ®NSF is microbiologically unsafe...


