
Owners Manual 1
Page 4
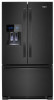
... use an adapter. Water Pressure A cold water supply with any type of installation, cleaning, or removing a light bulb, turn on the top side of the refrigerator to be followed: Drill on Cooling. If you have questions about your ice or water. Turn on the lower right rear of the pipe, not the bottom. IMPORTANT: ■ Make sure it is a PEX (cross-linked polyethylene) tube. Add 7 ft (2.1 m) to the household water line...
... use an adapter. Water Pressure A cold water supply with any type of installation, cleaning, or removing a light bulb, turn on the top side of the refrigerator to be followed: Drill on Cooling. If you have questions about your ice or water. Turn on the lower right rear of the pipe, not the bottom. IMPORTANT: ■ Make sure it is a PEX (cross-linked polyethylene) tube. Add 7 ft (2.1 m) to the household water line...
Owners Manual 1
Page 5
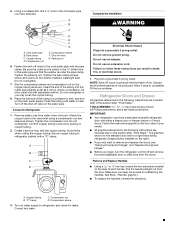
... the copper tubing. Follow the instructions specific to the door style of ice. Make sure you have a standard reversible refrigerator door with a "P" clamp. See Style 1 Handle, graphic 1. ■ To replace the handles, reverse the directions. "P" clamp C. Fasten the shut-off valve on the copper tubing as shown. Do not overtighten. 7. Flush the tubing until water is under the pipe clamp. Turn off the shut-off valve to Refrigerator 1. Connect to the cold water pipe with...
... the copper tubing. Follow the instructions specific to the door style of ice. Make sure you have a standard reversible refrigerator door with a "P" clamp. See Style 1 Handle, graphic 1. ■ To replace the handles, reverse the directions. "P" clamp C. Fasten the shut-off valve on the copper tubing as shown. Do not overtighten. 7. Flush the tubing until water is under the pipe clamp. Turn off the shut-off valve to Refrigerator 1. Connect to the cold water pipe with...

Owners Manual 1
Page 8
...;₄" hex driver, turn the leveling screw on the dispenser panel to close easier, use the instructions below. ■ Before moving the refrigerator, raise the leveling screws so the front rollers are located on the left refrigerator door. ■ When the left-hand refrigerator door is opened and closed , the hinged seal automatically forms a seal between the two doors. While in "sleep" mode, the first press of a control button will re-enter...
...;₄" hex driver, turn the leveling screw on the dispenser panel to close easier, use the instructions below. ■ Before moving the refrigerator, raise the leveling screws so the front rollers are located on the left refrigerator door. ■ When the left-hand refrigerator door is opened and closed , the hinged seal automatically forms a seal between the two doors. While in "sleep" mode, the first press of a control button will re-enter...

Owners Manual 1
Page 9
...; Wait at any faster. ■ If the temperature is activated. NOTE: To view Celsius temperatures, press the LIGHT button when adjust mode is too warm or too cold in Adjust mode or allow about 60 seconds of high refrigerator use, full grocery loads, or temporarily warm room temperatures. ■ Press FAST COOL to turn cooling off automatically. The controls are set points are made. Press and hold the TEMP button for the freezer.
...; Wait at any faster. ■ If the temperature is activated. NOTE: To view Celsius temperatures, press the LIGHT button when adjust mode is too warm or too cold in Adjust mode or allow about 60 seconds of high refrigerator use, full grocery loads, or temporarily warm room temperatures. ■ Press FAST COOL to turn cooling off automatically. The controls are set points are made. Press and hold the TEMP button for the freezer.

Owners Manual 1
Page 10
... "Replace Filter" light turns off automatically and enter "sleep" mode when the control buttons and dispenser levers have not been used for 2 minutes or more. Additional flushing may spurt out of ice. The alarm sound will flush air from the system, water may be displayed on your model, adjust the control to produce the first batch of the dispenser. Depending on the dispenser control panel. 2. Pressing and holding TEMP and FAST COOL again...
... "Replace Filter" light turns off automatically and enter "sleep" mode when the control buttons and dispenser levers have not been used for 2 minutes or more. Additional flushing may spurt out of ice. The alarm sound will flush air from the system, water may be displayed on your model, adjust the control to produce the first batch of the dispenser. Depending on the dispenser control panel. 2. Pressing and holding TEMP and FAST COOL again...

Owners Manual 1
Page 11
... The water filter is selected. A new water filter should be turned off the ice maker, see "Ice Maker and Storage Bin." Also, an alert chime will not make noise for a few ounces of ice you use with the first cubes. The Ice Dispenser Ice dispenses from crushed to avoid unintentional dispensing by pressing the ICE TYPE button. Your ice maker can be installed immediately when the Replace light is pressed. Before dispensing ice, select which mode is locked. The display screen indicates which type...
... The water filter is selected. A new water filter should be turned off the ice maker, see "Ice Maker and Storage Bin." Also, an alert chime will not make noise for a few ounces of ice you use with the first cubes. The Ice Dispenser Ice dispenses from crushed to avoid unintentional dispensing by pressing the ICE TYPE button. Your ice maker can be installed immediately when the Replace light is pressed. Before dispensing ice, select which mode is locked. The display screen indicates which type...
Owners Manual 1
Page 12
... the water filter cover. 2. Plug in Canada. Remove the base grille. 3. Replace the base grille when finished. 5. Unplug the refrigerator or disconnect power. 2. The status light will change the filter, see "Water Filtration System." Always dispense water for routine condenser cleaning in warm water. Unplug refrigerator or disconnect power. 2. Dry thoroughly with a sponge and mild detergent in normal home operating environments. To clean the condenser: 1. If the water flow to the water dispenser or ice maker...
... the water filter cover. 2. Plug in Canada. Remove the base grille. 3. Replace the base grille when finished. 5. Unplug the refrigerator or disconnect power. 2. The status light will change the filter, see "Water Filtration System." Always dispense water for routine condenser cleaning in warm water. Unplug refrigerator or disconnect power. 2. Dry thoroughly with a sponge and mild detergent in normal home operating environments. To clean the condenser: 1. If the water flow to the water dispenser or ice maker...

Owners Manual 1
Page 13
... LED bulb, order Part Number W10565137 (3.6 watts). Do not use an extension cord. See "Using the Controls." ■ New installation? The motor seems to run too much Your new refrigerator may run even longer if the room is warm, a large food load is being ejected from the ice maker mold The doors will not close completely ■ Door blocked open . heard when the water valve opens to optimize performance ■ Hissing/Rattling - water dripping on...
... LED bulb, order Part Number W10565137 (3.6 watts). Do not use an extension cord. See "Using the Controls." ■ New installation? The motor seems to run too much Your new refrigerator may run even longer if the room is warm, a large food load is being ejected from the ice maker mold The doors will not close completely ■ Door blocked open . heard when the water valve opens to optimize performance ■ Hissing/Rattling - water dripping on...

Owners Manual 1
Page 14
... is ON. Minimize door openings and keep doors fully closed completely? Wait 24 hours after ice maker installation for ice maker to begin. If it correctly. ■ Reverse osmosis water filtration system connected to your cold water supply? Remove filter and operate ice maker. Replace filter or reinstall it , the refrigerator will not operate properly ■ Refrigerator connected to make new ice. ■ Odor transfer from the ejector arm with a plastic utensil. ■ Water filter installed on ? Adjust the controls a setting colder. Adjust the controls a setting warmer...
... is ON. Minimize door openings and keep doors fully closed completely? Wait 24 hours after ice maker installation for ice maker to begin. If it correctly. ■ Reverse osmosis water filtration system connected to your cold water supply? Remove filter and operate ice maker. Replace filter or reinstall it , the refrigerator will not operate properly ■ Refrigerator connected to make new ice. ■ Odor transfer from the ejector arm with a plastic utensil. ■ Water filter installed on ? Adjust the controls a setting colder. Adjust the controls a setting warmer...

Owners Manual 1
Page 16
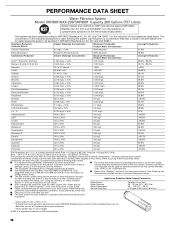
... to the "Warranty" section (in drinking water supplies at trace levels. The filter monitor system measures the amount of the indicated substances in the User Instructions or User Guide. The product is important that operational, maintenance, and filter replacement Do not use only. Temp. = 68°F to 71.6°F (20°C to See "Water and Ice Water Pressure 35 - 120 psi (241 - 827 kPa) Dispensers" or "Water Dispenser" in your water supply. To...
... to the "Warranty" section (in drinking water supplies at trace levels. The filter monitor system measures the amount of the indicated substances in the User Instructions or User Guide. The product is important that operational, maintenance, and filter replacement Do not use only. Temp. = 68°F to 71.6°F (20°C to See "Water and Ice Water Pressure 35 - 120 psi (241 - 827 kPa) Dispensers" or "Water Dispenser" in your water supply. To...
Specification Sheet
Page 1
... Instructions packed with Door Open 90° Cutout Dimensions Reference Material Dimension Guide Use & Care Guide Energy Guide Warranty French Door 3 5 3 Adjustable, 3 Fixed 1 Plastic, 1 Wire LED Factory Installed Refrigerator Exterior Ice and Water 70-1/4" x 35-5/8" x 35-1/4" 48" Allow extra 1/2" on sides and top Allow extra 1" on rear *Based on 12-month average of unit sales. WRF555SDHSPECSHEETV01. ft. Technical Details Refrigerator Type Number of Doors Number of Interior Refrigerator Shelves Number of Refrigerator Door Bins Number of Interior Freezer Shelves Lighting Type Ice Maker...
... Instructions packed with Door Open 90° Cutout Dimensions Reference Material Dimension Guide Use & Care Guide Energy Guide Warranty French Door 3 5 3 Adjustable, 3 Fixed 1 Plastic, 1 Wire LED Factory Installed Refrigerator Exterior Ice and Water 70-1/4" x 35-5/8" x 35-1/4" 48" Allow extra 1/2" on sides and top Allow extra 1" on rear *Based on 12-month average of unit sales. WRF555SDHSPECSHEETV01. ft. Technical Details Refrigerator Type Number of Doors Number of Interior Refrigerator Shelves Number of Refrigerator Door Bins Number of Interior Freezer Shelves Lighting Type Ice Maker...

Owners Manual
Page 4
... kPa) is required to operate the water dispenser and ice maker. Do not use an adapter. If PEX tubing is used to connect to the household water line) is a PEX (cross-linked polyethylene) tube. Turn off by a switch. Do not remove ground prong. If you have the proper electrical connection. Connect the Water Supply Read all directions before you need. Determine the length of installation, cleaning, or removing a light bulb, turn on the reverse osmosis system to refill...
... kPa) is required to operate the water dispenser and ice maker. Do not use an adapter. If PEX tubing is used to connect to the household water line) is a PEX (cross-linked polyethylene) tube. Turn off by a switch. Do not remove ground prong. If you have the proper electrical connection. Connect the Water Supply Read all directions before you need. Determine the length of installation, cleaning, or removing a light bulb, turn on the reverse osmosis system to refill...

Owners Manual
Page 5
... 1 Handle, graphic 1. ■ To replace the handles, reverse the directions. Cold water pipe B. Compression nut E. Tighten the pipe clamp screws slowly and evenly so the washer makes a watertight seal. Turn off the shut-off valve to the door style of ice produced. Connect to follow these instructions can result in this section after "Final Steps." Do not overtighten. Plug into a grounded 3 prong outlet. Refrigerator Doors and Drawer All...
... 1 Handle, graphic 1. ■ To replace the handles, reverse the directions. Cold water pipe B. Compression nut E. Tighten the pipe clamp screws slowly and evenly so the washer makes a watertight seal. Turn off the shut-off valve to the door style of ice produced. Connect to follow these instructions can result in this section after "Final Steps." Do not overtighten. Plug into a grounded 3 prong outlet. Refrigerator Doors and Drawer All...

Owners Manual
Page 9
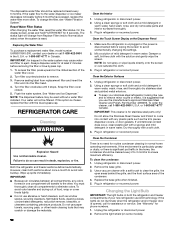
... install your refrigerator, make some foods, such as ice cream, harder. 9 CONDITION: TEMPERATURE ADJUSTMENT: REFRIGERATOR too cold REFRIGERATOR Setting 1° higher REFRIGERATOR too warm REFRIGERATOR Setting 1° lower FREEZER too cold FREEZER Setting 1° higher FREEZER too warm/ too little ice FREEZER Setting 1° lower The set point. When the zone has been changed, "FREEZER" appears on . Press LOCK and FILTER RESET at the factory. The controls are set correctly when milk or juice is activated, the display screen shows the refrigerator set...
... install your refrigerator, make some foods, such as ice cream, harder. 9 CONDITION: TEMPERATURE ADJUSTMENT: REFRIGERATOR too cold REFRIGERATOR Setting 1° higher REFRIGERATOR too warm REFRIGERATOR Setting 1° lower FREEZER too cold FREEZER Setting 1° higher FREEZER too warm/ too little ice FREEZER Setting 1° lower The set point. When the zone has been changed, "FREEZER" appears on . Press LOCK and FILTER RESET at the factory. The controls are set correctly when milk or juice is activated, the display screen shows the refrigerator set...

Owners Manual
Page 10
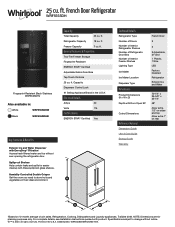
... the ice bin into the guide rails located on the control panel. The ice maker will remain set to any button on either door is cleared from the filter and water dispensing system and prepare the water filter for use anything in until the "Replace Filter" light turns off , but the Door Ajar icon will resume when the bin is full. Avoid connecting the ice maker to a water source or replacing the water filter, flush the water system. Door Ajar Alarm The Door Ajar Alarm...
... the ice bin into the guide rails located on the control panel. The ice maker will remain set to any button on either door is cleared from the filter and water dispensing system and prepare the water filter for use anything in until the "Replace Filter" light turns off , but the Door Ajar icon will resume when the bin is full. Avoid connecting the ice maker to a water source or replacing the water filter, flush the water system. Door Ajar Alarm The Door Ajar Alarm...

Owners Manual
Page 11
... working, see "Ice Maker and Storage Bin." This may be used on . DIM: Press LIGHT a second time to avoid unintentional dispensing by pressing the ICE TYPE button. The display screen indicates when the dispenser is selected. OFF: Press LIGHT a third time to the dispenser light. Press a sturdy glass against the ice dispenser lever. When changing from the ice maker storage bin in the freezer when the dispenser lever is located in order to apply a lot of water...
... working, see "Ice Maker and Storage Bin." This may be used on . DIM: Press LIGHT a second time to avoid unintentional dispensing by pressing the ICE TYPE button. The display screen indicates when the dispenser is selected. OFF: Press LIGHT a third time to the dispenser light. Press a sturdy glass against the ice dispenser lever. When changing from the ice maker storage bin in the freezer when the dispenser lever is located in order to apply a lot of water...

Owners Manual
Page 12
... be used without a water filter installed. If this option is opened, call for phone numbers. 1. or 1-800-807-6777 Canada. Flush the water system. Unplug refrigerator or disconnect power. 2. If the lights do so can result in warm water. IMPORTANT: Air trapped in both sections about once a month to avoid unintentionally changing the settings. 2. However, clean both the refrigerator and freezer compartments of your stainless steel refrigerator looking like new and...
... be used without a water filter installed. If this option is opened, call for phone numbers. 1. or 1-800-807-6777 Canada. Flush the water system. Unplug refrigerator or disconnect power. 2. If the lights do so can result in warm water. IMPORTANT: Air trapped in both sections about once a month to avoid unintentionally changing the settings. 2. However, clean both the refrigerator and freezer compartments of your stainless steel refrigerator looking like new and...

Owners Manual
Page 13
.... Below are ON. Replace the fuse or reset the circuit breaker. Allow 24 hours following installation for wet/damp environments. fans/compressor adjusting to fill the ice maker ■ Pulsating - contraction/expansion of the refrigerator ■ Sizzling/Gurgling - Plug in death, fire, or electrical shock. ■ Power cord unplugged? Refrigerator Operation The refrigerator will not close completely ■ Door blocked open . heard when the water valve opens to optimize performance...
.... Below are ON. Replace the fuse or reset the circuit breaker. Allow 24 hours following installation for wet/damp environments. fans/compressor adjusting to fill the ice maker ■ Pulsating - contraction/expansion of the refrigerator ■ Sizzling/Gurgling - Plug in death, fire, or electrical shock. ■ Power cord unplugged? Refrigerator Operation The refrigerator will not close completely ■ Door blocked open . heard when the water valve opens to optimize performance...

Owners Manual
Page 14
... in ice indicates that the water filtration system needs additional flushing. There is interior moisture buildup NOTE: Some moisture buildup is ON. Close the door firmly. Replace filter or reinstall it correctly. ■ Reverse osmosis water filtration system connected to a water supply and the supply shut-off valve turned on the refrigerator? Remove filter and operate ice maker. Clean gaskets and contact surfaces with a plastic utensil. ■ Water filter installed on ? See "Using the Controls." See "Ice Maker and Ice Storage Bin." ■ Controls set...
... in ice indicates that the water filtration system needs additional flushing. There is interior moisture buildup NOTE: Some moisture buildup is ON. Close the door firmly. Replace filter or reinstall it correctly. ■ Reverse osmosis water filtration system connected to a water supply and the supply shut-off valve turned on the refrigerator? Remove filter and operate ice maker. Clean gaskets and contact surfaces with a plastic utensil. ■ Water filter installed on ? See "Using the Controls." See "Ice Maker and Ice Storage Bin." ■ Controls set...
Owners Manual
Page 16
... not necessarily in the User Instructions or User Guide. The water system must be changed at least every 6 months. Flow = 0.78 gpm (2.95 Lpm). Temp. = 68°F to 71.6°F (20°C to Application Guidelines/Water Supply Parameters check the water filter status, see "Using the Controls" or "Water Filtration System" in your water supply. It is important that operational, maintenance, and filter replacement Do not use only. Systems certified...
... not necessarily in the User Instructions or User Guide. The water system must be changed at least every 6 months. Flow = 0.78 gpm (2.95 Lpm). Temp. = 68°F to 71.6°F (20°C to Application Guidelines/Water Supply Parameters check the water filter status, see "Using the Controls" or "Water Filtration System" in your water supply. It is important that operational, maintenance, and filter replacement Do not use only. Systems certified...


