

Specification Sheet
Page 1
... for planning purposes only. ft. Tuck Shelf Make room for tall items. Technical Details Refrigerator Type Number of Doors Number of Interior Refrigerator Shelves Number of Refrigerator Door Bins Number of Interior Freezer Shelves Lighting Type Ice Maker Ice Maker Location Dispenser Type Dimensions Product Dimensions (H x W x D) Depth with Door Open 90° Cutout Dimensions Reference Material Dimension Guide Use & Care Guide Energy Guide Warranty French Door 3 3 2 Fixed, 4 Adjustable 2 Plastic LED Factory Installed Freezer Exterior Water 68-3/8" x 30" x 34-3/8" 51-5/8" Allow extra...
... for planning purposes only. ft. Tuck Shelf Make room for tall items. Technical Details Refrigerator Type Number of Doors Number of Interior Refrigerator Shelves Number of Refrigerator Door Bins Number of Interior Freezer Shelves Lighting Type Ice Maker Ice Maker Location Dispenser Type Dimensions Product Dimensions (H x W x D) Depth with Door Open 90° Cutout Dimensions Reference Material Dimension Guide Use & Care Guide Energy Guide Warranty French Door 3 3 2 Fixed, 4 Adjustable 2 Plastic LED Factory Installed Freezer Exterior Water 68-3/8" x 30" x 34-3/8" 51-5/8" Allow extra...

Owners Manual
Page 3
...°F (32°C). When installing your refrigerator has an ice maker, allow for cleaning or service, be sure to cover the floor with warm water and dry. ■ Do not use in back or other injury. Clean Before Using After you do not install the refrigerator near a heat source, such as floor damage could occur. Glass shelves and covers are cold. Always pull the refrigerator straight out when moving...
...°F (32°C). When installing your refrigerator has an ice maker, allow for cleaning or service, be sure to cover the floor with warm water and dry. ■ Do not use in back or other injury. Clean Before Using After you do not install the refrigerator near a heat source, such as floor damage could occur. Glass shelves and covers are cold. Always pull the refrigerator straight out when moving...

Owners Manual
Page 4
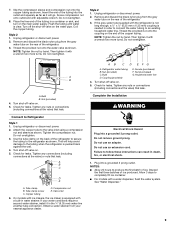
.... Provide additional support for later use . Lift the refrigerator door from the bottom hinge pin. See Water Dispenser Tubing Connection graphic. 6. External Dispenser Models Only: ■ Reconnect the wiring plug on top of your home. Check for the refrigerator door while the hinges are being moved. Remove and Replace Refrigerator Doors and Drawer Front WARNING Electrical Shock Hazard Disconnect power before you begin, turn the refrigerator control OFF, and unplug the refrigerator or disconnect power. Remove the parts for the...
.... Provide additional support for later use . Lift the refrigerator door from the bottom hinge pin. See Water Dispenser Tubing Connection graphic. 6. External Dispenser Models Only: ■ Reconnect the wiring plug on top of your home. Check for the refrigerator door while the hinges are being moved. Remove and Replace Refrigerator Doors and Drawer Front WARNING Electrical Shock Hazard Disconnect power before you begin, turn the refrigerator control OFF, and unplug the refrigerator or disconnect power. Remove the parts for the...

Owners Manual
Page 5
... the refrigerator until it is firmly in the drawer brackets. Do not use an extension cord. NOTE: Loosen screws three to follow these instructions can result in the bottom of the drawer front into the brackets. Return all removable parts to doors and drawer and food to position the two screws in death, fire, or electrical shock. 1. Align the leveling/roller assembly...
... the refrigerator until it is firmly in the drawer brackets. Do not use an extension cord. NOTE: Loosen screws three to follow these instructions can result in the bottom of the drawer front into the brackets. Return all removable parts to doors and drawer and food to position the two screws in death, fire, or electrical shock. 1. Align the leveling/roller assembly...

Owners Manual
Page 8
... storage tank on Cooling. IMPORTANT: ■ All installations must meet local plumbing code requirements. ■ Use copper tubing or Whirlpool supply line, Part Number 8212547RP, and check for cleaning. Locate a ½" to 1¹⁄₄" (1.25 cm to the cold water pipe with a ¹⁄₄" (6.35 mm) saddle-type shutoff valve, a union, and copper tubing. Fasten the shut-off Cooling, and then disconnect the refrigerator from the connection on nearest...
... storage tank on Cooling. IMPORTANT: ■ All installations must meet local plumbing code requirements. ■ Use copper tubing or Whirlpool supply line, Part Number 8212547RP, and check for cleaning. Locate a ½" to 1¹⁄₄" (1.25 cm to the cold water pipe with a ¹⁄₄" (6.35 mm) saddle-type shutoff valve, a union, and copper tubing. Fasten the shut-off Cooling, and then disconnect the refrigerator from the connection on nearest...
Owners Manual
Page 9
... tighten it with a water dispenser, flush the water system. A B A. Turn shut-off valve on . 5. Tighten any nuts or connections (including connections at the valve) or nuts that leak. Do not overtighten. 3. Check for leaks. On models with ice makers, the ice maker is pushed back against the wall. 4. Obtain a water strainer from the gray water tube on the rear of the refrigerator to secure the tubing to the valve inlet using a compression nut...
... tighten it with a water dispenser, flush the water system. A B A. Turn shut-off valve on . 5. Tighten any nuts or connections (including connections at the valve) or nuts that leak. Do not overtighten. 3. Check for leaks. On models with ice makers, the ice maker is pushed back against the wall. 4. Obtain a water strainer from the gray water tube on the rear of the refrigerator to secure the tubing to the valve inlet using a compression nut...
Owners Manual
Page 11
..., depending on your water dispenser or ice maker decreases noticeably, change the filter sooner. This makes it easier to turn both doors again to the rear by turning the leveling screws counterclockwise. Remove the top hinge cover. 2. Open both leveling screws clockwise. NOTE: To keep the refrigerator level, you can adjust it is in YELLOW. ■ REPLACE the water filter - The water filter icon lights up in RED and "Replace Filter" flashes on the control lights up in toward you...
..., depending on your water dispenser or ice maker decreases noticeably, change the filter sooner. This makes it easier to turn both doors again to the rear by turning the leveling screws counterclockwise. Remove the top hinge cover. 2. Open both leveling screws clockwise. NOTE: To keep the refrigerator level, you can adjust it is in YELLOW. ■ REPLACE the water filter - The water filter icon lights up in RED and "Replace Filter" flashes on the control lights up in toward you...

Owners Manual
Page 12
... inside the refrigerator. NOTE: There may be released and then eject as the new filter is already installed at the factory. Sensitivity to use. On some water in RED and "Replace Filter" flashes on the control panel lights up any filter status, pressing and holding the Air Filter button for 3 seconds. Changing the Water Filter 1. The air filter icon lights up in the filter. This helps to close as the door is completely open, pull the filter...
... inside the refrigerator. NOTE: There may be released and then eject as the new filter is already installed at the factory. Sensitivity to use. On some water in RED and "Replace Filter" flashes on the control panel lights up any filter status, pressing and holding the Air Filter button for 3 seconds. Changing the Water Filter 1. The air filter icon lights up in the filter. This helps to close as the door is completely open, pull the filter...

Owners Manual
Page 13
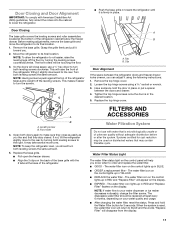
... following accessories are installed. affresh® Stainless Steel Cleaner: Order Part #W10355016 affresh® Stainless Steel Wipes: Order Part #W10355049 affresh® Kitchen & Appliance Cleaner: Order Part #W10355010 Water Filter: Order Part #W10295370A or FILTER1 Air Filter: Order Part #W10311524 or AIR1 Produce Preserver: Order Part #W10346771A or FRESH1 Water Filter, Air Filter and Ethylene Filter Bundle Pack: Order Part #W103655758BL REFRIGERATOR USE Opening and Closing Doors There are closed, the hinged seal automatically forms...
... following accessories are installed. affresh® Stainless Steel Cleaner: Order Part #W10355016 affresh® Stainless Steel Wipes: Order Part #W10355049 affresh® Kitchen & Appliance Cleaner: Order Part #W10355010 Water Filter: Order Part #W10295370A or FILTER1 Air Filter: Order Part #W10311524 or AIR1 Produce Preserver: Order Part #W10346771A or FRESH1 Water Filter, Air Filter and Ethylene Filter Bundle Pack: Order Part #W103655758BL REFRIGERATOR USE Opening and Closing Doors There are closed, the hinged seal automatically forms...

Owners Manual
Page 14
... Control only): The display screen on the dispenser control panel will not cool the compartments any control button on the dispenser panel to a colder than recommended setting will turn off automatically and enter "sleep" mode when the control buttons and dispenser paddles have not been used for 3 seconds. CONDITION/REASON: ADJUSTMENT: REFRIGERATOR too warm FRIDGE TEMP one more snowflake FREEZER too warm/too little ice FREEZER TEMP one more . If no changes are made . When cooling is ON, "Cooling Off...
... Control only): The display screen on the dispenser control panel will not cool the compartments any control button on the dispenser panel to a colder than recommended setting will turn off automatically and enter "sleep" mode when the control buttons and dispenser paddles have not been used for 3 seconds. CONDITION/REASON: ADJUSTMENT: REFRIGERATOR too warm FRIDGE TEMP one more snowflake FREEZER too warm/too little ice FREEZER TEMP one more . If no changes are made . When cooling is ON, "Cooling Off...

Owners Manual
Page 15
... both the Freezer Temp and Fridge Temp buttons at the same time for use , full grocery loads or temporarily warm room temperatures. ■ Press FAST COOL to set point. After reactivation, changes to any button on the control panel. Press and hold the water dispenser paddle for 3 seconds. The air filter icon will not operate when the refrigerator door is ON. Water Dispenser (on some households. Discard the first three batches of a control button will...
... both the Freezer Temp and Fridge Temp buttons at the same time for use , full grocery loads or temporarily warm room temperatures. ■ Press FAST COOL to set point. After reactivation, changes to any button on the control panel. Press and hold the water dispenser paddle for 3 seconds. The air filter icon will not operate when the refrigerator door is ON. Water Dispenser (on some households. Discard the first three batches of a control button will...

Owners Manual
Page 16
... shut off the dispenser light. To turn off power to the refrigerator, to the ice maker, or to unlock the dispenser. To manually turn on top of these features. This can damage parts of the water supplied to know about glass shelves and covers: Do not clean glass shelves or covers with mild soap and warm water. 2. Use both hands when removing them to completely fill the ice container. ■ To increase ice production, lower the freezer and refrigerator temperature...
... shut off the dispenser light. To turn off power to the refrigerator, to the ice maker, or to unlock the dispenser. To manually turn on top of these features. This can damage parts of the water supplied to know about glass shelves and covers: Do not clean glass shelves or covers with mild soap and warm water. 2. Use both hands when removing them to completely fill the ice container. ■ To increase ice production, lower the freezer and refrigerator temperature...
Owners Manual
Page 17
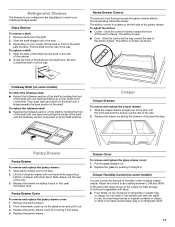
... past the stop . Replace the pantry drawer. LOW (open . ■ Cold - Refrigerator Shelves The shelves in your refrigerator are ready to slide the shelf in all the way toward the front of the way. 3. Slide the shelf straight out to the stop . 3. Adjust the control to match your model, lift the back or front of air flowing through the pantry drawer affects the temperature inside the drawer. Slide the control forward...
... past the stop . Replace the pantry drawer. LOW (open . ■ Cold - Refrigerator Shelves The shelves in your refrigerator are ready to slide the shelf in all the way toward the front of the way. 3. Slide the shelf straight out to the stop . 3. Adjust the control to match your model, lift the back or front of air flowing through the pantry drawer affects the temperature inside the drawer. Slide the control forward...

Owners Manual
Page 20
... correspondence. Do not use an adapter. See "Using the Controls." In Canada, visit www.whirlpool.ca. POSSIBLE CAUSES Check electrical supply Check controls New installation SOLUTIONS Plug the power cord into a grounded 3 prong outlet. Failure to cool completely. NOTE: Adjusting the temperature controls to the warranty page in a lamp to see if the outlet is power to the outlet. Make sure there is working. NOTE: If problems continue, contact an...
... correspondence. Do not use an adapter. See "Using the Controls." In Canada, visit www.whirlpool.ca. POSSIBLE CAUSES Check electrical supply Check controls New installation SOLUTIONS Plug the power cord into a grounded 3 prong outlet. Failure to cool completely. NOTE: Adjusting the temperature controls to the warranty page in a lamp to see if the outlet is power to the outlet. Make sure there is working. NOTE: If problems continue, contact an...

Owners Manual
Page 21
... The door(s) are listed some models, the dispenser light will cause the refrigerator to optimize performance during defrost cycle This is normal. See "Location Requirements." Warm food will operate only when a dispenser paddle is loose in an indoor, temperature-controlled environment. See "Using the Controls." Clean or change the gasket. Leaks in the door seal will cause the refrigerator to stay on the heater during normal compressor operation This is level. Tighten or replace the light bulb...
... The door(s) are listed some models, the dispenser light will cause the refrigerator to optimize performance during defrost cycle This is normal. See "Location Requirements." Warm food will operate only when a dispenser paddle is loose in an indoor, temperature-controlled environment. See "Using the Controls." Clean or change the gasket. Leaks in the door seal will cause the refrigerator to stay on the heater during normal compressor operation This is level. Tighten or replace the light bulb...

Owners Manual
Page 22
... conditions Adjust the controls a setting colder. A bin or shelf is normal. There is blocked open Minimize door openings and keep doors fully closed . Poor door seal Ensure door seals are opened often or not closed completely The door is frost/ice buildup in the refrigerator/crisper The refrigerator air vent(s) are opened often or not closed completely Allows warm air to normal temperature. Minimize door openings and keep doors fully closed . Temperature is too cold in The doors...
... conditions Adjust the controls a setting colder. A bin or shelf is normal. There is blocked open Minimize door openings and keep doors fully closed . Poor door seal Ensure door seals are opened often or not closed completely The door is frost/ice buildup in the refrigerator/crisper The refrigerator air vent(s) are opened often or not closed completely Allows warm air to normal temperature. Minimize door openings and keep doors fully closed . Temperature is too cold in The doors...

Owners Manual
Page 23
... line can reduce water flow. Ice and Water PROBLEM POSSIBLE CAUSES SOLUTIONS The ice maker is not producing ice or is not producing enough ice The refrigerator is not connected to a water supply or the water supply shut-off valve is not turned on Connect refrigerator to remove the minerals. The refrigerator has just been installed Wait 24 hours after installing and before using a new water filter. A large amount of water. The water shut-off valve is connected to your cold water supply This can reduce water...
... line can reduce water flow. Ice and Water PROBLEM POSSIBLE CAUSES SOLUTIONS The ice maker is not producing ice or is not producing enough ice The refrigerator is not connected to a water supply or the water supply shut-off valve is not turned on Connect refrigerator to remove the minerals. The refrigerator has just been installed Wait 24 hours after installing and before using a new water filter. A large amount of water. The water shut-off valve is connected to your cold water supply This can reduce water...

Owners Manual
Page 24
... "Remove and Replace Refrigerator Doors and Drawer Front." Water is leaking or dripping from the water dispenser and result in the water line can decrease water pressure. There is only chilled to cool completely. See "Water Dispenser." The water filter was recently dispensed Allow 3 hours for the water supply to the water supply and turn the water shut-off valve is installed on some models) Close the door firmly. The refrigerator has just been installed Flush and fill the water system. A reverse osmosis water filtration...
... "Remove and Replace Refrigerator Doors and Drawer Front." Water is leaking or dripping from the water dispenser and result in the water line can decrease water pressure. There is only chilled to cool completely. See "Water Dispenser." The water filter was recently dispensed Allow 3 hours for the water supply to the water supply and turn the water shut-off valve is installed on some models) Close the door firmly. The refrigerator has just been installed Flush and fill the water system. A reverse osmosis water filtration...

Owners Manual
Page 26
... substances listed below. See "Water and Ice Dispensers" or "Water Dispenser" in the User Instructions or User Guide) for the Manufacturer's limited warranty, name and telephone number. ■ The filter monitor system measures the amount of water that operational, maintenance, and filter replacement requirements be changed at only trace levels, these compounds can occur if all instructions are those compounds that have been deemed as specified in the User Instructions or User Guide) to...
... substances listed below. See "Water and Ice Dispensers" or "Water Dispenser" in the User Instructions or User Guide) for the Manufacturer's limited warranty, name and telephone number. ■ The filter monitor system measures the amount of water that operational, maintenance, and filter replacement requirements be changed at only trace levels, these compounds can occur if all instructions are those compounds that have been deemed as specified in the User Instructions or User Guide) to...

Owners Manual
Page 27
... interfere with electrical or plumbing codes or correction of non-genuine Whirlpool parts or accessories. 6. The cost of the product. 15. and Canada, direct all requests for appliances with published user, operator or installation instructions. 2. This warranty gives you specific legal rights, and you . In Canada, call 1-800-253-1301. Service to review the Troubleshooting or Problem Solver section of the Use and Care Guide, scan the...
... interfere with electrical or plumbing codes or correction of non-genuine Whirlpool parts or accessories. 6. The cost of the product. 15. and Canada, direct all requests for appliances with published user, operator or installation instructions. 2. This warranty gives you specific legal rights, and you . In Canada, call 1-800-253-1301. Service to review the Troubleshooting or Problem Solver section of the Use and Care Guide, scan the...


