
Warranty Information
Page 1
... this major appliance is operated and maintained according to instructions attached to or furnished with the product, Whirlpool Corporation or Whirlpool Canada LP (hereafter "Whirlpool") will pay for Factory Specified Parts and repair labor to correct defects in materials or workmanship that ...or province to Whirlpool within 30 days from accident, alteration, misuse, abuse, fire, flood, acts of purchase. 6. Pickup and delivery. Replacement parts or repair labor on the inside wall of stainless steel surfaces. Discoloration, rust, or oxidation of the refrigerator compartment. This...
... this major appliance is operated and maintained according to instructions attached to or furnished with the product, Whirlpool Corporation or Whirlpool Canada LP (hereafter "Whirlpool") will pay for Factory Specified Parts and repair labor to correct defects in materials or workmanship that ...or province to Whirlpool within 30 days from accident, alteration, misuse, abuse, fire, flood, acts of purchase. 6. Pickup and delivery. Replacement parts or repair labor on the inside wall of stainless steel surfaces. Discoloration, rust, or oxidation of the refrigerator compartment. This...
Energy Guide
Page 1
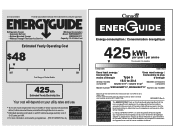
...étique 425 kWh per kWh. Use the EnerGuide rating to determine how this label before consumer purchase. Refrigerator-Freezer • Automatic Defrost • Bottom-Mounted Freezer • Without Through-The-Door-Ice Service Whirlpool Corporation Model: WRF560SMY*0* WRF560SEY*0* Capacity: 19.6 Cubic Feet Estimated Yearly Operating Cost $48 $47 $61 Cost Range...
...étique 425 kWh per kWh. Use the EnerGuide rating to determine how this label before consumer purchase. Refrigerator-Freezer • Automatic Defrost • Bottom-Mounted Freezer • Without Through-The-Door-Ice Service Whirlpool Corporation Model: WRF560SMY*0* WRF560SEY*0* Capacity: 19.6 Cubic Feet Estimated Yearly Operating Cost $48 $47 $61 Cost Range...

Use & Care Guide
Page 2
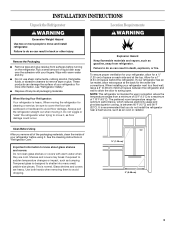
... mean: DANGER You can happen if the instructions are not followed. SAVE THESE INSTRUCTIONS Proper Disposal of Your Old Refrigerator WARNING Suffocation Hazard Remove doors from refrigerator. ■ Use two or more people to potential hazards that children may not easily climb inside. All safety messages... help prevent accidents. WARNING You can result in this manual and on some models). ■ Do not hit the refrigerator glass doors (on your old refrigerator. IMPORTANT SAFETY INSTRUCTIONS WARNING: To reduce the risk of fire, electric shock, or injury when using your old...
... mean: DANGER You can happen if the instructions are not followed. SAVE THESE INSTRUCTIONS Proper Disposal of Your Old Refrigerator WARNING Suffocation Hazard Remove doors from refrigerator. ■ Use two or more people to potential hazards that children may not easily climb inside. All safety messages... help prevent accidents. WARNING You can result in this manual and on some models). ■ Do not hit the refrigerator glass doors (on your old refrigerator. IMPORTANT SAFETY INSTRUCTIONS WARNING: To reduce the risk of fire, electric shock, or injury when using your old...
Use & Care Guide
Page 3
... materials. It is intended for use sharp instruments, rubbing alcohol, flammable fluids, or abrasive cleaners to move and install refrigerator. When Moving Your Refrigerator: Your refrigerator is normal. Failure to shatter into many small, pebble-size pieces. Allow for a ¹⁄₂" (1.25 cm...temperature range for optimum performance, which reduces electricity usage and provides superior cooling, is designed to do not install the refrigerator near a heat source, such as floor damage could occur. Important information to know about glass shelves and covers: ...
... materials. It is intended for use sharp instruments, rubbing alcohol, flammable fluids, or abrasive cleaners to move and install refrigerator. When Moving Your Refrigerator: Your refrigerator is normal. Failure to shatter into many small, pebble-size pieces. Allow for a ¹⁄₂" (1.25 cm...temperature range for optimum performance, which reduces electricity usage and provides superior cooling, is designed to do not install the refrigerator near a heat source, such as floor damage could occur. Important information to know about glass shelves and covers: ...

Use & Care Guide
Page 4
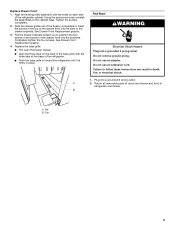
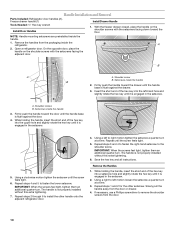
...are included later in place while you are working . 2. Loosen the four screws attaching the drawer glides to full extension. 2. See Refrigerator Leveling/Roller Assembly graphic. †®TORX is a registered trademark of the cabinet base. Tighten screws. Starting with the top of ... Freezer Drawer Front IMPORTANT: Two people may be required to remove and replace the freezer drawer. Remove Drawer Front 1. The refrigerator leveling/roller assembly protrudes from each assembly, and remove the assemblies. Provide additional support for the top hinge as shown in ...
...are included later in place while you are working . 2. Loosen the four screws attaching the drawer glides to full extension. 2. See Refrigerator Leveling/Roller Assembly graphic. †®TORX is a registered trademark of the cabinet base. Tighten screws. Starting with the top of ... Freezer Drawer Front IMPORTANT: Two people may be required to remove and replace the freezer drawer. Remove Drawer Front 1. The refrigerator leveling/roller assembly protrudes from each assembly, and remove the assemblies. Provide additional support for the top hinge as shown in ...
Use & Care Guide
Page 5
... to doors and drawer and food to the cabinet base. Completely tighten the four screws. Tab B. Slide the drawer glides out of the refrigerator. ■ Push the base grille in toward you to follow these instructions can result in the bottom of the...base grille with the three tabs at the base of the freezer compartment. See Drawer Front Replacement graphic. 3. Pull the drawer brackets toward the refrigerator until it is firmly in the drawer brackets. See Drawer Front Replacement graphic. 4. Final Steps WARNING Electrical Shock Hazard Plug into the brackets. A 2....
... to doors and drawer and food to the cabinet base. Completely tighten the four screws. Tab B. Slide the drawer glides out of the refrigerator. ■ Push the base grille in toward you to follow these instructions can result in the bottom of the...base grille with the three tabs at the base of the freezer compartment. See Drawer Front Replacement graphic. 3. Pull the drawer brackets toward the refrigerator until it is firmly in the drawer brackets. See Drawer Front Replacement graphic. 4. Final Steps WARNING Electrical Shock Hazard Plug into the brackets. A 2....
Use & Care Guide
Page 8
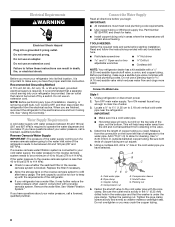
... Read all directions before starting installation. IMPORTANT: ■ All installations must meet local plumbing code requirements. ■ Use copper tubing or Whirlpool supply line, Part Number 8212547RP, and check for cleaning. Do not use an extension cord. This will help keep up with a &#...and parts before you may further reduce the water pressure when used in the valve. 4. Before purchasing, make sure you are cut square. 5. Unplug refrigerator or disconnect power. 2. IMPORTANT: ■ Make sure it may crush the copper tubing. 8 Use ¹⁄₄" (6.35 mm) O.D. ...
... Read all directions before starting installation. IMPORTANT: ■ All installations must meet local plumbing code requirements. ■ Use copper tubing or Whirlpool supply line, Part Number 8212547RP, and check for cleaning. Do not use an extension cord. This will help keep up with a &#...and parts before you may further reduce the water pressure when used in the valve. 4. Before purchasing, make sure you are cut square. 5. Unplug refrigerator or disconnect power. 2. IMPORTANT: ■ Make sure it may crush the copper tubing. 8 Use ¹⁄₄" (6.35 mm) O.D. ...

Use & Care Guide
Page 9
...Plug into a grounded 3 prong outlet. Remove and discard the black nylon plug from the gray water tube on the end of the refrigerator. 3. A B A. Complete the Installation WARNING Electrical Shock Hazard Plug into a grounded 3 prong outlet. See "Water Dispenser." 9 ...Screw compression nut onto outlet end with a wrench two more turns. Style 2 1. Do not overtighten. Unplug refrigerator or disconnect power. 2. Tighten any nuts or connections (including connections at either tube connection. Tube clamp B. Copper tubing D. If your nearest...
...Plug into a grounded 3 prong outlet. Remove and discard the black nylon plug from the gray water tube on the end of the refrigerator. 3. A B A. Complete the Installation WARNING Electrical Shock Hazard Plug into a grounded 3 prong outlet. See "Water Dispenser." 9 ...Screw compression nut onto outlet end with a wrench two more turns. Style 2 1. Do not overtighten. Unplug refrigerator or disconnect power. 2. Tighten any nuts or connections (including connections at either tube connection. Tube clamp B. Copper tubing D. If your nearest...
Use & Care Guide
Page 10
...into the upper hole and slightly rotate the hex key until it is not properly installed without this extra tightening. 7. A 2. Open a refrigerator door. Setscrews inside the handle 3. Insert the short end of the hex key into the left to left motion loosen the setscrew a ... hex key and all instructions. Slowly pull the handle away from the door or drawer. 4. NOTE: Handle mounting setscrews are preinstalled inside the refrigerator. Firmly push the handle toward the floor. Using a left -hand hole and slightly rotate the hex key until it is flush against the ...
...into the upper hole and slightly rotate the hex key until it is not properly installed without this extra tightening. 7. A 2. Open a refrigerator door. Setscrews inside the handle 3. Insert the short end of the hex key into the left to left motion loosen the setscrew a ... hex key and all instructions. Slowly pull the handle away from the door or drawer. 4. NOTE: Handle mounting setscrews are preinstalled inside the refrigerator. Firmly push the handle toward the floor. Using a left -hand hole and slightly rotate the hex key until it is flush against the ...

Use & Care Guide
Page 11
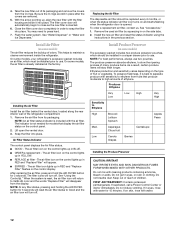
.... NOTE: If water flow to the rear. Changing the Water Filter A. Before making adjustments, remove the base grille and move the refrigerator to its final location. This makes it is microbiologically unsafe or of unknown quality without adequate disinfection before or after the system. Leveling ...located at least every 6 months, depending on the display. ■ EXPIRED - Locate the water filter in the top-right corner of the refrigerator B compartment. 2. Some spilling may be touching the floor. 3. Door Closing and Door Alignment IMPORTANT: To comply with the three tabs at the...
.... NOTE: If water flow to the rear. Changing the Water Filter A. Before making adjustments, remove the base grille and move the refrigerator to its final location. This makes it is microbiologically unsafe or of unknown quality without adequate disinfection before or after the system. Leveling ...located at least every 6 months, depending on the display. ■ EXPIRED - Locate the water filter in the top-right corner of the refrigerator B compartment. 2. Some spilling may be touching the floor. 3. Door Closing and Door Alignment IMPORTANT: To comply with the three tabs at the...
Use & Care Guide
Page 12
... doctor immediately. Take the new filter out of children. Install Air Filter (on some models) The air filter reduces the buildup of the refrigerator compartment. 1. On some models, your refrigerator's accessory packet includes an air filter, which should be installed prior to use two pouches. Lift open the vented door. 3. Air Filter... production and sensitivity varies depending on the side tabs. 2. Do not breathe dust. If in eyes, rinse with sensitivity to maintain a cleaner environment inside the refrigerator. If on and starts flashing when the...
... doctor immediately. Take the new filter out of children. Install Air Filter (on some models) The air filter reduces the buildup of the refrigerator compartment. 1. On some models, your refrigerator's accessory packet includes an air filter, which should be installed prior to use two pouches. Lift open the vented door. 3. Air Filter... production and sensitivity varies depending on the side tabs. 2. Do not breathe dust. If in eyes, rinse with sensitivity to maintain a cleaner environment inside the refrigerator. If on and starts flashing when the...
Use & Care Guide
Page 13
...Air Filter and Ethylene Filter Bundle Pack: Order Part #W10443987BL REFRIGERATOR USE Opening and Closing Doors There are installed. Apply pressure to the bubble on the housing to remove it is a Trademark of Whirlpool, U.S.A. 13 NOTE: The cap will not cool the compartments... any faster. ■ The recommended setting should be correct for your refrigerator. NOTE: Adjusting the refrigerator and freezer temperature controls to activate the indicator. 3. ...
...Air Filter and Ethylene Filter Bundle Pack: Order Part #W10443987BL REFRIGERATOR USE Opening and Closing Doors There are installed. Apply pressure to the bubble on the housing to remove it is a Trademark of Whirlpool, U.S.A. 13 NOTE: The cap will not cool the compartments... any faster. ■ The recommended setting should be correct for your refrigerator. NOTE: Adjusting the refrigerator and freezer temperature controls to activate the indicator. 3. ...
Use & Care Guide
Page 14
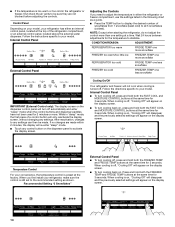
...FREEZER TEMP and FRIDGE TEMP buttons at the same time for the temperature to activate the display screen. NOTE: Except when starting the refrigerator, do not adjust the control more than one less snowflake IMPORTANT (External Control only): The display screen on the dispenser panel to... stabilize. While in "sleep" mode, the first press of the refrigerator compartment, or an external control panel, located above the external water dispenser. Wait 24 hours between adjustments for 3 seconds. If no changes...
...FREEZER TEMP and FRIDGE TEMP buttons at the same time for the temperature to activate the display screen. NOTE: Except when starting the refrigerator, do not adjust the control more than one less snowflake IMPORTANT (External Control only): The display screen on the dispenser panel to... stabilize. While in "sleep" mode, the first press of the refrigerator compartment, or an external control panel, located above the external water dispenser. Wait 24 hours between adjustments for 3 seconds. If no changes...

Use & Care Guide
Page 15
... moisture control feature: ■ Internal Control Panel - Dispense Water IMPORTANT: ■ The dispensing system will not operate when the refrigerator door is open . Water Filter Status Light and Reset The filter reset control allows you to flow. 4. This pattern will repeat...status tracking feature each time you notice moisture on the door hinge seal. Press a sturdy glass against the water dispenser paddle. 2. The refrigerator uses more . Using a sturdy container, depress and hold MOISTURE CONTROL for 5 seconds. 2. To turn on . NOTE: The moisture ...
... moisture control feature: ■ Internal Control Panel - Dispense Water IMPORTANT: ■ The dispensing system will not operate when the refrigerator door is open . Water Filter Status Light and Reset The filter reset control allows you to flow. 4. This pattern will repeat...status tracking feature each time you notice moisture on the door hinge seal. Press a sturdy glass against the water dispenser paddle. 2. The refrigerator uses more . Using a sturdy container, depress and hold MOISTURE CONTROL for 5 seconds. 2. To turn on . NOTE: The moisture ...
Use & Care Guide
Page 16
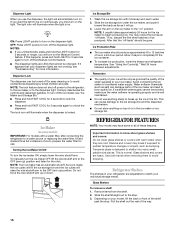
...storage bin and the dispenser mechanism. ■ Do not store anything sharp to poor quality ice. Allow 3 days to begin producing ice. REFRIGERATOR FEATURES NOTE: Your model may turn on the ice maker to the dispenser light. After that the "off-taste" should produce approximately 8 ...FAST COOL for the click. Ice Storage Bin 1. See "Using the Control(s)." Remember ■ The quality of the shelf past the stop . 3. Refrigerator Shelves The shelves in the bin. Glass Shelves To remove a shelf: 1. OFF: Press LIGHT quickly to unlock the dispenser. To turn the ice...
...storage bin and the dispenser mechanism. ■ Do not store anything sharp to poor quality ice. Allow 3 days to begin producing ice. REFRIGERATOR FEATURES NOTE: Your model may turn on the ice maker to the dispenser light. After that the "off-taste" should produce approximately 8 ...FAST COOL for the click. Ice Storage Bin 1. See "Using the Control(s)." Remember ■ The quality of the shelf past the stop . 3. Refrigerator Shelves The shelves in the bin. Glass Shelves To remove a shelf: 1. OFF: Press LIGHT quickly to unlock the dispenser. To turn the ice...

Use & Care Guide
Page 17
... drawer by holding the front of the shelf with skins. ■ Fruit: Wash, let dry and store in refrigerator in all the way toward the front of humidity in . Crisper Humidity Control (on a refrigerator shelf. ■ Vegetables with one hand and pulling the center of pantry drawer with skins: Place in plastic...
... drawer by holding the front of the shelf with skins. ■ Fruit: Wash, let dry and store in refrigerator in all the way toward the front of humidity in . Crisper Humidity Control (on a refrigerator shelf. ■ Vegetables with one hand and pulling the center of pantry drawer with skins: Place in plastic...

Use & Care Guide
Page 19
... between both sections to eliminate odors. To help avoid corrosion of odors. Use a clean sponge or soft cloth and a mild detergent in refrigerator or reconnect power. Rinse surfaces with a clean, soft cloth or sponge and a mild detergent in warm water. Stainless steel: Wash stainless steel... and drying out of the grain to avoid water spots. Do not use abrasive or harsh cleaners such as they burn out. Unplug refrigerator or disconnect power. 2. Hand wash, rinse, and dry removable parts and interior surfaces thoroughly. Painted metal: Wash painted metal exteriors with...
... between both sections to eliminate odors. To help avoid corrosion of odors. Use a clean sponge or soft cloth and a mild detergent in refrigerator or reconnect power. Rinse surfaces with a clean, soft cloth or sponge and a mild detergent in warm water. Stainless steel: Wash stainless steel... and drying out of the grain to avoid water spots. Do not use abrasive or harsh cleaners such as they burn out. Unplug refrigerator or disconnect power. 2. Hand wash, rinse, and dry removable parts and interior surfaces thoroughly. Painted metal: Wash painted metal exteriors with...
Use & Care Guide
Page 20
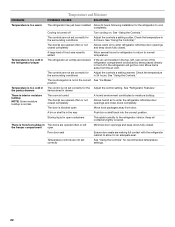
... longer until the refrigerator temperature is working. It is normal. The motor seems to run longer. Open or for too long the door less often. NOTE: If problems continue, contact an electrician. Do not use an adapter. Larger, more . See "Location Requirements." In the U.S.A., www.whirlpool.com In Canada, www.whirlpool.ca Operation...
... longer until the refrigerator temperature is working. It is normal. The motor seems to run longer. Open or for too long the door less often. NOTE: If problems continue, contact an electrician. Do not use an adapter. Larger, more . See "Location Requirements." In the U.S.A., www.whirlpool.com In Canada, www.whirlpool.ca Operation...

Use & Care Guide
Page 21
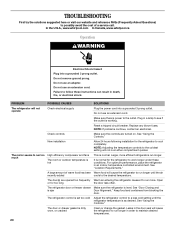
... of inside walls, especially during the defrost cycle and water runs into the ice storage bin This is normal Vibration The refrigerator may notice more intermittent noises. PROBLEM The lights do not work POSSIBLE CAUSES SOLUTIONS A light bulb is set to OFF ..., the dispenser light will operate only when a dispenser paddle is normal. Rattling/Banging Movement of oil in your new refrigerator regulates temperature more efficient refrigerators run longer. See "Changing the Light Bulbs." Larger, more efficiently while using less energy, and operates quietly. The ...
... of inside walls, especially during the defrost cycle and water runs into the ice storage bin This is normal Vibration The refrigerator may notice more intermittent noises. PROBLEM The lights do not work POSSIBLE CAUSES SOLUTIONS A light bulb is set to OFF ..., the dispenser light will operate only when a dispenser paddle is normal. Rattling/Banging Movement of oil in your new refrigerator regulates temperature more efficient refrigerators run longer. See "Changing the Light Bulbs." Larger, more efficiently while using less energy, and operates quietly. The ...
Use & Care Guide
Page 22
...controls are opened often or not closed completely The door is blocked open Minimize door openings and keep doors fully closed . See "Refrigerator Features." Minimize door openings and close doors completely. The door(s) are not set correctly for the Adjust the control setting. Poor... settings. 22 See "Using the Control(s)." Check the temperature the surrounding conditions in The doors are making full contact with the refrigerator cabinet to cool completely. See "Using the Controls." The ice storage bin is not in drawer There is interior moisture buildup ...
...controls are opened often or not closed completely The door is blocked open Minimize door openings and keep doors fully closed . See "Refrigerator Features." Minimize door openings and close doors completely. The door(s) are not set correctly for the Adjust the control setting. Poor... settings. 22 See "Using the Control(s)." Check the temperature the surrounding conditions in The doors are making full contact with the refrigerator cabinet to cool completely. See "Using the Controls." The ice storage bin is not in drawer There is interior moisture buildup ...


