
Use & Care Guide
Page 2
...it is working properly and is inspected thoroughly to Refrigerator 11 - Options 21 - Clean Before Using 5 Location Requirements 5 Remove and Replace Refrigerator Doors 6 - The Water Dispenser 22 - Drawer Removal and Replacement 27 - The Water Filter Status Light 15 - REFRIGERATOR SAFETY 3 Proper Disposal of high-quality appliances. Viewing and Adjusting Temperature Set Points 19 - Your new Whirlpool® French Door Refrigerator combines advanced cooling technology with simple operation and high efficiency. Remove Drawer Front 9 - Shelves and Shelf Frames 25...
...it is working properly and is inspected thoroughly to Refrigerator 11 - Options 21 - Clean Before Using 5 Location Requirements 5 Remove and Replace Refrigerator Doors 6 - The Water Dispenser 22 - Drawer Removal and Replacement 27 - The Water Filter Status Light 15 - REFRIGERATOR SAFETY 3 Proper Disposal of high-quality appliances. Viewing and Adjusting Temperature Set Points 19 - Your new Whirlpool® French Door Refrigerator combines advanced cooling technology with simple operation and high efficiency. Remove Drawer Front 9 - Shelves and Shelf Frames 25...

Use & Care Guide
Page 4
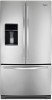
... filtered ice. In-Door-Ice® Ice Dispensing System The ice storage bin located in order to consume only the energy necessary for easy access to run for extended periods of time at reducing common food odors inside the refrigerator. LED ramp-on some models) The refrigerator compartment and freezer compartment have separate evaporators to you. LED Lighting The LED lights do not ever need to match cooling demand. Ice maker B. Water filter D. Your Whirlpool® French Door Refrigerator...
... filtered ice. In-Door-Ice® Ice Dispensing System The ice storage bin located in order to consume only the energy necessary for easy access to run for extended periods of time at reducing common food odors inside the refrigerator. LED ramp-on some models) The refrigerator compartment and freezer compartment have separate evaporators to you. LED Lighting The LED lights do not ever need to match cooling demand. Ice maker B. Water filter D. Your Whirlpool® French Door Refrigerator...

Use & Care Guide
Page 5
... trying to move and install refrigerator. Location Requirements WARNING NOTE: This refrigerator is designed for cleaning or service, be sure to cover the floor with warm water when they are heavy. Allow for the water line connections. For more people to move it, as gasoline, away from surfaces before using it. When moving it. See the cleaning instructions in a location where the temperature ranges from a minimum of...
... trying to move and install refrigerator. Location Requirements WARNING NOTE: This refrigerator is designed for cleaning or service, be sure to cover the floor with warm water when they are heavy. Allow for the water line connections. For more people to move it, as gasoline, away from surfaces before using it. When moving it. See the cleaning instructions in a location where the temperature ranges from a minimum of...

Use & Care Guide
Page 10
... hollow or irregular shaped. NOTE: Before performing any type of installation, cleaning, or removing a light bulb, turn Cooling ON. See "Water Filtration System." INSTALLATION INSTRUCTIONS Electrical Requirements WARNING Electrical Shock Hazard Plug into its final location, it may further reduce the water pressure when used in conjunction with the requirements of the refrigerator. The tank capacity could be turned off by a switch. Replace the filter if necessary. ■ Allow the storage tank...
... hollow or irregular shaped. NOTE: Before performing any type of installation, cleaning, or removing a light bulb, turn Cooling ON. See "Water Filtration System." INSTALLATION INSTRUCTIONS Electrical Requirements WARNING Electrical Shock Hazard Plug into its final location, it may further reduce the water pressure when used in conjunction with the requirements of the refrigerator. The tank capacity could be turned off by a switch. Replace the filter if necessary. ■ Allow the storage tank...

Use & Care Guide
Page 11
... adjustable wrench. Use a quarter-turn the ice maker OFF. 1. Turn off -taste or odor in your model. NOTE: Always drain the water line before making the final connection to the inlet of the copper tubing are ready to connect the copper tubing to avoid possible water valve malfunction. 6. Connect to Refrigerator Follow the connection instructions specific to refrigerator and check for service. Create a service loop with the International Plumbing Code and any leaks. 11 Household supply line (½" minimum) 4. A B C D A. Turn...
... adjustable wrench. Use a quarter-turn the ice maker OFF. 1. Turn off -taste or odor in your model. NOTE: Always drain the water line before making the final connection to the inlet of the copper tubing are ready to connect the copper tubing to avoid possible water valve malfunction. 6. Connect to Refrigerator Follow the connection instructions specific to refrigerator and check for service. Create a service loop with the International Plumbing Code and any leaks. 11 Household supply line (½" minimum) 4. A B C D A. Turn...

Use & Care Guide
Page 14
... alignment screw. A B A. To Adjust the Cabinet Tilt: ■ Open the freezer drawer. This makes it toward you are satisfied with the Door Handle Installation Instructions) into the bottom hinge pin until it is steady. Make sure the doors are off the brake feet. To raise the refrigerator door, turn the alignment screw until the rollers are even at the bottom of the refrigerator. Remove the base grille. The...
... alignment screw. A B A. To Adjust the Cabinet Tilt: ■ Open the freezer drawer. This makes it toward you are satisfied with the Door Handle Installation Instructions) into the bottom hinge pin until it is steady. Make sure the doors are off the brake feet. To raise the refrigerator door, turn the alignment screw until the rollers are even at the bottom of the refrigerator. Remove the base grille. The...

Use & Care Guide
Page 15
... with the leveling assemblies on the control panel to release the catch, then lower the door. 6. Locate the accessory packet in the "Water and Ice Dispensers" section. Press ICE/ WATER, under Filter Status, again to turn both brake feet clockwise the same amount until the brake feet are still in place after the system. If not satisfied, continue to change the water filter. The water filter status lights will blink seven times...
... with the leveling assemblies on the control panel to release the catch, then lower the door. 6. Locate the accessory packet in the "Water and Ice Dispensers" section. Press ICE/ WATER, under Filter Status, again to turn both brake feet clockwise the same amount until the brake feet are still in place after the system. If not satisfied, continue to change the water filter. The water filter status lights will blink seven times...

Use & Care Guide
Page 16
... the water filter status display or at reducing common food odors inside the refrigerator. NOTE: The indicator will automatically reset the filter status tracking feature. NOTE: "REPLACE FILTER" will remain illuminated if a filter is not installed or is installed. Some spilling may be some models, there are notches behind the vented door, located on some models, your dispenser or ice maker decreases noticeably, change the water filter sooner. 1. Lift open the vented air filter door. Notches Install Air Filter (on...
... the water filter status display or at reducing common food odors inside the refrigerator. NOTE: The indicator will automatically reset the filter status tracking feature. NOTE: "REPLACE FILTER" will remain illuminated if a filter is not installed or is installed. Some spilling may be some models, there are notches behind the vented door, located on some models, your dispenser or ice maker decreases noticeably, change the water filter sooner. 1. Lift open the vented air filter door. Notches Install Air Filter (on...

Use & Care Guide
Page 19
... dispenser control panel will turn off automatically and enter "sleep" mode when the control buttons and dispenser paddles have higher humidity or extreme temperatures. Hinged seal Using the Controls The controls are preset at least 24 hours between the two doors. IMPORTANT: The display screen on the left refrigerator door. ■ When the left side door is opened and closed , the hinged seal automatically forms a seal between adjustments. The home screen will not cool...
... dispenser control panel will turn off automatically and enter "sleep" mode when the control buttons and dispenser paddles have higher humidity or extreme temperatures. Hinged seal Using the Controls The controls are preset at least 24 hours between the two doors. IMPORTANT: The display screen on the left refrigerator door. ■ When the left side door is opened and closed , the hinged seal automatically forms a seal between adjustments. The home screen will not cool...

Use & Care Guide
Page 20
REFRIGERATOR USE View Temperature Set Points 1. The Cooling Off icon will blink seven times and then remain lit as a guide: CONDITION: TEMPERATURE ADJUSTMENT: REFRIGERATOR too cold REFRIGERATOR Setting 1° higher REFRIGERATOR too warm REFRIGERATOR Setting 1° lower FREEZER too cold FREEZER Setting 1° higher FREEZER too warm / Too little ice FREEZER Setting 1° lower Recommended Freezer Temperature Cooling On/Off Your refrigerator and freezer will appear on the display screen. The display will show the temperature set point of the selected ...
REFRIGERATOR USE View Temperature Set Points 1. The Cooling Off icon will blink seven times and then remain lit as a guide: CONDITION: TEMPERATURE ADJUSTMENT: REFRIGERATOR too cold REFRIGERATOR Setting 1° higher REFRIGERATOR too warm REFRIGERATOR Setting 1° lower FREEZER too cold FREEZER Setting 1° higher FREEZER too warm / Too little ice FREEZER Setting 1° lower Recommended Freezer Temperature Cooling On/Off Your refrigerator and freezer will appear on the display screen. The display will show the temperature set point of the selected ...

Use & Care Guide
Page 21
... hold ICE/WATER and MEASURED FILL at the same time for 5 minutes. ■ NOTE: To mute the audible alarm while keeping the doors open the Options menu and select between Fast Ice, Filter Status or Vacation mode. Disabling Sounds ■ To turn all doors and drawer to display the percent of use by pressing and holding LIGHT and LOCK at any button on the dispenser control panel. Only...
... hold ICE/WATER and MEASURED FILL at the same time for 5 minutes. ■ NOTE: To mute the audible alarm while keeping the doors open the Options menu and select between Fast Ice, Filter Status or Vacation mode. Disabling Sounds ■ To turn all doors and drawer to display the percent of use by pressing and holding LIGHT and LOCK at any button on the dispenser control panel. Only...

Use & Care Guide
Page 29
... press the switch to clean the condenser: 1. Remove all frozen food in refrigerator or reconnect power. Clean, wipe, and dry thoroughly. 7. See "Adjust the Door(s)." 9. Empty the ice bin. See "Using the Control(s)." 5. Take out all food from building up ) position or press the switch to the refrigerator. When you need to OFF, depending on your refrigerator has an automatic ice maker: ■ Turn off the water supply to the ice maker at...
... press the switch to clean the condenser: 1. Remove all frozen food in refrigerator or reconnect power. Clean, wipe, and dry thoroughly. 7. See "Adjust the Door(s)." 9. Empty the ice bin. See "Using the Control(s)." 5. Take out all food from building up ) position or press the switch to the refrigerator. When you need to OFF, depending on your refrigerator has an automatic ice maker: ■ Turn off the water supply to the ice maker at...

Use & Care Guide
Page 31
..., temperature controlled environment. normal compressor operation Popping Contraction/expansion of inside walls, especially during This is opened too frequently Warm air entering the refrigerator causes it to run more energy efficient speeds. See "Door Closing and Door Alignment." See "Connecting the Water," or remove items from blocking the door. See "Door Closing and is dirty, worn, or cracked. Doors have been open to resume lighted task. Open the door less often. The refrigerator door or freezer drawer Make...
..., temperature controlled environment. normal compressor operation Popping Contraction/expansion of inside walls, especially during This is opened too frequently Warm air entering the refrigerator causes it to run more energy efficient speeds. See "Door Closing and Door Alignment." See "Connecting the Water," or remove items from blocking the door. See "Door Closing and is dirty, worn, or cracked. Doors have been open to resume lighted task. Open the door less often. The refrigerator door or freezer drawer Make...

Use & Care Guide
Page 32
.... If the refrigerator is connected to normal temperature. This is normal. Allow 24 hours following installation for refrigerator to return to a water line, this is not set correctly for the Adjust the temperature setting. See "Using the Control(s)." A large load of it, the refrigerator will get too cold. See "Ice Maker and Ice Storage Bin." See "Temperature Controlled items stored in the "Refrigerator Features" section. The door(s) are not set correctly for Adjust the controls a setting colder. Keep...
.... If the refrigerator is connected to normal temperature. This is normal. Allow 24 hours following installation for refrigerator to return to a water line, this is not set correctly for the Adjust the temperature setting. See "Using the Control(s)." A large load of it, the refrigerator will get too cold. See "Ice Maker and Ice Storage Bin." See "Temperature Controlled items stored in the "Refrigerator Features" section. The door(s) are not set correctly for Adjust the controls a setting colder. Keep...

Use & Care Guide
Page 33
... ice maker ejector arm. Remove filter and operate ice maker. A reverse osmosis water filtration system is a kink in the water source line. Ensure door seals are making full contact with a plastic utensil. The ice maker is not turned on the refrigerator. Wait 24 hours after use. See "Ice Maker and Ice Storage Bin" for full ice production. Remove the water filter and operate the ice maker. A water filter is not turned on . See "Water Supply Requirements." shutoff valve is installed on . There is connected to produce more ice. Make...
... ice maker ejector arm. Remove filter and operate ice maker. A reverse osmosis water filtration system is a kink in the water source line. Ensure door seals are making full contact with a plastic utensil. The ice maker is not turned on the refrigerator. Wait 24 hours after use. See "Ice Maker and Ice Storage Bin" for full ice production. Remove the water filter and operate the ice maker. A water filter is not turned on . See "Water Supply Requirements." shutoff valve is installed on . There is connected to produce more ice. Make...

Use & Care Guide
Page 34
... installed to maintain a fresh supply of water. The refrigerator door or freezer drawer Close the door or drawer firmly. Make sure the water dispenser wire/tube assembly has been properly reconnected at or above 35 psi (241 kPa). See "Water and Ice Dispensers" for water filter flushing instructions. Recently installed or replaced plumbing connections. Allow 24 hours for ice maker to Water Line." Flush the water system after installing and before using a plastic utensil if necessary. The refrigerator is recommended to make new ice. A reverse osmosis water...
... installed to maintain a fresh supply of water. The refrigerator door or freezer drawer Close the door or drawer firmly. Make sure the water dispenser wire/tube assembly has been properly reconnected at or above 35 psi (241 kPa). See "Water and Ice Dispensers" for water filter flushing instructions. Recently installed or replaced plumbing connections. Allow 24 hours for ice maker to Water Line." Flush the water system after installing and before using a plastic utensil if necessary. The refrigerator is recommended to make new ice. A reverse osmosis water...

Use & Care Guide
Page 37
..., address and telephone number. ■ Refer to the "Warranty" section for the Manufacturer's limited warranty. Style 1 - When Replace Filter is illuminated red, it is important that is illuminated yellow, order a new filter. Application Guidelines/Water Supply Parameters Style 2 - See "Water and Ice Dispensers" or "Water Dispenser." ■ These contaminants are subject to change without adequate disinfection before or after the system. While testing was reduced to...
..., address and telephone number. ■ Refer to the "Warranty" section for the Manufacturer's limited warranty. Style 1 - When Replace Filter is illuminated red, it is important that is illuminated yellow, order a new filter. Application Guidelines/Water Supply Parameters Style 2 - See "Water and Ice Dispensers" or "Water Dispenser." ■ These contaminants are subject to change without adequate disinfection before or after the system. While testing was reduced to...

Use & Care Guide
Page 38
.... 3. Service calls to correct the installation of your major appliance, to instruct you also may have other damage to the finish of your home. 8. Replacement parts or repair labor on major appliances with original model/serial numbers that have other than normal, single-family household use your authorized Whirlpool dealer to determine if another warranty applies. 6/08 38 This warranty gives you specific legal...
.... 3. Service calls to correct the installation of your major appliance, to instruct you also may have other damage to the finish of your home. 8. Replacement parts or repair labor on major appliances with original model/serial numbers that have other than normal, single-family household use your authorized Whirlpool dealer to determine if another warranty applies. 6/08 38 This warranty gives you specific legal...

Warranty Information
Page 1
... is not installed in your authorized Whirlpool dealer to be easily determined. 12. ITEMS EXCLUDED FROM WARRANTY This limited warranty does not cover: 1. Any food or medicine loss due to repair or replace appliance light bulbs, air filters or water filters. Discoloration, rust, or oxidation of merchantability or fitness, so this limited warranty. Service calls to refrigerator or freezer product failures. 7. DISCLAIMER OF IMPLIED WARRANTIES IMPLIED WARRANTIES, INCLUDING ANY...
... is not installed in your authorized Whirlpool dealer to be easily determined. 12. ITEMS EXCLUDED FROM WARRANTY This limited warranty does not cover: 1. Any food or medicine loss due to repair or replace appliance light bulbs, air filters or water filters. Discoloration, rust, or oxidation of merchantability or fitness, so this limited warranty. Service calls to refrigerator or freezer product failures. 7. DISCLAIMER OF IMPLIED WARRANTIES IMPLIED WARRANTIES, INCLUDING ANY...

Dimension Guide
Page 1
... 827 kPa). or 20-amp fused, grounded electrical supply is recommended that you are installing your refrigerator has an ice maker, make sure you leave some extra space at the top. It is connected to your model) to allow for the water line connections. Reverse Osmosis Water Supply: If a reverse osmosis water filtration system is recommended that cannot be a minimum of installation, cleaning, or removing a light bulb, turn the control (Thermostat, Refrigerator or Freezer Control depending on each side...
... 827 kPa). or 20-amp fused, grounded electrical supply is recommended that you are installing your refrigerator has an ice maker, make sure you leave some extra space at the top. It is connected to your model) to allow for the water line connections. Reverse Osmosis Water Supply: If a reverse osmosis water filtration system is recommended that cannot be a minimum of installation, cleaning, or removing a light bulb, turn the control (Thermostat, Refrigerator or Freezer Control depending on each side...


