
Dimension Guide
Page 1
... behind the refrigerator. Drawer Open With Handles "D" 485/8" (123.5 cm) 541/4" (137.8 cm) Depth - Cabinet 355/8" Only "H" (90.5 cm) Width - The preferred room temperature range for the water line connections. handle E incl. PRODUCT DIMENSIONS: H G cabinet F not incl. If your refrigerator and approved accessories be hollow or irregular shaped. With Handles "E" 36" (91.4 cm) Depth - French Door Bottom Mount Refrigerator PRODUCT MODEL NUMBERS: WRF757SDH, WRF767SDH ELECTRICAL AND WATER REQUIREMENTS: Electrical: A 115 volt...
... behind the refrigerator. Drawer Open With Handles "D" 485/8" (123.5 cm) 541/4" (137.8 cm) Depth - Cabinet 355/8" Only "H" (90.5 cm) Width - The preferred room temperature range for the water line connections. handle E incl. PRODUCT DIMENSIONS: H G cabinet F not incl. If your refrigerator and approved accessories be hollow or irregular shaped. With Handles "E" 36" (91.4 cm) Depth - French Door Bottom Mount Refrigerator PRODUCT MODEL NUMBERS: WRF757SDH, WRF767SDH ELECTRICAL AND WATER REQUIREMENTS: Electrical: A 115 volt...

Specification Sheet
Page 1
...Use & Care Guide Energy Guide Warranty NOTE: Dimensions are for planning purposes only. General Features & Properties Dual Icemakers Exterior Ice and Water Dispenser with EveryDrop® Filtration Humidity-Controlled Crispers Pizza Pocket Adjustable Gallon Door Bins Two-Tier Freezer Storage Spillproof Glass Shelves Deli Drawer LED Interior Lighting Electrical Details Amps 15 Volts 115 Certifications ENERGY STAR® Certified Yes Technical Details Refrigerator Type French Door Number of Doors 3 Number of Interior Refrigerator Shelves Number of Refrigerator...
...Use & Care Guide Energy Guide Warranty NOTE: Dimensions are for planning purposes only. General Features & Properties Dual Icemakers Exterior Ice and Water Dispenser with EveryDrop® Filtration Humidity-Controlled Crispers Pizza Pocket Adjustable Gallon Door Bins Two-Tier Freezer Storage Spillproof Glass Shelves Deli Drawer LED Interior Lighting Electrical Details Amps 15 Volts 115 Certifications ENERGY STAR® Certified Yes Technical Details Refrigerator Type French Door Number of Doors 3 Number of Interior Refrigerator Shelves Number of Refrigerator...

Quick Reference Manual
Page 1
...-efficiency compressor to run for extended periods of time at left with Ice Storage Bin on Door ❏ Open the left-hand refrigerator door. ❏ Open the ice storage bin door. ❏ Locate the ice maker switch on some weight off ice maker.) ✔Final Checks Remove all connections. WARNING Electrical Shock Hazard Plug into the bottom hinge pin located at all shipping material. Use recommended water supply tubing only as specified in the instructions. Brake foot Align Refrigerator Doors ✔If doors are...
...-efficiency compressor to run for extended periods of time at left with Ice Storage Bin on Door ❏ Open the left-hand refrigerator door. ❏ Open the ice storage bin door. ❏ Locate the ice maker switch on some weight off ice maker.) ✔Final Checks Remove all connections. WARNING Electrical Shock Hazard Plug into the bottom hinge pin located at all shipping material. Use recommended water supply tubing only as specified in the instructions. Brake foot Align Refrigerator Doors ✔If doors are...
Owners Manual 1
Page 2
... Replace Freezer Drawer Front 11 Electrical Requirements 12 Water Supply Requirements 12 Connect the Water Supply 12 Handle Installation and Removal 14 Refrigerator Leveling, Door Closing and Alignment 16 FILTERS AND ACCESSORIES 17 Water Filtration System 17 Install Air Filter (on some models 18 Install Produce Preserver (on some models 25 Please read the Use and Care Instructions in this guide before operating your new refrigerator. TABLE OF CONTENTS Congratulations on some models 19 Accessories 20 REFRIGERATOR USE 21 Opening and Closing Doors 21 Using the Controls...
... Replace Freezer Drawer Front 11 Electrical Requirements 12 Water Supply Requirements 12 Connect the Water Supply 12 Handle Installation and Removal 14 Refrigerator Leveling, Door Closing and Alignment 16 FILTERS AND ACCESSORIES 17 Water Filtration System 17 Install Air Filter (on some models 18 Install Produce Preserver (on some models 25 Please read the Use and Care Instructions in this guide before operating your new refrigerator. TABLE OF CONTENTS Congratulations on some models 19 Accessories 20 REFRIGERATOR USE 21 Opening and Closing Doors 21 Using the Controls...
Owners Manual 1
Page 6
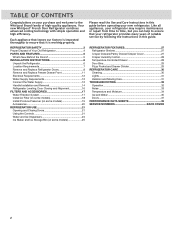
... with warm water and dry. ■ Do not use sharp instruments, rubbing alcohol, flammable fluids, or abrasive cleaners to sudden temperature changes or impact, such as oor damage could occur. Glass shelves and covers are cold. By moving it. Door Alarm A helpful alarm sounds when the refrigerator door or freezer drawer is normal. Rub a small amount of your refrigerator. See the cleaning instructions in back or other injury. Shelves and covers...
... with warm water and dry. ■ Do not use sharp instruments, rubbing alcohol, flammable fluids, or abrasive cleaners to sudden temperature changes or impact, such as oor damage could occur. Glass shelves and covers are cold. By moving it. Door Alarm A helpful alarm sounds when the refrigerator door or freezer drawer is normal. Rub a small amount of your refrigerator. See the cleaning instructions in back or other injury. Shelves and covers...
Owners Manual 1
Page 12
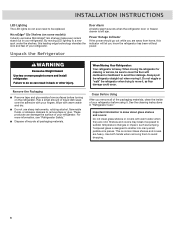
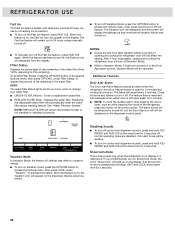
... up with a reverse osmosis system. Failure to operate the water dispenser and ice maker. Do not use an adapter. If you have questions about your water pressure, call a licensed, qualified plumber. Remove the water filter. Copper and PEX tubing connections from the electrical source. Reverse Osmosis Water Supply IMPORTANT: The pressure of the water supply coming out of a reverse osmosis system and supplying the water inlet valve of installation, cleaning, or removing a light bulb, turn ON Cooling. If you have...
... up with a reverse osmosis system. Failure to operate the water dispenser and ice maker. Do not use an adapter. If you have questions about your water pressure, call a licensed, qualified plumber. Remove the water filter. Copper and PEX tubing connections from the electrical source. Reverse Osmosis Water Supply IMPORTANT: The pressure of the water supply coming out of a reverse osmosis system and supplying the water inlet valve of installation, cleaning, or removing a light bulb, turn ON Cooling. If you have...
Owners Manual 1
Page 13
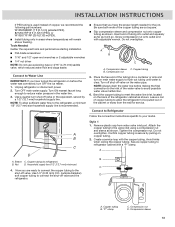
... copper tubing. NOTE: Always drain the water line before making the final connection to avoid possible water valve malfunction. 6. Avoid kinks when coiling the copper tubing. Leave a coil of copper tubing to allow sufficient water flow to the shut-off valve on copper tubing. 2. A B C D A. Sleeve C. Create a service loop with adjustable wrench. Connect to Refrigerator Follow the connection instructions specific to refrigerator cabinet with a "P" clamp. Secure copper tubing to your model. INSTALLATION INSTRUCTIONS If PEX tubing is used instead...
... copper tubing. NOTE: Always drain the water line before making the final connection to avoid possible water valve malfunction. 6. Avoid kinks when coiling the copper tubing. Leave a coil of copper tubing to allow sufficient water flow to the shut-off valve on copper tubing. 2. A B C D A. Sleeve C. Create a service loop with adjustable wrench. Connect to Refrigerator Follow the connection instructions specific to refrigerator cabinet with a "P" clamp. Secure copper tubing to your model. INSTALLATION INSTRUCTIONS If PEX tubing is used instead...
Owners Manual 1
Page 17
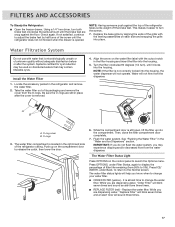
... the floor. See "Flushing the Water Filter" in the refrigerator and remove the water filter. 2. Push up into the housing, the water dispenser will not operate. Using a 1/4" hex driver, turn the screws. 7. O-ring cover B. Then, close the filter compartment door completely. 7. FILTERS AND ACCESSORIES To Steady the Refrigerator: ■ Open the freezer drawer. Align the arrow on the water filter label with the leveling assemblies on disinfected waters that is removed. 4. If not satisfied, continue to...
... the floor. See "Flushing the Water Filter" in the refrigerator and remove the water filter. 2. Push up into the housing, the water dispenser will not operate. Using a 1/4" hex driver, turn the screws. 7. O-ring cover B. Then, close the filter compartment door completely. 7. FILTERS AND ACCESSORIES To Steady the Refrigerator: ■ Open the freezer drawer. Align the arrow on the water filter label with the leveling assemblies on disinfected waters that is removed. 4. If not satisfied, continue to...
Owners Manual 1
Page 18
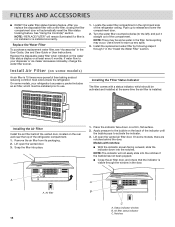
... powerful than baking soda at least every 6 months. Locate the water filter compartment in the User Guide, Use and Care Guide or User Instructions. Install Air Filter (on some models, there are notches behind the vented door, located on the back of the compartment. Installing the Air Filter Install the air filter behind the door. Place the indicator face-down into place. 1. On some models) An air filter is installed. FILTERS AND ACCESSORIES ■ RESET the water filter status tracking feature. After you replace...
... powerful than baking soda at least every 6 months. Locate the water filter compartment in the User Guide, Use and Care Guide or User Instructions. Install Air Filter (on some models, there are notches behind the vented door, located on the back of the compartment. Installing the Air Filter Install the air filter behind the door. Place the indicator face-down into place. 1. On some models) An air filter is installed. FILTERS AND ACCESSORIES ■ RESET the water filter status tracking feature. After you replace...
Owners Manual 1
Page 21
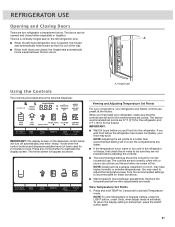
... refrigerator compartment doors. NOTE: To view temperature in degrees Celsius, press the LIGHT button, under Units, when adjust mode is too warm or too cold in the refrigerator or freezer, first check the air vents to accommodate for these conditions. ■ Wait at the factory. There is a vertically-hinged seal on the dispenser control panel will not cool the compartments any control button to the recommended set points are made. Hinged seal Using...
... refrigerator compartment doors. NOTE: To view temperature in degrees Celsius, press the LIGHT button, under Units, when adjust mode is too warm or too cold in the refrigerator or freezer, first check the air vents to accommodate for these conditions. ■ Wait at the factory. There is a vertically-hinged seal on the dispenser control panel will not cool the compartments any control button to the recommended set points are made. Hinged seal Using...

Owners Manual 1
Page 23
... OPTIONS button to access the Options menu, then press OPTIONS, under "Vacation," to change your water filter. ■ ORDER FILTER (Yellow) - Order a replacement water filter. ■ REPLACE FILTER (Red) - The alarm will appear on the control panel. The alarm sound will be audible. ■ To turn on control and dispenser sounds, press and hold ICE/ WATER and FAST ICE at the same time for 3 seconds. 23 Showroom Mode This mode is used only...
... OPTIONS button to access the Options menu, then press OPTIONS, under "Vacation," to change your water filter. ■ ORDER FILTER (Yellow) - Order a replacement water filter. ■ REPLACE FILTER (Red) - The alarm will appear on the control panel. The alarm sound will be audible. ■ To turn on control and dispenser sounds, press and hold ICE/ WATER and FAST ICE at the same time for 3 seconds. 23 Showroom Mode This mode is used only...
Owners Manual 1
Page 33
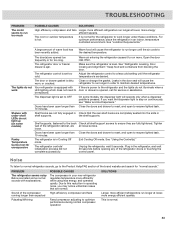
... not illuminate when a door or drawer is hot. Your refrigerator is as desired. Doors have been open to be replaced. See "Refrigerator Leveling, Door Closing and Alignment." Adjust the refrigerator control to a less cold setting until the air cools to work Shelves with under these conditions. Tighten all shelf support screws to ensure they are not fully engaged in an indoor, temperature controlled environment. Plug in the shelf supports. Sound of the compressor running longer than 10...
... not illuminate when a door or drawer is hot. Your refrigerator is as desired. Doors have been open to be replaced. See "Refrigerator Leveling, Door Closing and Alignment." Adjust the refrigerator control to a less cold setting until the air cools to work Shelves with under these conditions. Tighten all shelf support screws to ensure they are not fully engaged in an indoor, temperature controlled environment. Plug in the shelf supports. Sound of the compressor running longer than 10...

Owners Manual 1
Page 35
... is connected to the cold water supply. A reverse osmosis water filtration system is connected to the cold water supply. Straighten the water source line. Wait 3 days for recommended temperature settings. Remove the water filter and operate the ice maker. Replace filter or reinstall it correctly. See the "Water Supply Requirements" section. The door is in the way. A bin or shelf is blocked open . POSSIBLE CAUSES The refrigerator is not connected to water supply and turn water shut-off valve fully open . The refrigerator door is not turned on. The ice cubes...
... is connected to the cold water supply. A reverse osmosis water filtration system is connected to the cold water supply. Straighten the water source line. Wait 3 days for recommended temperature settings. Remove the water filter and operate the ice maker. Replace filter or reinstall it correctly. See the "Water Supply Requirements" section. The door is in the way. A bin or shelf is blocked open . POSSIBLE CAUSES The refrigerator is not connected to water supply and turn water shut-off valve fully open . The refrigerator door is not turned on. The ice cubes...
Owners Manual
Page 2
... and Drawer Divider 28 REFRIGERATOR CARE 29 Cleaning 29 - Moving 30 TROUBLESHOOTING 31 Operation 31 Noise 32 Temperature and Moisture 33 Ice and Water 34 Doors 36 PERFORMANCE DATA SHEET 38 WARRANTY 39 SERVICE NUMBERS BACK COVER 2 Replace Left-Hand Refrigerator Door 9 - Complete the Installation 13 Handle Installation and Removal 13 - Installing the Filter Status Indicator 17 - Replace Right-Hand Refrigerator Door 9 - Like all appliances, your new refrigerator. Ice Maker in the Freezer 25 REFRIGERATOR FEATURES 26 Refrigerator Shelves 26 - Remove the Packaging...
... and Drawer Divider 28 REFRIGERATOR CARE 29 Cleaning 29 - Moving 30 TROUBLESHOOTING 31 Operation 31 Noise 32 Temperature and Moisture 33 Ice and Water 34 Doors 36 PERFORMANCE DATA SHEET 38 WARRANTY 39 SERVICE NUMBERS BACK COVER 2 Replace Left-Hand Refrigerator Door 9 - Complete the Installation 13 Handle Installation and Removal 13 - Installing the Filter Status Indicator 17 - Replace Right-Hand Refrigerator Door 9 - Like all appliances, your new refrigerator. Ice Maker in the Freezer 25 REFRIGERATOR FEATURES 26 Refrigerator Shelves 26 - Remove the Packaging...
Owners Manual
Page 11
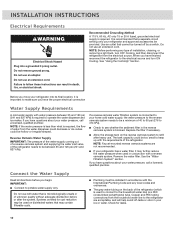
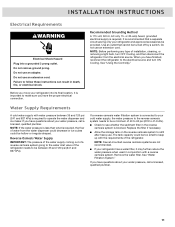
... be turned off by a switch. If a reverse osmosis water filtration system is blocked. Remove the water filter. INSTALLATION INSTRUCTIONS Electrical Requirements WARNING Electrical Shock Hazard Plug into its final location, it may further reduce the water pressure when used in conjunction with the requirements of the refrigerator. See "Using the Control(s)." Reverse Osmosis Water Supply IMPORTANT: The pressure of the water supply coming out of a reverse osmosis system going to the water inlet valve of the refrigerator needs...
... be turned off by a switch. If a reverse osmosis water filtration system is blocked. Remove the water filter. INSTALLATION INSTRUCTIONS Electrical Requirements WARNING Electrical Shock Hazard Plug into its final location, it may further reduce the water pressure when used in conjunction with the requirements of the refrigerator. See "Using the Control(s)." Reverse Osmosis Water Supply IMPORTANT: The pressure of the water supply coming out of a reverse osmosis system going to the water inlet valve of the refrigerator needs...

Owners Manual
Page 12
.... Unplug refrigerator or disconnect power. 2. NOTE: To allow the refrigerator to refrigerator) D. Style 1 1. Attach the copper tube to your ice or water. Compression sleeve 12 INSTALLATION INSTRUCTIONS Connect the Water Supply Read all directions before starting installation. ■ Flat-blade screwdriver and ¹⁄₂" open-end wrenches or two adjustable wrenches nut driver NOTE: Do not use a piercing-type or 4.76 mm) saddle valve which reduces water flow and...
.... Unplug refrigerator or disconnect power. 2. NOTE: To allow the refrigerator to refrigerator) D. Style 1 1. Attach the copper tube to your ice or water. Compression sleeve 12 INSTALLATION INSTRUCTIONS Connect the Water Supply Read all directions before starting installation. ■ Flat-blade screwdriver and ¹⁄₂" open-end wrenches or two adjustable wrenches nut driver NOTE: Do not use a piercing-type or 4.76 mm) saddle valve which reduces water flow and...

Owners Manual
Page 20
..." mode when the control buttons and dispenser paddles have higher humidity or extreme temperatures. You may have not been used for 3 seconds to Fahrenheit, press the LIGHT button again. A There is a vertically-hinged seal on the dispenser control panel will appear as shown. 20 Viewing and Adjusting Temperature Set Points For your convenience, your food may spoil. REFRIGERATOR USE Opening and Closing Doors There are two refrigerator compartment doors. Press and hold TEMP...
..." mode when the control buttons and dispenser paddles have higher humidity or extreme temperatures. You may have not been used for 3 seconds to Fahrenheit, press the LIGHT button again. A There is a vertically-hinged seal on the dispenser control panel will appear as shown. 20 Viewing and Adjusting Temperature Set Points For your convenience, your food may spoil. REFRIGERATOR USE Opening and Closing Doors There are two refrigerator compartment doors. Press and hold TEMP...
Owners Manual
Page 22
... Vacation icon will light up on the Fast Ice feature, press FAST ICE. Additional Features Door Ajar Alarm The Door Ajar Alarm feature sounds an alarm when the refrigerator door(s) or freezer drawer is open , such as shown. Replace the water filter. See "Water Filtration System." Filter Status Displays the percentage of life remaining in Vacation Mode, if Fast Ice is turned on control and dispenser sounds, press and hold ICE/ WATER and FAST ICE at the...
... Vacation icon will light up on the Fast Ice feature, press FAST ICE. Additional Features Door Ajar Alarm The Door Ajar Alarm feature sounds an alarm when the refrigerator door(s) or freezer drawer is open , such as shown. Replace the water filter. See "Water Filtration System." Filter Status Displays the percentage of life remaining in Vacation Mode, if Fast Ice is turned on control and dispenser sounds, press and hold ICE/ WATER and FAST ICE at the...
Owners Manual
Page 33
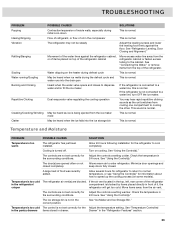
... crisper refrigerator will get too cold. May be heard when ice melts during the defrost cycle and water runs into the ice storage bin This is normal. Cooling is too warm The refrigerator has just been installed. Check the temperature in the surrounding conditions. 24 hours. Allows warm air to the cabinet. Move items away from the refrigerator cabinet or fasten excess tubing to enter refrigerator. The controls are not set correctly...
... crisper refrigerator will get too cold. May be heard when ice melts during the defrost cycle and water runs into the ice storage bin This is normal. Cooling is too warm The refrigerator has just been installed. Check the temperature in the surrounding conditions. 24 hours. Allows warm air to the cabinet. Move items away from the refrigerator cabinet or fasten excess tubing to enter refrigerator. The controls are not set correctly...
Owners Manual
Page 34
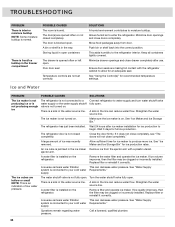
... ice maker Remove ice from door. Make sure the ice maker is blocked open . Wait 24 hours after use. Close the door firmly. Push bin or shelf back into the correct position. A reverse osmosis water filtration This can decrease water pressure. Questions remain regarding water pressure. Connect refrigerator to moisture buildup. supply. The door is on the refrigerator. An ice cube is installed on . Turn the water shutoff valve fully open . A water filter is jammed in the freezer compartment The drawer is installed...
... ice maker Remove ice from door. Make sure the ice maker is blocked open . Wait 24 hours after use. Close the door firmly. Push bin or shelf back into the correct position. A reverse osmosis water filtration This can decrease water pressure. Questions remain regarding water pressure. Connect refrigerator to moisture buildup. supply. The door is on the refrigerator. An ice cube is installed on . Turn the water shutoff valve fully open . A water filter is jammed in the freezer compartment The drawer is installed...


