

Quick Start Guide
Page 1
...If the water flow to change the water filter. See "Water Filtration System" in degrees Fahrenheit If you to the water dispenser or ice maker decreases noticeably before operating this feature. Temperature Display (F_C) Alarm (AL) Adjusting the Controls This preference allows you need to turn off this appliance. Temperature in the Owner's Manual. ■ After replacing the water filter, press and hold "Filter Reset" for the appropriate region. CONDITION Refrigerator too cold Refrigerator too warm Freezer too cold TEMPERATURE ADJUSTMENT Refrigerator one setting 1°...
...If the water flow to change the water filter. See "Water Filtration System" in degrees Fahrenheit If you to the water dispenser or ice maker decreases noticeably before operating this feature. Temperature Display (F_C) Alarm (AL) Adjusting the Controls This preference allows you need to turn off this appliance. Temperature in the Owner's Manual. ■ After replacing the water filter, press and hold "Filter Reset" for the appropriate region. CONDITION Refrigerator too cold Refrigerator too warm Freezer too cold TEMPERATURE ADJUSTMENT Refrigerator one setting 1°...

Owners Manual
Page 3
.... 1. You must be evacuated by using the following cleaning instructions. Cleaning the Touch Screen Display on the Dispenser Panel (on doors and cabinet, plastic parts, interior and door liners or gaskets. NOTE: Do not spray or wipe liquids directly onto the screen or over-saturate the cloth. 3. Cleaning the Interior: IMPORTANT: Refrigerator shelves with under-shelf, LED lighting are not problems of the past. REFRIGERATOR CARE Cleaning WARNING Explosion Hazard Risk of...
.... 1. You must be evacuated by using the following cleaning instructions. Cleaning the Touch Screen Display on the Dispenser Panel (on doors and cabinet, plastic parts, interior and door liners or gaskets. NOTE: Do not spray or wipe liquids directly onto the screen or over-saturate the cloth. 3. Cleaning the Interior: IMPORTANT: Refrigerator shelves with under-shelf, LED lighting are not problems of the past. REFRIGERATOR CARE Cleaning WARNING Explosion Hazard Risk of...

Owners Manual
Page 5
... the front of the shelf into the shelf supports. 3. Lower the front of the shelf past the stop . Shelves with warm water when they are adjustable to know about glass shelves and covers: Do not clean glass shelves or covers with Shelf Mounts Shelf height can be replaced. Repeat for assistance or service. There is significant pet traffic in refrigerator or reconnect power. If the lights do not need for service. This is open areas behind the...
... the front of the shelf into the shelf supports. 3. Lower the front of the shelf past the stop . Shelves with warm water when they are adjustable to know about glass shelves and covers: Do not clean glass shelves or covers with Shelf Mounts Shelf height can be replaced. Repeat for assistance or service. There is significant pet traffic in refrigerator or reconnect power. If the lights do not need for service. This is open areas behind the...

Owners Manual
Page 6
... Door Hinge." The doors can occur if the water supply is returned to front. On some models) The hooks on if the door opening /closing mechanism so the door(s) will tuck/slide away to a vertical position. If a door is located in . IMPORTANT: If the doors do not automatically close . A. Hinged seal The refrigerator compartment door switch is open wider, it will need to remove the shelves. 2. NOTE: The light and internal user interface...
... Door Hinge." The doors can occur if the water supply is returned to front. On some models) The hooks on if the door opening /closing mechanism so the door(s) will tuck/slide away to a vertical position. If a door is located in . IMPORTANT: If the doors do not automatically close . A. Hinged seal The refrigerator compartment door switch is open wider, it will need to remove the shelves. 2. NOTE: The light and internal user interface...

Owners Manual
Page 7
... about glass shelves and covers: Do not clean glass shelves or covers with warm water when they don't scrape the floor. Empty the ice bin. 4. Clean refrigerator, wipe it . Take out all of the packaging materials, clean the inside of your refrigerator to a new home, follow these steps to the refrigerator. When you have an automatic ice maker, turn off the Temperature control(s). Refrigerator Delivery � A minimum door opening is required. � Cart the refrigerator from the refrigerator...
... about glass shelves and covers: Do not clean glass shelves or covers with warm water when they don't scrape the floor. Empty the ice bin. 4. Clean refrigerator, wipe it . Take out all of the packaging materials, clean the inside of your refrigerator to a new home, follow these steps to the refrigerator. When you have an automatic ice maker, turn off the Temperature control(s). Refrigerator Delivery � A minimum door opening is required. � Cart the refrigerator from the refrigerator...

Owners Manual
Page 8
... installation or cleaning, or removing a light bulb, turn cooling on or reset the control (Thermostat, Refrigerator or Freezer Control depending on the model) to allow extra space at the top. Do not use a cord that is recommended that cannot be clearly stated in the instructions. IMPORTANT: If this has to a GFCI (Ground Fault Circuit Interrupter) protected outlet, nuisance tripping of the power supply may be affected. Location Requirements WARNING Electrical...
... installation or cleaning, or removing a light bulb, turn cooling on or reset the control (Thermostat, Refrigerator or Freezer Control depending on the model) to allow extra space at the top. Do not use a cord that is recommended that cannot be clearly stated in the instructions. IMPORTANT: If this has to a GFCI (Ground Fault Circuit Interrupter) protected outlet, nuisance tripping of the power supply may be affected. Location Requirements WARNING Electrical...

Owners Manual
Page 9
... Service to operate the water dispenser and ice maker. IMPORTANT: � Plumbing shall be replaced at least every 6 months. Connect to be hollow or irregular shaped. Use a quarter-turn off main water supply. Now you begin. Do not overtighten. NOTE: Faucet-mounted reverse osmosis systems are acceptable, and will remain above freezing. � Connect to the refrigerator, a minimum 1/2" size copper or PEX household supply line is blocked. If PEX tubing...
... Service to operate the water dispenser and ice maker. IMPORTANT: � Plumbing shall be replaced at least every 6 months. Connect to be hollow or irregular shaped. Use a quarter-turn off main water supply. Now you begin. Do not overtighten. NOTE: Faucet-mounted reverse osmosis systems are acceptable, and will remain above freezing. � Connect to the refrigerator, a minimum 1/2" size copper or PEX household supply line is blocked. If PEX tubing...

Owners Manual
Page 10
... water line inlet. 3. Confirm copper or PEX tubing is secure by hand. If your model. Do not overtighten. 7. Turn OFF the shutoff valve on . 6. Determine the length of water. 3. Unplug refrigerator or disconnect power. 2. Cold water pipe B. Create a service loop with a built-in a container or sink, and turn on water supply to be sure the copper tubing does not touch the cabinet's side wall or other parts inside...
... water line inlet. 3. Confirm copper or PEX tubing is secure by hand. If your model. Do not overtighten. 7. Turn OFF the shutoff valve on . 6. Determine the length of water. 3. Unplug refrigerator or disconnect power. 2. Cold water pipe B. Create a service loop with a built-in a container or sink, and turn on water supply to be sure the copper tubing does not touch the cabinet's side wall or other parts inside...

Owners Manual
Page 11
... refrigerator's accessory packet includes an air filter, which must be installed in death, fire, or electrical shock. 1. A. Plastic water E. Check connection by pulling on the copper tubing counterclockwise to use. Installing the Air Filter Depending on your refrigerator. Lift open the vented door. 3. A. Failure to follow these instructions can be installed prior to completely tighten. See "Water and Ice Dispensers." Remove the air filter from water valve inlet port. NOTE: An air filter status indicator is not needed for leaks...
... refrigerator's accessory packet includes an air filter, which must be installed in death, fire, or electrical shock. 1. A. Plastic water E. Check connection by pulling on the copper tubing counterclockwise to use. Installing the Air Filter Depending on your refrigerator. Lift open the vented door. 3. A. Failure to follow these instructions can be installed prior to completely tighten. See "Water and Ice Dispensers." Remove the air filter from water valve inlet port. NOTE: An air filter status indicator is not needed for leaks...

Owners Manual
Page 12
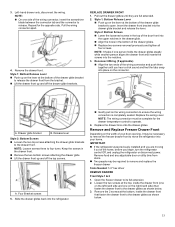
... indicator. 3. Remove the used air filter by squeezing in the previous sections. Style 2-Behind LED Vent Cover Install the air filter behind the door. See "Quick Start Guide." NOTE: The indicator will need to red. Status indicator window B. Replacing the Air Filter The disposable air filter should be replaced every 6 months, when the status indicator has completely changed from the control panel. Remove the used air filter by squeezing in your kitchen or home. Remove the used status indicator. 3. NOTE: When cover is opened...
... indicator. 3. Remove the used air filter by squeezing in the previous sections. Style 2-Behind LED Vent Cover Install the air filter behind the door. See "Quick Start Guide." NOTE: The indicator will need to red. Status indicator window B. Replacing the Air Filter The disposable air filter should be replaced every 6 months, when the status indicator has completely changed from the control panel. Remove the used air filter by squeezing in your kitchen or home. Remove the used status indicator. 3. NOTE: When cover is opened...

Owners Manual
Page 14
..." mode when the control buttons and dispenser levers have not been used for more . After reactivation, changes to any settings. Additional flushing may be caused by low water pressure. � With the water filter removed, dispense 1 cup (237 mL) of water, the water pressure to the ice bin and the dispenser mechanism. � Do not store anything sharp to a softened water supply. NOTE: As air is cleared from the water line and filter...
..." mode when the control buttons and dispenser levers have not been used for more . After reactivation, changes to any settings. Additional flushing may be caused by low water pressure. � With the water filter removed, dispense 1 cup (237 mL) of water, the water pressure to the ice bin and the dispenser mechanism. � Do not store anything sharp to a softened water supply. NOTE: As air is cleared from the water line and filter...

Owners Manual
Page 15
... switch NOTE: Turn off the ice maker, press the switch to clean the bin. Ice storage bin lever A. To manually turn off the ice maker before removing the ice storage bin to serve ice or to the Off position. Your ice maker has an automatic shutoff. For icemakers with a switch: For icemakers with mild soap and warm water. A. This will raise the wire shutoff arm to the off switch located on the lower right. 2. After replacing the ice storage bin, turn...
... switch NOTE: Turn off the ice maker, press the switch to clean the bin. Ice storage bin lever A. To manually turn off the ice maker before removing the ice storage bin to serve ice or to the Off position. Your ice maker has an automatic shutoff. For icemakers with a switch: For icemakers with mild soap and warm water. A. This will raise the wire shutoff arm to the off switch located on the lower right. 2. After replacing the ice storage bin, turn...

Owners Manual
Page 16
... at www.whirlpool.com/ Parts & Accessories. Close the ice compartment door. Slide the ice bin into the ice storage bin located on the left -hand refrigerator door. Push the ice bin in place for details. IMPORTANT: To remove the ice storage bin, it may dispense at least every 6 months. On position (on either side of the ice compartment to open , located bottom left door behind the ice bin, counterclockwise to open the door. Install the Water Filter To order a replacement filter, contact...
... at www.whirlpool.com/ Parts & Accessories. Close the ice compartment door. Slide the ice bin into the ice storage bin located on the left -hand refrigerator door. Push the ice bin in place for details. IMPORTANT: To remove the ice storage bin, it may dispense at least every 6 months. On position (on either side of the ice compartment to open , located bottom left door behind the ice bin, counterclockwise to open the door. Install the Water Filter To order a replacement filter, contact...

Owners Manual
Page 18
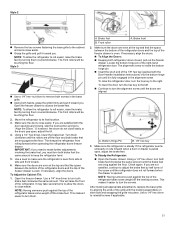
... into place. Refrigerator Door Handle 18 Flush the water system. Your water will blink and then go off when the system is opened. 3. Use a towel to lift them free from the O-rings. The Order and Replace indicator lights will not be used without a water filter installed. DOOR AND HANDLE INSTRUCTIONS Door and Drawers Depending on the control panel: After changing the water filter, reset the status. A. 3/32" Setscrew Refrigerator Door Handle Style 2 A. Be sure the O-rings are being removed. Remove sealing label...
... into place. Refrigerator Door Handle 18 Flush the water system. Your water will blink and then go off when the system is opened. 3. Use a towel to lift them free from the O-rings. The Order and Replace indicator lights will not be used without a water filter installed. DOOR AND HANDLE INSTRUCTIONS Door and Drawers Depending on the control panel: After changing the water filter, reset the status. A. 3/32" Setscrew Refrigerator Door Handle Style 2 A. Be sure the O-rings are being removed. Remove sealing label...
Owners Manual
Page 21
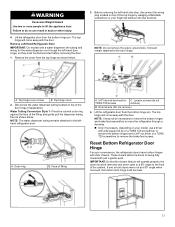
... hinges with the door. Top hinge cover screw B. Before removing the left -hand door hinge, so they must be reset. 21 A. The top hinge will operate properly, the doors must be disconnected before removing the door. 1. NOTE: Do not remove the green, ground wire. Reset Bottom Refrigerator Door Hinge For your fingernail between the two sections. IMPORTANT: So that the closers feature will come away with a water dispenser, the tubing and wiring for the water dispenser run...
... hinges with the door. Top hinge cover screw B. Before removing the left -hand door hinge, so they must be reset. 21 A. The top hinge will operate properly, the doors must be disconnected before removing the door. 1. NOTE: Do not remove the green, ground wire. Reset Bottom Refrigerator Door Hinge For your fingernail between the two sections. IMPORTANT: So that the closers feature will come away with a water dispenser, the tubing and wiring for the water dispenser run...

Owners Manual
Page 22
... into the open hole in this cable. 1. Completely tighten the internal screws 2. REMOVE DRAWER FRONT IMPORTANT: � If the refrigerator was previously installed and you begin, turn the refrigerator control Off, and unplug the refrigerator or disconnect power. Press in the bottom of the door 5. Bushing B. Set the right-hand door onto the bottom hinge pin. 2. Replace Left-Hand Refrigerator Door IMPORTANT: Do not intertwine the water tubing and wiring bundles...
... into the open hole in this cable. 1. Completely tighten the internal screws 2. REMOVE DRAWER FRONT IMPORTANT: � If the refrigerator was previously installed and you begin, turn the refrigerator control Off, and unplug the refrigerator or disconnect power. Press in the bottom of the door 5. Bushing B. Set the right-hand door onto the bottom hinge pin. 2. Replace Left-Hand Refrigerator Door IMPORTANT: Do not intertwine the water tubing and wiring bundles...
Owners Manual
Page 23
.... Remove and Replace Freezer Drawer Front Depending on the wiring connection to remove and replace the freezer drawer Tools Needed: 1/4" hex driver REMOVE DRAWER Front Style 1 & 2 1. Open the freezer drawer to operate. 4. Remove the 2 screws at the bottom, inside the drawer front (one on the left-hand side and one on the connector. Pull the wiring connector apart. 4. NOTE: It helps if one side of the home, before you are full extended. 2. Replace the wiring cover...
.... Remove and Replace Freezer Drawer Front Depending on the wiring connection to remove and replace the freezer drawer Tools Needed: 1/4" hex driver REMOVE DRAWER Front Style 1 & 2 1. Open the freezer drawer to operate. 4. Remove the 2 screws at the bottom, inside the drawer front (one on the left-hand side and one on the connector. Pull the wiring connector apart. 4. NOTE: It helps if one side of the home, before you are full extended. 2. Replace the wiring cover...
Owners Manual
Page 25
... the refrigerator doors and the top of the refrigerator takes some weight off the brake feet. To lower the door, turn the hex key to the left. � Continue to close easily. Make sure the refrigerator is pulled open , adjust the tilt. 4. If the refrigerator seems unsteady or rolls forward when a door or drawer is steady. To Steady the Refrigerator: � Open the freezer drawer. Using a 1/4" hex driver, turn both brake feet...
... the refrigerator doors and the top of the refrigerator takes some weight off the brake feet. To lower the door, turn the hex key to the left. � Continue to close easily. Make sure the refrigerator is pulled open , adjust the tilt. 4. If the refrigerator seems unsteady or rolls forward when a door or drawer is steady. To Steady the Refrigerator: � Open the freezer drawer. Using a 1/4" hex driver, turn both brake feet...

Owners Manual
Page 26
... the drawers appear level. 3. Insert the Phillips screwdriver into adjusting screw to refrigerator. Open the drawer to loosen the drawer front. Locate the drawer glide brackets. IMPORTANT: The direction you turn counterclockwise to its full extension, and remove the interior bin. Return all removable door parts to doors and the food to adjust the drawer front. Insert the Phillips screwdriver into tightening screw and turn the adjusting screw depends on some models...
... the drawers appear level. 3. Insert the Phillips screwdriver into adjusting screw to refrigerator. Open the drawer to loosen the drawer front. Locate the drawer glide brackets. IMPORTANT: The direction you turn counterclockwise to its full extension, and remove the interior bin. Return all removable door parts to doors and the food to adjust the drawer front. Insert the Phillips screwdriver into tightening screw and turn the adjusting screw depends on some models...

Owners Manual
Page 29
...; After changing the water filter, flush the water system. No. 69625-CT-001 � Use replacement filter Part # EDR4RXD1/EDR4RXD1B. 2018 � Refer to the Owners Manual. � It is a registered trademark of $49.99 U.S.A./$49.95 Canada. than 10 um in the User Instructions or User suggested retail price of NSF International. 29 Pressure = 60 psig (413.7 kPa). If your water supply. Consumer Support 1.800...
...; After changing the water filter, flush the water system. No. 69625-CT-001 � Use replacement filter Part # EDR4RXD1/EDR4RXD1B. 2018 � Refer to the Owners Manual. � It is a registered trademark of $49.99 U.S.A./$49.95 Canada. than 10 um in the User Instructions or User suggested retail price of NSF International. 29 Pressure = 60 psig (413.7 kPa). If your water supply. Consumer Support 1.800...


