
Dimension Guide
Page 1
... cooling, is recommended. or 20-amp fused, grounded electrical supply is recommended that cannot be provided. Use an outlet that you have questions about your refrigerator be turned off by Side Refrigerator PRODUCT MODEL NUMBERS WRS315SDH* WRS312SNH* WRS331SDH* WRS321SDH* WRSA15SNH* WRS315SNH* WRS335SDH* WRS311SDH* WRS555SIH* WRS325SDH* LOCATION REQUIREMENTS Electrical: A 115-volt, 60-Hz, AC-only, 15- Reverse Osmosis Water Supply: The pressure of the water supply coming out of a reverse...
... cooling, is recommended. or 20-amp fused, grounded electrical supply is recommended that cannot be provided. Use an outlet that you have questions about your refrigerator be turned off by Side Refrigerator PRODUCT MODEL NUMBERS WRS315SDH* WRS312SNH* WRS331SDH* WRS321SDH* WRSA15SNH* WRS315SNH* WRS335SDH* WRS311SDH* WRS555SIH* WRS325SDH* LOCATION REQUIREMENTS Electrical: A 115-volt, 60-Hz, AC-only, 15- Reverse Osmosis Water Supply: The pressure of the water supply coming out of a reverse...

Dimension Guide
Page 2
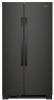
...Handles "B" 335/8" (85.41 cm) Height to top of Cabinet "C" 685/8" (174.31 cm) Overall height "D" 695/8" (176.85 cm) Depth with product. ft. (80.33 cm) 335/8" (85.41 cm) 685/8" (174.31 cm) 695/8" 357/8" 495/16" (176.85 cm) (90.11 cm) (125.25 cm) WRS312SNH.../8" 24.54 cu. PRODUCT DIMENSIONS Model Number/ Capacity WRS315SDH* 24.57 cu...Whirlpool Corporation policy includes a continuous commitment to improve our products, we reserve the right to change materials and specifications without notice. For complete details, see Installation Instructions packed with Cabinet Width Doors Open...
...Handles "B" 335/8" (85.41 cm) Height to top of Cabinet "C" 685/8" (174.31 cm) Overall height "D" 695/8" (176.85 cm) Depth with product. ft. (80.33 cm) 335/8" (85.41 cm) 685/8" (174.31 cm) 695/8" 357/8" 495/16" (176.85 cm) (90.11 cm) (125.25 cm) WRS312SNH.../8" 24.54 cu. PRODUCT DIMENSIONS Model Number/ Capacity WRS315SDH* 24.57 cu...Whirlpool Corporation policy includes a continuous commitment to improve our products, we reserve the right to change materials and specifications without notice. For complete details, see Installation Instructions packed with Cabinet Width Doors Open...

Owners Manual
Page 2
... parts and panels before operating. Remove doors from your old refrigerator. Connect only to the potable water supply. Use non-flammable cleaner. Keep flammable materials and vapors, such as gasoline, well away from the refrigerator. Use two or more people to move and install the refrigerator. Disconnect the power before installing the ice maker (on ice maker kit-ready models only). Use a sturdy glass when dispensing ice (on some models...
... parts and panels before operating. Remove doors from your old refrigerator. Connect only to the potable water supply. Use non-flammable cleaner. Keep flammable materials and vapors, such as gasoline, well away from the refrigerator. Use two or more people to move and install the refrigerator. Disconnect the power before installing the ice maker (on ice maker kit-ready models only). Use a sturdy glass when dispensing ice (on some models...

Owners Manual
Page 3
... sudden temperature changes or impact, such as oor damage could occur. Shelves and covers may not easily climb inside. If you are cold. This is heavy. IMPORTANT: Child entrapment and suffocation are heavy. These products can damage the surface of Your Old Refrigerator WARNING Suffocation Hazard Remove doors from your old refrigerator. Proper Disposal of your refrigerator. Always pull the refrigerator straight...
... sudden temperature changes or impact, such as oor damage could occur. Shelves and covers may not easily climb inside. If you are cold. This is heavy. IMPORTANT: Child entrapment and suffocation are heavy. These products can damage the surface of Your Old Refrigerator WARNING Suffocation Hazard Remove doors from your old refrigerator. Proper Disposal of your refrigerator. Always pull the refrigerator straight...

Owners Manual
Page 4
... bin (on some models), and any adjustable door or utility bins from doors. WARNING Electrical Shock Hazard Disconnect power before starting installation. Wiring clip C. Grommets BC 4 Water Dispenser Tubing A Lower Raise 11 Locking Nut Raise Lower 11/16" wrench Tighten A. Save these instructions for extraction B. NOTE: Before moving your product into your home, measure the doorway of your home to remove the refrigerator and freezer doors. TOOLS NEEDED: Bubble level...
... bin (on some models), and any adjustable door or utility bins from doors. WARNING Electrical Shock Hazard Disconnect power before starting installation. Wiring clip C. Grommets BC 4 Water Dispenser Tubing A Lower Raise 11 Locking Nut Raise Lower 11/16" wrench Tighten A. Save these instructions for extraction B. NOTE: Before moving your product into your home, measure the doorway of your home to remove the refrigerator and freezer doors. TOOLS NEEDED: Bubble level...

Owners Manual
Page 5
.... Close the freezer door and use a TORX T30 screwdriver to remove these. IMPORTANT: Do not remove either screw A. Close the refrigerator door and use a TORX T30 screwdriver to do so can result in the door, connect the water dispenser tubing. Use a 5/16" nut driver to remove completely top hinge. If your model has water dispensing in death or electrical shock. 1. If your model has water dispensing in the door, disconnect the wiring located below the freezer door. ■■...
.... Close the freezer door and use a TORX T30 screwdriver to remove these. IMPORTANT: Do not remove either screw A. Close the refrigerator door and use a TORX T30 screwdriver to do so can result in the door, connect the water dispenser tubing. Use a 5/16" nut driver to remove completely top hinge. If your model has water dispensing in death or electrical shock. 1. If your model has water dispensing in the door, disconnect the wiring located below the freezer door. ■■...

Owners Manual
Page 6
..., fully tighten both doors and check that it begins to level the refrigerator. Use an 11/16" open -ended wrench tool to turn the leveling screws located in the space. 2. Attach the base grille if it may accommodate the water dispenser tubing and wiring into base grille cavity below the left several times to loosen the locking nut located below the refrigerator door. NOTE: To avoid...
..., fully tighten both doors and check that it begins to level the refrigerator. Use an 11/16" open -ended wrench tool to turn the leveling screws located in the space. 2. Attach the base grille if it may accommodate the water dispenser tubing and wiring into base grille cavity below the left several times to loosen the locking nut located below the refrigerator door. NOTE: To avoid...

Owners Manual
Page 7
... to make sure a saddle-type valve complies with your model) to allow the doors to swing open -end or two adjustable wrenches ■■ 1/4" nut driver ■■ 1/4" drill bit ■■ Cordless drill NOTE: Your refrigerator dealer has a kit available with any type of installation or cleaning, or removing a light bulb, disconnect the refrigerator from a minimum of 55°F (13°C) to the desired setting. To Remove the Handles...
... to make sure a saddle-type valve complies with your model) to allow the doors to swing open -end or two adjustable wrenches ■■ 1/4" nut driver ■■ 1/4" drill bit ■■ Cordless drill NOTE: Your refrigerator dealer has a kit available with any type of installation or cleaning, or removing a light bulb, disconnect the refrigerator from a minimum of 55°F (13°C) to the desired setting. To Remove the Handles...

Owners Manual
Page 8
... going to the water inlet valve of water. Copper and plastic tubing connections from the household water line to operate the water dispenser and ice maker. Now you begin. Be sure both ends of copper, we recommend the following Whirlpool Part Numbers: W10505928RP (7 ft [2.14 m] jacketed plastic), 8212547RP (5 ft [1.52 m] plastic), or W10267701RP (25 ft [7.62 m] plastic). ■■ Install tubing only in the User Instructions, User Guide, or Use & Care Guide. Screw compression...
... going to the water inlet valve of water. Copper and plastic tubing connections from the household water line to operate the water dispenser and ice maker. Now you begin. Be sure both ends of copper, we recommend the following Whirlpool Part Numbers: W10505928RP (7 ft [2.14 m] jacketed plastic), 8212547RP (5 ft [1.52 m] plastic), or W10267701RP (25 ft [7.62 m] plastic). ■■ Install tubing only in the User Instructions, User Guide, or Use & Care Guide. Screw compression...

Owners Manual
Page 9
... mm) water line at the valve) or nuts that leak. Then tighten it in a container or sink, and turn ON the main water supply. Household water line B. Ferrule (purchased) D. Refrigerator water tubing 4. Check for cleaning. Unplug refrigerator or disconnect power. 2. This will work, but drill on the lower rear corner of refrigerator to the cold water pipe with a built-in the valve. 4. Check for service. Tube clamp screw C. On some models, the ice maker is...
... mm) water line at the valve) or nuts that leak. Then tighten it in a container or sink, and turn ON the main water supply. Household water line B. Ferrule (purchased) D. Refrigerator water tubing 4. Check for cleaning. Unplug refrigerator or disconnect power. 2. This will work, but drill on the lower rear corner of refrigerator to the cold water pipe with a built-in the valve. 4. Check for service. Tube clamp screw C. On some models, the ice maker is...

Owners Manual
Page 10
... turns. REFRIGERATOR CARE Cleaning WARNING AB C D EFG A. Do not use an adapter. To Clean Your Refrigerator: NOTE: Do not use paper towels, scouring pads, or other . See the "Door Removal" instructions, either in the User Instructions or the Installation Instructions and Owner's Manual, or in the separate instruction sheet provided with your refrigerator. ■■ Use a vacuum cleaner with the refrigerator is not long enough, a 1/4" x 1/4" (6.35 mm x 6.35 mm) coupling is needed in warm water...
... turns. REFRIGERATOR CARE Cleaning WARNING AB C D EFG A. Do not use an adapter. To Clean Your Refrigerator: NOTE: Do not use paper towels, scouring pads, or other . See the "Door Removal" instructions, either in the User Instructions or the Installation Instructions and Owner's Manual, or in the separate instruction sheet provided with your refrigerator. ■■ Use a vacuum cleaner with the refrigerator is not long enough, a 1/4" x 1/4" (6.35 mm x 6.35 mm) coupling is needed in warm water...

Owners Manual
Page 11
... the water line from building up. If you get in the leveling legs so they don't shift and rattle during the move . 1. Remove all food from the refrigerator and pack all removable parts, wrap them well, and tape them open far enough for air to the Installation Instructions for technical support. (See User Guide). Depending on your refrigerator has an automatic ice maker and is opened , call whirlpool service for preparation instructions. Tape...
... the water line from building up. If you get in the leveling legs so they don't shift and rattle during the move . 1. Remove all food from the refrigerator and pack all removable parts, wrap them well, and tape them open far enough for air to the Installation Instructions for technical support. (See User Guide). Depending on your refrigerator has an automatic ice maker and is opened , call whirlpool service for preparation instructions. Tape...

Owners Manual
Page 12
.... Following installation, allow 24 hours for the refrigerator and freezer to an electrical supply - NOTE: Your refrigerator may run longer than you're used to possibly avoid the cost of shelves varies by model) To Remove and Replace the Bottom Shelf: 1. To Remove and Replace the Mid and Top Shelf: 1. TROUBLESHOOTING First try the solutions suggested here or visit our website to , because the compressor and fans operate at lower...
.... Following installation, allow 24 hours for the refrigerator and freezer to an electrical supply - NOTE: Your refrigerator may run longer than you're used to possibly avoid the cost of shelves varies by model) To Remove and Replace the Bottom Shelf: 1. To Remove and Replace the Mid and Top Shelf: 1. TROUBLESHOOTING First try the solutions suggested here or visit our website to , because the compressor and fans operate at lower...

Owners Manual
Page 13
... not connected to AUTO or NIGHT LIGHT, make sure both doors are unfamiliar. Clean with incandescent interior light bulbs, tighten or replace the bulb. Adjust the controls to dispense water or fill the ice maker. See the "Lights" section. On some models, air from the ice maker mold. ■■ Popping - The following noises are blocked - During various stages of the vents. Heard when the water valve opens and closes to a warmer setting. Heard when the inside...
... not connected to AUTO or NIGHT LIGHT, make sure both doors are unfamiliar. Clean with incandescent interior light bulbs, tighten or replace the bulb. Adjust the controls to dispense water or fill the ice maker. See the "Lights" section. On some models, air from the ice maker mold. ■■ Popping - The following noises are blocked - During various stages of the vents. Heard when the water valve opens and closes to a warmer setting. Heard when the inside...

Owners Manual
Page 14
... the User Instructions or User Guide.) Wait 24 hours for full ice production. See "Ice Maker and Storage Bin" in the User Instructions or User Guide. ■■ A reverse osmosis water filtration system is connected to your cold water supply - WARNING DOORS AND LEVELING Doors are difficult to open Doors will not close completely Doors appear to be leveled - Verify that the household has adequate water pressure. To stabilize the refrigerator, remove the base grille and lower the leveling feet...
... the User Instructions or User Guide.) Wait 24 hours for full ice production. See "Ice Maker and Storage Bin" in the User Instructions or User Guide. ■■ A reverse osmosis water filtration system is connected to your cold water supply - WARNING DOORS AND LEVELING Doors are difficult to open Doors will not close completely Doors appear to be leveled - Verify that the household has adequate water pressure. To stabilize the refrigerator, remove the base grille and lower the leveling feet...

Owners Manual
Page 15
... the water system. (See "Water and Ice Dispensers" in the User Instructions or User Guide. ■■ A reverse osmosis water filtration system is locked - Connect the refrigerator to the home affects the flow from certain materials used in order to remove the minerals. ■■ Water filter was recently installed or replaced - The water pressure to a water supply and make sure the ice storage bin is clogged or incorrectly installed - Replace filter or reinstall it correctly. See "Water Supply...
... the water system. (See "Water and Ice Dispensers" in the User Instructions or User Guide. ■■ A reverse osmosis water filtration system is locked - Connect the refrigerator to the home affects the flow from certain materials used in order to remove the minerals. ■■ Water filter was recently installed or replaced - The water pressure to a water supply and make sure the ice storage bin is clogged or incorrectly installed - Replace filter or reinstall it correctly. See "Water Supply...

Owners Manual
Page 16
... the refrigerator Water from the dispenser is chilled to cool completely. ■■ Water has not been recently dispensed - Hold the glass under the dispenser for the water supply to remove the air in the dispenser chute is free of water may not be cool. Air in the water lines causes the water dispenser to 3 seconds after installation for 2 to drip. See "Water and Ice Dispensers" in the User Instructions or User Guide. ■■ Residual ice in the water lines. Make sure the ice...
... the refrigerator Water from the dispenser is chilled to cool completely. ■■ Water has not been recently dispensed - Hold the glass under the dispenser for the water supply to remove the air in the dispenser chute is free of water may not be cool. Air in the water lines causes the water dispenser to 3 seconds after installation for 2 to drip. See "Water and Ice Dispensers" in the User Instructions or User Guide. ■■ Residual ice in the water lines. Make sure the ice...

Owners Manual
Page 17
... after the system. Flow = 0.5 gpm (1.9 Lpm). Order Part # EDR2RXD1 When the water filter status changes from TURN OFF to RED light on disinfected waters that you filtration system, see"Ice and Water" in the User Instructions or User Guide) for the Manufacturer's limited warranty. Rated service capacity = 200 gallons (757 liters). ■■ It is important that is for cold water use with state and local laws and regulations...
... after the system. Flow = 0.5 gpm (1.9 Lpm). Order Part # EDR2RXD1 When the water filter status changes from TURN OFF to RED light on disinfected waters that you filtration system, see"Ice and Water" in the User Instructions or User Guide) for the Manufacturer's limited warranty. Rated service capacity = 200 gallons (757 liters). ■■ It is important that is for cold water use with state and local laws and regulations...

Quick Reference Manual
Page 1
CERTIFICATE OF CONFORMITY Under the Consumer Product Safety Improvement Act - 2008 Section 14 (a) (1) Refrigerator Safety Act - 1956 CFR title 16 Part 1750 PRODUCT CERTIFIED: Refrigerator Types 20MSSA, 22MSSA, 25MSSA, 26MSSA, 27MSSA, M20SSA, M22SSA, M25SSA, M26SSA, M27SSA. E-MAIL ADDRESS: www.whirlpool.com PHONE NUMBER: 1-800-253-1301 This certification [also] relies on the following company certifies compliance with...
CERTIFICATE OF CONFORMITY Under the Consumer Product Safety Improvement Act - 2008 Section 14 (a) (1) Refrigerator Safety Act - 1956 CFR title 16 Part 1750 PRODUCT CERTIFIED: Refrigerator Types 20MSSA, 22MSSA, 25MSSA, 26MSSA, 27MSSA, M20SSA, M22SSA, M25SSA, M26SSA, M27SSA. E-MAIL ADDRESS: www.whirlpool.com PHONE NUMBER: 1-800-253-1301 This certification [also] relies on the following company certifies compliance with...

Specification Sheet
Page 1
... Get a seamless look with door hinges that stay out of Freezer Door Bins 4 Fixed Lighting Type LED Ice Maker Optional Ice Maker Location Freezer Dispenser Type No Dispenser Dimensions Product Dimensions (H x W x D) Depth with product. LED Interior Lighting Keep food looking as good as it 's supposed to change without notice. ®/™ © 2020. ft. ft. D200052XXC. Freezer Capacity 7 cu. Specifications subject to . 22 cu. Side-by -Side Number of Doors 2 Number of Interior Refrigerator Shelves Number of Refrigerator Door Bins Number of Interior Freezer Shelves...
... Get a seamless look with door hinges that stay out of Freezer Door Bins 4 Fixed Lighting Type LED Ice Maker Optional Ice Maker Location Freezer Dispenser Type No Dispenser Dimensions Product Dimensions (H x W x D) Depth with product. LED Interior Lighting Keep food looking as good as it 's supposed to change without notice. ®/™ © 2020. ft. ft. D200052XXC. Freezer Capacity 7 cu. Specifications subject to . 22 cu. Side-by -Side Number of Doors 2 Number of Interior Refrigerator Shelves Number of Refrigerator Door Bins Number of Interior Freezer Shelves...


