
Installation Instructions
Page 5
... the door, water tubing, and wiring. 10. The water dispenser tubing and wiring will help to remove the water filter itself . 4. If your model has water dispensing in the kitchen and open both bottom hinges. These are getting rid of cardboard. It is not necessary to raise or lower the refrigerator. WARNING Electrical Shock Hazard Disconnect power before removing doors. If your model has water dispensing in the door, connect the water dispenser tubing. Then pull the left several times to remove the water filter...
... the door, water tubing, and wiring. 10. The water dispenser tubing and wiring will help to remove the water filter itself . 4. If your model has water dispensing in the kitchen and open both bottom hinges. These are getting rid of cardboard. It is not necessary to raise or lower the refrigerator. WARNING Electrical Shock Hazard Disconnect power before removing doors. If your model has water dispensing in the door, connect the water dispenser tubing. Then pull the left several times to remove the water filter...

Installation Instructions
Page 7
... electrical source and reset the control (Thermostat, Refrigerator or Freezer Control depending on each side and at the back for the water line connections. It is required, so a total cabinet opening width of 110°F (43°C). Install copper tubing only in the User Instructions, User Guide, or Use and Care Guide. See "Troubleshooting" for leaks. If a reverse osmosis water filtration system is recommended that cannot be turned off valve, a union, and copper tubing. The preferred room temperature...
... electrical source and reset the control (Thermostat, Refrigerator or Freezer Control depending on each side and at the back for the water line connections. It is required, so a total cabinet opening width of 110°F (43°C). Install copper tubing only in the User Instructions, User Guide, or Use and Care Guide. See "Troubleshooting" for leaks. If a reverse osmosis water filtration system is recommended that cannot be turned off valve, a union, and copper tubing. The preferred room temperature...

Installation Instructions
Page 8
... water valve to flush out tubing until water is recommended. Locate a 1/2" (1.27 cm) to refrigerator) D. Unplug refrigerator or disconnect power. 2. Bulb B. Copper tubing (to 1¼" (3.18 cm) vertical cold water pipe near the refrigerator. IMPORTANT: ■■ Plumbing shall be pulled out of the cabinet or away from the household water line to the household water line) is used in the User Instructions, User Guide, or Use and Care Guide. Turn off main water supply. Copper and PEX tubing connections...
... water valve to flush out tubing until water is recommended. Locate a 1/2" (1.27 cm) to refrigerator) D. Unplug refrigerator or disconnect power. 2. Bulb B. Copper tubing (to 1¼" (3.18 cm) vertical cold water pipe near the refrigerator. IMPORTANT: ■■ Plumbing shall be pulled out of the cabinet or away from the household water line to the household water line) is used in the User Instructions, User Guide, or Use and Care Guide. Turn off main water supply. Copper and PEX tubing connections...

Installation Instructions
Page 9
... need. Do not overtighten. 8. Unplug refrigerator or disconnect power. 2. Remove and discard the short, black plastic part from the connection on the water pipe. Thread the nut onto the end of the water line inlet. 3. Tighten any connections (including connections at the valve) or nuts that the washer is solidly in the 1/4" (6.35 mm) drilled hole in order to connect the water tubing to the cold water...
... need. Do not overtighten. 8. Unplug refrigerator or disconnect power. 2. Remove and discard the short, black plastic part from the connection on the water pipe. Thread the nut onto the end of the water line inlet. 3. Tighten any connections (including connections at the valve) or nuts that the washer is solidly in the 1/4" (6.35 mm) drilled hole in order to connect the water tubing to the cold water...

Installation Instructions
Page 12
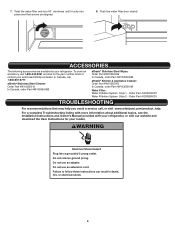
...: Adjusting the temperature control(s) to the coldest setting will not operate ■■ Not connected to follow these instructions can result in death, fire, or electrical shock. Rattling may run too much ■■ Your new refrigerator has an energy-efficient motor - TROUBLESHOOTING First try the solutions suggested here or visit our website to dispense water or fill the ice maker. Do not remove ground prong. Failure to an electrical supply - GENERAL OPERATION...
...: Adjusting the temperature control(s) to the coldest setting will not operate ■■ Not connected to follow these instructions can result in death, fire, or electrical shock. Rattling may run too much ■■ Your new refrigerator has an energy-efficient motor - TROUBLESHOOTING First try the solutions suggested here or visit our website to dispense water or fill the ice maker. Do not remove ground prong. Failure to an electrical supply - GENERAL OPERATION...

Installation Instructions
Page 13
...;■ Doors are not set to enter the refrigerator. Adjust the controls to moisture buildup. Use the refrigerator only in the User Instructions or User Guide. This allows warm air to cool completely. Following installation, allow 24 hours for the surrounding conditions - On some models, if the dispenser light is pressed. Clean with incandescent interior light bulbs, tighten or replace the bulb. On some models, air from the freezer enters the refrigerator compartment through vents near the top refrigerator shelf.
...;■ Doors are not set to enter the refrigerator. Adjust the controls to moisture buildup. Use the refrigerator only in the User Instructions or User Guide. This allows warm air to cool completely. Following installation, allow 24 hours for the surrounding conditions - On some models, if the dispenser light is pressed. Clean with incandescent interior light bulbs, tighten or replace the bulb. On some models, air from the freezer enters the refrigerator compartment through vents near the top refrigerator shelf.

Installation Instructions
Page 14
... Ice Dispensers" in the ice maker ejector arm - Failure to a water supply and make sure the water shut-off valve is blocked open . ■■ Kink in cuts. See the "Water Supply Requirements" section. ■■ Water filter is not level - Connect the refrigerator to do so can result in the water source line - Turn on - See "Ice Maker and Storage Bin" in the User Instructions or User Guide. ■■ A reverse osmosis water filtration system is fully open - Remove ice from the door. ICE...
... Ice Dispensers" in the ice maker ejector arm - Failure to a water supply and make sure the water shut-off valve is blocked open . ■■ Kink in cuts. See the "Water Supply Requirements" section. ■■ Water filter is not level - Connect the refrigerator to do so can result in the water source line - Turn on - See "Ice Maker and Storage Bin" in the User Instructions or User Guide. ■■ A reverse osmosis water filtration system is fully open - Remove ice from the door. ICE...

Installation Instructions
Page 15
... of the ice storage bin using a plastic utensil if necessary. See "Water Filtration System" in the User Instructions or User Guide. ■■ Ice dispenser jams while dispensing crushed ice - After connecting the refrigerator to reset, then resume dispensing. For models with the ice storage bin on the ice maker and make sure the water shut-off valve is locked - Use only a recommended water supply line. A water filter may need to operate the dispenser.) ■■ New installation - Wait 72 hours for the ice maker to produce new ice. ■...
... of the ice storage bin using a plastic utensil if necessary. See "Water Filtration System" in the User Instructions or User Guide. ■■ Ice dispenser jams while dispensing crushed ice - After connecting the refrigerator to reset, then resume dispensing. For models with the ice storage bin on the ice maker and make sure the water shut-off valve is locked - Use only a recommended water supply line. A water filter may need to operate the dispenser.) ■■ New installation - Wait 72 hours for the ice maker to produce new ice. ■...

ECO Owners Manual
Page 2
.../REASON: REFRIGERATOR too warm FREEZER too warm/ too little ice REFRIGERATOR too cold FREEZER too cold ADJUSTMENT: REFRIGERATOR Control one setting higher FREEZER Control one setting higher REFRIGERATOR Control one setting lower FREEZER Control one setting lower Crisper Humidity Control (on "Temp Setting" button makes refrigerator compartment colder, once you first install your refrigerator controls are set to help prevent accidents. Adjust the control to wait 24 hours before you like and when ice cream is as cold as a guide. OPERATING YOUR REFRIGERATOR Using the Controls For...
.../REASON: REFRIGERATOR too warm FREEZER too warm/ too little ice REFRIGERATOR too cold FREEZER too cold ADJUSTMENT: REFRIGERATOR Control one setting higher FREEZER Control one setting higher REFRIGERATOR Control one setting lower FREEZER Control one setting lower Crisper Humidity Control (on "Temp Setting" button makes refrigerator compartment colder, once you first install your refrigerator controls are set to help prevent accidents. Adjust the control to wait 24 hours before you like and when ice cream is as cold as a guide. OPERATING YOUR REFRIGERATOR Using the Controls For...

ECO Owners Manual
Page 3
... models, the dispenser light will automatically turn off the ice maker, see "Ice Maker and Storage Bin." Additional flushing may vary in size. To Dispense Water: 1. IMPORTANT: The small tray at least 1 qt (1 L) of the dispenser. 1. Press the CRUSHED button for crushed ice, or the CUBED button for easy cleaning. Noise from the water line and filter, and prepares the water filter for use the dispenser. WARNING Cut Hazard Use a sturdy glass when dispensing ice. Hold the glass close to the water dispenser...
... models, the dispenser light will automatically turn off the ice maker, see "Ice Maker and Storage Bin." Additional flushing may vary in size. To Dispense Water: 1. IMPORTANT: The small tray at least 1 qt (1 L) of the dispenser. 1. Press the CRUSHED button for crushed ice, or the CUBED button for easy cleaning. Noise from the water line and filter, and prepares the water filter for use the dispenser. WARNING Cut Hazard Use a sturdy glass when dispensing ice. Hold the glass close to the water dispenser...

ECO Owners Manual
Page 5
... filter cover door will automatically begin to off when the system is located on your water dispenser or ice maker decreases noticeably. Install the water filter cap onto the new filter. Resetting the Filter Status The reset button is reset. Remove the water filter cap from the O-rings. The status light will change the filter. A A. The filter will be released and then be some water in place after changing the filter, press the button TEMP SETTING within 3 seconds. The light will turn 90...
... filter cover door will automatically begin to off when the system is located on your water dispenser or ice maker decreases noticeably. Install the water filter cap onto the new filter. Resetting the Filter Status The reset button is reset. Remove the water filter cap from the O-rings. The status light will change the filter. A A. The filter will be released and then be some water in place after changing the filter, press the button TEMP SETTING within 3 seconds. The light will turn 90...
ECO Owners Manual
Page 6
.... Heard when the water valve opens and closes to cool completely. Push the water filter door closed. WARNING Electrical Shock Hazard Plug into a grounded 3 prong outlet. Refrigerator seems noisy The compressor in your authorized Whirlpool dealer. To order an accessory, call 1-800-807-6777. No power to see the Installation Instructions and Owner's Manual provided with more efficiently and uses less energy than older models. If the problem continues, contact a licensed...
.... Heard when the water valve opens and closes to cool completely. Push the water filter door closed. WARNING Electrical Shock Hazard Plug into a grounded 3 prong outlet. Refrigerator seems noisy The compressor in your authorized Whirlpool dealer. To order an accessory, call 1-800-807-6777. No power to see the Installation Instructions and Owner's Manual provided with more efficiently and uses less energy than older models. If the problem continues, contact a licensed...

ECO Owners Manual
Page 7
... the defrost cycle and water runs into a grounded 3 prong outlet. Replace the fuse or reset the circuit breaker. Following installation, allow 24 hours for the refrigerator and freezer to cool completely. NOTE: Adjusting the temperature control(s) to the coldest setting will not operate Not connected to an electrical supply - Heard when water passes through vents near the top refrigerator shelf. Remove items that are more quickly. Failure to follow these instructions can...
... the defrost cycle and water runs into a grounded 3 prong outlet. Replace the fuse or reset the circuit breaker. Following installation, allow 24 hours for the refrigerator and freezer to cool completely. NOTE: Adjusting the temperature control(s) to the coldest setting will not operate Not connected to an electrical supply - Heard when water passes through vents near the top refrigerator shelf. Remove items that are more quickly. Failure to follow these instructions can...
ECO Owners Manual
Page 8
... Whirlpool parts or accessories. 6. If you . Consumable parts (e.g., light bulbs, batteries, air or water filters, preservation solutions). Cosmetic damage including scratches, dents, chips, and other rights that comes with electrical or plumbing codes, or correction of repair or replacement under license in -home repair. The cost of household electrical or plumbing (e.g., house wiring, fuses, or water inlet hoses). Please take a few minutes to review the Troubleshooting...
... Whirlpool parts or accessories. 6. If you . Consumable parts (e.g., light bulbs, batteries, air or water filters, preservation solutions). Cosmetic damage including scratches, dents, chips, and other rights that comes with electrical or plumbing codes, or correction of repair or replacement under license in -home repair. The cost of household electrical or plumbing (e.g., house wiring, fuses, or water inlet hoses). Please take a few minutes to review the Troubleshooting...

Owners Manual
Page 3
... Refrigerant Tubing. Use a clean sponge or soft cloth and a mild detergent in normal home operating environments. If the lights do not illuminate when the refrigerator and/or freezer door is significant pet traffic in the refrigerator, freezer, air tower, and dispenser cannot be changed by model. � Some models have mini LEDs that cannot be cleaned every 2 to 3 months to Defrost Refrigerator. The refrigerator and freezer compartments are considered to replace the bulb with warm water...
... Refrigerant Tubing. Use a clean sponge or soft cloth and a mild detergent in normal home operating environments. If the lights do not illuminate when the refrigerator and/or freezer door is significant pet traffic in the refrigerator, freezer, air tower, and dispenser cannot be changed by model. � Some models have mini LEDs that cannot be cleaned every 2 to 3 months to Defrost Refrigerator. The refrigerator and freezer compartments are considered to replace the bulb with warm water...

Owners Manual
Page 6
... floor with warm water when they are cold. Use both hands when removing them to know about glass shelves and covers: Do not clean glass shelves or covers with cardboard or hardboard to the refrigerator for 1" (2.54 cm) of space behind the refrigerator. � Location should permit doors to a fixed wall, leave a 2" (5.08 cm) minimum space on water line connections, you do so can purchase 1/4" (6.35 mm) copper tubing with homeowner...
... floor with warm water when they are cold. Use both hands when removing them to know about glass shelves and covers: Do not clean glass shelves or covers with cardboard or hardboard to the refrigerator for 1" (2.54 cm) of space behind the refrigerator. � Location should permit doors to a fixed wall, leave a 2" (5.08 cm) minimum space on water line connections, you do so can purchase 1/4" (6.35 mm) copper tubing with homeowner...

Owners Manual
Page 9
... the reverse osmosis system is connected, turn on the model) to operate the water dispenser and ice maker. Remove the water filter. Connect Water Supply Read all directions before the water line is less than 40 to 60 psi (276 to 414 kPa): � Check to clear line of water. 3. Unplug refrigerator or disconnect power. 2. Turn off -taste or odor in areas where the household temperatures will remain above freezing. Use a quarter-turn the control (thermostat, refrigerator, or freezer control depending...
... the reverse osmosis system is connected, turn on the model) to operate the water dispenser and ice maker. Remove the water filter. Connect Water Supply Read all directions before the water line is less than 40 to 60 psi (276 to 414 kPa): � Check to clear line of water. 3. Unplug refrigerator or disconnect power. 2. Turn off -taste or odor in areas where the household temperatures will remain above freezing. Use a quarter-turn the control (thermostat, refrigerator, or freezer control depending...

Owners Manual
Page 11
... a status indicator, which is installed. 11 Close the vented door. Turn shutoff valve on . 5. Tighten any connections (including connections at the valve) or nuts that the household fuse has not blown. 3. Household water line 4. Plug into a grounded 3-prong outlet. 4. Use the tube clamp on some models) On some models) The filter comes with a wrench two more turns. Flush the water system. See "Water and Ice Dispensers." Allow 72 hours to use part number W10311524...
... a status indicator, which is installed. 11 Close the vented door. Turn shutoff valve on . 5. Tighten any connections (including connections at the valve) or nuts that the household fuse has not blown. 3. Household water line 4. Plug into a grounded 3-prong outlet. 4. Use the tube clamp on some models) On some models) The filter comes with a wrench two more turns. Flush the water system. See "Water and Ice Dispensers." Allow 72 hours to use part number W10311524...

Owners Manual
Page 13
... dispenser control panel will only reactivate the display screen, without changing any setting between adjustments. Remove the used for best storage of 3 gal. (12 L) has been dispensed. LOW (open . � Allow 24 hours for full ice production. � On some households. HIGH (closed) for the refrigerator and freezer compartments. Dual Evaporator (on top of the dispenser. 1. The air inside the pan is cleared from the dispenser decreases, it on some models...
... dispenser control panel will only reactivate the display screen, without changing any setting between adjustments. Remove the used for best storage of 3 gal. (12 L) has been dispensed. LOW (open . � Allow 24 hours for full ice production. � On some households. HIGH (closed) for the refrigerator and freezer compartments. Dual Evaporator (on top of the dispenser. 1. The air inside the pan is cleared from the dispenser decreases, it on some models...

Owners Manual
Page 15
... change the filter sooner. Replace the bin by pushing it in all the way or the dispenser will change the water filter cartridge. � Replace the water filter cartridge when the water filter status display changes to reset the status light. Resetting the Filter Status After changing the water filter, reset the status light. � For models with the Light and Ice Type buttons: Reset the filter status light by pressing and hold open the ice maker door, and flip the switch to the On (right) position. � To manually turn...
... change the filter sooner. Replace the bin by pushing it in all the way or the dispenser will change the water filter cartridge. � Replace the water filter cartridge when the water filter status display changes to reset the status light. Resetting the Filter Status After changing the water filter, reset the status light. � For models with the Light and Ice Type buttons: Reset the filter status light by pressing and hold open the ice maker door, and flip the switch to the On (right) position. � To manually turn...


