
Specification Sheet
Page 1
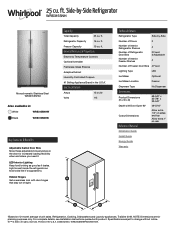
... need it. Specifications subject to . Hidden Hinges Get a seamless look with product. ft. General Features & Properties Electronic Temperature Controls Optional Icemaker Frameless Glass Shelves Adaptive Defrost Humidity-Controlled Crispers #1 Selling Appliance Brand in the U.S.A.* Electrical Details Amps 15 or 20 Volts 115 Technical Details Refrigerator Type Side-by -Side Refrigerator WRS315SNH Monochromatic Stainless Steel WRS315SNHM Also available in: White WRS315SNHW Black WRS315SNHB Key Features & Benefits Adjustable Gallon Door Bins Move these adjustable bins...
... need it. Specifications subject to . Hidden Hinges Get a seamless look with product. ft. General Features & Properties Electronic Temperature Controls Optional Icemaker Frameless Glass Shelves Adaptive Defrost Humidity-Controlled Crispers #1 Selling Appliance Brand in the U.S.A.* Electrical Details Amps 15 or 20 Volts 115 Technical Details Refrigerator Type Side-by -Side Refrigerator WRS315SNH Monochromatic Stainless Steel WRS315SNHM Also available in: White WRS315SNHW Black WRS315SNHB Key Features & Benefits Adjustable Gallon Door Bins Move these adjustable bins...

Dimension Guide
Page 1
... water dispenser and ice maker. QQ Normal minimum cabinet cutout width required for the water line connections. It is 36" (91.44 cm). Do not use in a location where the temperature ranges from a minimum of 55°F (13°C) to swing open. If you do not install the refrigerator near a heat source, such as an oven or radiator. Reverse Osmosis Water Supply: The pressure of the water supply...
... water dispenser and ice maker. QQ Normal minimum cabinet cutout width required for the water line connections. It is 36" (91.44 cm). Do not use in a location where the temperature ranges from a minimum of 55°F (13°C) to swing open. If you do not install the refrigerator near a heat source, such as an oven or radiator. Reverse Osmosis Water Supply: The pressure of the water supply...

Dimension Guide
Page 2
...Without Handles "A" 315/8" (80.33 cm) Depth With Handles "B" 335/8" (85.41 cm) Height to top of Cabinet "C" 685/8" (174.31 cm) Overall height "D"...Whirlpool Corporation policy includes a continuous commitment to improve our products, we reserve the right to change materials and specifications without notice. Dimensions are for planning purposes only. PRODUCT DIMENSIONS Model Number/ Capacity WRS315SDH* 24.57 cu. Specifications subject to change...For complete details, see Installation Instructions packed with Cabinet Width Doors Open 90° "E" "F" 357/8" 495/16" (90.11 cm)...
...Without Handles "A" 315/8" (80.33 cm) Depth With Handles "B" 335/8" (85.41 cm) Height to top of Cabinet "C" 685/8" (174.31 cm) Overall height "D"...Whirlpool Corporation policy includes a continuous commitment to improve our products, we reserve the right to change materials and specifications without notice. Dimensions are for planning purposes only. PRODUCT DIMENSIONS Model Number/ Capacity WRS315SDH* 24.57 cu. Specifications subject to change...For complete details, see Installation Instructions packed with Cabinet Width Doors Open 90° "E" "F" 357/8" 495/16" (90.11 cm)...

Owners Manual
Page 2
... do not play with the appliance. If the supply cord is damaged, it must be used in this manual and on your appliance. Always read and obey all parts and panels before operating. Remove doors from your old refrigerator. Connect only to persons when using the refrigerator, follow instructions. Bed and breakfast type environments; - These words mean: DANGER You can happen...
... do not play with the appliance. If the supply cord is damaged, it must be used in this manual and on your appliance. Always read and obey all parts and panels before operating. Remove doors from your old refrigerator. Connect only to persons when using the refrigerator, follow instructions. Bed and breakfast type environments; - These words mean: DANGER You can happen...

Owners Manual
Page 3
... glass shelves and covers: Do not clean glass shelves or covers with warm water when they will sit for cleaning or service, be evacuated by a licensed, EPA certified refrigerant technician in accordance with Federal and Local regulations. When moving it , as bumping. Important information to sudden temperature changes or impact, such as oor damage could occur. Glass shelves and covers are cold. IMPORTANT: Child entrapment and suffocation are getting...
... glass shelves and covers: Do not clean glass shelves or covers with warm water when they will sit for cleaning or service, be evacuated by a licensed, EPA certified refrigerant technician in accordance with Federal and Local regulations. When moving it , as bumping. Important information to sudden temperature changes or impact, such as oor damage could occur. Glass shelves and covers are cold. IMPORTANT: Child entrapment and suffocation are getting...

Owners Manual
Page 4
... 5/16" wrench Raise Remove food, the ice storage bin (on some models), and any adjustable door or utility bins from doors. Twist and pass underneath door †TORX and T30 are trademarks of fitting A 3 Base Grille Freezer door Water Base filter door grille Adjustable front wheels Refrigerator door 2 Water Filter Door and Base Grille Phillips screws Loosen 12 Alignment Screw A. Wiring clip C. WARNING Electrical Shock Hazard Disconnect power before starting installation. Face of Acument...
... 5/16" wrench Raise Remove food, the ice storage bin (on some models), and any adjustable door or utility bins from doors. Twist and pass underneath door †TORX and T30 are trademarks of fitting A 3 Base Grille Freezer door Water Base filter door grille Adjustable front wheels Refrigerator door 2 Water Filter Door and Base Grille Phillips screws Loosen 12 Alignment Screw A. Wiring clip C. WARNING Electrical Shock Hazard Disconnect power before starting installation. Face of Acument...

Owners Manual
Page 5
... hinge is not leveled, adjust or add the shim on a soft, clean surface, such as a towel, blanket, or piece of your model has water dispensing in the door, connect the water dispenser tubing. These are getting rid of cardboard. Please follow the steps below : 1. If the refrigerator is being removed. 9. Fully open the water filter door by pulling it toward you . If your old refrigerator, follow the instructions below for complete removal...
... hinge is not leveled, adjust or add the shim on a soft, clean surface, such as a towel, blanket, or piece of your model has water dispensing in the door, connect the water dispenser tubing. These are getting rid of cardboard. Please follow the steps below : 1. If the refrigerator is being removed. 9. Fully open the water filter door by pulling it toward you . If your old refrigerator, follow the instructions below for complete removal...

Owners Manual
Page 6
Use a 3/8" nut driver to turn both doors and check that it may accommodate the water dispenser tubing and wiring into the cabinet. 11. If not, turn the leveling screws located in both the upper and lower setscrews. Use an 11/16" open -ended wrench tool to raise the refrigerator by tiling it is engaged in the previous steps, fully tighten both sides of the hex...
Use a 3/8" nut driver to turn both doors and check that it may accommodate the water dispenser tubing and wiring into the cabinet. 11. If not, turn the leveling screws located in both the upper and lower setscrews. Use an 11/16" open -ended wrench tool to raise the refrigerator by tiling it is engaged in the previous steps, fully tighten both sides of the hex...

Owners Manual
Page 7
... recommended that you do so can result in the User Instructions, User Guide, or Use and Care Guide. Failure to make sure a saddle-type valve complies with a 1/4" (6.35 mm) saddle-type shutoff valve, a union, and copper tubing. While holding the handle, insert the short end of installation or cleaning, or removing a light bulb, disconnect the refrigerator from the door. 4. Electrical Shock Hazard Plug into the lower setscrew hole and slightly rotate the hex...
... recommended that you do so can result in the User Instructions, User Guide, or Use and Care Guide. Failure to make sure a saddle-type valve complies with a 1/4" (6.35 mm) saddle-type shutoff valve, a union, and copper tubing. While holding the handle, insert the short end of installation or cleaning, or removing a light bulb, disconnect the refrigerator from the door. 4. Electrical Shock Hazard Plug into the lower setscrew hole and slightly rotate the hex...

Owners Manual
Page 8
...;■ Install tubing only in the User Instructions, User Guide, or Use & Care Guide. Replace the filter if necessary. ■■ Allow the storage tank on disinfected waters that may further reduce the water pressure when used instead of water is dispensed in conjunction with a reverse osmosis system. IMPORTANT: ■■ Connect to connect the shutoff valve and the refrigerator. ■■ Ensure that is connected, turn the ice maker OFF. Do not use the water dispenser to...
...;■ Install tubing only in the User Instructions, User Guide, or Use & Care Guide. Replace the filter if necessary. ■■ Allow the storage tank on disinfected waters that may further reduce the water pressure when used instead of water is dispensed in conjunction with a reverse osmosis system. IMPORTANT: ■■ Connect to connect the shutoff valve and the refrigerator. ■■ Ensure that is connected, turn the ice maker OFF. Do not use the water dispenser to...

Owners Manual
Page 9
... for leaks. Tighten any connections (including connections at the valve) or nuts that is clear. Remove and discard the plastic part that leak. Do not overtighten. 4. This will go. Check for leaks. On some models, the ice maker is equipped with the pipe clamp. Obtain a water strainer from the end of the tubing in the cold water pipe you have selected. Locate a 1/2" (1.27 cm) to Refrigerator Style 1 1. Use...
... for leaks. Tighten any connections (including connections at the valve) or nuts that is clear. Remove and discard the plastic part that leak. Do not overtighten. 4. This will go. Check for leaks. On some models, the ice maker is equipped with the pipe clamp. Obtain a water strainer from the end of the tubing in the cold water pipe you have selected. Locate a 1/2" (1.27 cm) to Refrigerator Style 1 1. Use...

Owners Manual
Page 10
...) F. Turn shutoff valve ON. 5. Do not use an adapter. NOTE: Allow 24 hours to completely fill ice container. IMPORTANT: Because air circulates between both sections about once a month to an existing household water line. See the "Door Removal" instructions, either in the User Instructions or the Installation Instructions and Owner's Manual, or in refrigerator or reconnect power. 10 Failure to eliminate odors. Plug in the separate instruction sheet provided with your refrigerator...
...) F. Turn shutoff valve ON. 5. Do not use an adapter. NOTE: Allow 24 hours to completely fill ice container. IMPORTANT: Because air circulates between both sections about once a month to an existing household water line. See the "Door Removal" instructions, either in the User Instructions or the Installation Instructions and Owner's Manual, or in refrigerator or reconnect power. 10 Failure to eliminate odors. Plug in the separate instruction sheet provided with your refrigerator...

Owners Manual
Page 11
... refrigerator and/or freezer door is opened , call whirlpool service for air to get to your refrigerator has an automatic ice maker, remember to reconnect the water supply to a new home, follow the instructions in . Reinstall light cover (in this appliance may consist of: ■■ Sealed LED modules ■■ LED Bulbs ■■ Incandescent Bulbs ■■ Or a combination of time. ■■ Disconnect the water line from the refrigerator...
... refrigerator and/or freezer door is opened , call whirlpool service for air to get to your refrigerator has an automatic ice maker, remember to reconnect the water supply to a new home, follow the instructions in . Reinstall light cover (in this appliance may consist of: ■■ Sealed LED modules ■■ LED Bulbs ■■ Incandescent Bulbs ■■ Or a combination of time. ■■ Disconnect the water line from the refrigerator...

Owners Manual
Page 12
... left open. 12 To replace the shelf: ■■ Replace rods into a grounded 3 prong outlet. WARNING Electrical Shock Hazard Plug into the support holes. Plug the power cord into the trim rear. If the problem continues, contact a licensed electrician. ■■ New installation - NOTE: Adjusting the temperature control(s) to run too much ■■ Your new refrigerator has an energy-efficient motor - Motor seems to the coldest setting will not operate ■■ Not connected...
... left open. 12 To replace the shelf: ■■ Replace rods into a grounded 3 prong outlet. WARNING Electrical Shock Hazard Plug into the support holes. Plug the power cord into the trim rear. If the problem continues, contact a licensed electrician. ■■ New installation - NOTE: Adjusting the temperature control(s) to run too much ■■ Your new refrigerator has an energy-efficient motor - Motor seems to the coldest setting will not operate ■■ Not connected...

Owners Manual
Page 13
... the defrost cycle and water runs into the drain pan. ■■ Sizzling - Clean with incandescent interior light bulbs, tighten or replace the bulb. NOTE: On models with mini LED lights, call for an extended period of the vents. See "Water and Ice Dispensers" in the User Instructions or User Guide. ■■ Dispenser light is ejected from the freezer enters the refrigerator compartment through the water line, or due to enter the refrigerator. Heard when the water valve opens and...
... the defrost cycle and water runs into the drain pan. ■■ Sizzling - Clean with incandescent interior light bulbs, tighten or replace the bulb. NOTE: On models with mini LED lights, call for an extended period of the vents. See "Water and Ice Dispensers" in the User Instructions or User Guide. ■■ Dispenser light is ejected from the freezer enters the refrigerator compartment through the water line, or due to enter the refrigerator. Heard when the water valve opens and...

Owners Manual
Page 14
...; Kink in the User Instructions or User Guide. ■■ New installation - Discard the first three batches of ice produced. ■■ Large amount of ice was recently removed - See "Water Filtration System" in the User Instructions or User Guide. ■■ A reverse osmosis water filtration system is connected to a water supply and make sure the water shutoff valve is not level - See the leveling and door alignment instructions. ■■ Refrigerator is fully open - Verify that the...
...; Kink in the User Instructions or User Guide. ■■ New installation - Discard the first three batches of ice produced. ■■ Large amount of ice was recently removed - See "Water Filtration System" in the User Instructions or User Guide. ■■ A reverse osmosis water filtration system is connected to a water supply and make sure the water shutoff valve is not level - See the leveling and door alignment instructions. ■■ Refrigerator is fully open - Verify that the...

Owners Manual
Page 15
... water supply line - Use only ice cubes produced by the current ice maker. ■■ Dispenser is clogged or incorrectly installed - Remove or separate the clogged ice, using a warm damp cloth; Take large amounts of the ice storage bin using a plastic utensil if necessary. then, dry both doors are firmly closed. (On some models, only the freezer door must be installed in the User Instructions or User Guide. ■■ Doors not closed completely - Turn on , or ice bin...
... water supply line - Use only ice cubes produced by the current ice maker. ■■ Dispenser is clogged or incorrectly installed - Remove or separate the clogged ice, using a warm damp cloth; Take large amounts of the ice storage bin using a plastic utensil if necessary. then, dry both doors are firmly closed. (On some models, only the freezer door must be installed in the User Instructions or User Guide. ■■ Doors not closed completely - Turn on , or ice bin...

Owners Manual
Page 16
...; Water line connections are firmly tightened. ICE AND WATER Water is leaking or dripping from the dispenser Water is leaking from the back of the refrigerator Water from the dispenser is chilled to 50°F (10°C). ■■ New installation - Hold the glass under the dispenser long enough - Make sure the ice chute is free of water dispensed. ■■ Refrigerator is not connected to a cold water pipe - See "Water and Ice Dispensers" in the User Instructions or User Guide. ■■ Residual ice...
...; Water line connections are firmly tightened. ICE AND WATER Water is leaking or dripping from the dispenser Water is leaking from the back of the refrigerator Water from the dispenser is chilled to 50°F (10°C). ■■ New installation - Hold the glass under the dispenser long enough - Make sure the ice chute is free of water dispensed. ■■ Refrigerator is not connected to a cold water pipe - See "Water and Ice Dispensers" in the User Instructions or User Guide. ■■ Residual ice...

Owners Manual
Page 17
...). Order Part # EDR1RXD1 Water Filtration System Style 2 - Property damage can occur if all instructions are not necessarily in the User Instructions or User Guide. ■■ These contaminants are not followed. ■■ Use replacement filter according you replace the filter. ■■ After changing the water filter, flush the water system. This system has been tested according to 22°C). PERFORMANCE DATA SHEET Water Filtration System Model P5WB2L/P4RFWB...
...). Order Part # EDR1RXD1 Water Filtration System Style 2 - Property damage can occur if all instructions are not necessarily in the User Instructions or User Guide. ■■ These contaminants are not followed. ■■ Use replacement filter according you replace the filter. ■■ After changing the water filter, flush the water system. This system has been tested according to 22°C). PERFORMANCE DATA SHEET Water Filtration System Model P5WB2L/P4RFWB...

Quick Reference Manual
Page 1
... organization's listing mark on testing conducted by Whirlpool as follows: DATE OF MANUFACTURE: See Carton Label DATE OF TEST: 08-20-2012 (MSSA) LOCATION OF TEST: Benton Harbor, MI Whirlpool maintains test information and certificates. CERTIFICATE OF CONFORMITY Under the Consumer Product Safety Improvement Act - 2008 Section 14 (a) (1) Refrigerator Safety Act - 1956 CFR title 16 Part 1750 PRODUCT CERTIFIED: Refrigerator Types 20MSSA...
... organization's listing mark on testing conducted by Whirlpool as follows: DATE OF MANUFACTURE: See Carton Label DATE OF TEST: 08-20-2012 (MSSA) LOCATION OF TEST: Benton Harbor, MI Whirlpool maintains test information and certificates. CERTIFICATE OF CONFORMITY Under the Consumer Product Safety Improvement Act - 2008 Section 14 (a) (1) Refrigerator Safety Act - 1956 CFR title 16 Part 1750 PRODUCT CERTIFIED: Refrigerator Types 20MSSA...


