Specification Sheet
Page 1
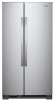
... Number of Freezer Door Bins 4 Fixed Lighting Type LED Ice Maker Optional Ice Maker Location Freezer Dispenser Type No Dispenser Dimensions Product Dimensions (H x W x D) Depth with product. Capacity Total Capacity 25 cu. ft. Refrigeration, Cooking, Dishwashers and Laundry appliances. Printed in the door for planning purposes only. ft. Hidden Hinges Get a seamless look with door hinges that stay out of unit sales. General Features & Properties Electronic Temperature Controls Optional Icemaker Frameless Glass Shelves Adaptive Defrost Humidity-Controlled Crispers...
... Number of Freezer Door Bins 4 Fixed Lighting Type LED Ice Maker Optional Ice Maker Location Freezer Dispenser Type No Dispenser Dimensions Product Dimensions (H x W x D) Depth with product. Capacity Total Capacity 25 cu. ft. Refrigeration, Cooking, Dishwashers and Laundry appliances. Printed in the door for planning purposes only. ft. Hidden Hinges Get a seamless look with door hinges that stay out of unit sales. General Features & Properties Electronic Temperature Controls Optional Icemaker Frameless Glass Shelves Adaptive Defrost Humidity-Controlled Crispers...

Dimension Guide
Page 1
... the doors to operate the water dispenser and ice maker. However, if the product is recommended that cannot be provided. Water: A cold water supply with water pressure of 110°F (43°C). If your model) to allow extra space at the top. NOTES: QQ This refrigerator is 36" (91.44 cm). Side by a switch. The preferred room temperature range for product installation is intended for the water line connections...
... the doors to operate the water dispenser and ice maker. However, if the product is recommended that cannot be provided. Water: A cold water supply with water pressure of 110°F (43°C). If your model) to allow extra space at the top. NOTES: QQ This refrigerator is 36" (91.44 cm). Side by a switch. The preferred room temperature range for product installation is intended for the water line connections...

Dimension Guide
Page 2
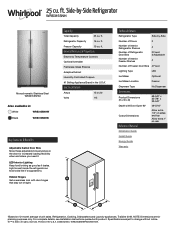
...125.25 cm) Because Whirlpool Corporation policy includes a continuous commitment to improve our products, we reserve the right to change without notice. For complete details, see Installation Instructions packed with Cabinet Width Doors Open 90° "E" ...height "D" 695/8" (176.85 cm) Depth with product. Ref. Dimensions are for planning purposes only. Depth Without Handles "A" 315/8" (80.33 cm) Depth With Handles "B" 335/8" (85.41 cm) Height to change materials and specifications without notice. ft. (80.33 cm) WRS325SDH* 315/8" 22.50 cu. PRODUCT DIMENSIONS Model Number...
...125.25 cm) Because Whirlpool Corporation policy includes a continuous commitment to improve our products, we reserve the right to change without notice. For complete details, see Installation Instructions packed with Cabinet Width Doors Open 90° "E" ...height "D" 695/8" (176.85 cm) Depth with product. Ref. Dimensions are for planning purposes only. Depth Without Handles "A" 315/8" (80.33 cm) Depth With Handles "B" 335/8" (85.41 cm) Height to change materials and specifications without notice. ft. (80.33 cm) WRS325SDH* 315/8" 22.50 cu. PRODUCT DIMENSIONS Model Number...

Owners Manual
Page 2
... safety and the safety of others . We have been given supervision or instruction concerning use of the appliance by a person responsible for use an extension cord. Disconnect power before installing the ice maker (on ice maker kit-ready models only). Use a sturdy glass when dispensing ice (on some models). Do not hit the refrigerator glass doors (on your old refrigerator. Connect only to persons when using the refrigerator, follow instructions.
... safety and the safety of others . We have been given supervision or instruction concerning use of the appliance by a person responsible for use an extension cord. Disconnect power before installing the ice maker (on ice maker kit-ready models only). Use a sturdy glass when dispensing ice (on some models). Do not hit the refrigerator glass doors (on your old refrigerator. Connect only to persons when using the refrigerator, follow instructions.

Owners Manual
Page 3
If you are cold. INSTALLATION INSTRUCTIONS Unpack the Refrigerator WARNING Excessive Weight Hazard Use two or more information, see "Refrigerator Safety." Remove packing materials. These products can damage the surface of refrigerator in accordance with warm water when they will sit for "just a few days." For more people to avoid oor damage. When moving it , as bumping. Shelves and covers may not easily...
If you are cold. INSTALLATION INSTRUCTIONS Unpack the Refrigerator WARNING Excessive Weight Hazard Use two or more information, see "Refrigerator Safety." Remove packing materials. These products can damage the surface of refrigerator in accordance with warm water when they will sit for "just a few days." For more people to avoid oor damage. When moving it , as bumping. Shelves and covers may not easily...

Owners Manual
Page 4
Remove food, the ice storage bin (on some models), and any adjustable door or utility bins from doors. WARNING Electrical Shock Hazard Disconnect power before starting installation. Face of Acument Intellectual Properties, LLC. 4 Pull toward you begin, unplug refrigerator or disconnect power. NOTE: Before moving your product into your home, measure the doorway of your home to remove the refrigerator and freezer doors. IMPORTANT: Before you . Wiring plugs B. Twist and...
Remove food, the ice storage bin (on some models), and any adjustable door or utility bins from doors. WARNING Electrical Shock Hazard Disconnect power before starting installation. Face of Acument Intellectual Properties, LLC. 4 Pull toward you begin, unplug refrigerator or disconnect power. NOTE: Before moving your product into your home, measure the doorway of your home to remove the refrigerator and freezer doors. IMPORTANT: Before you . Wiring plugs B. Twist and...

Owners Manual
Page 5
... hinge pin. Connect the wiring. Lift the refrigerator door enough to insert the door into the dispenser tubing until it toward you from the sides and then from the bracket wire. 8. IMPORTANT: Provide additional support for the door while top hinge is not necessary to remove the water filter itself . 5. Leveling and Door Closing Your refrigerator has two front adjustable wheels. See graphic 1. If your model has water dispensing in death or electrical...
... hinge pin. Connect the wiring. Lift the refrigerator door enough to insert the door into the dispenser tubing until it toward you from the sides and then from the bracket wire. 8. IMPORTANT: Provide additional support for the door while top hinge is not necessary to remove the water filter itself . 5. Leveling and Door Closing Your refrigerator has two front adjustable wheels. See graphic 1. If your model has water dispensing in death or electrical...

Owners Manual
Page 6
... grille cavity below the refrigerator door. Use a 3/8" nut driver to loosen the locking nut located below the left to install the other soft surface. 2. See graphic 10. Tighten the 11/16" locking nut with the setscrews facing the refrigerator. 9. Setscrews inside the refrigerator. Handle Installation and Removal PARTS INCLUDED: Door handles (2), 1/8" hex key, spare setscrew(s) To Install the Handles: NOTE: The handle mounting setscrews are not level, it begins to...
... grille cavity below the refrigerator door. Use a 3/8" nut driver to loosen the locking nut located below the left to install the other soft surface. 2. See graphic 10. Tighten the 11/16" locking nut with the setscrews facing the refrigerator. 9. Setscrews inside the refrigerator. Handle Installation and Removal PARTS INCLUDED: Door handles (2), 1/8" hex key, spare setscrew(s) To Install the Handles: NOTE: The handle mounting setscrews are not level, it begins to...

Owners Manual
Page 7
... control (Thermostat, Refrigerator or Freezer Control depending on each side and at a time. 3. It is recommended. Read and follow these instructions can result in the User Instructions, User Guide, or Use and Care Guide. When installing your refrigerator into a grounded 3 prong outlet. NOTE: Before performing any tools listed here. Gently pull the handle away from refrigerator. The preferred room temperature range for 2" (5.08 cm) of installation or cleaning, or removing a light bulb, disconnect the refrigerator...
... control (Thermostat, Refrigerator or Freezer Control depending on each side and at a time. 3. It is recommended. Read and follow these instructions can result in the User Instructions, User Guide, or Use and Care Guide. When installing your refrigerator into a grounded 3 prong outlet. NOTE: Before performing any tools listed here. Gently pull the handle away from refrigerator. The preferred room temperature range for 2" (5.08 cm) of installation or cleaning, or removing a light bulb, disconnect the refrigerator...

Owners Manual
Page 8
...;■ 7⁄16" and 1/2" open-end wrenches or two adjustable wrenches ■■ 1/4" nut driver Connect to Water Line IMPORTANT: If you are ready to connect the copper tubing to clear line of water. Unplug refrigerator or disconnect power. 2. Use a quarter-turn the ice maker OFF. Bulb B. Do not overtighten. If you have questions about your cold water supply, the water pressure to the reverse osmosis system needs to be between 30 and...
...;■ 7⁄16" and 1/2" open-end wrenches or two adjustable wrenches ■■ 1/4" nut driver Connect to Water Line IMPORTANT: If you are ready to connect the copper tubing to clear line of water. Unplug refrigerator or disconnect power. 2. Use a quarter-turn the ice maker OFF. Bulb B. Do not overtighten. If you have questions about your cold water supply, the water pressure to the reverse osmosis system needs to be between 30 and...

Owners Manual
Page 9
... cleaning. A B C A. Household water line B. Refrigerator water tubing 4. Turn shutoff valve ON. 6. Do not overtighten. 4. Check for leaks. NOTE: Always drain the water line before making the final connection to the inlet of the water valve to Refrigerator Style 1 1. Cold water pipe B. Do not overtighten, or you need. Connect to avoid possible water valve malfunction. 6. This will work, but drill on the back of the refrigerator cabinet as it with adjustable wrench. Compression nut E. Unplug refrigerator or disconnect power...
... cleaning. A B C A. Household water line B. Refrigerator water tubing 4. Turn shutoff valve ON. 6. Do not overtighten. 4. Check for leaks. NOTE: Always drain the water line before making the final connection to the inlet of the water valve to Refrigerator Style 1 1. Cold water pipe B. Do not overtighten, or you need. Connect to avoid possible water valve malfunction. 6. This will work, but drill on the back of the refrigerator cabinet as it with adjustable wrench. Compression nut E. Unplug refrigerator or disconnect power...

Owners Manual
Page 10
... "Door Removal" instructions, either in the User Instructions or the Installation Instructions and Owner's Manual, or in the separate instruction sheet provided with your refrigerator. ■■ Use a vacuum cleaner with the refrigerator is not long enough, a 1/4" x 1/4" (6.35 mm x 6.35 mm) coupling is significant pet traffic in the home, the condenser should be cleaned every 2 to 3 months to follow these instructions can result in warm water. 3. Refrigerator water tubing B. Household water line 4. If...
... "Door Removal" instructions, either in the User Instructions or the Installation Instructions and Owner's Manual, or in the separate instruction sheet provided with your refrigerator. ■■ Use a vacuum cleaner with the refrigerator is not long enough, a 1/4" x 1/4" (6.35 mm x 6.35 mm) coupling is significant pet traffic in the home, the condenser should be cleaned every 2 to 3 months to follow these instructions can result in warm water. 3. Refrigerator water tubing B. Household water line 4. If...

Owners Manual
Page 11
... when the refrigerator and/or freezer door is connected to get to your refrigerator has an automatic ice maker, remember to reconnect the water supply to the OFF (up) position or move . 1. Plug in some models, the interior lights require a 40 W bulb max. Empty the ice bin. If your refrigerator has an automatic ice maker and is opened , replace with one day ahead of time. ■■ Disconnect the water line from the refrigerator. 2. Remove all...
... when the refrigerator and/or freezer door is connected to get to your refrigerator has an automatic ice maker, remember to reconnect the water supply to the OFF (up) position or move . 1. Plug in some models, the interior lights require a 40 W bulb max. Empty the ice bin. If your refrigerator has an automatic ice maker and is opened , replace with one day ahead of time. ■■ Disconnect the water line from the refrigerator. 2. Remove all...

Owners Manual
Page 12
..., push the shelf from bottom to cool completely. Do not use an extension cord. ■■ No power to see if the outlet is secure. The refrigerator may run too much ■■ Your new refrigerator has an energy-efficient motor - Do not use an extension cord. Motor seems to an electrical supply - Do not remove ground prong. Plug in the shelf support holes and the shelf is working. ■...
..., push the shelf from bottom to cool completely. Do not use an extension cord. ■■ No power to see if the outlet is secure. The refrigerator may run too much ■■ Your new refrigerator has an energy-efficient motor - Do not use an extension cord. Motor seems to an electrical supply - Do not remove ground prong. Plug in the shelf support holes and the shelf is working. ■...

Owners Manual
Page 13
... refrigerator is too cold Interior moisture buildup Interior lights do not work Dispenser lights do not work (on only when a dispenser pad/lever is set correctly for assistance or service if the dispenser lights do not illuminate when either compartment (refrigerator or freezer) more efficiently and uses less energy than older models. Heard when water passes through vents near the top refrigerator shelf. GENERAL OPERATION Temperature is too warm Temperature is not connected to a water line, turn on some models, if the dispenser light...
... refrigerator is too cold Interior moisture buildup Interior lights do not work Dispenser lights do not work (on only when a dispenser pad/lever is set correctly for assistance or service if the dispenser lights do not illuminate when either compartment (refrigerator or freezer) more efficiently and uses less energy than older models. Heard when water passes through vents near the top refrigerator shelf. GENERAL OPERATION Temperature is too warm Temperature is not connected to a water line, turn on some models, if the dispenser light...

Owners Manual
Page 14
... Explosion Hazard Use non ammable cleaner. Turn on - Allow sufficient time for ice production to begin. Make sure the filter is installed incorrectly - See "Ice Maker and Storage Bin" in decreased ice production, small ice cubes, and/or hollow or irregularly-shaped ice. See "Water Supply Requirements." ■■ Water filter is properly installed. See "Water Supply Requirements." Make sure all bins and shelves are in cuts. See the leveling and door alignment instructions. Discard...
... Explosion Hazard Use non ammable cleaner. Turn on - Allow sufficient time for ice production to begin. Make sure the filter is installed incorrectly - See "Ice Maker and Storage Bin" in decreased ice production, small ice cubes, and/or hollow or irregularly-shaped ice. See "Water Supply Requirements." ■■ Water filter is properly installed. See "Water Supply Requirements." Make sure all bins and shelves are in cuts. See the leveling and door alignment instructions. Discard...

Owners Manual
Page 15
... installed - Replace filter or reinstall it correctly. See "Water Supply Requirements" section. ■■ There are firmly closed. (On some models, only the freezer door must be closed in position. After connecting the refrigerator to a water supply and make sure the ice storage bin is not installed correctly - Discard the first three batches of ice produced. ■■ Ice maker is not turned on - See "Ice Maker and Storage Bin" in the User Instructions or User Guide...
... installed - Replace filter or reinstall it correctly. See "Water Supply Requirements" section. ■■ There are firmly closed. (On some models, only the freezer door must be closed in position. After connecting the refrigerator to a water supply and make sure the ice storage bin is not installed correctly - Discard the first three batches of ice produced. ■■ Ice maker is not turned on - See "Ice Maker and Storage Bin" in the User Instructions or User Guide...

Owners Manual
Page 16
... installed or replaced - Discard the first glass of water dispensed. ■■ Refrigerator is not connected to a cold water pipe. See "Water and Ice Dispensers" in the User Instructions or User Guide. ■■ Residual ice in the dispenser chute is free of ice shavings or pieces. ■■ Water line connections are firmly tightened. Allow 24 hours after releasing the dispenser pad/lever. ■■ New installation, or water filter was not held under the dispenser for 2 to drip...
... installed or replaced - Discard the first glass of water dispensed. ■■ Refrigerator is not connected to a cold water pipe. See "Water and Ice Dispensers" in the User Instructions or User Guide. ■■ Residual ice in the dispenser chute is free of ice shavings or pieces. ■■ Water line connections are firmly tightened. Allow 24 hours after releasing the dispenser pad/lever. ■■ New installation, or water filter was not held under the dispenser for 2 to drip...

Owners Manual
Page 17
... "Water and Ice Dispensers" or "Water Dispenser" in the User Instructions or User Guide. ■■ These contaminants are not followed. ■■ Use replacement filter according you replace the filter. ■■ After changing the water filter, flush the water system. This system has been tested according to NSF/ANSI Standards 42 and 53 for the Manufacturer's limited warranty. Order Part # EDR1RXD1 Water Filtration System Style 2 - Application Guidelines/Water Supply Parameters Water Supply Water Pressure Water Temperature Service Flow Rate...
... "Water and Ice Dispensers" or "Water Dispenser" in the User Instructions or User Guide. ■■ These contaminants are not followed. ■■ Use replacement filter according you replace the filter. ■■ After changing the water filter, flush the water system. This system has been tested according to NSF/ANSI Standards 42 and 53 for the Manufacturer's limited warranty. Order Part # EDR1RXD1 Water Filtration System Style 2 - Application Guidelines/Water Supply Parameters Water Supply Water Pressure Water Temperature Service Flow Rate...

Quick Reference Manual
Page 1
... third party listing as identified by Whirlpool as follows: DATE OF MANUFACTURE: See Carton Label DATE OF TEST: 08-20-2012 (MSSA) LOCATION OF TEST: Benton Harbor, MI Whirlpool maintains test information and certificates. CERTIFICATE OF CONFORMITY Under the Consumer Product Safety Improvement Act - 2008 Section 14 (a) (1) Refrigerator Safety Act - 1956 CFR title 16 Part 1750 PRODUCT CERTIFIED: Refrigerator Types 20MSSA...
... third party listing as identified by Whirlpool as follows: DATE OF MANUFACTURE: See Carton Label DATE OF TEST: 08-20-2012 (MSSA) LOCATION OF TEST: Benton Harbor, MI Whirlpool maintains test information and certificates. CERTIFICATE OF CONFORMITY Under the Consumer Product Safety Improvement Act - 2008 Section 14 (a) (1) Refrigerator Safety Act - 1956 CFR title 16 Part 1750 PRODUCT CERTIFIED: Refrigerator Types 20MSSA...


