
Installation Instructions
Page 5
... used to level the refrigerator under uneven floor conditions or want the doors to the tube that runs through the door hinge. 7. Unplug refrigerator or disconnect power. 2. NOTE: Keep the water tubing connector attached to close more easily. If your model has water dispensing in the kitchen and open both bottom hinges. Hold the door while hinge is being installed 3. IMPORTANT: Do not remove either screw A. IMPORTANT: Do not remove either screw B. Connect the wiring. Connect...
... used to level the refrigerator under uneven floor conditions or want the doors to the tube that runs through the door hinge. 7. Unplug refrigerator or disconnect power. 2. NOTE: Keep the water tubing connector attached to close more easily. If your model has water dispensing in the kitchen and open both bottom hinges. Hold the door while hinge is being installed 3. IMPORTANT: Do not remove either screw A. IMPORTANT: Do not remove either screw B. Connect the wiring. Connect...

Installation Instructions
Page 7
... open -end or two adjustable wrenches ■■ 1/4" nut driver ■■ 1/4" drill bit ■■ Cordless drill NOTE: Your refrigerator dealer has a kit available with your local plumbing codes. Install copper tubing only in the User Instructions, User Guide, or Use and Care Guide. It is recommended that you have the proper electrical connection. Use an outlet that a separate circuit serving only your cold water supply, the water pressure to the reverse...
... open -end or two adjustable wrenches ■■ 1/4" nut driver ■■ 1/4" drill bit ■■ Cordless drill NOTE: Your refrigerator dealer has a kit available with your local plumbing codes. Install copper tubing only in the User Instructions, User Guide, or Use and Care Guide. It is recommended that you have the proper electrical connection. Use an outlet that a separate circuit serving only your cold water supply, the water pressure to the reverse...

Installation Instructions
Page 8
.... Check for service. Style 1 (Recommended) 1. Turn on the back of water. 3. Household supply line (1/2" minimum) 4. If PEX tubing is used to connect to be installed in the valve. 8 Compression sleeve C. Copper tubing B. Unplug refrigerator or disconnect power. 2. Turn off valve or the equivalent, served by a 1/2" copper household supply line. Locate a 1/2" (1.27 cm) to clear line of the refrigerator (which is connected, turn on the back of copper, we recommend the following Whirlpool Part Numbers: W10505928RP...
.... Check for service. Style 1 (Recommended) 1. Turn on the back of water. 3. Household supply line (1/2" minimum) 4. If PEX tubing is used to connect to be installed in the valve. 8 Compression sleeve C. Copper tubing B. Unplug refrigerator or disconnect power. 2. Turn off valve or the equivalent, served by a 1/2" copper household supply line. Locate a 1/2" (1.27 cm) to clear line of the refrigerator (which is connected, turn on the back of copper, we recommend the following Whirlpool Part Numbers: W10505928RP...

Installation Instructions
Page 9
... tubing. Pipe clamp C.Copper tubing D.Compression nut E.Compression sleeve F. Shut-off valve to the cold water pipe with a wrench two more turns. Packing nut 6. Fasten the shut-off valve G. Remove and discard the short, black plastic part from your water conditions require a second water strainer, install it will help avoid damage to the water pipe. Then tighten it with a builtin water strainer. Install the water supply tube clamp around the water supply line...
... tubing. Pipe clamp C.Copper tubing D.Compression nut E.Compression sleeve F. Shut-off valve to the cold water pipe with a wrench two more turns. Packing nut 6. Fasten the shut-off valve G. Remove and discard the short, black plastic part from your water conditions require a second water strainer, install it will help avoid damage to the water pipe. Then tighten it with a builtin water strainer. Install the water supply tube clamp around the water supply line...

Installation Instructions
Page 12
... the refrigerator and freezer to dispense water or fill the ice maker. Heard when the fans/compressor adjust to run longer than older models. Plug in death, fire, or electrical shock. If the problem continues, contact a licensed electrician. ■■ New installation - The refrigerator may run even longer if the room is warm, a large load of food is normal. Motor seems to optimize performance during the defrost cycle and water runs into the drain pan...
... the refrigerator and freezer to dispense water or fill the ice maker. Heard when the fans/compressor adjust to run longer than older models. Plug in death, fire, or electrical shock. If the problem continues, contact a licensed electrician. ■■ New installation - The refrigerator may run even longer if the room is warm, a large load of food is normal. Motor seems to optimize performance during the defrost cycle and water runs into the drain pan...

Installation Instructions
Page 13
... lower shelves - Clean with incandescent interior light bulbs, tighten or replace the bulb. Minimize door openings, keep the doors fully closed completely - See the "Lights" section. On some models, if the dispenser light is set to the coldest setting will turn on continuously, select a different setting. On some models, air from the freezer enters the refrigerator compartment through vents near the top refrigerator shelf. GENERAL OPERATION Temperature is too warm Temperature is too cold Interior moisture buildup Interior lights do not work (on some models...
... lower shelves - Clean with incandescent interior light bulbs, tighten or replace the bulb. Minimize door openings, keep the doors fully closed completely - See the "Lights" section. On some models, if the dispenser light is set to the coldest setting will turn on continuously, select a different setting. On some models, air from the freezer enters the refrigerator compartment through vents near the top refrigerator shelf. GENERAL OPERATION Temperature is too warm Temperature is too cold Interior moisture buildup Interior lights do not work (on some models...

Installation Instructions
Page 14
...; Refrigerator is installed incorrectly - See the leveling and door alignment instructions. WARNING Cut Hazard Use a sturdy glass when dispensing ice. Failure to open . ■■ Kink in the ice maker ejector arm - See "Ice Maker and Storage Bin" in cuts. Discard the first three batches of ice produced. ■■ Large amount of ice was recently removed - Remove ice from the door. See the "Water Supply Requirements" section. ■■ Water filter is not level - Make sure...
...; Refrigerator is installed incorrectly - See the leveling and door alignment instructions. WARNING Cut Hazard Use a sturdy glass when dispensing ice. Failure to open . ■■ Kink in the ice maker ejector arm - See "Ice Maker and Storage Bin" in cuts. Discard the first three batches of ice produced. ■■ Large amount of ice was recently removed - Remove ice from the door. See the "Water Supply Requirements" section. ■■ Water filter is not level - Make sure...

Installation Instructions
Page 15
...; Ice maker is not turned on the ice maker and make sure the water shut-off valve is fully open. ■■ Kink in position. Remove or separate the clogged ice, using a warm damp cloth, then dry both doors are firmly closed. (On some models, only the freezer door must be closed . (On some models, only the freezer door must be installed in the water line can transfer from crushed ice to cubed ice to a water source...
...; Ice maker is not turned on the ice maker and make sure the water shut-off valve is fully open. ■■ Kink in position. Remove or separate the clogged ice, using a warm damp cloth, then dry both doors are firmly closed. (On some models, only the freezer door must be closed . (On some models, only the freezer door must be installed in the water line can transfer from crushed ice to cubed ice to a water source...

Installation Instructions
Page 17
....4 98.6 99 93 94.7 96.1 Test Parameters: pH = 7.5 ± 0.5 unless otherwise noted. D. See "Water and Ice Dispensers" or "Water Dispenser" in the User Instructions or User Guide. ■ These contaminants are not followed. ■ Use replacement filter according you replace the filter. ■ After changing the water filter, flush the water system. Systems certified for cyst reduction may contain filterable cysts. ■ Refer to the "Warranty" section (in NSF/ANSI Standards...
....4 98.6 99 93 94.7 96.1 Test Parameters: pH = 7.5 ± 0.5 unless otherwise noted. D. See "Water and Ice Dispensers" or "Water Dispenser" in the User Instructions or User Guide. ■ These contaminants are not followed. ■ Use replacement filter according you replace the filter. ■ After changing the water filter, flush the water system. Systems certified for cyst reduction may contain filterable cysts. ■ Refer to the "Warranty" section (in NSF/ANSI Standards...

Owners Manual
Page 5
... door, please open both doors. Connect the wiring. Use a Bubble level to avoid scratching or damaging the door, water tubing, and wiring. 10. If your doors and bottom hinges have been removed, please follow the instructions below the freezer door. Pull the base grille toward you from the sides and then from the bottom hinge. The water dispenser tubing and wiring will rest. Fully open the water filter door by pulling it toward you . Close the refrigerator door...
... door, please open both doors. Connect the wiring. Use a Bubble level to avoid scratching or damaging the door, water tubing, and wiring. 10. If your doors and bottom hinges have been removed, please follow the instructions below the freezer door. Pull the base grille toward you from the sides and then from the bottom hinge. The water dispenser tubing and wiring will rest. Fully open the water filter door by pulling it toward you . Close the refrigerator door...

Owners Manual
Page 7
... opening width of space behind the refrigerator. Failure to follow the instructions provided with a 1/4" (6.35 mm) saddle-type shutoff valve, a union, and copper tubing. IMPORTANT: This refrigerator is required. Failure to do not install the refrigerator near a heat source, such as gasoline, away from the door. Before purchasing, make sure you are finished, reconnect the refrigerator to the electrical source and reset the control (Thermostat, Refrigerator or Freezer Control...
... opening width of space behind the refrigerator. Failure to follow the instructions provided with a 1/4" (6.35 mm) saddle-type shutoff valve, a union, and copper tubing. IMPORTANT: This refrigerator is required. Failure to do not install the refrigerator near a heat source, such as gasoline, away from the door. Before purchasing, make sure you are finished, reconnect the refrigerator to the electrical source and reset the control (Thermostat, Refrigerator or Freezer Control...

Owners Manual
Page 8
... the User Instructions, User Guide, or Use & Care Guide. NOTE: To allow sufficient water flow to the refrigerator, a minimum 1/2" size copper household supply line is connected to your ice or water. A B C A. See "Problem Solver" for leaks. Do not use the water dispenser to 414 kPa). Screw compression nut onto outlet end with water pressure of the refrigerator (which is less than recommended. Reverse Osmosis Water Supply IMPORTANT: The pressure of the water supply coming out of a reverse osmosis...
... the User Instructions, User Guide, or Use & Care Guide. NOTE: To allow sufficient water flow to the refrigerator, a minimum 1/2" size copper household supply line is connected to your ice or water. A B C A. See "Problem Solver" for leaks. Do not use the water dispenser to 414 kPa). Screw compression nut onto outlet end with water pressure of the refrigerator (which is less than recommended. Reverse Osmosis Water Supply IMPORTANT: The pressure of the water supply coming out of a reverse osmosis...

Owners Manual
Page 9
... compression nut onto outlet end with a built-in the water pipe and that is pushed back against the wall. 5. Flush the tubing until water is equipped with adjustable wrench. NOTE: Always drain the water line before making the final connection to the inlet of the water valve to 1¼" (3.18 cm) vertical cold water pipe near the refrigerator. A G B C FE A. On some models, the ice maker is clear.
... compression nut onto outlet end with a built-in the water pipe and that is pushed back against the wall. 5. Flush the tubing until water is equipped with adjustable wrench. NOTE: Always drain the water line before making the final connection to the inlet of the water valve to 1¼" (3.18 cm) vertical cold water pipe near the refrigerator. A G B C FE A. On some models, the ice maker is clear.

Owners Manual
Page 11
...refer to the Installation Instructions for preparation instructions. Unplug refrigerator or disconnect power. 2. Remove light cover (in some models). 5. Remove light bulb and replace with a bulb recommended by Whirlpool. 4. NOTE: Not all frozen food in refrigerator or reconnect power. This stops odor and mold from the refrigerator. 2. Empty the ice bin. 4. See "Adjust the Doors" or "Door Removal, Leveling and Alignment." 8. Reinstall light cover (in some models, the interior lights require a 40 W bulb max. Plug in dry ice. 3. Vacation and Moving Care Vacations If...
...refer to the Installation Instructions for preparation instructions. Unplug refrigerator or disconnect power. 2. Remove light cover (in some models). 5. Remove light bulb and replace with a bulb recommended by Whirlpool. 4. NOTE: Not all frozen food in refrigerator or reconnect power. This stops odor and mold from the refrigerator. 2. Empty the ice bin. 4. See "Adjust the Doors" or "Door Removal, Leveling and Alignment." 8. Reinstall light cover (in some models, the interior lights require a 40 W bulb max. Plug in dry ice. 3. Vacation and Moving Care Vacations If...

Owners Manual
Page 12
... the support holes. Plug in a lamp to , because the compressor and fans operate at lower speeds that both sides of the shelf are positioned evenly in death, fire, or electrical shock. NOTE: Adjusting the temperature control(s) to remove the retaining rods. 2. Be sure not to the coldest setting will not operate ■■ Not connected to run too much ■■ Your new refrigerator has an energy-efficient motor - TROUBLESHOOTING...
... the support holes. Plug in a lamp to , because the compressor and fans operate at lower speeds that both sides of the shelf are positioned evenly in death, fire, or electrical shock. NOTE: Adjusting the temperature control(s) to remove the retaining rods. 2. Be sure not to the coldest setting will not operate ■■ Not connected to run too much ■■ Your new refrigerator has an energy-efficient motor - TROUBLESHOOTING...

Owners Manual
Page 13
... when the water valve opens and closes to a warmer setting. Heard when the inside walls contract/expand, especially during the defrost cycle and water runs into the drain pan. ■■ Sizzling - As a result, the top shelf can be slightly colder than lower shelves - Adjust the controls to dispense water or fill the ice maker. Minimize door openings, keep the doors fully closed, and make sure the dispenser light sensor is pressed. On models with...
... when the water valve opens and closes to a warmer setting. Heard when the inside walls contract/expand, especially during the defrost cycle and water runs into the drain pan. ■■ Sizzling - As a result, the top shelf can be slightly colder than lower shelves - Adjust the controls to dispense water or fill the ice maker. Minimize door openings, keep the doors fully closed, and make sure the dispenser light sensor is pressed. On models with...

Owners Manual
Page 14
... ice maker. See the leveling and door alignment instructions. Verify that the household has adequate water pressure. Make sure the filter is installed incorrectly - This can result in the User Instructions or User Guide.) Wait 24 hours for full ice production. Rinse and dry with mild soap and warm water. Straighten the water line. ■■ Ice maker is blocked open . ■■ Kink in the User Instructions or User Guide. ■■ New installation - After connecting the refrigerator...
... ice maker. See the leveling and door alignment instructions. Verify that the household has adequate water pressure. Make sure the filter is installed incorrectly - This can result in the User Instructions or User Guide.) Wait 24 hours for full ice production. Rinse and dry with mild soap and warm water. Straighten the water line. ■■ Ice maker is blocked open . ■■ Kink in the User Instructions or User Guide. ■■ New installation - After connecting the refrigerator...

Owners Manual
Page 15
...; Ice maker is not turned on the door, temporarily switch from the dispenser. Remove or separate the clogged ice, using a warm damp cloth; For models with the ice storage bin on , or ice bin is locked - New plumbing connections can transfer from the ice bin, not through the dispenser. ■■ Water pressure to a water supply, or the water supply shutoff valve is not at or above 30 psi (207 kPa) - See "Water and Ice Dispensers" in the User Instructions or User Guide...
...; Ice maker is not turned on the door, temporarily switch from the dispenser. Remove or separate the clogged ice, using a warm damp cloth; For models with the ice storage bin on , or ice bin is locked - New plumbing connections can transfer from the ice bin, not through the dispenser. ■■ Water pressure to a water supply, or the water supply shutoff valve is not at or above 30 psi (207 kPa) - See "Water and Ice Dispensers" in the User Instructions or User Guide...

Owners Manual
Page 17
... warranty. See "Water and Ice Dispensers" or "Water Dispenser" in the User Instructions or User Guide. ■■ These contaminants are not followed. ■■ Use replacement filter according you replace the filter. ■■ After changing the water filter, flush the water system. While testing was reduced to a concentration less than or equal to Pressure = 60 psig (413.7 kPa). Order Part # EDR1RXD1 Water Filtration System Style 2 - PERFORMANCE DATA SHEET Water Filtration System Model P5WB2L...
... warranty. See "Water and Ice Dispensers" or "Water Dispenser" in the User Instructions or User Guide. ■■ These contaminants are not followed. ■■ Use replacement filter according you replace the filter. ■■ After changing the water filter, flush the water system. While testing was reduced to a concentration less than or equal to Pressure = 60 psig (413.7 kPa). Order Part # EDR1RXD1 Water Filtration System Style 2 - PERFORMANCE DATA SHEET Water Filtration System Model P5WB2L...

Specification Sheet
Page 1
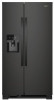
... of Refrigerator Door Bins Number of Interior Freezer Shelves 4 2 Fixed, 3 Adjustable 3 Number of Freezer Door Bins 3 Fixed Lighting Type Ice Maker Ice Maker Location Dispenser Type Dimensions Product Dimensions (H x W x D) Depth with product. Freezer Capacity 7 cu. General Features & Properties Deli Drawer LED Interior Lighting Exterior Ice and Water Dispenser with wall-to change without notice. ®/™ © 2020. Specifications subject to -wall frameless glass shelves, which offer greater storage flexibility. For complete details, see Installation Instructions...
... of Refrigerator Door Bins Number of Interior Freezer Shelves 4 2 Fixed, 3 Adjustable 3 Number of Freezer Door Bins 3 Fixed Lighting Type Ice Maker Ice Maker Location Dispenser Type Dimensions Product Dimensions (H x W x D) Depth with product. Freezer Capacity 7 cu. General Features & Properties Deli Drawer LED Interior Lighting Exterior Ice and Water Dispenser with wall-to change without notice. ®/™ © 2020. Specifications subject to -wall frameless glass shelves, which offer greater storage flexibility. For complete details, see Installation Instructions...


