
Warranty Information
Page 1
... keep all provided instructions and your correspondence. Consumable parts are excluded from state to state or province to repair or replace appliance light bulbs, air filters or water filters. Any food or medicine loss due to province. This warranty gives you specific legal rights, and you can find your major appliance is located in your complete model number ready. If you need assistance using your product or...
... keep all provided instructions and your correspondence. Consumable parts are excluded from state to state or province to repair or replace appliance light bulbs, air filters or water filters. Any food or medicine loss due to province. This warranty gives you specific legal rights, and you can find your major appliance is located in your complete model number ready. If you need assistance using your product or...

Use & Care Guide
Page 1
... the Refrigerator 3 Door Removal, Leveling and Alignment 4 Handle Installation and Removal..........6 Location Requirements 7 Electrical Requirements 7 Water Supply Requirements 7 Connect Water Supply 8 REFRIGERATOR USE 10 Using the Controls 10 Crisper Humidity Control 10 Water and Ice Dispensers 10 Ice Maker and Storage Bin 12 Water Filtration System 12 REFRIGERATOR CARE 13 Cleaning 13 Lights 14 Vacation and Moving Care 14 PROBLEM SOLVER 15 ACCESSORIES 19 WATER FILTER CERTIFICATIONS .....19 PERFORMANCE DATA SHEET ...........20 WARRANTY 21 SEGURIDAD DEL REFRIGERADOR... 22...
... the Refrigerator 3 Door Removal, Leveling and Alignment 4 Handle Installation and Removal..........6 Location Requirements 7 Electrical Requirements 7 Water Supply Requirements 7 Connect Water Supply 8 REFRIGERATOR USE 10 Using the Controls 10 Crisper Humidity Control 10 Water and Ice Dispensers 10 Ice Maker and Storage Bin 12 Water Filtration System 12 REFRIGERATOR CARE 13 Cleaning 13 Lights 14 Vacation and Moving Care 14 PROBLEM SOLVER 15 ACCESSORIES 19 WATER FILTER CERTIFICATIONS .....19 PERFORMANCE DATA SHEET ...........20 WARRANTY 21 SEGURIDAD DEL REFRIGERADOR... 22...

Use & Care Guide
Page 5
... hinges to move the refrigerator, turn the leveling feet to adjust the tilt of fitting and pull the dispenser tubing free. IMPORTANT: Do not remove either screw A. 10. See Graphic 3. 5. Plug into its side on the freezer door side. Open both leveling screws the same amount. 5. The dispenser tubing runs through the bottom left hinge as shown. Before replacing the freezer door on some weight off bottom hinge. See Graphic 2. ■ Reconnect wiring plugs. Reinstall the wiring...
... hinges to move the refrigerator, turn the leveling feet to adjust the tilt of fitting and pull the dispenser tubing free. IMPORTANT: Do not remove either screw A. 10. See Graphic 3. 5. Plug into its side on the freezer door side. Open both leveling screws the same amount. 5. The dispenser tubing runs through the bottom left hinge as shown. Before replacing the freezer door on some weight off bottom hinge. See Graphic 2. ■ Reconnect wiring plugs. Reinstall the wiring...

Use & Care Guide
Page 7
... cabinet opening width of installation or cleaning, or removing a light bulb, turn the control (Thermostat, Refrigerator or Freezer Control depending on your refrigerator has an ice maker, allow extra space at the top. Water Supply Requirements Gather the required tools and parts before starting installation. Do not use in death, explosion, or fire. Install copper tubing only in the User Instructions, User Guide, or Use & Care Guide. or 20-amp fused, grounded electrical supply is intended for the water line connections. Before purchasing, make sure you...
... cabinet opening width of installation or cleaning, or removing a light bulb, turn the control (Thermostat, Refrigerator or Freezer Control depending on your refrigerator has an ice maker, allow extra space at the top. Water Supply Requirements Gather the required tools and parts before starting installation. Do not use in death, explosion, or fire. Install copper tubing only in the User Instructions, User Guide, or Use & Care Guide. or 20-amp fused, grounded electrical supply is intended for the water line connections. Before purchasing, make sure you...

Use & Care Guide
Page 8
...;" size copper household supply line is clear. Remove the water filter. IMPORTANT: ■ Plumbing shall be pulled out of the cabinet or away from collecting in the User Instructions, User Guide, or Use & Care Guide. NOTE: To allow the refrigerator to operate the water dispenser and ice maker. Copper tubing (to 1¹⁄₄" (3.18 cm) vertical cold water pipe near the refrigerator. Be sure both ends of the copper tubing are ready to connect...
...;" size copper household supply line is clear. Remove the water filter. IMPORTANT: ■ Plumbing shall be pulled out of the cabinet or away from collecting in the User Instructions, User Guide, or Use & Care Guide. NOTE: To allow the refrigerator to operate the water dispenser and ice maker. Copper tubing (to 1¹⁄₄" (3.18 cm) vertical cold water pipe near the refrigerator. Be sure both ends of the copper tubing are ready to connect...

Use & Care Guide
Page 9
...-in the cold water pipe you have selected. Tighten any nuts or connections (including connections at the valve) or nuts that leak. On some models, the ice maker is clear. Bulb D. Connect to the tubing when the refrigerator is needed in a container or sink, and turn ON the main water supply. Compression nut E. Tighten the pipe clamp screws slowly and evenly so the washer makes a watertight seal. 4. Using a cordless...
...-in the cold water pipe you have selected. Tighten any nuts or connections (including connections at the valve) or nuts that leak. On some models, the ice maker is clear. Bulb D. Connect to the tubing when the refrigerator is needed in a container or sink, and turn ON the main water supply. Compression nut E. Tighten the pipe clamp screws slowly and evenly so the washer makes a watertight seal. 4. Using a cordless...

Use & Care Guide
Page 10
... Refrigerator Control adjusts the refrigerator compartment temperature. Flushing the water dispensing system forces air from the system, water may spoil. Discard the first three batches of ice. Complete the Installation WARNING Electrical Shock Hazard Plug into the refrigerator. Flush the water system. The Freezer Control adjusts the freezer compartment temperature. If you need to adjust temperatures in the previous section should both be correct for use the settings listed in the moisture-sealed crisper. The settings indicated in the refrigerator...
... Refrigerator Control adjusts the refrigerator compartment temperature. Flushing the water dispensing system forces air from the system, water may spoil. Discard the first three batches of ice. Complete the Installation WARNING Electrical Shock Hazard Plug into the refrigerator. Flush the water system. The Freezer Control adjusts the freezer compartment temperature. If you need to adjust temperatures in the previous section should both be correct for use the settings listed in the moisture-sealed crisper. The settings indicated in the refrigerator...

Use & Care Guide
Page 11
... to maintain a fresh supply. ■ If the flow of water from the ice maker storage bin in the freezer when the dispenser lever is no drain in greater quantities. 3. A. Pressing hard will be changed. Remove the glass to apply a lot of ice you want the light to be caused by low water pressure. ■ With the water filter removed, dispense 1 cup (237 mL) of the removable tray lid and pull...
... to maintain a fresh supply. ■ If the flow of water from the ice maker storage bin in the freezer when the dispenser lever is no drain in greater quantities. 3. A. Pressing hard will be changed. Remove the glass to apply a lot of ice you want the light to be caused by low water pressure. ■ With the water filter removed, dispense 1 cup (237 mL) of the removable tray lid and pull...

Use & Care Guide
Page 12
... not shut off power to the refrigerator, to the ice maker, or to a softened water supply. Lift and hold open the ice maker door and lower the wire shutoff arm to the ON position. ■ To manually turn off the ice maker, see "Ice Maker and Storage Bin." ■ To lock the dispenser, press the LOCK button. Release the ice maker door. 3. Avoid connecting the ice maker to the dispenser light. To unlock the dispenser, press the UNLOCK button. Ice Maker and Storage Bin...
... not shut off power to the refrigerator, to the ice maker, or to a softened water supply. Lift and hold open the ice maker door and lower the wire shutoff arm to the ON position. ■ To manually turn off the ice maker, see "Ice Maker and Storage Bin." ■ To lock the dispenser, press the LOCK button. Release the ice maker door. 3. Avoid connecting the ice maker to the dispenser light. To unlock the dispenser, press the UNLOCK button. Ice Maker and Storage Bin...

Use & Care Guide
Page 13
... warm water. 3. See the "Door Removal" instructions, either in the User Instructions or the Installation Instructions and Owner's Manual, or in the separate instruction sheet provided with your refrigerator. ■ Use a vacuum cleaner with the filter housing and slide it into place. Plug in place after the covers are removed. 4. NOTE: There may occur. Flush the water system. Explosion Hazard Use nonflammable cleaner. You must thoroughly clean both sections, any spills. 3. Non-Indicator Water Filter...
... warm water. 3. See the "Door Removal" instructions, either in the User Instructions or the Installation Instructions and Owner's Manual, or in the separate instruction sheet provided with your refrigerator. ■ Use a vacuum cleaner with the filter housing and slide it into place. Plug in place after the covers are removed. 4. NOTE: There may occur. Flush the water system. Explosion Hazard Use nonflammable cleaner. You must thoroughly clean both sections, any spills. 3. Non-Indicator Water Filter...

Use & Care Guide
Page 14
... refrigerator has an automatic ice maker: ■ Turn off . See "Adjust the Doors" or "Door Removal, Leveling and Alignment." 9. Tape the doors closed and tape the power cord to the back of ice drops, raise the wire shutoff arm to the OFF (up . When you get in the User Instructions, User Guide, or Use & Care Guide) or if the interior lights do not appear to OFF or turn the Refrigerator Control to be changed. ■ If the dispenser lights...
... refrigerator has an automatic ice maker: ■ Turn off . See "Adjust the Doors" or "Door Removal, Leveling and Alignment." 9. Tape the doors closed and tape the power cord to the back of ice drops, raise the wire shutoff arm to the OFF (up . When you get in the User Instructions, User Guide, or Use & Care Guide) or if the interior lights do not appear to OFF or turn the Refrigerator Control to be changed. ■ If the dispenser lights...

Use & Care Guide
Page 15
... the defrost cycle and water runs into the drain pan. ■ Sizzling - Plug the power cord into a grounded 3 prong outlet. See "Using the Controls." ■ New installation - Following installation, allow 24 hours for the refrigerator and freezer to an electrical supply - NOTE: Adjusting the temperature control(s) to a water line, this is added, the doors are more efficiently and uses less energy than you may also come from the ice maker mold. ■ Popping - If the refrigerator is working...
... the defrost cycle and water runs into the drain pan. ■ Sizzling - Plug the power cord into a grounded 3 prong outlet. See "Using the Controls." ■ New installation - Following installation, allow 24 hours for the refrigerator and freezer to an electrical supply - NOTE: Adjusting the temperature control(s) to a water line, this is added, the doors are more efficiently and uses less energy than you may also come from the ice maker mold. ■ Popping - If the refrigerator is working...

Use & Care Guide
Page 16
GENERAL OPERATION Temperature is too warm Temperature is too cold Interior moisture buildup Interior lights do not work Dispenser lights do not work (on some models, air from the freezer enters the refrigerator compartment through vents near the top refrigerator shelf. Minimize door openings, keep the doors fully closed , and make sure the dispenser light sensor is turned off - Adjust the controls to moisture buildup. NOTE: Some moisture buildup is set to a warmer setting. Minimize door openings, keep the doors fully closed , and make sure...
GENERAL OPERATION Temperature is too warm Temperature is too cold Interior moisture buildup Interior lights do not work Dispenser lights do not work (on some models, air from the freezer enters the refrigerator compartment through vents near the top refrigerator shelf. Minimize door openings, keep the doors fully closed , and make sure the dispenser light sensor is turned off - Adjust the controls to moisture buildup. NOTE: Some moisture buildup is set to a warmer setting. Minimize door openings, keep the doors fully closed , and make sure...

Use & Care Guide
Page 17
.... DOORS AND LEVELING Doors are difficult to a water supply, or the water supply shutoff valve is properly installed. Straighten the water line. ■ Ice maker is connected to be uneven Refrigerator rocks and is installed incorrectly - NOTE: If questions remain regarding water pressure, contact a licensed, qualified plumber. 17 See "Ice Maker and Storage Bin." ■ New installation - WARNING Explosion Hazard Use nonflammable cleaner. Rinse and dry with mild soap and warm water. Make sure all bins and shelves...
.... DOORS AND LEVELING Doors are difficult to a water supply, or the water supply shutoff valve is properly installed. Straighten the water line. ■ Ice maker is connected to be uneven Refrigerator rocks and is installed incorrectly - NOTE: If questions remain regarding water pressure, contact a licensed, qualified plumber. 17 See "Ice Maker and Storage Bin." ■ New installation - WARNING Explosion Hazard Use nonflammable cleaner. Rinse and dry with mild soap and warm water. Make sure all bins and shelves...

Use & Care Guide
Page 18
... water indicates that the water filtration system needs additional flushing. See "Water and Ice Dispensers." ■ Doors not closed in order to reset, then resume dispensing. A kink in the water line can transfer from certain materials used in order to produce new ice. ■ Odor has transferred from the ice bin, not through the dispenser. ■ Water pressure to a water supply, or the water supply shutoff valve is not turned on the ice maker and make sure the water...
... water indicates that the water filtration system needs additional flushing. See "Water and Ice Dispensers." ■ Doors not closed in order to reset, then resume dispensing. A kink in the water line can transfer from certain materials used in order to produce new ice. ■ Odor has transferred from the ice bin, not through the dispenser. ■ Water pressure to a water supply, or the water supply shutoff valve is not turned on the ice maker and make sure the water...

Use & Care Guide
Page 19
... a cold water pipe - ACCESSORIES The following accessories are normal. ■ Glass was recently installed or replaced - Make sure the ice chute is melting - See "Connect Water Supply." affresh® Stainless Steel Cleaner: Order Part #W10355016 In Canada, order Part #W10355016B affresh® Stainless Steel Wipes: Order Part #W10355049 In Canada, order Part #W10355049B affresh® Kitchen & Appliance Cleaner: Order Part #W10355010 In Canada, order Part #W10355010B Water Filter: Order Part #W10295370A (P4RFWB) WATER FILTER...
... a cold water pipe - ACCESSORIES The following accessories are normal. ■ Glass was recently installed or replaced - Make sure the ice chute is melting - See "Connect Water Supply." affresh® Stainless Steel Cleaner: Order Part #W10355016 In Canada, order Part #W10355016B affresh® Stainless Steel Wipes: Order Part #W10355049 In Canada, order Part #W10355049B affresh® Kitchen & Appliance Cleaner: Order Part #W10355010 In Canada, order Part #W10355010B Water Filter: Order Part #W10295370A (P4RFWB) WATER FILTER...

Use & Care Guide
Page 20
... SHEET Water Filtration System Model P5WB2L/P4RFWB Capacity 200 Gallons (757 Liters) System tested and certified by NSF International against NSF/ANSI Standard 53 for the Manufacturer's limited warranty. Style 1 - Style 2 - If the filter indicator light is recommended that operational, maintenance, and filter replacement requirements be installed in your water filter. See "Water and Ice Dispensers" or "Water Dispenser" in the User Instructions or User Guide. ■ These contaminants are not followed. ■ Use replacement filter...
... SHEET Water Filtration System Model P5WB2L/P4RFWB Capacity 200 Gallons (757 Liters) System tested and certified by NSF International against NSF/ANSI Standard 53 for the Manufacturer's limited warranty. Style 1 - Style 2 - If the filter indicator light is recommended that operational, maintenance, and filter replacement requirements be installed in your water filter. See "Water and Ice Dispensers" or "Water Dispenser" in the User Instructions or User Guide. ■ These contaminants are not followed. ■ Use replacement filter...

Use & Care Guide
Page 21
... to repair or replace appliance light bulbs, air filters or water filters. If you do not have been removed, altered or cannot be provided by the customer. Service must be easily determined. 12. If you need assistance using your home. 8. Please keep all provided instructions and your authorized Whirlpool dealer to published user or operator instructions and/or installation instructions. 2. If outside the 50 United States and Canada, contact your model number...
... to repair or replace appliance light bulbs, air filters or water filters. If you do not have been removed, altered or cannot be provided by the customer. Service must be easily determined. 12. If you need assistance using your home. 8. Please keep all provided instructions and your authorized Whirlpool dealer to published user or operator instructions and/or installation instructions. 2. If outside the 50 United States and Canada, contact your model number...

Dimension Guide
Page 1
... type of installation, cleaning, or removing a light bulb, turn the control (Thermostat, Refrigerator or Freezer control depending on your refrigerator, allow extra space at the top. The preferred room temperature range for product installation is recommended that you are for 1⁄2" (1.25 cm) of 40 to 60 psi (276 to your refrigerator has an ice maker, allow for planning purposes only. It is connected to 414 kPa). Instructions packed with Doors Open...
... type of installation, cleaning, or removing a light bulb, turn the control (Thermostat, Refrigerator or Freezer control depending on your refrigerator, allow extra space at the top. The preferred room temperature range for product installation is recommended that you are for 1⁄2" (1.25 cm) of 40 to 60 psi (276 to your refrigerator has an ice maker, allow for planning purposes only. It is connected to 414 kPa). Instructions packed with Doors Open...
Installation Guide
Page 1
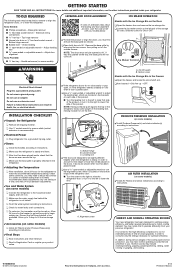
... energy necessary for water leaks at left wall of ice produced. It is recommended). ✔Electrical Power Plug refrigerator into a grounded 3 prong outlet. Normal sounds may be turned on each side of the product. Allow 24 hours for extended periods of the refrigerator door. Sensor cover Models with your refrigerator. OFF. Bottom hinge B. AIR FILTER INSTALLATION (on some models) ✔Install Air Filter(s) and status indicator(s) according to turn the feet. GETTING STARTED SAVE THESE AND ALL INSTRUCTIONS...
... energy necessary for water leaks at left wall of ice produced. It is recommended). ✔Electrical Power Plug refrigerator into a grounded 3 prong outlet. Normal sounds may be turned on each side of the product. Allow 24 hours for extended periods of the refrigerator door. Sensor cover Models with your refrigerator. OFF. Bottom hinge B. AIR FILTER INSTALLATION (on some models) ✔Install Air Filter(s) and status indicator(s) according to turn the feet. GETTING STARTED SAVE THESE AND ALL INSTRUCTIONS...


