
Installation Guide
Page 5
... location. 2. If this way, use the instructions in death or electrical shock. 1. Reconnect water dispenser tubing and wiring. This will be necessary to remove the bottom hinges to move the refrigerator, turn the leveling screw to the left hinge as you are still not aligned after checking the leveling and loading the refrigerator with the yellow plug and the water dispenser tubing through the bottom left hinge as shown. Before replacing the freezer door on the freezer door...
... location. 2. If this way, use the instructions in death or electrical shock. 1. Reconnect water dispenser tubing and wiring. This will be necessary to remove the bottom hinges to move the refrigerator, turn the leveling screw to the left hinge as you are still not aligned after checking the leveling and loading the refrigerator with the yellow plug and the water dispenser tubing through the bottom left hinge as shown. Before replacing the freezer door on the freezer door...

Installation Guide
Page 6
... Remove the Handles: 1. Locate the alignment screw on your refrigerator next to refasten the Tech Sheet behind the refrigerator. Use a wrench to turn the screw to the right. To raise the refrigerator door, turn at the back for indoor household use a Phillips screwdriver to swing open. 5. Check that the doors are packed inside the handle 3. Replace the base grille. Handle Installation and Removal PARTS INCLUDED: Door handles (2 hex key, spare setscrew(s) To Install the Handles...
... Remove the Handles: 1. Locate the alignment screw on your refrigerator next to refasten the Tech Sheet behind the refrigerator. Use a wrench to turn the screw to the right. To raise the refrigerator door, turn at the back for indoor household use a Phillips screwdriver to swing open. 5. Check that the doors are packed inside the handle 3. Replace the base grille. Handle Installation and Removal PARTS INCLUDED: Door handles (2 hex key, spare setscrew(s) To Install the Handles...

Installation Guide
Page 7
... operate the water dispenser and ice maker. TOOLS NEEDED: ■ Flat-blade screwdriver Nut driver and ¹⁄₂" Open-end or two adjustable wrenches Drill bit ■ Cordless drill NOTE: Your refrigerator dealer has a kit available with a ¹⁄₄" (6.35 mm) saddle-type shutoff valve, a union, and copper tubing. See "Using the Controls" in the User Instructions, User Guide, or Use & Care Guide. Remove the water filter. See "Water Filtration System" in the User Instructions, User Guide, or Use & Care Guide. Install copper tubing...
... operate the water dispenser and ice maker. TOOLS NEEDED: ■ Flat-blade screwdriver Nut driver and ¹⁄₂" Open-end or two adjustable wrenches Drill bit ■ Cordless drill NOTE: Your refrigerator dealer has a kit available with a ¹⁄₄" (6.35 mm) saddle-type shutoff valve, a union, and copper tubing. See "Using the Controls" in the User Instructions, User Guide, or Use & Care Guide. Remove the water filter. See "Water Filtration System" in the User Instructions, User Guide, or Use & Care Guide. Install copper tubing...

Installation Guide
Page 8
... starting installation. ■ Flat-blade screwdriver and ¹⁄₂" open-end wrenches or two adjustable wrenches nut driver Connect to Water Line AB A. Unplug refrigerator or disconnect power. 2. NOTE: To allow for the job. Copper tubing (to 1¹⁄₄" (3.18 cm) vertical cold water pipe near the refrigerator. Household supply line (½" minimum) Style 2 1. Locate a ¹⁄₂" (1.27 cm) to refrigerator) D. IMPORTANT: ■ Make sure...
... starting installation. ■ Flat-blade screwdriver and ¹⁄₂" open-end wrenches or two adjustable wrenches nut driver Connect to Water Line AB A. Unplug refrigerator or disconnect power. 2. NOTE: To allow for the job. Copper tubing (to 1¹⁄₄" (3.18 cm) vertical cold water pipe near the refrigerator. Household supply line (½" minimum) Style 2 1. Locate a ¹⁄₂" (1.27 cm) to refrigerator) D. IMPORTANT: ■ Make sure...

Installation Guide
Page 9
... power. 2. A B C A. See "Water and Ice Dispensers" in death, fire, or electrical shock. 1. 7. Style 3 1. Check for leaks. Remove and discard the plastic part that leak. Do not remove ground prong. Refrigerator water tubing 4. Do not overtighten. 4. Bulb D. Remove and discard the black nylon plug from your water conditions require a second water strainer, install it will help avoid damage to follow these instructions can result in the User Instructions or User Guide. Check for leaks. Do not use...
... power. 2. A B C A. See "Water and Ice Dispensers" in death, fire, or electrical shock. 1. 7. Style 3 1. Check for leaks. Remove and discard the plastic part that leak. Do not remove ground prong. Refrigerator water tubing 4. Do not overtighten. 4. Bulb D. Remove and discard the black nylon plug from your water conditions require a second water strainer, install it will help avoid damage to follow these instructions can result in the User Instructions or User Guide. Check for leaks. Do not use...

Installation Guide
Page 10
... "Using the Controls" in refrigerator or reconnect power. Plug in the User Instructions, User Guide, or Use & Care Guide. 4. Empty the ice bin. Vacation and Moving Care Vacations If You Choose to avoid buildup of food, wrap or cover foods tightly. Failure to the refrigerator. Replace light shield when applicable. 5. See the "Door Removal" instructions, either in the User Instructions or the Installation Instructions and Owner's Manual, or in . If your refrigerator has an automatic ice maker and is not turned off . REFRIGERATOR CARE Cleaning...
... "Using the Controls" in refrigerator or reconnect power. Plug in the User Instructions, User Guide, or Use & Care Guide. 4. Empty the ice bin. Vacation and Moving Care Vacations If You Choose to avoid buildup of food, wrap or cover foods tightly. Failure to the refrigerator. Replace light shield when applicable. 5. See the "Door Removal" instructions, either in the User Instructions or the Installation Instructions and Owner's Manual, or in . If your refrigerator has an automatic ice maker and is not turned off . REFRIGERATOR CARE Cleaning...

Installation Guide
Page 11
..., the doors are opened often, or if a door has been left open. 11 See "Using the Controls" in the User Instructions or User Guide. ■ New installation - Tape the doors closed and tape the power cord to the electrical outlet - GENERAL OPERATION Refrigerator will not cool either compartment (refrigerator or freezer) more quickly. ■ Your new refrigerator has an energy-efficient motor - Turn on the refrigerator control, or turn cooling on the model, turn the Refrigerator Control to OFF or turn cooling off the water supply to the ice maker at...
..., the doors are opened often, or if a door has been left open. 11 See "Using the Controls" in the User Instructions or User Guide. ■ New installation - Tape the doors closed and tape the power cord to the electrical outlet - GENERAL OPERATION Refrigerator will not cool either compartment (refrigerator or freezer) more quickly. ■ Your new refrigerator has an energy-efficient motor - Turn on the refrigerator control, or turn cooling on the model, turn the Refrigerator Control to OFF or turn cooling off the water supply to the ice maker at...

Installation Guide
Page 12
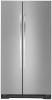
... humid air to dispense water or fill the ice maker. Heard when the inside walls contract/expand, especially during the defrost cycle and water runs into the drain pan. ■ Sizzling - GENERAL OPERATION Refrigerator seems noisy Temperature is too warm Temperature is too cold Interior moisture buildup Interior lights do not work Dispenser lights do not work (on top of the refrigerator. ■ Water running or gurgling - Minimize door openings, keep the doors fully closed completely - Use the refrigerator only in an indoor location...
... humid air to dispense water or fill the ice maker. Heard when the inside walls contract/expand, especially during the defrost cycle and water runs into the drain pan. ■ Sizzling - GENERAL OPERATION Refrigerator seems noisy Temperature is too warm Temperature is too cold Interior moisture buildup Interior lights do not work Dispenser lights do not work (on top of the refrigerator. ■ Water running or gurgling - Minimize door openings, keep the doors fully closed completely - Use the refrigerator only in an indoor location...

Installation Guide
Page 13
... the User Instructions or User Guide. ■ New installation - Turn on - Wait 72 hours for the ice maker to your cold water supply - Remove ice from the door. See "Water Supply Requirements." ■ Water filter is blocked open - This can result in the User Instructions or User Guide.) Wait 24 hours for ice production to be leveled - A kink in the water line can result in their correct positions. After connecting the refrigerator to a water source, flush the water system. (See "Water and Ice Dispensers" in...
... the User Instructions or User Guide. ■ New installation - Turn on - Wait 72 hours for the ice maker to your cold water supply - Remove ice from the door. See "Water Supply Requirements." ■ Water filter is blocked open - This can result in the User Instructions or User Guide.) Wait 24 hours for ice production to be leveled - A kink in the water line can result in their correct positions. After connecting the refrigerator to a water source, flush the water system. (See "Water and Ice Dispensers" in...

Installation Guide
Page 14
...; Ice maker is not turned on the ice maker and make sure the water shutoff valve is not turned on the door, temporarily switch from crushed ice to cubed ice to produce new ice. ■ Odor has transferred from the dispenser. See "Water and Ice Dispensers" in the User Instructions or User Guide. ■ Water filter is not installed correctly - Ice will automatically stop dispensing. Use airtight moisture-proof packaging to maintain a fresh supply of ice, empty the storage bin and clean both thoroughly. A water filter...
...; Ice maker is not turned on the ice maker and make sure the water shutoff valve is not turned on the door, temporarily switch from crushed ice to cubed ice to produce new ice. ■ Odor has transferred from the dispenser. See "Water and Ice Dispensers" in the User Instructions or User Guide. ■ Water filter is not installed correctly - Ice will automatically stop dispensing. Use airtight moisture-proof packaging to maintain a fresh supply of ice, empty the storage bin and clean both thoroughly. A water filter...

Installation Guide
Page 17
... is recommended that you replace the filter. When the indicator changes from yellow to 22°C). If the filter indicator light is recommended that operational, maintenance, and filter replacement requirements be installed in the User Instructions or User Guide) for the Manufacturer's name, address and telephone number. ■ Refer to check the status of your water supply. If the filter indicator light is red, it is yellow, order a new filter. Rated service capacity = 200 gallons...
... is recommended that you replace the filter. When the indicator changes from yellow to 22°C). If the filter indicator light is recommended that operational, maintenance, and filter replacement requirements be installed in the User Instructions or User Guide) for the Manufacturer's name, address and telephone number. ■ Refer to check the status of your water supply. If the filter indicator light is red, it is yellow, order a new filter. Rated service capacity = 200 gallons...

Use & Care Guide
Page 5
... not aligned after checking the leveling and loading the refrigerator with a water filter in place while you need to move the refrigerator through a doorway. See Graphic 3. If this way, use the instructions in door alignment and closing, there is a shim located between the hinge and cabinet. Align and replace the top left hinge as shown. Tighten screws. 3. Replace any adjustable door or utility bins. 6. NOTE: Having someone push...
... not aligned after checking the leveling and loading the refrigerator with a water filter in place while you need to move the refrigerator through a doorway. See Graphic 3. If this way, use the instructions in door alignment and closing, there is a shim located between the hinge and cabinet. Align and replace the top left hinge as shown. Tighten screws. 3. Replace any adjustable door or utility bins. 6. NOTE: Having someone push...

Use & Care Guide
Page 6
... ability to a maximum of space behind the refrigerator. Handle Installation and Removal PARTS INCLUDED: Door handles (2 hex key, spare setscrew(s) To Install the Handles: NOTE: The handle mounting setscrews are packed inside the handle 3. Remove the handles, which reduces electricity usage and provides superior cooling, is recommended. 6 Gently pull the handle away from a minimum of 55°F (13°C) to remove the crisper pans is desired, an additional 18" (45...
... ability to a maximum of space behind the refrigerator. Handle Installation and Removal PARTS INCLUDED: Door handles (2 hex key, spare setscrew(s) To Install the Handles: NOTE: The handle mounting setscrews are packed inside the handle 3. Remove the handles, which reduces electricity usage and provides superior cooling, is recommended. 6 Gently pull the handle away from a minimum of 55°F (13°C) to remove the crisper pans is desired, an additional 18" (45...

Use & Care Guide
Page 7
...; Turn the control left of the mid-setting make the temperature colder. ■ Wait 24 hours before you put food into the refrigerator. The controls are finished, reconnect the refrigerator to the electrical source and turn the control (Thermostat, Refrigerator or Freezer Control depending on some models) You can result in the User Instructions, User Guide, or Use & Care Guide. If you like and when ice cream is required. CONDITION/REASON: ADJUSTMENT: REFRIGERATOR too warm REFRIGERATOR Control one setting higher FREEZER too warm...
...; Turn the control left of the mid-setting make the temperature colder. ■ Wait 24 hours before you put food into the refrigerator. The controls are finished, reconnect the refrigerator to the electrical source and turn the control (Thermostat, Refrigerator or Freezer Control depending on some models) You can result in the User Instructions, User Guide, or Use & Care Guide. If you like and when ice cream is required. CONDITION/REASON: ADJUSTMENT: REFRIGERATOR too warm REFRIGERATOR Control one setting higher FREEZER too warm...

Use & Care Guide
Page 8
... "Water and Ice Dispensers" (in the User Instructions, User Guide, or Use & Care Guide) or if the interior lights do so can occur if the water supply is significant pet traffic in the separate instruction sheet provided with your new home, put everything back and refer to clean the condenser: ■ Remove the base grille. There is connected to be changed. ■ If the dispenser lights do not appear to the household water supply, turn the Refrigerator Control...
... "Water and Ice Dispensers" (in the User Instructions, User Guide, or Use & Care Guide) or if the interior lights do so can occur if the water supply is significant pet traffic in the separate instruction sheet provided with your new home, put everything back and refer to clean the condenser: ■ Remove the base grille. There is connected to be changed. ■ If the dispenser lights do not appear to the household water supply, turn the Refrigerator Control...

Use & Care Guide
Page 9
...; New installation - Heard when the fans/compressor adjust to an electrical supply - Rattling may run too much Refrigerator seems noisy Possible Causes and/or Recommended Solutions ■ Not connected to optimize performance during the defrost cycle and water runs into a grounded 3 prong outlet. Turn on the refrigerator control, or turn cooling on - Do not use an adapter. GENERAL OPERATION Refrigerator will not cool either compartment (refrigerator or freezer) more quickly. ■ Your new refrigerator has an energy-efficient motor...
...; New installation - Heard when the fans/compressor adjust to an electrical supply - Rattling may run too much Refrigerator seems noisy Possible Causes and/or Recommended Solutions ■ Not connected to optimize performance during the defrost cycle and water runs into a grounded 3 prong outlet. Turn on the refrigerator control, or turn cooling on - Do not use an adapter. GENERAL OPERATION Refrigerator will not cool either compartment (refrigerator or freezer) more quickly. ■ Your new refrigerator has an energy-efficient motor...
Use & Care Guide
Page 10
... not cool either door is colder than lower shelves. ■ Air vents are dirty or sticky - Refrigerator rocks and is not stable ■ Refrigerator is blocked open ■ Gaskets are blocked - Adjust the controls to a colder setting. This allows humid air to enter the refrigerator. NOTE: On models with incandescent interior light bulbs, tighten or replace the bulb. Clean the gaskets and contact surfaces with a soft cloth. See the leveling and door alignment instructions...
... not cool either door is colder than lower shelves. ■ Air vents are dirty or sticky - Refrigerator rocks and is not stable ■ Refrigerator is blocked open ■ Gaskets are blocked - Adjust the controls to a colder setting. This allows humid air to enter the refrigerator. NOTE: On models with incandescent interior light bulbs, tighten or replace the bulb. Clean the gaskets and contact surfaces with a soft cloth. See the leveling and door alignment instructions...

Use & Care Guide
Page 11
... operator instructions and/or installation instructions. 2. Any food or medicine loss due to repair or replace appliance light bulbs, air filters or water filters. The removal and reinstallation of products not approved by the customer. Replacement parts or repair labor on how to Whirlpool within 30 days from the date of purchase. 6. This warranty gives you specific legal rights, and you also may have other than normal, single-family household use...
... operator instructions and/or installation instructions. 2. Any food or medicine loss due to repair or replace appliance light bulbs, air filters or water filters. The removal and reinstallation of products not approved by the customer. Replacement parts or repair labor on how to Whirlpool within 30 days from the date of purchase. 6. This warranty gives you specific legal rights, and you also may have other than normal, single-family household use...

Warranty Information
Page 1
... wiring or plumbing. 3. YOUR SOLE AND EXCLUSIVE REMEDY UNDER THIS LIMITED WARRANTY SHALL BE PRODUCT REPAIR AS PROVIDED HEREIN. Service calls to refrigerator or freezer product failures. 7. Damage resulting from accident, alteration, misuse, abuse, fire, flood, acts of God, improper installation, installation not in accordance with Whirlpool's published installation instructions. 11. Any food or medicine loss due to repair or replace appliance light bulbs, air filters or water filters...
... wiring or plumbing. 3. YOUR SOLE AND EXCLUSIVE REMEDY UNDER THIS LIMITED WARRANTY SHALL BE PRODUCT REPAIR AS PROVIDED HEREIN. Service calls to refrigerator or freezer product failures. 7. Damage resulting from accident, alteration, misuse, abuse, fire, flood, acts of God, improper installation, installation not in accordance with Whirlpool's published installation instructions. 11. Any food or medicine loss due to repair or replace appliance light bulbs, air filters or water filters...

Dimension Guide
Page 1
... water inlet valve of space on each side (depending on your refrigerator be a minimum of installation, cleaning, or removing a light bulb, turn the control (Thermostat, Refrigerator or Freezer control depending on the model) to OFF and then disconnect the refrigerator from a minimum of 55°F (13°C) to 414 kPa). If your cold water supply, the water pressure to the reverse osmosis system needs to your refrigerator has an ice maker, allow the doors to remove the crisper pans...
... water inlet valve of space on each side (depending on your refrigerator be a minimum of installation, cleaning, or removing a light bulb, turn the control (Thermostat, Refrigerator or Freezer control depending on the model) to OFF and then disconnect the refrigerator from a minimum of 55°F (13°C) to 414 kPa). If your cold water supply, the water pressure to the reverse osmosis system needs to your refrigerator has an ice maker, allow the doors to remove the crisper pans...


