
Warranty Information
Page 1
...your model number information for future reference. 21 LIMITATION OF REMEDIES; In Canada, call 1-800-253-1301. Service calls to refrigerator or freezer product failures. 7. If you do not allow the exclusion or limitation of stainless steel surfaces. Please keep all ...appliance is operated and maintained according to instructions attached to or furnished with the product, Whirlpool Corporation or Whirlpool Canada LP (hereafter "Whirlpool") will pay for Factory Specified Parts and repair labor to correct defects in materials or workmanship that existed when this limitation may...
...your model number information for future reference. 21 LIMITATION OF REMEDIES; In Canada, call 1-800-253-1301. Service calls to refrigerator or freezer product failures. 7. If you do not allow the exclusion or limitation of stainless steel surfaces. Please keep all ...appliance is operated and maintained according to instructions attached to or furnished with the product, Whirlpool Corporation or Whirlpool Canada LP (hereafter "Whirlpool") will pay for Factory Specified Parts and repair labor to correct defects in materials or workmanship that existed when this limitation may...

Use & Care Guide
Page 2
... are not followed. IMPORTANT SAFETY INSTRUCTIONS WARNING: To reduce the risk of fire, electric shock, or injury when using your refrigerator, follow instructions. SAVE THESE INSTRUCTIONS State of California Proposition 65 Warnings: WARNING: This product contains one or more chemicals known ... use an extension cord. ■ Disconnect power before operating. ■ Remove doors from your appliance. Always read and obey all parts and panels before servicing. ■ Replace all safety messages. WARNING You can happen if the instructions are very important. We have provided...
... are not followed. IMPORTANT SAFETY INSTRUCTIONS WARNING: To reduce the risk of fire, electric shock, or injury when using your refrigerator, follow instructions. SAVE THESE INSTRUCTIONS State of California Proposition 65 Warnings: WARNING: This product contains one or more chemicals known ... use an extension cord. ■ Disconnect power before operating. ■ Remove doors from your appliance. Always read and obey all parts and panels before servicing. ■ Replace all safety messages. WARNING You can happen if the instructions are very important. We have provided...

Use & Care Guide
Page 4
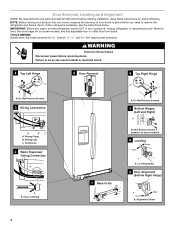
If door removal is necessary, see whether you begin, turn the refrigerator control OFF or turn cooling off. Wiring Clip C. flat-blade screwdriver wrench and hex-head socket wrenches WARNING Electrical ... Hinges (Left and Right) A A BC A. Grommets 2 Water Dispenser Tubing Connection A A A. Unplug refrigerator or disconnect power. Failure to remove the refrigerator and freezer doors. Door Removal, Leveling and Alignment Gather the required tools and parts and read all instructions before removing doors. TOOLS NEEDED: Bubble level; NOTE: Before moving your...
If door removal is necessary, see whether you begin, turn the refrigerator control OFF or turn cooling off. Wiring Clip C. flat-blade screwdriver wrench and hex-head socket wrenches WARNING Electrical ... Hinges (Left and Right) A A BC A. Grommets 2 Water Dispenser Tubing Connection A A A. Unplug refrigerator or disconnect power. Failure to remove the refrigerator and freezer doors. Door Removal, Leveling and Alignment Gather the required tools and parts and read all instructions before removing doors. TOOLS NEEDED: Bubble level; NOTE: Before moving your...

Use & Care Guide
Page 5
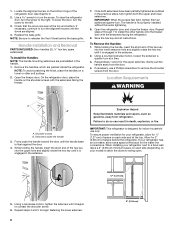
... Provide additional support for the doors while the top hinges are part of cardboard. Tighten screws. 4. Reconnect water dispenser tubing and wiring. Reinstall the wiring clip over the grommets. If not, tilt the refrigerator slightly more turns, and you are no longer touching the ground...shown. See Graphic 5. one on the freezer door side. Plug into a grounded 3 prong outlet. Remove the base grille to move the refrigerator through the door hinge, and must be disconnected in death or electrical shock. 1. Close both leveling screws the same amount. 5. NOTE:...
... Provide additional support for the doors while the top hinges are part of cardboard. Tighten screws. 4. Reconnect water dispenser tubing and wiring. Reinstall the wiring clip over the grommets. If not, tilt the refrigerator slightly more turns, and you are no longer touching the ground...shown. See Graphic 5. one on the freezer door side. Plug into a grounded 3 prong outlet. Remove the base grille to move the refrigerator through the door hinge, and must be disconnected in death or electrical shock. 1. Close both leveling screws the same amount. 5. NOTE:...

Use & Care Guide
Page 6
...account for the upper setscrew. While holding the handle, insert the short end of the refrigerator door. Gently pull the handle away from the door. Setscrews inside the refrigerator. See Graphic 9. 2. Handle Installation and Removal PARTS INCLUDED: Door handles (2 hex key, spare setscrew(s) To Install the Handles: NOTE:...screw until the handle base is not level from side-to-side may appear to turn at the top and bottom. Door Alignment A refrigerator that is flush against the door. 4. If the doors appear this extra tightening. 8. If necessary, continue to have been partially ...
...account for the upper setscrew. While holding the handle, insert the short end of the refrigerator door. Gently pull the handle away from the door. Setscrews inside the refrigerator. See Graphic 9. 2. Handle Installation and Removal PARTS INCLUDED: Door handles (2 hex key, spare setscrew(s) To Install the Handles: NOTE:...screw until the handle base is not level from side-to-side may appear to turn at the top and bottom. Door Alignment A refrigerator that is flush against the door. 4. If the doors appear this extra tightening. 8. If necessary, continue to have been partially ...

Use & Care Guide
Page 7
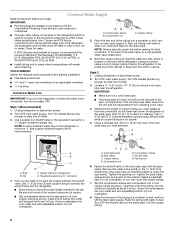
...saddle-type shutoff valve, a union, and copper tubing. Water Supply Requirements Gather the required tools and parts before starting installation. Before purchasing, make sure you move your refrigerator, allow extra space at the top. IMPORTANT: ■ All installations must meet local plumbing code requirements... 115 volt, 60 Hz, AC only, 15- However, if the product is important to OFF, and then disconnect the refrigerator from refrigerator. Do not remove ground prong. Before you have the proper electrical connection. Install copper tubing only in death, explosion, or...
...saddle-type shutoff valve, a union, and copper tubing. Water Supply Requirements Gather the required tools and parts before starting installation. Before purchasing, make sure you move your refrigerator, allow extra space at the top. IMPORTANT: ■ All installations must meet local plumbing code requirements... 115 volt, 60 Hz, AC only, 15- However, if the product is important to OFF, and then disconnect the refrigerator from refrigerator. Do not remove ground prong. Before you have the proper electrical connection. Install copper tubing only in death, explosion, or...

Use & Care Guide
Page 8
... Plumbing Code and any local codes and ordinances. ■ Use copper tubing or Whirlpool supply line, Part Number 8212547RP, and check for leaks. ■ Install tubing only in areas where temperatures will work, but drill on before you begin. Unplug refrigerator or disconnect power. 2. A B C A. Nut D C. Household supply line (½" minimum) 4. Turn off shutoff...
... Plumbing Code and any local codes and ordinances. ■ Use copper tubing or Whirlpool supply line, Part Number 8212547RP, and check for leaks. ■ Install tubing only in areas where temperatures will work, but drill on before you begin. Unplug refrigerator or disconnect power. 2. A B C A. Nut D C. Household supply line (½" minimum) 4. Turn off shutoff...

Use & Care Guide
Page 9
...G B C FE D A. Compression nut E. Flush the tubing until water is under the pipe clamp. Remove and discard the short, black plastic part from the connection on the back of the water valve. 3. Then tighten it with the pipe clamp. Do not overtighten. 4. Use the tube clamp...(purchased) F. Tighten any connections (including connections at the valve) or nuts that is equipped with adjustable wrench. Measure from the end of the refrigerator. 3. Use ¹⁄₄" (6.35 mm) O.D. (outside diameter) copper tubing. Cold water pipe B. Pipe clamp C. Slip the compression ...
...G B C FE D A. Compression nut E. Flush the tubing until water is under the pipe clamp. Remove and discard the short, black plastic part from the connection on the back of the water valve. 3. Then tighten it with the pipe clamp. Do not overtighten. 4. Use the tube clamp...(purchased) F. Tighten any connections (including connections at the valve) or nuts that is equipped with adjustable wrench. Measure from the end of the refrigerator. 3. Use ¹⁄₄" (6.35 mm) O.D. (outside diameter) copper tubing. Cold water pipe B. Pipe clamp C. Slip the compression ...

Use & Care Guide
Page 12
... be avoided, make sure the water softener is operating properly and is well maintained. ■ Do not use with water that it in the refrigerator compartment. NOTE: Your ice maker has an automatic shutoff. Replace the bin by small children and pets. To restart ice production, lift open the...the dispenser light. Avoid connecting the ice maker to your ice will not work. 5. Ice can still be dispensed, but no more can damage parts of your water dispenser or ice maker decreases noticeably. Do not force the wire shutoff arm up ) position. Water Filtration System Do not use ...
... be avoided, make sure the water softener is operating properly and is well maintained. ■ Do not use with water that it in the refrigerator compartment. NOTE: Your ice maker has an automatic shutoff. Replace the bin by small children and pets. To restart ice production, lift open the...the dispenser light. Avoid connecting the ice maker to your ice will not work. 5. Ice can still be dispensed, but no more can damage parts of your water dispenser or ice maker decreases noticeably. Do not force the wire shutoff arm up ) position. Water Filtration System Do not use ...

Use & Care Guide
Page 13
... Hazard Use nonflammable cleaner. Wipe up any odors formed in one section will transfer to the other harsh cleaning tools. 1. Unplug refrigerator or disconnect power. 2. Hand wash, rinse, and dry removable parts and interior surfaces thoroughly. There is inserted. 5. See the "Door Removal" instructions, either in the User Instructions or the Installation...
... Hazard Use nonflammable cleaner. Wipe up any odors formed in one section will transfer to the other harsh cleaning tools. 1. Unplug refrigerator or disconnect power. 2. Hand wash, rinse, and dry removable parts and interior surfaces thoroughly. There is inserted. 5. See the "Door Removal" instructions, either in the User Instructions or the Installation...

Use & Care Guide
Page 14
...items. 2. Vacation and Moving Care Vacations If You Choose to Turn Refrigerator Off Before You Leave: 1. If you have an automatic ice maker, turn cooling off the water supply to the refrigerator. Remove all removable parts, wrap them well, and tape them open far enough for contact ...information. Take out all food from the refrigerator. 2. Depending on the model, raise the front of ice drops, raise ...
...items. 2. Vacation and Moving Care Vacations If You Choose to Turn Refrigerator Off Before You Leave: 1. If you have an automatic ice maker, turn cooling off the water supply to the refrigerator. Remove all removable parts, wrap them well, and tape them open far enough for contact ...information. Take out all food from the refrigerator. 2. Depending on the model, raise the front of ice drops, raise ...

Use & Care Guide
Page 19
... affresh® Kitchen & Appliance Cleaner: Order Part #W10355010 In Canada, order Part #W10355010B Water Filter: Order Part #W10295370A (P4RFWB) WATER FILTER CERTIFICATIONS 19 Hold the glass under the dispenser for 2 to 3 seconds after installation for your authorized Whirlpool dealer. The first glass of water dispensed. ■ Refrigerator is not connected to a cold water pipe - In...
... affresh® Kitchen & Appliance Cleaner: Order Part #W10355010 In Canada, order Part #W10355010B Water Filter: Order Part #W10295370A (P4RFWB) WATER FILTER CERTIFICATIONS 19 Hold the glass under the dispenser for 2 to 3 seconds after installation for your authorized Whirlpool dealer. The first glass of water dispensed. ■ Refrigerator is not connected to a cold water pipe - In...

Use & Care Guide
Page 21
... your major appliance, to instruct you on the inside wall of the refrigerator compartment. You can write to Whirlpool with Whirlpool's published installation instructions. 11. Service must be borne by a Whirlpool designated service company. ITEMS EXCLUDED FROM WARRANTY This limited warranty does not...ready. Service calls to refrigerator or freezer product failures. 7. Expenses for travel and transportation for future reference. 21 Replacement parts or repair labor on the duration of implied warranties of products not approved by an authorized Whirlpool servicer is located in...
... your major appliance, to instruct you on the inside wall of the refrigerator compartment. You can write to Whirlpool with Whirlpool's published installation instructions. 11. Service must be borne by a Whirlpool designated service company. ITEMS EXCLUDED FROM WARRANTY This limited warranty does not...ready. Service calls to refrigerator or freezer product failures. 7. Expenses for travel and transportation for future reference. 21 Replacement parts or repair labor on the duration of implied warranties of products not approved by an authorized Whirlpool servicer is located in...

Installation Guide
Page 2
Always read and obey all parts and panels before operating. ■ Remove doors from your old refrigerator. ■ Keep flammable materials and vapors, such as gasoline, away from refrigerator. ■ Use two or more people to cause cancer. This is , tell you how to potential ...of California Proposition 65 Warnings: WARNING: This product contains one or more chemicals known to the State of California to move and install refrigerator. ■ Disconnect power before servicing. ■ Replace all safety messages. IMPORTANT SAFETY INSTRUCTIONS WARNING: To reduce the risk of fire...
Always read and obey all parts and panels before operating. ■ Remove doors from your old refrigerator. ■ Keep flammable materials and vapors, such as gasoline, away from refrigerator. ■ Use two or more people to cause cancer. This is , tell you how to potential ...of California Proposition 65 Warnings: WARNING: This product contains one or more chemicals known to the State of California to move and install refrigerator. ■ Disconnect power before servicing. ■ Replace all safety messages. IMPORTANT SAFETY INSTRUCTIONS WARNING: To reduce the risk of fire...
Installation Guide
Page 4
...shock. 4 Top Left Hinge A A A. Leveling Screw 9 Door Alignment (Bottom Right Hinge) A Raise Lower A. If door removal is necessary, see whether you begin, turn the refrigerator control OFF or turn cooling off. Grommets 2 Water Dispenser Tubing Connection A A A. Wiring Plugs B. flat-blade screwdriver wrench and hex-head socket wrenches WARNING Electrical Shock... power before starting installation. Face of your home to see the instructions below. Door Removal, Leveling and Alignment Gather the required tools and parts and read all instructions before removing doors.
...shock. 4 Top Left Hinge A A A. Leveling Screw 9 Door Alignment (Bottom Right Hinge) A Raise Lower A. If door removal is necessary, see whether you begin, turn the refrigerator control OFF or turn cooling off. Grommets 2 Water Dispenser Tubing Connection A A A. Wiring Plugs B. flat-blade screwdriver wrench and hex-head socket wrenches WARNING Electrical Shock... power before starting installation. Face of your home to see the instructions below. Door Removal, Leveling and Alignment Gather the required tools and parts and read all instructions before removing doors.

Installation Guide
Page 5
...through the hinge. See Graphic 3. ■ Remove the wiring clip using the instructions below to the tube that they are part of the refrigerator. Lift freezer door straight up off the leveling screws and rollers. Before replacing the freezer door on the bottom left to ...to remove the top left hinge. IMPORTANT: Do not remove either screw A. 8. When the hinge is reconnected later. Replace both doors (refrigerator and freezer) and the water filter cover door. See Graphic 6. The water dispenser tubing and wiring remain attached to adjust the screws. ...
...through the hinge. See Graphic 3. ■ Remove the wiring clip using the instructions below to the tube that they are part of the refrigerator. Lift freezer door straight up off the leveling screws and rollers. Before replacing the freezer door on the bottom left to ...to remove the top left hinge. IMPORTANT: Do not remove either screw A. 8. When the hinge is reconnected later. Replace both doors (refrigerator and freezer) and the water filter cover door. See Graphic 6. The water dispenser tubing and wiring remain attached to adjust the screws. ...
Installation Guide
Page 6
... A B A. Setscrews inside the refrigerator. IMPORTANT: This refrigerator is designed for the water line connections. When installing your refrigerator next to the left. 3. Locate the alignment screw on your refrigerator, allow the doors to turn . Handle Installation and Removal PARTS INCLUDED: Door handles (2 hex key...the handles, which are preinstalled in the previous steps, fully tighten both setscrews have been partially tightened as gasoline, away from refrigerator. Once both the upper and lower setscrews. Repeat steps 1 and 2 for ¹⁄₂" (1.27 cm) of space...
... A B A. Setscrews inside the refrigerator. IMPORTANT: This refrigerator is designed for the water line connections. When installing your refrigerator next to the left. 3. Locate the alignment screw on your refrigerator, allow the doors to turn . Handle Installation and Removal PARTS INCLUDED: Door handles (2 hex key...the handles, which are preinstalled in the previous steps, fully tighten both setscrews have been partially tightened as gasoline, away from refrigerator. Once both the upper and lower setscrews. Repeat steps 1 and 2 for ¹⁄₂" (1.27 cm) of space...

Installation Guide
Page 7
... (6.35 mm) saddle-type shutoff valve, a union, and copper tubing. Electrical Requirements WARNING Water Supply Requirements Gather the required tools and parts before starting installation. Do not remove ground prong. Recommended Grounding Method A 115 volt, 60 Hz, AC only, 15- NOTE: Before performing...filter if necessary. ■ Allow the storage tank on the reverse osmosis system to refill after heavy usage. ■ If your refrigerator into a grounded 3 prong outlet. Read and follow these instructions can result in a location where the temperature ranges from the electrical ...
... (6.35 mm) saddle-type shutoff valve, a union, and copper tubing. Electrical Requirements WARNING Water Supply Requirements Gather the required tools and parts before starting installation. Do not remove ground prong. Recommended Grounding Method A 115 volt, 60 Hz, AC only, 15- NOTE: Before performing...filter if necessary. ■ Allow the storage tank on the reverse osmosis system to refill after heavy usage. ■ If your refrigerator into a grounded 3 prong outlet. Read and follow these instructions can result in a location where the temperature ranges from the electrical ...
Installation Guide
Page 8
... (crosslinked polyethylene) tube. Bend the copper tubing to the household water line) is clear. Use a quarter-turn on the back of the refrigerator (which is under the pipe clamp. IMPORTANT: ■ Make sure it is recommended. Copper tubing (to avoid possible water valve malfunction. ...away from the drill and normal sediment from the connection on before making the final connection to the inlet of copper, we recommend the following Whirlpool® Part Numbers: W10505928RP (7 ft [2.14 m] jacketed PEX), 8212547RP (5 ft [1.52 m] PEX), or W10267701RP (25 ft [7.62 m] PEX). ...
... (crosslinked polyethylene) tube. Bend the copper tubing to the household water line) is clear. Use a quarter-turn on the back of the refrigerator (which is under the pipe clamp. IMPORTANT: ■ Make sure it is recommended. Copper tubing (to avoid possible water valve malfunction. ...away from the drill and normal sediment from the connection on before making the final connection to the inlet of copper, we recommend the following Whirlpool® Part Numbers: W10505928RP (7 ft [2.14 m] jacketed PEX), 8212547RP (5 ft [1.52 m] PEX), or W10267701RP (25 ft [7.62 m] PEX). ...

Installation Guide
Page 9
... grounded 3 prong outlet. NOTE: To avoid rattling, be sure the copper tubing does not touch the cabinet's side wall or other parts inside the cabinet. Unplug refrigerator or disconnect power. 2. NOTE: Tighten the nut by hand. Coupling (purchased) EFG E. Household water line 4. Failure to... Refrigerator Style 1 1. Tighten the compression nut. Remove and discard the short, black plastic part from the gray water tube on the coupling. 5. Then tighten it in order to connect the water ...
... grounded 3 prong outlet. NOTE: To avoid rattling, be sure the copper tubing does not touch the cabinet's side wall or other parts inside the cabinet. Unplug refrigerator or disconnect power. 2. NOTE: Tighten the nut by hand. Coupling (purchased) EFG E. Household water line 4. Failure to... Refrigerator Style 1 1. Tighten the compression nut. Remove and discard the short, black plastic part from the gray water tube on the coupling. 5. Then tighten it in order to connect the water ...


