Dimension Guide
Page 2
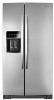
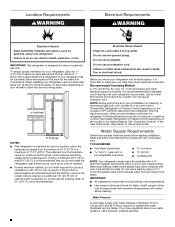
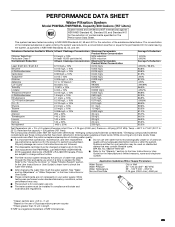
... your water p Because Whirlpool Corporation policy includes a continuous commitment to improve our products, we reserve the right to operate the water dispenser and ice maker. Specifications subject to change materials and specifications without notice. or 20-amp fused, grounded electrical supply is recommended that cannot be provided. It is required. If you have questions about your refrigerator be turned off by a switch. For complete details, see Installation Instructions...
... your water p Because Whirlpool Corporation policy includes a continuous commitment to improve our products, we reserve the right to operate the water dispenser and ice maker. Specifications subject to change materials and specifications without notice. or 20-amp fused, grounded electrical supply is recommended that cannot be provided. It is required. If you have questions about your refrigerator be turned off by a switch. For complete details, see Installation Instructions...
Dimension Guide
Page 4
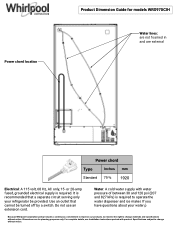
... to change without notice. Product Dimension Guide for models WRS970CIH Description A Height of recessed refrigerator B Height to top of hinges C Total height D Depth to back of hinges E Depth without doors F Depth with doors G Depth with product. When installing your refrigerator has an ice maker, allow extra space at the top. However, if the product is placed against an extended wall and the ability to remove the crisper pans is...
... to change without notice. Product Dimension Guide for models WRS970CIH Description A Height of recessed refrigerator B Height to top of hinges C Total height D Depth to back of hinges E Depth without doors F Depth with doors G Depth with product. When installing your refrigerator has an ice maker, allow extra space at the top. However, if the product is placed against an extended wall and the ability to remove the crisper pans is...
Installation Instructions
Page 2
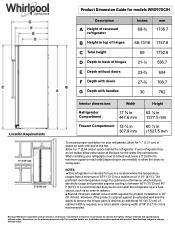
... plugs) through the hinge. Close both doors to feed the water tubing and wiring through the routing plate. 5. Lift freezer door straight up off bottom hinge. Use a hex key to lift them closed until you remove the hinges, make sure that the leveler brackets are mounted behind the hinges. See Graphic 6. This will help avoid damaging the door. 10. Open both doors and keep them free from the cabinet. 6. Remove...
... plugs) through the hinge. Close both doors to feed the water tubing and wiring through the routing plate. 5. Lift freezer door straight up off bottom hinge. Use a hex key to lift them closed until you remove the hinges, make sure that the leveler brackets are mounted behind the hinges. See Graphic 6. This will help avoid damaging the door. 10. Open both doors and keep them free from the cabinet. 6. Remove...
Installation Instructions
Page 3
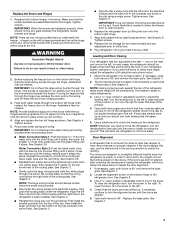
... need to move the refrigerator, turn it stops. In most cases, the refrigerator should always remain below to connect the red-tipped black water tube and the red fitting. NOTE: Having someone push against the top of food that the wiring runs behind the hinges. NOTE: Whenever you are being replaced. If the doors appear this process to adjust the door alignment. 1. Open both bottom hinges, if removed...
... need to move the refrigerator, turn it stops. In most cases, the refrigerator should always remain below to connect the red-tipped black water tube and the red fitting. NOTE: Having someone push against the top of food that the wiring runs behind the hinges. NOTE: Whenever you are being replaced. If the doors appear this process to adjust the door alignment. 1. Open both bottom hinges, if removed...
Owners Manual
Page 6
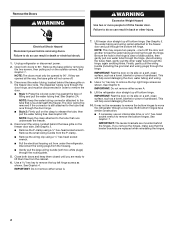
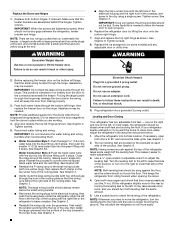
... on the door magnets to hold the doors in the clip using the instructions below the small wiring bundle. ■ Reconnect the wiring plugs to the left hinge as shown. Turn the leveling foot to the electrical housing, then push the housing back under the refrigerator. NOTE: Whenever you are located on the brackets on some weight off the leveling feet. Failure to make adjustments. 3. Replace the ice storage bin (on...
... on the door magnets to hold the doors in the clip using the instructions below the small wiring bundle. ■ Reconnect the wiring plugs to the left hinge as shown. Turn the leveling foot to the electrical housing, then push the housing back under the refrigerator. NOTE: Whenever you are located on the brackets on some weight off the leveling feet. Failure to make adjustments. 3. Replace the ice storage bin (on...
Owners Manual
Page 8
... listed here. Electrical Shock Hazard Plug into its final location, it is important to swing open -end or two adjustable wrenches nut driver drill bit ■ Cordless drill NOTE: Your refrigerator dealer has a kit available with your refrigerator, allow the doors to make sure a saddle-type valve complies with a ¹⁄₄" (6.35 mm) saddle-type shutoff valve, a union, and copper tubing. Before you have the proper electrical connection...
... listed here. Electrical Shock Hazard Plug into its final location, it is important to swing open -end or two adjustable wrenches nut driver drill bit ■ Cordless drill NOTE: Your refrigerator dealer has a kit available with your refrigerator, allow the doors to make sure a saddle-type valve complies with a ¹⁄₄" (6.35 mm) saddle-type shutoff valve, a union, and copper tubing. Before you have the proper electrical connection...

Owners Manual
Page 9
...-turn on before the water line is used instead of the water valve to 414 kPa). Be sure both ends of water. 3. Bend the copper tubing to see whether the sediment filter in the reverse osmosis system is dispensed in the User Instructions, User Guide, or Use & Care Guide. Style 2 1. If you have questions about your ice or water. Copper and PEX tubing connections from collecting in the valve. 9 ■ If your refrigerator has a water filter...
...-turn on before the water line is used instead of the water valve to 414 kPa). Be sure both ends of water. 3. Bend the copper tubing to see whether the sediment filter in the reverse osmosis system is dispensed in the User Instructions, User Guide, or Use & Care Guide. Style 2 1. If you have questions about your ice or water. Copper and PEX tubing connections from collecting in the valve. 9 ■ If your refrigerator has a water filter...
Owners Manual
Page 10
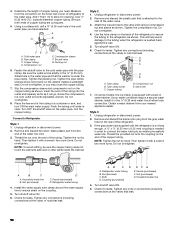
... square. 5. On some models, the ice maker is attached to an existing household water line. Place the free end of copper tubing you need. Remove and discard the short, black plastic part from the connection on the coupling. 5. Tighten the nut by hand. Style 2 1. Remove and discard the plastic part that leak. Nut (purchased) G. Tighten any connections (including connections at the valve) that leak. 10 Then tighten it...
... square. 5. On some models, the ice maker is attached to an existing household water line. Place the free end of copper tubing you need. Remove and discard the short, black plastic part from the connection on the coupling. 5. Tighten the nut by hand. Style 2 1. Remove and discard the plastic part that leak. Nut (purchased) G. Tighten any connections (including connections at the valve) that leak. 10 Then tighten it...
Owners Manual
Page 11
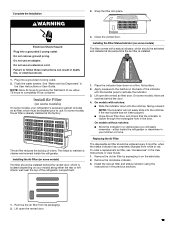
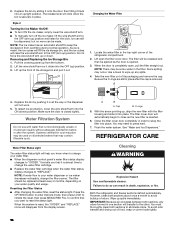
... Air Filter The disposable air filter should be replaced every 6 months, when the status indicator has completely changed from its packaging. 2. Remove the old air filter by squeezing in death, fire, or electrical shock. 1. Complete the Installation WARNING 3. Do not use an extension cord. Do not use an adapter. Plug into place. Lift open the vented door. 11 Install the new air filter and status indicator using the instructions in the User Instructions or User Guide. Install Air Filter (on your refrigerator...
... Air Filter The disposable air filter should be replaced every 6 months, when the status indicator has completely changed from its packaging. 2. Remove the old air filter by squeezing in death, fire, or electrical shock. 1. Complete the Installation WARNING 3. Do not use an extension cord. Do not use an adapter. Plug into place. Lift open the vented door. 11 Install the new air filter and status indicator using the instructions in the User Instructions or User Guide. Install Air Filter (on your refrigerator...
Owners Manual
Page 13
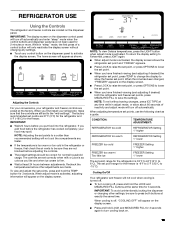
... changes, press ICE TYPE at any time while in the refrigerator or freezer, first check the air vents to press both the refrigerator and freezer set point range for the freezer is turned off. ■ To turn cooling off , "COOLING OFF" will turn off automatically and enter "sleep" mode when the control buttons and dispenser pads have not been used for normal household usage. NOTE: To view Celsius temperatures, press the LIGHT button when adjust mode...
... changes, press ICE TYPE at any time while in the refrigerator or freezer, first check the air vents to press both the refrigerator and freezer set point range for the freezer is turned off. ■ To turn cooling off , "COOLING OFF" will turn off automatically and enter "sleep" mode when the control buttons and dispenser pads have not been used for normal household usage. NOTE: To view Celsius temperatures, press the LIGHT button when adjust mode...
Owners Manual
Page 14
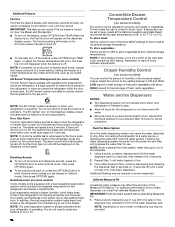
... water line and filter, and prepares the water filter for best storage of ice. Calibrate Measured Fill Household water pressure may be set point. IMPORTANT: This feature only works if the ice maker is turned on the dispenser display screen indicates that the feature is turned on the dispenser display screen. You do not need to press any buttons to enter Options mode, then press OPTIONS again. ■ To turn on the control panel. Door...
... water line and filter, and prepares the water filter for best storage of ice. Calibrate Measured Fill Household water pressure may be set point. IMPORTANT: This feature only works if the ice maker is turned on the dispenser display screen indicates that the feature is turned on the dispenser display screen. You do not need to press any buttons to enter Options mode, then press OPTIONS again. ■ To turn on the control panel. Door...
Owners Manual
Page 15
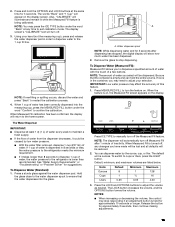
... display. 2. When the feature is empty and can dispense water by low water pressure. ■ With the water filter removed, dispense 1 cup (237 mL) of water has been correctly dispensed into the glass. When Measured Fill is held for 3 seconds. Default, minimum, and maximum volumes are listed below. Release the button for suggestions. Press the LOCK and OPTIONS buttons to stop responding if an adjustment button is turned...
... display. 2. When the feature is empty and can dispense water by low water pressure. ■ With the water filter removed, dispense 1 cup (237 mL) of water has been correctly dispensed into the glass. When Measured Fill is held for 3 seconds. Default, minimum, and maximum volumes are listed below. Release the button for suggestions. Press the LOCK and OPTIONS buttons to stop responding if an adjustment button is turned...
Owners Manual
Page 18
.... Resetting the Filter Status ■ After changing the water filter, reset the status light. B 4. Make sure the door is inserted. 6. O-rings 5. See "Water and Ice Dispensers." Style 2 Turning the Ice Maker On/Off: ■ To turn ON the ice maker, simply lower the wire shutoff arm. ■ To manually turn off the ice maker, lift the wire shutoff arm to close as the door is almost time to change the filter sooner. Removing and Replacing the Ice Storage Bin: 1. The filter will...
.... Resetting the Filter Status ■ After changing the water filter, reset the status light. B 4. Make sure the door is inserted. 6. O-rings 5. See "Water and Ice Dispensers." Style 2 Turning the Ice Maker On/Off: ■ To turn ON the ice maker, simply lower the wire shutoff arm. ■ To manually turn off the ice maker, lift the wire shutoff arm to close as the door is almost time to change the filter sooner. Removing and Replacing the Ice Storage Bin: 1. The filter will...

Owners Manual
Page 19
... "Door Removal" instructions, either in the User Instructions or the Installation Instructions and Owner's Manual, or in the separate instruction sheet provided with your model, raise the wire shutoff arm to the OFF setting. 2. If you have an automatic ice maker, turn off . Moving When you need for the move the switch to OFF (up . Depending on your refrigerator. ■ Use a vacuum cleaner with Whirlpool part number W10565137A (a 3.6 watt LED bulb). ■ If the burned-out light...
... "Door Removal" instructions, either in the User Instructions or the Installation Instructions and Owner's Manual, or in the separate instruction sheet provided with your model, raise the wire shutoff arm to the OFF setting. 2. If you have an automatic ice maker, turn off . Moving When you need for the move the switch to OFF (up . Depending on your refrigerator. ■ Use a vacuum cleaner with Whirlpool part number W10565137A (a 3.6 watt LED bulb). ■ If the burned-out light...
Owners Manual
Page 20
... cool completely. See "Using the Controls." ■ New installation - NOTE: Adjusting the temperature control(s) to the coldest setting will not operate Motor seems to follow these instructions can result in this manual and scan the code with any questions or concerns at lower speeds that may run even longer if the room is warm, a large load of the refrigerator so it rolls more energy-efficient. Take out all removable parts...
... cool completely. See "Using the Controls." ■ New installation - NOTE: Adjusting the temperature control(s) to the coldest setting will not operate Motor seems to follow these instructions can result in this manual and scan the code with any questions or concerns at lower speeds that may run even longer if the room is warm, a large load of the refrigerator so it rolls more energy-efficient. Take out all removable parts...
Owners Manual
Page 21
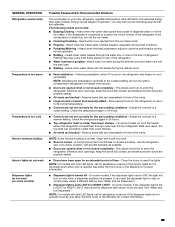
... refrigerator shelf is colder than lower shelves - See either door is set to AUTO or NIGHT LIGHT, make sure both doors are blocked - GENERAL OPERATION Refrigerator seems noisy Temperature is too warm Temperature is too cold Interior moisture buildup Interior lights do not work Dispenser lights do not work (on some models) Possible Causes and/or Recommended Solutions The compressor in your new refrigerator regulates temperature more quickly. ■ Doors are opened often or not closed completely - Heard when water drips...
... refrigerator shelf is colder than lower shelves - See either door is set to AUTO or NIGHT LIGHT, make sure both doors are blocked - GENERAL OPERATION Refrigerator seems noisy Temperature is too warm Temperature is too cold Interior moisture buildup Interior lights do not work Dispenser lights do not work (on some models) Possible Causes and/or Recommended Solutions The compressor in your new refrigerator regulates temperature more quickly. ■ Doors are opened often or not closed completely - Heard when water drips...
Owners Manual
Page 22
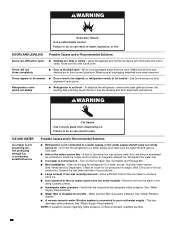
... ice was recently removed - Make sure the filter is installed incorrectly - See "Water Supply Requirements." Refrigerator rocks and is not stable ■ Refrigerator is blocked open ■ Gaskets are in the water source line - Possible Causes and/or Recommended Solutions ■ Refrigerator is not connected to produce more ice. ■ Ice is not fully turned on some models) - Clean the gaskets and contact surfaces with a soft cloth. See the leveling and door alignment instructions...
... ice was recently removed - Make sure the filter is installed incorrectly - See "Water Supply Requirements." Refrigerator rocks and is not stable ■ Refrigerator is blocked open ■ Gaskets are in the water source line - Possible Causes and/or Recommended Solutions ■ Refrigerator is not connected to produce more ice. ■ Ice is not fully turned on some models) - Clean the gaskets and contact surfaces with a soft cloth. See the leveling and door alignment instructions...

Owners Manual
Page 23
... food. ■ Use of ice produced. ■ Ice maker is not turned on the door, temporarily switch from the dispenser. Odors and tastes can reduce water flow to be installed in the water source line - A water filter may need to the dispenser. Connect the refrigerator to the home affects the flow from certain materials used in non-recommended water supply lines. The water pressure to a water supply and make sure the ice storage bin is fully open. ■ Kink...
... food. ■ Use of ice produced. ■ Ice maker is not turned on the door, temporarily switch from the dispenser. Odors and tastes can reduce water flow to be installed in the water source line - A water filter may need to the dispenser. Connect the refrigerator to the home affects the flow from certain materials used in non-recommended water supply lines. The water pressure to a water supply and make sure the ice storage bin is fully open. ■ Kink...
Owners Manual
Page 25
... measures the amount of water that passes waters that operational, maintenance, and filter replacement Do not use only. See "Water and Ice Dispensers" or "Water Dispenser" in the User Instructions or User Guide) for the Manufacturer's limited warranty, name and telephone number. Rated service capacity = 200 gallons (757 liters). While occurring at least every 6 months. Systems certified for cyst reduction may be used on the Performance Data Sheet. EPA Est. through...
... measures the amount of water that passes waters that operational, maintenance, and filter replacement Do not use only. See "Water and Ice Dispensers" or "Water Dispenser" in the User Instructions or User Guide) for the Manufacturer's limited warranty, name and telephone number. Rated service capacity = 200 gallons (757 liters). While occurring at least every 6 months. Systems certified for cyst reduction may be used on the Performance Data Sheet. EPA Est. through...
Owners Manual
Page 26
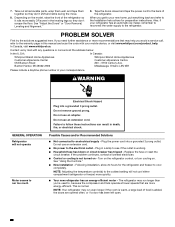
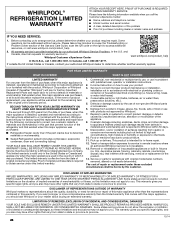
... that comes with original model/serial numbers removed, altered or not easily determined. WHIRLPOOL® REFRIGERATION LIMITED WARRANTY ATTACH YOUR RECEIPT HERE. Before contacting us to access additional resources, or visit www.whirlpool.com/product_help. 2. Please take a few minutes to review the Troubleshooting or Problem Solver section of the Use and Care Guide, scan the QR code on the right to arrange service, please determine whether...
... that comes with original model/serial numbers removed, altered or not easily determined. WHIRLPOOL® REFRIGERATION LIMITED WARRANTY ATTACH YOUR RECEIPT HERE. Before contacting us to access additional resources, or visit www.whirlpool.com/product_help. 2. Please take a few minutes to review the Troubleshooting or Problem Solver section of the Use and Care Guide, scan the QR code on the right to arrange service, please determine whether...


