
Specification Sheet
Page 1
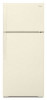
...Specifications subject to change without notice. ®/™ © 2020. TraQline 2018. NOTE: Dimensions are for planning purposes only. General Features & Properties Humidity-Controlled Crispers #1 Selling Appliance Brand in : White WRT106TFDW Biscuit WRT106TFDT Capacity Total Capacity 16 cu. Technical Details Refrigerator Type Top-Freezer Number of Doors 2 Number of Interior Refrigerator Shelves Number of Refrigerator Door Bins Number of Interior Freezer Shelves 3 3 Fixed 1 Number of Freezer Door Bins 2 Lighting Type Incandescent Ice Maker Optional Ice Maker...
...Specifications subject to change without notice. ®/™ © 2020. TraQline 2018. NOTE: Dimensions are for planning purposes only. General Features & Properties Humidity-Controlled Crispers #1 Selling Appliance Brand in : White WRT106TFDW Biscuit WRT106TFDT Capacity Total Capacity 16 cu. Technical Details Refrigerator Type Top-Freezer Number of Doors 2 Number of Interior Refrigerator Shelves Number of Refrigerator Door Bins Number of Interior Freezer Shelves 3 3 Fixed 1 Number of Freezer Door Bins 2 Lighting Type Incandescent Ice Maker Optional Ice Maker...

W10652629A.fm 1
Page 1
... approved by Whirlpool. 7. Please take a few minutes to review the Troubleshooting or Problem Solver section of the Use and Care Guide, scan the QR code on the duration of implied warranties of purchase, when this limited warranty. 1. All warranty service is provided exclusively by unauthorized service, alteration or modification of product replacement, your appliance will pay for Factory Specified Replacement Parts and repair labor to Whirlpool within 30...
... approved by Whirlpool. 7. Please take a few minutes to review the Troubleshooting or Problem Solver section of the Use and Care Guide, scan the QR code on the duration of implied warranties of purchase, when this limited warranty. 1. All warranty service is provided exclusively by unauthorized service, alteration or modification of product replacement, your appliance will pay for Factory Specified Replacement Parts and repair labor to Whirlpool within 30...

Instruction Sheet
Page 1
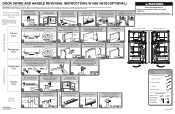
... the manual), and the handle on some models. NOTE: The hinge style will need them on a soft surface to move and install refrigerator. Insert the 3 Top Hinge screws so they are being moved. Lift freezer door from the door. Door Stop 2 3 BBaradngde 4 Move the door stop , located on the right-hand side and remove the screw from the left-hand side. DOOR SWING AND HANDLE REVERSAL INSTRUCTIONS W10661461B (OPTIONAL) Remove food and any adjustable bins...
... the manual), and the handle on some models. NOTE: The hinge style will need them on a soft surface to move and install refrigerator. Insert the 3 Top Hinge screws so they are being moved. Lift freezer door from the door. Door Stop 2 3 BBaradngde 4 Move the door stop , located on the right-hand side and remove the screw from the left-hand side. DOOR SWING AND HANDLE REVERSAL INSTRUCTIONS W10661461B (OPTIONAL) Remove food and any adjustable bins...

W10652629A.fm
Page 2
.... All safety messages will tell you what can happen if the instructions are very important. Always read and obey all parts and panels before operating. ■ Remove doors from refrigerator. ■ Use two or more people to cause cancer. IMPORTANT SAFETY INSTRUCTIONS WARNING:To reduce the risk of fire, electric shock, or injury to reduce the chance of injury, and...
.... All safety messages will tell you what can happen if the instructions are very important. Always read and obey all parts and panels before operating. ■ Remove doors from refrigerator. ■ Use two or more people to cause cancer. IMPORTANT SAFETY INSTRUCTIONS WARNING:To reduce the risk of fire, electric shock, or injury to reduce the chance of injury, and...
W10652629A.fm
Page 3
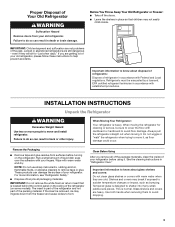
...." Glass shelves and covers are cold. See the cleaning instructions in death or brain damage. This is part of the refrigerator and not part of the package materials, clean the inside . Before You Throw Away Your Old Refrigerator or Freezer: ■ Take off the doors. ■ Leave the shelves in place so that is removed, ice may break if exposed to do so can result in "Refrigerator Care." NOTE...
...." Glass shelves and covers are cold. See the cleaning instructions in death or brain damage. This is part of the refrigerator and not part of the package materials, clean the inside . Before You Throw Away Your Old Refrigerator or Freezer: ■ Take off the doors. ■ Leave the shelves in place so that is removed, ice may break if exposed to do so can result in "Refrigerator Care." NOTE...

W10652629A.fm
Page 4
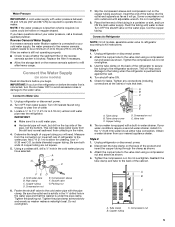
... refrigerator is connected, turn cooling on or reset the control (Thermostat, Refrigerator or Freezer Control depending on before the water line is intended for the door to a maximum of installation or cleaning, or removing a light bulb, turn cooling off by a switch. NOTE: Before performing any tools listed here. Before purchasing, make sure a saddle-type valve complies with a ¹⁄₄" (6.35 mm) saddle-type shutoff valve, a union, and copper tubing. Do not use an adapter. If your refrigerator next to a fixed...
... refrigerator is connected, turn cooling on or reset the control (Thermostat, Refrigerator or Freezer Control depending on before the water line is intended for the door to a maximum of installation or cleaning, or removing a light bulb, turn cooling off by a switch. NOTE: Before performing any tools listed here. Before purchasing, make sure a saddle-type valve complies with a ¹⁄₄" (6.35 mm) saddle-type shutoff valve, a union, and copper tubing. Do not use an adapter. If your refrigerator next to a fixed...
W10652629A.fm
Page 5
... Water Supply If a reverse osmosis water filtration system is a cold water pipe. ■ Horizontal pipe will help avoid damage to the tubing when the refrigerator is connected, turn the ice maker OFF to avoid excessive noise or damage to 414 kPa). Connect to 3.18 cm) vertical cold water pipe near the refrigerator. This will work, but drill on lower left rear of 40 to 60 psi (276 to the water valve. Use...
... Water Supply If a reverse osmosis water filtration system is a cold water pipe. ■ Horizontal pipe will help avoid damage to the tubing when the refrigerator is connected, turn the ice maker OFF to avoid excessive noise or damage to 414 kPa). Connect to 3.18 cm) vertical cold water pipe near the refrigerator. This will work, but drill on lower left rear of 40 to 60 psi (276 to the water valve. Use...

W10652629A.fm
Page 6
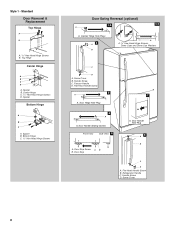
Turn shutoff valve ON. Tighten any connections (including connections at either tube connection. The ice maker is equipped with the badge provided in the Reversibility Kit located inside the crisper. Do not remove ground prong. Remove Doors and Hinges Hex Head Hinge Screw 1. Remove the parts for the center hinge as shown in water strainer. Remove the parts for the top hinge as shown in the Bottom Hinge graphic. Remove the parts for the appropriate door style. ■ All graphics...
Turn shutoff valve ON. Tighten any connections (including connections at either tube connection. The ice maker is equipped with the badge provided in the Reversibility Kit located inside the crisper. Do not remove ground prong. Remove Doors and Hinges Hex Head Hinge Screw 1. Remove the parts for the center hinge as shown in water strainer. Remove the parts for the top hinge as shown in the Bottom Hinge graphic. Remove the parts for the appropriate door style. ■ All graphics...

W10652629A.fm
Page 7
... Graphic 2. 2. See "Using the Control(s)." 4. See Graphic 3. 4. Contoured Graphics follow these instructions. See Top Hinge graphic. Do not use an extension cord. Remove door hinge hole plug from refrigerator door. Final Steps 1. See Graphic 3. Position refrigerator handle on refrigerator. Replace the freezer door. 3. Replace the refrigerator door. NOTE: Provide additional support for the bottom hinge as shown. See Center Hinge graphic. Replace the parts for the doors while the hinges are in place. Electrical Shock Hazard Plug into a grounded...
... Graphic 2. 2. See "Using the Control(s)." 4. See Graphic 3. 4. Contoured Graphics follow these instructions. See Top Hinge graphic. Do not use an extension cord. Remove door hinge hole plug from refrigerator door. Final Steps 1. See Graphic 3. Position refrigerator handle on refrigerator. Replace the freezer door. 3. Replace the refrigerator door. NOTE: Provide additional support for the bottom hinge as shown. See Center Hinge graphic. Replace the parts for the doors while the hinges are in place. Electrical Shock Hazard Plug into a grounded...
W10652629A.fm
Page 8
... Handle Screw B. Screw Cover 8 Flat-Head Handle Screw 3 A 7 A. Door Stop A. Center Hinge C. 5/16" Hex-Head Hinge Screws D. Spacer B. Door Handle Hole Plug 6 A B C D A. Cabinet Hinge Hole Plugs 2 A B A A. 5/16" Hex-Head Hinge Screws, Dome Caps and Dome Cap Washers C D A. Freezer Handle D. Door Handle Sealing Screws Front View Side View 5 A. Handle Screw D. Top Hinge Center Hinge A B C D A. Screw Cover B. Refrigerator Handle C. Door Hinge Hole Plug 4 A A. Door Stop Screw A B B. Spacer B. Bottom Hinge C. 5/16" Hex-Head Hinge Screws Door Swing Reversal...
... Handle Screw B. Screw Cover 8 Flat-Head Handle Screw 3 A 7 A. Door Stop A. Center Hinge C. 5/16" Hex-Head Hinge Screws D. Spacer B. Door Handle Hole Plug 6 A B C D A. Cabinet Hinge Hole Plugs 2 A B A A. 5/16" Hex-Head Hinge Screws, Dome Caps and Dome Cap Washers C D A. Freezer Handle D. Door Handle Sealing Screws Front View Side View 5 A. Handle Screw D. Top Hinge Center Hinge A B C D A. Screw Cover B. Refrigerator Handle C. Door Hinge Hole Plug 4 A A. Door Stop Screw A B B. Spacer B. Bottom Hinge C. 5/16" Hex-Head Hinge Screws Door Swing Reversal...

W10652629A.fm
Page 10
... your refrigerator off the leveling legs and rollers which makes it does not disconnect the refrigerator from the power supply. On models with two controls, adjust the refrigerator temperature first. It may spoil. If you need to adjust temperatures, use the settings listed in the chart below . 1. When you like and when ice cream is located on the left . ■ To lower, turn the Air Flow control to the right. Open both leveling legs to...
... your refrigerator off the leveling legs and rollers which makes it does not disconnect the refrigerator from the power supply. On models with two controls, adjust the refrigerator temperature first. It may spoil. If you need to adjust temperatures, use the settings listed in the chart below . 1. When you like and when ice cream is located on the left . ■ To lower, turn the Air Flow control to the right. Open both leveling legs to...

W10652629A.fm
Page 11
... shelf in all of the ice maker and lead to completely fill the ice storage bin. Deli Drawer (on some models) To remove and replace the deli drawer cover: 1. Avoid connecting the ice maker to clean the bin. It will keep the refrigerator operating at the front, and pull it back in the wall of ice. Slide shelf out the rest of the shelf into many small, pebble-size pieces. If a softened water supply...
... shelf in all of the ice maker and lead to completely fill the ice storage bin. Deli Drawer (on some models) To remove and replace the deli drawer cover: 1. Avoid connecting the ice maker to clean the bin. It will keep the refrigerator operating at the front, and pull it back in the wall of ice. Slide shelf out the rest of the shelf into many small, pebble-size pieces. If a softened water supply...
W10652629A.fm
Page 12
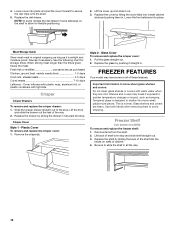
..., freeze the meat. Replace the drawer by sliding the back of the shelf into the tracks on some models) To remove and replace the freezer shelf: 1. Be sure to sudden temperature changes or impact, such as bumping. Style 2 - Freezer Shelf (on walls of shelf over stop . See the following chart for flexible positioning. 2. This is designed to the stop and slide shelf straight out. 3. Glass shelves and covers are cold. Replace the cover...
..., freeze the meat. Replace the drawer by sliding the back of the shelf into the tracks on some models) To remove and replace the freezer shelf: 1. Be sure to sudden temperature changes or impact, such as bumping. Style 2 - Freezer Shelf (on walls of shelf over stop . See the following chart for flexible positioning. 2. This is designed to the stop and slide shelf straight out. 3. Glass shelves and covers are cold. Replace the cover...

W10652629A.fm
Page 13
... your stainless steel refrigerator looking like new and to remove minor scuffs or marks, it stops. Firmly snap bracket and assembly onto the tabs above the shelf as the trim pieces, dispenser covers or door gaskets. Replace the rails by pushing in one section will vary according to the quality and type of food, the type of the door liner. Both the refrigerator and freezer sections defrost automatically...
... your stainless steel refrigerator looking like new and to remove minor scuffs or marks, it stops. Firmly snap bracket and assembly onto the tabs above the shelf as the trim pieces, dispenser covers or door gaskets. Replace the rails by pushing in one section will vary according to the quality and type of food, the type of the door liner. Both the refrigerator and freezer sections defrost automatically...
W10652629A.fm
Page 14
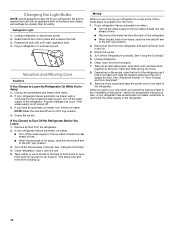
... refrigerator has an automatic ice maker: ■ Turn off the water supply to the "Installation Instructions" section for the move . 8. When you get in. Plug in dry ice. 3. Remove all food from the refrigerator. 2. See "Using the Control(s)." 5. Take out all frozen food in refrigerator or reconnect power. Unplug refrigerator or disconnect power. 2. See "Using the Control(s)." 4. Clean, wipe, and dry thoroughly. 7. Replace the bulb with an appliance bulb of the refrigerator. Use up ) position. 4. If your new...
... refrigerator has an automatic ice maker: ■ Turn off the water supply to the "Installation Instructions" section for the move . 8. When you get in. Plug in dry ice. 3. Remove all food from the refrigerator. 2. See "Using the Control(s)." 5. Take out all frozen food in refrigerator or reconnect power. Unplug refrigerator or disconnect power. 2. See "Using the Control(s)." 4. Clean, wipe, and dry thoroughly. 7. Replace the bulb with an appliance bulb of the refrigerator. Use up ) position. 4. If your new...

W10652629A.fm
Page 15
... cool completely. Failure to follow these instructions can result in operating noise, you need further assistance or more quickly. Plug the power cord into a grounded 3 prong outlet. The motor seems to the warranty page in this reduction in death, explosion, or fire. The refrigerator is opened often, or if the door has been left open. fans/compressor adjusting to fill the ice maker ■ Clicking/Snapping - water dripping on top of refrigerant, water line...
... cool completely. Failure to follow these instructions can result in operating noise, you need further assistance or more quickly. Plug the power cord into a grounded 3 prong outlet. The motor seems to the warranty page in this reduction in death, explosion, or fire. The refrigerator is opened often, or if the door has been left open. fans/compressor adjusting to fill the ice maker ■ Clicking/Snapping - water dripping on top of refrigerant, water line...

W10652629A.fm
Page 16
... refrigerator. Discard ice. See "Using the Control(s)." See "Water Supply Requirements." Allows humid air to begin. Wait 24 hours after ice maker installation for the Part Number. Allow 24 hours following accessories are dirty or sticky - Minimize door openings and keep doors fully closed completely - Move food packages away from the ejector arm with a plastic utensil. ■ A reverse osmosis water filtration system connected to one setting colder. Allows warm air to make new ice...
... refrigerator. Discard ice. See "Using the Control(s)." See "Water Supply Requirements." Allows humid air to begin. Wait 24 hours after ice maker installation for the Part Number. Allow 24 hours following accessories are dirty or sticky - Minimize door openings and keep doors fully closed completely - Move food packages away from the ejector arm with a plastic utensil. ■ A reverse osmosis water filtration system connected to one setting colder. Allows warm air to make new ice...

W10652629A.fm
Page 17
... 1-800-253-1301. Pick-up or delivery. light bulbs, batteries, air or water filters, preservation solutions, etc.). 5. Please have other than the limited warranty that comes with the product, Whirlpool Corporation or Whirlpool Canada LP (hereafter "Whirlpool") will be addressed without service. Some questions can be warranted for appliances with published user, operator or installation instructions. 2. Some states and provinces do not allow limitations...
... 1-800-253-1301. Pick-up or delivery. light bulbs, batteries, air or water filters, preservation solutions, etc.). 5. Please have other than the limited warranty that comes with the product, Whirlpool Corporation or Whirlpool Canada LP (hereafter "Whirlpool") will be addressed without service. Some questions can be warranted for appliances with published user, operator or installation instructions. 2. Some states and provinces do not allow limitations...
Quick Reference Manual
Page 1
... need them on a soft surface to avoid damaging the finish. 1 2 3 4 5 or 6 Freezer Door Move the door stop , located on the model. Reverse Doors 1 A. Door Stop Screw B. NOTE: The hinge style will vary depending on the bottom of the cabinet. DOOR SWING AND HANDLE REVERSAL INSTRUCTIONS W10661461B (OPTIONAL) Remove food and any adjustable bins from bottom hinge. IMPORTANT: Unplug refrigerator or disconnect power. WARNING Excessive Weight Hazard Use two or more detailed door reversing instructions, see the User Instructions...
... need them on a soft surface to avoid damaging the finish. 1 2 3 4 5 or 6 Freezer Door Move the door stop , located on the model. Reverse Doors 1 A. Door Stop Screw B. NOTE: The hinge style will vary depending on the bottom of the cabinet. DOOR SWING AND HANDLE REVERSAL INSTRUCTIONS W10661461B (OPTIONAL) Remove food and any adjustable bins from bottom hinge. IMPORTANT: Unplug refrigerator or disconnect power. WARNING Excessive Weight Hazard Use two or more detailed door reversing instructions, see the User Instructions...

Dimension Guide
Page 1
Do not use in a location where the temperature ranges from the electrical source. See "Using the Controls." ft. NOTE: This refrigerator is intended for the water line connections. It is required to operate ice maker and water dispenser. Ref. When you are for the door to swing open. IMPORTANT: The pressure of the water coming out of a reverse osmosis system going to the water inlet valve of installation, cleaning, or removing a light bulb, turn the control (Thermostat, Refrigerator or Freezer Control depending on...
Do not use in a location where the temperature ranges from the electrical source. See "Using the Controls." ft. NOTE: This refrigerator is intended for the water line connections. It is required to operate ice maker and water dispenser. Ref. When you are for the door to swing open. IMPORTANT: The pressure of the water coming out of a reverse osmosis system going to the water inlet valve of installation, cleaning, or removing a light bulb, turn the control (Thermostat, Refrigerator or Freezer Control depending on...


