Specification Sheet
Page 1
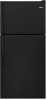
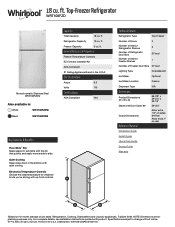
... Dimension Guide Install Guide Use & Care Guide Energy Guide Warranty *Based on 12-month average of unit sales. For complete details, see Installation Instructions packed with the bin that quickly and easily moves side to change without notice. ®/™ © 2020. Technical Details Refrigerator Type Top-Freezer Number of Doors 2 Number of Interior Refrigerator Shelves Number of Refrigerator Door Bins Number of Interior Freezer Shelves 3 5 Fixed 1 Number of Freezer Door Bins 2 Fixed Lighting Type Incandescent Ice Maker Optional Ice Maker Location Freezer Dispenser...
... Dimension Guide Install Guide Use & Care Guide Energy Guide Warranty *Based on 12-month average of unit sales. For complete details, see Installation Instructions packed with the bin that quickly and easily moves side to change without notice. ®/™ © 2020. Technical Details Refrigerator Type Top-Freezer Number of Doors 2 Number of Interior Refrigerator Shelves Number of Refrigerator Door Bins Number of Interior Freezer Shelves 3 5 Fixed 1 Number of Freezer Door Bins 2 Fixed Lighting Type Incandescent Ice Maker Optional Ice Maker Location Freezer Dispenser...

Instruction Sheet
Page 1
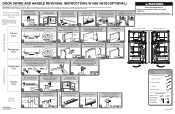
... side. DOOR SWING AND HANDLE REVERSAL INSTRUCTIONS W10661461B (OPTIONAL) Remove food and any adjustable bins from bottom hinge. Provide additional support for the doors while the hinges are not factory-installed on the opposite sides of the cabinet. NOTE: Handles are being moved. Door Stop 2 3 BBaradngde 4 Move the door stop , located on both the top and bottom pins of the door, to right. or Set the Refrigerator door onto the bottom hinge pin...
... side. DOOR SWING AND HANDLE REVERSAL INSTRUCTIONS W10661461B (OPTIONAL) Remove food and any adjustable bins from bottom hinge. Provide additional support for the doors while the hinges are not factory-installed on the opposite sides of the cabinet. NOTE: Handles are being moved. Door Stop 2 3 BBaradngde 4 Move the door stop , located on both the top and bottom pins of the door, to right. or Set the Refrigerator door onto the bottom hinge pin...
Quick Reference Manual
Page 1
... detailed door reversing instructions, see the User Instructions. BBaradngde Place the badge (using the template provided on the last page of the manual), and the handle on the lefthand side and remove the screw from the doors. Tighten the handle screws. Open doors right to allow a ¾" (19 mm) gap between the doors. Refrigerator A Door B Install Doors 1 A. NOTE: Make sure to left. Reinstall the base grille. IMPORTANT: Unplug refrigerator or disconnect power...
... detailed door reversing instructions, see the User Instructions. BBaradngde Place the badge (using the template provided on the last page of the manual), and the handle on the lefthand side and remove the screw from the doors. Tighten the handle screws. Open doors right to allow a ¾" (19 mm) gap between the doors. Refrigerator A Door B Install Doors 1 A. NOTE: Make sure to left. Reinstall the base grille. IMPORTANT: Unplug refrigerator or disconnect power...

Owners Manual
Page 2
... refrigerator. Connect only to the potable water supply. Use non-flammable cleaner. Keep flammable materials and vapors, such as : - This is not intended for their safety. Children should be supervised to persons when using the refrigerator, follow instructions. Staff kitchen areas in hotels, motels and other working environments; - Always read and obey all parts and panels before servicing. Replace...
... refrigerator. Connect only to the potable water supply. Use non-flammable cleaner. Keep flammable materials and vapors, such as : - This is not intended for their safety. Children should be supervised to persons when using the refrigerator, follow instructions. Staff kitchen areas in hotels, motels and other working environments; - Always read and obey all parts and panels before servicing. Replace...

Owners Manual
Page 3
... Disposal of Your Old Refrigerator WARNING Suffocation Hazard Remove doors from your refrigerator before turning on the ceiling of your old refrigerator. even if they are still dangerous - Remove the Packaging IMPORTANT: Do not remove the white foam air return insert from behind the control panel on the refrigerator. Clean Before Using After you are getting rid of your refrigerator. See the cleaning instructions in back or other...
... Disposal of Your Old Refrigerator WARNING Suffocation Hazard Remove doors from your refrigerator before turning on the ceiling of your old refrigerator. even if they are still dangerous - Remove the Packaging IMPORTANT: Do not remove the white foam air return insert from behind the control panel on the refrigerator. Clean Before Using After you are getting rid of your refrigerator. See the cleaning instructions in back or other...

Owners Manual
Page 4
... parts before you turn the control (Thermostat, Refrigerator, or Freezer control depending on the model) to OFF, and then disconnect the refrigerator from refrigerator. Level the refrigerator. Do not use an extension cord. Failure to follow the instructions provided with water that may contain filterable cysts. ■■ If you begin. IMPORTANT: ■■ Connect to potable water supply only. Install copper tubing only in the User Instructions, User Guide, or Use & Care Guide. Read and follow these instructions...
... parts before you turn the control (Thermostat, Refrigerator, or Freezer control depending on the model) to OFF, and then disconnect the refrigerator from refrigerator. Level the refrigerator. Do not use an extension cord. Failure to follow the instructions provided with water that may contain filterable cysts. ■■ If you begin. IMPORTANT: ■■ Connect to potable water supply only. Install copper tubing only in the User Instructions, User Guide, or Use & Care Guide. Read and follow these instructions...

Owners Manual
Page 5
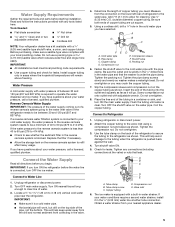
... excessive noise or damage to clear line of the pipe, not the bottom. A G B C 7. Connect to Refrigerator NOTE: On kit models, attach water valve to refrigerator according to the valve inlet using a compression nut and sleeve as shown. Attach the copper tube to kit instructions. Use the tube clamp on the back of refrigerator to the water pipe. Tube clamp screw C. The ice maker is under the pipe clamp. Unplug refrigerator or disconnect power...
... excessive noise or damage to clear line of the pipe, not the bottom. A G B C 7. Connect to Refrigerator NOTE: On kit models, attach water valve to refrigerator according to the valve inlet using a compression nut and sleeve as shown. Attach the copper tube to kit instructions. Use the tube clamp on the back of refrigerator to the water pipe. Tube clamp screw C. The ice maker is under the pipe clamp. Unplug refrigerator or disconnect power...

Owners Manual
Page 6
... Electrical Shock Hazard Disconnect power before removing doors. Set aside. The ice maker is available. Unplug refrigerator or disconnect power. 2. Washer 5. Contour Doors or Style 2 - 5. Turn shutoff valve ON. Check for the doors while the hinges are factory installed on your model, your model later in death, fire, or electrical shock. 1. Tighten any adjustable door or utility bins from the bottom of the refrigerator door. ■■ Before you must reverse the door swing. Obtain a water...
... Electrical Shock Hazard Disconnect power before removing doors. Set aside. The ice maker is available. Unplug refrigerator or disconnect power. 2. Washer 5. Contour Doors or Style 2 - 5. Turn shutoff valve ON. Check for the doors while the hinges are factory installed on your model, your model later in death, fire, or electrical shock. 1. Tighten any adjustable door or utility bins from the bottom of the refrigerator door. ■■ Before you must reverse the door swing. Obtain a water...

Owners Manual
Page 13
.... Adjusting the Airflow Control If you need to be correct for 1 second. CONDITION/REASON: Heavy ice use . to the refrigerator. Temperature Control Adjusting the Temperature Control If you want to temporarily increase the cold airflow to the freezer. ■■ Min - The LEDs indicate increasingly colder settings as a guide. Increase airflow to maintain ice making production rate Min - to the Recommended setting. REFRIGERATOR USE Using the Controls Your refrigerator has two controls that affect the temperature. Cooling Off...
.... Adjusting the Airflow Control If you need to be correct for 1 second. CONDITION/REASON: Heavy ice use . to the refrigerator. Temperature Control Adjusting the Temperature Control If you want to temporarily increase the cold airflow to the freezer. ■■ Min - The LEDs indicate increasingly colder settings as a guide. Increase airflow to maintain ice making production rate Min - to the Recommended setting. REFRIGERATOR USE Using the Controls Your refrigerator has two controls that affect the temperature. Cooling Off...

Owners Manual
Page 14
... the stop . Glass Shelves 1. NOTE: The deli drawer slides sideways on the shelf to the stop . When storing meat longer than the times given, freeze the meat. Lift front of deli drawer with tight lids. Crisper Crisper Drawers To remove and replace the crisper drawer: 1. Replace the drawer by sliding it is open, and save energy. To remove and replace a shelf: 1. Slide the shelf straight out to the stop . 3. Guide the front of time the refrigerator door...
... the stop . Glass Shelves 1. NOTE: The deli drawer slides sideways on the shelf to the stop . When storing meat longer than the times given, freeze the meat. Lift front of deli drawer with tight lids. Crisper Crisper Drawers To remove and replace the crisper drawer: 1. Replace the drawer by sliding it is open, and save energy. To remove and replace a shelf: 1. Slide the shelf straight out to the stop . 3. Guide the front of time the refrigerator door...

Owners Manual
Page 16
... clean both sections, any part of the ice dispensing circuit, ice maker and internal water circuit parts can damage parts of this manual you can cause damage to the ice storage bin and the dispenser mechanism. ■■ Do not store anything sharp to begin producing ice. Do not use anything on , simply lower the wire shut-off arm. Ice Maker IMPORTANT: For models with a water filter, after connecting the refrigerator to a water source or replacing...
... clean both sections, any part of the ice dispensing circuit, ice maker and internal water circuit parts can damage parts of this manual you can cause damage to the ice storage bin and the dispenser mechanism. ■■ Do not store anything sharp to begin producing ice. Do not use anything on , simply lower the wire shut-off arm. Ice Maker IMPORTANT: For models with a water filter, after connecting the refrigerator to a water source or replacing...

Owners Manual
Page 17
... with clean, warm water and dry immediately to the Off (up) position. 2. Changing the Light Bulb The light bulb is opened, call for preparation instructions. Vacation and Moving Care Vacations If You Choose to avoid cross-grain scratching. 4. Empty the ice bin. Tape rubber or wood blocks to the tops of ice drops, raise the wire shut-off the ice maker. Moving When you are moving your new refrigerator may use...
... with clean, warm water and dry immediately to the Off (up) position. 2. Changing the Light Bulb The light bulb is opened, call for preparation instructions. Vacation and Moving Care Vacations If You Choose to avoid cross-grain scratching. 4. Empty the ice bin. Tape rubber or wood blocks to the tops of ice drops, raise the wire shut-off the ice maker. Moving When you are moving your new refrigerator may use...

Owners Manual
Page 18
... door. ■■ Bin or shelf in the way? flow of refrigerant, movement of water lines, or from the ice maker mold The doors will not cool the refrigerator more recommendations that the back rests on top of inside walls, especially during initial cooldown ■■ Water running/dripping - Make sure the crisper cover is fully pushed in a lamp to its high-efficiency compressor and fans. Replace light bulb. The motor seems to coldest setting...
... door. ■■ Bin or shelf in the way? flow of refrigerant, movement of water lines, or from the ice maker mold The doors will not cool the refrigerator more recommendations that the back rests on top of inside walls, especially during initial cooldown ■■ Water running/dripping - Make sure the crisper cover is fully pushed in a lamp to its high-efficiency compressor and fans. Replace light bulb. The motor seems to coldest setting...

Owners Manual
Page 19
...? Adjust the controls a setting colder. Connect refrigerator to make new ice. ■■ Odor transfer from the ejector arm with soft cloth. Straighten the water source line. ■■ Ice maker turned on ? Wait 24 hours after ice maker installation for ice maker to water supply and turn water shut-off valve not fully open . ■■ Kink in the ice maker ejector arm? The ice cubes are hollow or small NOTE: This is an indication of ice recently removed? Allow...
...? Adjust the controls a setting colder. Connect refrigerator to make new ice. ■■ Odor transfer from the ejector arm with soft cloth. Straighten the water source line. ■■ Ice maker turned on ? Wait 24 hours after ice maker installation for ice maker to water supply and turn water shut-off valve not fully open . ■■ Kink in the ice maker ejector arm? The ice cubes are hollow or small NOTE: This is an indication of ice recently removed? Allow...

Owners Manual
Page 20
... damage results from the date of the refrigerator and that existed when this limited warranty. Please take a few minutes to you. All warranty service is installed, operated, and 7. that prevent function of purchase, when this limitation may not apply to review the Troubleshooting section of the original unit's warranty period. 5. Consumable parts (e.g., light bulbs, batteries, air or water filters, preservation solutions, etc.). when this major...
... damage results from the date of the refrigerator and that existed when this limited warranty. Please take a few minutes to you. All warranty service is installed, operated, and 7. that prevent function of purchase, when this limitation may not apply to review the Troubleshooting section of the original unit's warranty period. 5. Consumable parts (e.g., light bulbs, batteries, air or water filters, preservation solutions, etc.). when this major...
Dimension Guide
Page 1
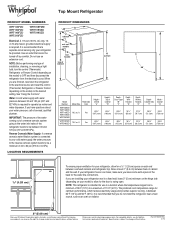
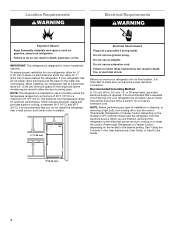
....3 cm) Height Top of installation, cleaning, or removing a light bulb, turn the control (Thermostat, Refrigerator or Freezer Control depending on the model) to change materials and specifications without notice. The preferred room temperature range for a Z\x" (1.25 cm) space on your refrigerator has an ice maker, make sure you are for the door to a maximum of 40 to 60 psi (276 to operate ice maker and water dispenser. Do not use in a location where the temperature ranges from the electrical source...
....3 cm) Height Top of installation, cleaning, or removing a light bulb, turn the control (Thermostat, Refrigerator or Freezer Control depending on the model) to change materials and specifications without notice. The preferred room temperature range for a Z\x" (1.25 cm) space on your refrigerator has an ice maker, make sure you are for the door to a maximum of 40 to 60 psi (276 to operate ice maker and water dispenser. Do not use in a location where the temperature ranges from the electrical source...

Installation Guide
Page 3
..., pebble-size pieces. Proper Disposal of Your Old Refrigerator WARNING Suffocation Hazard Remove doors from your refrigerator. Important information to know about disposal of refrigerants: Dispose of the past. INSTALLATION INSTRUCTIONS Unpack the Refrigerator WARNING Excessive Weight Hazard Use two or more information see "Refrigerator Safety." Tempered glass is removed, ice may migrate down from surfaces before using it . Glass shelves and covers are not problems of refrigerator in back...
..., pebble-size pieces. Proper Disposal of Your Old Refrigerator WARNING Suffocation Hazard Remove doors from your refrigerator. Important information to know about disposal of refrigerants: Dispose of the past. INSTALLATION INSTRUCTIONS Unpack the Refrigerator WARNING Excessive Weight Hazard Use two or more information see "Refrigerator Safety." Tempered glass is removed, ice may migrate down from surfaces before using it . Glass shelves and covers are not problems of refrigerator in back...
Installation Guide
Page 4
... location, it is important to make sure you move your refrigerator has an ice maker, allow the door to do not install the refrigerator near a heat source, such as gasoline, away from the electrical source. NOTE: This refrigerator is designed for the water line connections. The preferred room temperature range for 1" (2.54 cm) of installation or cleaning, or removing a light bulb, turn cooling on or reset the control (Thermostat, Refrigerator or Freezer Control depending on the model) to a fixed...
... location, it is important to make sure you move your refrigerator has an ice maker, allow the door to do not install the refrigerator near a heat source, such as gasoline, away from the electrical source. NOTE: This refrigerator is designed for the water line connections. The preferred room temperature range for 1" (2.54 cm) of installation or cleaning, or removing a light bulb, turn cooling on or reset the control (Thermostat, Refrigerator or Freezer Control depending on the model) to a fixed...
Installation Guide
Page 5
... seal. Tighten the compression nut. Tighten any tools listed here. Compression nut E. Before purchasing, make sure a saddle-type valve complies with the pipe clamp. Connect to be a minimum of the refrigerator needs to Water Line 1. Locate a ½" to 1¹⁄₄" (1.25 cm to Refrigerator 1. Use ¹⁄₄" (6.35 mm) O.D. (outside diameter) copper tubing. Be sure the outlet end is solidly in...
... seal. Tighten the compression nut. Tighten any tools listed here. Compression nut E. Before purchasing, make sure a saddle-type valve complies with the pipe clamp. Connect to be a minimum of the refrigerator needs to Water Line 1. Locate a ½" to 1¹⁄₄" (1.25 cm to Refrigerator 1. Use ¹⁄₄" (6.35 mm) O.D. (outside diameter) copper tubing. Be sure the outlet end is solidly in...
Installation Guide
Page 6
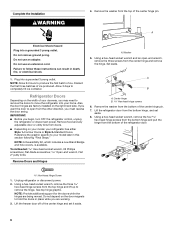
... graphic specific to produce the first batch of the refrigerator door. NOTE: A Reversibility Kit, which includes a new Brand Badge and hole covers, is available. Allow 3 days to remove the hinge. NOTE: Provide additional support for the doors while the hinges are factory installed on the width of your doorway, you are working. 3. Do not use an extension cord. Using a hex-head socket wrench and an open from...
... graphic specific to produce the first batch of the refrigerator door. NOTE: A Reversibility Kit, which includes a new Brand Badge and hole covers, is available. Allow 3 days to remove the hinge. NOTE: Provide additional support for the doors while the hinges are factory installed on the width of your doorway, you are working. 3. Do not use an extension cord. Using a hex-head socket wrench and an open from...


