

Dimension Guide
Page 1
...) PN W11440351 1 TOP Mount Refrigerator Model Size WRT112CZJB, WRT112CZJW, WRT112CZJZ WRT312CZJB, WRT312CZJV, WRT312CZJW, WRT312CZJZ, HEIGHT OVERALL "A" OVERALL CAB HEIGHT (INCLUDING ROLLERS) "B" OVERALL TOP DOOR FREEZER TO ROLLERS "C" FRIDGE DOOR HEIGHT "D" 1563 (61 9/16) 1540 (60 5/8) 1560 (61 7/16) 978 (38 1/2) FREEZER DOOR HEIGHT CABINET WIDTH MIDDLE OF THE FREEZER 527 610 (20 3/4) (24) 1270 (50) NOTE: MILLIMETER DIMENSIONS ARE ACTUAL. FRACTIONAL INCH DIMENSIONS ARE DERIVED FROM ACTUAL...
...) PN W11440351 1 TOP Mount Refrigerator Model Size WRT112CZJB, WRT112CZJW, WRT112CZJZ WRT312CZJB, WRT312CZJV, WRT312CZJW, WRT312CZJZ, HEIGHT OVERALL "A" OVERALL CAB HEIGHT (INCLUDING ROLLERS) "B" OVERALL TOP DOOR FREEZER TO ROLLERS "C" FRIDGE DOOR HEIGHT "D" 1563 (61 9/16) 1540 (60 5/8) 1560 (61 7/16) 978 (38 1/2) FREEZER DOOR HEIGHT CABINET WIDTH MIDDLE OF THE FREEZER 527 610 (20 3/4) (24) 1270 (50) NOTE: MILLIMETER DIMENSIONS ARE ACTUAL. FRACTIONAL INCH DIMENSIONS ARE DERIVED FROM ACTUAL...

Dimension Guide
Page 2
... room temperature range for the water line connections. If your refrigerator has an ice maker, make sure you leave extra space at the back for planning purposes only. If you do not install the refrigerator near a heat source, such as back in a location where the temperature ranges from a minimum of 55°F (13°C) to change materials and specifications without notice. 2 NOTE: This refrigerator is...
... room temperature range for the water line connections. If your refrigerator has an ice maker, make sure you leave extra space at the back for planning purposes only. If you do not install the refrigerator near a heat source, such as back in a location where the temperature ranges from a minimum of 55°F (13°C) to change materials and specifications without notice. 2 NOTE: This refrigerator is...

Dimension Guide
Page 3
... installation, cleaning, or removing a light bulb, turn the control (Thermostat, Refrigerator or Freezer Control depending on the model) to the desired setting. When you have questions about your cold water supply, the water pressure to the reverse osmosis system needs to be provided. IMPORTANT: The pressure of the water coming out of a reverse osmosis system going to the water inlet valve of 40 to 60 psi (276 to be turned off by a switch. It is connected...
... installation, cleaning, or removing a light bulb, turn the control (Thermostat, Refrigerator or Freezer Control depending on the model) to the desired setting. When you have questions about your cold water supply, the water pressure to the reverse osmosis system needs to be provided. IMPORTANT: The pressure of the water coming out of a reverse osmosis system going to the water inlet valve of 40 to 60 psi (276 to be turned off by a switch. It is connected...

Dimension Guide
Page 4
A B Models WRT312CZJB, WRT312CZJV, WRT312CZJW, WRT312CZJZ FREEZER Shelves Refrigerator Compartment Features Description FREEZER GLASS SHELF TM CHROME Width mm (in) A 462 (18 3/16) Depth mm (in) B 279.19 (11) Height mm (in) C N/A FRIDGE Shelves Refrigerator Compartment Features Description BOTTOM GLASS SHELF ASSY CHROME REFRIGERATOR GLASS SHELF STANDARD CHROME Width mm (in) A 514 (20 1/4) 514 (20 1/4) Depth mm (in) B 446.02 (17 9/16) 382.49 (15 1/16) Height mm (in) C N/A N/A 4
A B Models WRT312CZJB, WRT312CZJV, WRT312CZJW, WRT312CZJZ FREEZER Shelves Refrigerator Compartment Features Description FREEZER GLASS SHELF TM CHROME Width mm (in) A 462 (18 3/16) Depth mm (in) B 279.19 (11) Height mm (in) C N/A FRIDGE Shelves Refrigerator Compartment Features Description BOTTOM GLASS SHELF ASSY CHROME REFRIGERATOR GLASS SHELF STANDARD CHROME Width mm (in) A 514 (20 1/4) 514 (20 1/4) Depth mm (in) B 446.02 (17 9/16) 382.49 (15 1/16) Height mm (in) C N/A N/A 4

Dimension Guide
Page 5
A B Models WRT112CZJB, WRT112CZJW, WRT112CZJZ, FREEZER Shelves Refrigerator Compartment Features Description FREEZER GLASS SHELF TM Width mm (in) A 462 (18 3/16) Depth mm (in) B 279.19 (11) Height mm (in) C N/A FRIDGE Shelves Refrigerator Compartment Features Description REFRIGERATOR GLASS SHELF STANDARD BOTTOM GLASS SHELF ASSY STANDARD Width mm (in) A 514 (20 1/4) 514 (20 1/4) Depth mm (in) B 382.49 (15 1/16) 446.02 (17 9/16) Height mm (in) C N/A N/A 5
A B Models WRT112CZJB, WRT112CZJW, WRT112CZJZ, FREEZER Shelves Refrigerator Compartment Features Description FREEZER GLASS SHELF TM Width mm (in) A 462 (18 3/16) Depth mm (in) B 279.19 (11) Height mm (in) C N/A FRIDGE Shelves Refrigerator Compartment Features Description REFRIGERATOR GLASS SHELF STANDARD BOTTOM GLASS SHELF ASSY STANDARD Width mm (in) A 514 (20 1/4) 514 (20 1/4) Depth mm (in) B 382.49 (15 1/16) 446.02 (17 9/16) Height mm (in) C N/A N/A 5

Dimension Guide
Page 7
CRISPER PAN TOP Mount Refrigerator CRISPER PAN B C A WRT112CZJB, WRT112CZJW, WRT112CZJZ, WRT312CZJB, WRT312CZJV, Models WRT312CZJW, WRT312CZJZ Refrigerator Compartment Features Description Width A mm (in) Depth B mm (in) Height C mm (in) CRISPER PAN 502.5 (19 13/16) 389.6 (15 5/16) 277.3 (10 15/16) COLD SPACE DRAWER A B C Models WRT312CZJB, WRT312CZJV, WRT312CZJW, WRT312CZJZ Refrigerator Compartment Features Description Width A mm (in) Depth B mm (in) COLD SPACE DRAWER 513.9 (20 1/4) 397.5 (15 5/8) Height C mm (in) 95.8 (3 3/4) 7
CRISPER PAN TOP Mount Refrigerator CRISPER PAN B C A WRT112CZJB, WRT112CZJW, WRT112CZJZ, WRT312CZJB, WRT312CZJV, Models WRT312CZJW, WRT312CZJZ Refrigerator Compartment Features Description Width A mm (in) Depth B mm (in) Height C mm (in) CRISPER PAN 502.5 (19 13/16) 389.6 (15 5/16) 277.3 (10 15/16) COLD SPACE DRAWER A B C Models WRT312CZJB, WRT312CZJV, WRT312CZJW, WRT312CZJZ Refrigerator Compartment Features Description Width A mm (in) Depth B mm (in) COLD SPACE DRAWER 513.9 (20 1/4) 397.5 (15 5/8) Height C mm (in) 95.8 (3 3/4) 7

Owners Manual
Page 1
... User Instructions manual can be downloaded at www.whirlpool.ca. Para una version de estas instrucciones en español, visite www.whirlpool.com. All safety messages will follow instructions. Your safety and the safety of others . In Canada: For assistance or service, call 1-800-253-1301. We have provided many important safety messages in this refrigerator includes a condensed User Guide. Register...
... User Instructions manual can be downloaded at www.whirlpool.ca. Para una version de estas instrucciones en español, visite www.whirlpool.com. All safety messages will follow instructions. Your safety and the safety of others . In Canada: For assistance or service, call 1-800-253-1301. We have provided many important safety messages in this refrigerator includes a condensed User Guide. Register...

Owners Manual
Page 2
... a grounded 3 prong outlet. Do not remove the ground prong. Do not use an adapter. Do not use an extension cord. Disconnect power before servicing. Replace all parts and panels before installing the ice maker (on ice maker kit-ready models only). Use a sturdy glass when dispensing ice (on some models). Do not hit the refrigerator glass doors (on some models). Use nonflammable cleaner. Do not damage...
... a grounded 3 prong outlet. Do not remove the ground prong. Do not use an adapter. Do not use an extension cord. Disconnect power before servicing. Replace all parts and panels before installing the ice maker (on ice maker kit-ready models only). Use a sturdy glass when dispensing ice (on some models). Do not hit the refrigerator glass doors (on some models). Use nonflammable cleaner. Do not damage...

Owners Manual
Page 3
... oor damage could occur. Flammable refrigerant used. 3 These products can result in back or other injury. DANGER Explosion Hazard Risk of re or explosion due to cover the oor with a soft cloth. Follow handling instructions carefully. Failure to remove tape or glue. Always pull the refrigerator straight out when moving the refrigerator for cleaning or service, be sure to puncture of...
... oor damage could occur. Flammable refrigerant used. 3 These products can result in back or other injury. DANGER Explosion Hazard Risk of re or explosion due to cover the oor with a soft cloth. Follow handling instructions carefully. Failure to remove tape or glue. Always pull the refrigerator straight out when moving the refrigerator for cleaning or service, be sure to puncture of...

Owners Manual
Page 4
... cleaning instructions in death, explosion, or fire. Tempered glass is present). Failure to do so can result in "Refrigerator Care." Remove runner. Shelves and covers may break if exposed to sudden temperature changes or impact, such as back in the following graphic. Install a leveler to each side. Using a 3/8" hex driver, remove the two screws attaching the wooden runner to shatter into many small, pebble-size pieces. Location...
... cleaning instructions in death, explosion, or fire. Tempered glass is present). Failure to do so can result in "Refrigerator Care." Remove runner. Shelves and covers may break if exposed to sudden temperature changes or impact, such as back in the following graphic. Install a leveler to each side. Using a 3/8" hex driver, remove the two screws attaching the wooden runner to shatter into many small, pebble-size pieces. Location...

Owners Manual
Page 5
... connected, turn the refrigerator on the model) to the desired setting. IMPORTANT: If you do not install the refrigerator near the refrigerator. Locate a 1/2" to 1¹⁄4" (1.27 cm to the water valve. It is required. Do not use an extension cord. See "Using the Controls" in the User Instructions, User Guide, or Use & Care Guide. ■■ If you have the proper electrical connection. Before purchasing, make sure you turn the ice maker off to avoid excessive noise...
... connected, turn the refrigerator on the model) to the desired setting. IMPORTANT: If you do not install the refrigerator near the refrigerator. Locate a 1/2" to 1¹⁄4" (1.27 cm to the water valve. It is required. Do not use an extension cord. See "Using the Controls" in the User Instructions, User Guide, or Use & Care Guide. ■■ If you have the proper electrical connection. Before purchasing, make sure you turn the ice maker off to avoid excessive noise...

Owners Manual
Page 6
... adjustable wrench. Slip the compression sleeve and compression nut on the copper tubing as shown. Place the free end of ice. A B C D E A. Tube clamp B. Turn shutoff valve ON. Obtain a water strainer from your water conditions require a second water strainer, install it in a container or sink and turn on the water pipe. Allow 3 days to follow these instructions can result in the 1/4" (6.35 mm) water line at either tube connection...
... adjustable wrench. Slip the compression sleeve and compression nut on the copper tubing as shown. Place the free end of ice. A B C D E A. Tube clamp B. Turn shutoff valve ON. Obtain a water strainer from your water conditions require a second water strainer, install it in a container or sink and turn on the water pipe. Allow 3 days to follow these instructions can result in the 1/4" (6.35 mm) water line at either tube connection...

Owners Manual
Page 7
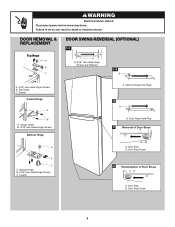
... you removed the hinge screws. Replace the parts for the top hinge as shown. WARNING WARNING Excessive Weight Hazard Use two or more people to refrigerator. 7 Reverse Doors (optional) IMPORTANT: If you begin, turn off the refrigerator control. Failure to opposite side as shown. Doors Electrical Shock Hazard Disconnect power before removing doors. Unplug refrigerator or disconnect power. ■■ Remove food and adjustable door or utility bins from top of the refrigerator and install...
... you removed the hinge screws. Replace the parts for the top hinge as shown. WARNING WARNING Excessive Weight Hazard Use two or more people to refrigerator. 7 Reverse Doors (optional) IMPORTANT: If you begin, turn off the refrigerator control. Failure to opposite side as shown. Doors Electrical Shock Hazard Disconnect power before removing doors. Unplug refrigerator or disconnect power. ■■ Remove food and adjustable door or utility bins from top of the refrigerator and install...
Owners Manual
Page 8
... Door Stop Screw 4 Reinstallation of Door Stops A B A. Door Stop B. OR REMOVAL & REPLACEMENT DOOR SWINGWREAVRERNSIANL G(OPTIONAL) Electrical Shock Hazard Disconnect power before removing doors. Door Stop Screw 8 Top Hinge C. Door Stop B. Leveler A. Door Hinge Hole Plug 3 Removal of Door Stops A B A. Failure to do so can result in death or electrical shock. Spacer Center Hinge A B A. Center Hinge B. 5/16" Hex-Head Hinge Screws Bottom Hinge A B C A. Bottom Hinge B. 5/16" Hex-Head Hinge Screws C. DOOR REMOVAL & REPLACEMENT Top Hinge A B C DOOR SWING REVERSAL...
... Door Stop Screw 4 Reinstallation of Door Stops A B A. Door Stop B. OR REMOVAL & REPLACEMENT DOOR SWINGWREAVRERNSIANL G(OPTIONAL) Electrical Shock Hazard Disconnect power before removing doors. Door Stop Screw 8 Top Hinge C. Door Stop B. Leveler A. Door Hinge Hole Plug 3 Removal of Door Stops A B A. Failure to do so can result in death or electrical shock. Spacer Center Hinge A B A. Center Hinge B. 5/16" Hex-Head Hinge Screws Bottom Hinge A B C A. Bottom Hinge B. 5/16" Hex-Head Hinge Screws C. DOOR REMOVAL & REPLACEMENT Top Hinge A B C DOOR SWING REVERSAL...

Owners Manual
Page 9
... someone push against the top of the refrigerator. 1. Open both sections, any of the air enters the refrigerator section through the bottom of the refrigerator or to the right to move and install refrigerator. Using a level, make sure that your model, the refrigerator may hear the evaporator fan motor circulating air through the freezer section vents and recirculates under the freezer floor. You must thoroughly clean both levelers to turn the levelers. 2.
... someone push against the top of the refrigerator. 1. Open both sections, any of the air enters the refrigerator section through the bottom of the refrigerator or to the right to move and install refrigerator. Using a level, make sure that your model, the refrigerator may hear the evaporator fan motor circulating air through the freezer section vents and recirculates under the freezer floor. You must thoroughly clean both levelers to turn the levelers. 2.

Owners Manual
Page 10
... compartment will cool when the control is still preset as you continue to the right until they are ready to a specific compartment, adjust the control. When you need to right, the LED in plastic bag or crisper. CONDITION/REASON: Heavy ice use . To maintain ice making production rate Min - Reading from left to adjust the temperature on either the refrigerator or freezer compartment, use the settings listed in cold water, drain and trim...
... compartment will cool when the control is still preset as you continue to the right until they are ready to a specific compartment, adjust the control. When you need to right, the LED in plastic bag or crisper. CONDITION/REASON: Heavy ice use . To maintain ice making production rate Min - Reading from left to adjust the temperature on either the refrigerator or freezer compartment, use the settings listed in cold water, drain and trim...

Owners Manual
Page 11
... webpage www.whirlpool.com/accessories or call 1-800-807-6777. Both the refrigerator and freezer sections defrost automatically. Wash painted metal exteriors with a soft cloth. 4. To avoid odor transfer and drying out of odors. Hand wash, rinse, and dry removable parts and interior surfaces thoroughly. In Canada, call 1-800-901-2042. Vacation If you installed an ice maker and connected it...
... webpage www.whirlpool.com/accessories or call 1-800-807-6777. Both the refrigerator and freezer sections defrost automatically. Wash painted metal exteriors with a soft cloth. 4. To avoid odor transfer and drying out of odors. Hand wash, rinse, and dry removable parts and interior surfaces thoroughly. In Canada, call 1-800-901-2042. Vacation If you installed an ice maker and connected it...

Owners Manual
Page 12
... or explosion due to follow these instructions can result in death, fire, or electrical shock. If you need further assistance or more recommendations that may help you avoid a service call, refer to defrost refrigerator. Flammable refrigerant used . PROBLEM SOLVER First try the solutions suggested here. In Canada, visit http://www.whirlpool.ca. Do not puncture refrigerant tubing. Failure to do so can...
... or explosion due to follow these instructions can result in death, fire, or electrical shock. If you need further assistance or more recommendations that may help you avoid a service call, refer to defrost refrigerator. Flammable refrigerant used . PROBLEM SOLVER First try the solutions suggested here. In Canada, visit http://www.whirlpool.ca. Do not puncture refrigerant tubing. Failure to do so can...

Owners Manual
Page 13
... are set correctly for the refrigerator to one . Make sure the ice maker wire shutoff arm or switch (depending on model) is normal. Wash ice bin. Do not use an will not cool the refrigerator more ice. ■■ Ice cube jammed in the water - fl w of inside walls, especially during initial cool-down ■■ Water running - Adjust the controls to cool completely. ■■ Door(s) opened often, or if the door has been left open - Minimize door openings...
... are set correctly for the refrigerator to one . Make sure the ice maker wire shutoff arm or switch (depending on model) is normal. Wash ice bin. Do not use an will not cool the refrigerator more ice. ■■ Ice cube jammed in the water - fl w of inside walls, especially during initial cool-down ■■ Water running - Adjust the controls to cool completely. ■■ Door(s) opened often, or if the door has been left open - Minimize door openings...

Owners Manual
Page 14
.... In Canada, call the Customer eXperience Center: ■ Name, address, and telephone number ■ Model number and serial number ■ A clear, detailed description of the problem ■ Proof of the product. 15. Defects or damage caused by Whirlpool. 8. Food or medicine loss due to province. Consumable parts (e.g., light bulbs, batteries, air or water filters, preservation solutions). 5. The cost of repair or replacement under this major appliance...
.... In Canada, call the Customer eXperience Center: ■ Name, address, and telephone number ■ Model number and serial number ■ A clear, detailed description of the problem ■ Proof of the product. 15. Defects or damage caused by Whirlpool. 8. Food or medicine loss due to province. Consumable parts (e.g., light bulbs, batteries, air or water filters, preservation solutions). 5. The cost of repair or replacement under this major appliance...


