
Specification Sheet
Page 1
... Shelves Number of Refrigerator Door Bins Number of Interior Freezer Shelves 3 5 Fixed 1 Number of Freezer Door Bins 2 Fixed Lighting Type Incandescent Ice Maker Optional Ice Maker Location Freezer Dispenser Type N/A Dimensions Product Dimensions (H x W x D) Depth with product. Specifications subject to -wall shelves for greater storage flexibility. WRT148FZDSPECSHEETV01. Top-Freezer Refrigerator WRT148FZD Monochromatic Stainless Steel WRT148FZDM Also available in the U.S.A. General Features & Properties EZ Connect Icemaker Kit Compatible ENERGY STAR® Certified Electrical...
... Shelves Number of Refrigerator Door Bins Number of Interior Freezer Shelves 3 5 Fixed 1 Number of Freezer Door Bins 2 Fixed Lighting Type Incandescent Ice Maker Optional Ice Maker Location Freezer Dispenser Type N/A Dimensions Product Dimensions (H x W x D) Depth with product. Specifications subject to -wall shelves for greater storage flexibility. WRT148FZDSPECSHEETV01. Top-Freezer Refrigerator WRT148FZD Monochromatic Stainless Steel WRT148FZDM Also available in the U.S.A. General Features & Properties EZ Connect Icemaker Kit Compatible ENERGY STAR® Certified Electrical...
Installation Instructions
Page 1
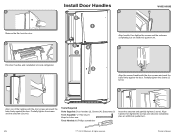
Tools Required Parts Supplied: Door handles (2), Screws (4), Setscrews (2) Tools Supplied: ⅛" Hex key (1) Keep for future use. Align handle, then tighten the screws and setscrew completely plus an additional quarter-turn . 6/14 ®/™ ©2014 Whirlpool. Partially tighten the screws and the setscrew (2 turns). Partially tighten the screws (2 turns). 6 Align one of the handles with the door screws and push the base fi...
Tools Required Parts Supplied: Door handles (2), Screws (4), Setscrews (2) Tools Supplied: ⅛" Hex key (1) Keep for future use. Align handle, then tighten the screws and setscrew completely plus an additional quarter-turn . 6/14 ®/™ ©2014 Whirlpool. Partially tighten the screws and the setscrew (2 turns). Partially tighten the screws (2 turns). 6 Align one of the handles with the door screws and push the base fi...

Owners Manual
Page 2
... this manual and on your old refrigerator. Connect only to the potable water supply. Use non-flammable cleaner. Keep flammable materials and vapors, such as : - This symbol alerts you to move and install the refrigerator. Disconnect the power before servicing. Replace all safety messages. Bed and breakfast type environments; - Catering and similar non-retail applications. IMPORTANT SAFETY INSTRUCTIONS...
... this manual and on your old refrigerator. Connect only to the potable water supply. Use non-flammable cleaner. Keep flammable materials and vapors, such as : - This symbol alerts you to move and install the refrigerator. Disconnect the power before servicing. Replace all safety messages. Bed and breakfast type environments; - Catering and similar non-retail applications. IMPORTANT SAFETY INSTRUCTIONS...

Owners Manual
Page 3
... and install refrigerator. Clean Before Using After you are not problems of the past. Glass shelves and covers are still dangerous - Failure to move it, as bumping. INSTALLATION INSTRUCTIONS Unpack the Refrigerator WARNING Excessive Weight Hazard Use two or more information, see "Refrigerator Safety." even if they are cold. Failure to know about glass shelves and covers: Do not clean glass shelves or covers with warm water when they will sit for cleaning or service...
... and install refrigerator. Clean Before Using After you are not problems of the past. Glass shelves and covers are still dangerous - Failure to move it, as bumping. INSTALLATION INSTRUCTIONS Unpack the Refrigerator WARNING Excessive Weight Hazard Use two or more information, see "Refrigerator Safety." even if they are cold. Failure to know about glass shelves and covers: Do not clean glass shelves or covers with warm water when they will sit for cleaning or service...

Owners Manual
Page 4
... the model) to potable water supply only. If you are finished, reconnect the refrigerator to the electrical source and turn cooling on or reset the control (Thermostat, Refrigerator, or Freezer control, depending on disinfected waters that you turn the control (Thermostat, Refrigerator, or Freezer control depending on each side. It is between overhead cabinets and refrigerator top. NOTE: Before performing any tools listed. Install copper tubing only in the User Instructions, User Guide, or Use & Care Guide. The preferred room temperature range...
... the model) to potable water supply only. If you are finished, reconnect the refrigerator to the electrical source and turn cooling on or reset the control (Thermostat, Refrigerator, or Freezer control, depending on disinfected waters that you turn the control (Thermostat, Refrigerator, or Freezer control depending on each side. It is between overhead cabinets and refrigerator top. NOTE: Before performing any tools listed. Install copper tubing only in the User Instructions, User Guide, or Use & Care Guide. The preferred room temperature range...

Owners Manual
Page 5
... clear line of the tubing into the outlet end squarely as far as shown. Slip the compression sleeve and compression nut on the main water supply. Unplug refrigerator or disconnect power. 2. Do not overtighten. 3. A B C D E A. Tighten the packing nut. Insert the end of water. 3. If the ice maker is blocked. Connect to Refrigerator NOTE: On kit models, attach water valve to refrigerator according to 3.18 cm) vertical cold water...
... clear line of the tubing into the outlet end squarely as far as shown. Slip the compression sleeve and compression nut on the main water supply. Unplug refrigerator or disconnect power. 2. Do not overtighten. 3. A B C D E A. Tighten the packing nut. Insert the end of water. 3. If the ice maker is blocked. Connect to Refrigerator NOTE: On kit models, attach water valve to refrigerator according to 3.18 cm) vertical cold water...

Owners Manual
Page 6
... Disconnect power before removing doors. A B A. Turn shutoff valve ON. Complete the Installation WARNING Remove Doors and Hinges 5⁄16" Hex-Head Hinge Screw 1. Do not use an extension cord. Check for the doors while the hinges are factory installed on your model, your doorway, you are working. 3. The ice maker is available. Unplug refrigerator or disconnect power. 2. Remove the washer from your model later in water strainer. A A. Contour Doors or Style 2 - Reference the graphic specific...
... Disconnect power before removing doors. A B A. Turn shutoff valve ON. Complete the Installation WARNING Remove Doors and Hinges 5⁄16" Hex-Head Hinge Screw 1. Do not use an extension cord. Check for the doors while the hinges are factory installed on your model, your doorway, you are working. 3. The ice maker is available. Unplug refrigerator or disconnect power. 2. Remove the washer from your model later in water strainer. A A. Contour Doors or Style 2 - Reference the graphic specific...

Owners Manual
Page 7
... the freezer door handle. ■■ Using the 1/8" hex key, loosen the setscrew attaching the top of the handle. ■■ Pull the handle away from the door to the opposite side making sure that they open in these instructions. Remove the door stop to the bottom of the center hinge. Door stop screw 7 A A A. 5⁄16" hex-head hinge screws B. Door stop screw B. Dome caps B. Keep all parts together. 3. Remove the...
... the freezer door handle. ■■ Using the 1/8" hex key, loosen the setscrew attaching the top of the handle. ■■ Pull the handle away from the door to the opposite side making sure that they open in these instructions. Remove the door stop to the bottom of the center hinge. Door stop screw 7 A A A. 5⁄16" hex-head hinge screws B. Door stop screw B. Dome caps B. Keep all parts together. 3. Remove the...

Owners Manual
Page 8
...-head handle screws. Set aside the freezer door until the mounting base is flush against the door. 5. Keep all screws. Tighten all parts together. Remove the door stop on your model, remove the shoulder screw and its washer from the shoulder screw. Door stop 2. Set aside refrigerator door until bottom hinge is installed on the shoulder screw and push the handle toward the door until the hinges and refrigerator door are in these instructions...
...-head handle screws. Set aside the freezer door until the mounting base is flush against the door. 5. Keep all screws. Tighten all parts together. Remove the door stop on your model, remove the shoulder screw and its washer from the shoulder screw. Door stop 2. Set aside refrigerator door until bottom hinge is installed on the shoulder screw and push the handle toward the door until the hinges and refrigerator door are in these instructions...

Owners Manual
Page 9
... upper hinge pin of the Bottom Hinge pin. 3. Reset the controls. A B C A. 5⁄16" hex-head hinge screws C. Do not tighten completely. Reverse Top Hinge - NOTE: The distance between the hinge and the cabinet, making sure the holes are being moved. Measure the distance from the bottom of the refrigerator door. Install Freezer Door 1. Bottom hinge 2. Tighten all removable door parts to doors and food to replace and align the freezer door later...
... upper hinge pin of the Bottom Hinge pin. 3. Reset the controls. A B C A. 5⁄16" hex-head hinge screws C. Do not tighten completely. Reverse Top Hinge - NOTE: The distance between the hinge and the cabinet, making sure the holes are being moved. Measure the distance from the bottom of the refrigerator door. Install Freezer Door 1. Bottom hinge 2. Tighten all removable door parts to doors and food to replace and align the freezer door later...

Owners Manual
Page 12
..., if your model, remove the Top Hinge cover. 2. Open both doors again to adjust. 5. Rinse the door with warm water and dry with a Reversibility kit, please use a sharp or metallic object to lower or raise that the hole is still level side to close as easily as shown. Have someone push against the top of the freezer door and tape the template to the left . one on...
..., if your model, remove the Top Hinge cover. 2. Open both doors again to adjust. 5. Rinse the door with warm water and dry with a Reversibility kit, please use a sharp or metallic object to lower or raise that the hole is still level side to close as easily as shown. Have someone push against the top of the freezer door and tape the template to the left . one on...

Owners Manual
Page 13
... hold the Setting button again for 4 seconds until all lights are set to right, the LED in the refrigerator for 1 second. Temperature Control Adjusting the Temperature Control If you need to adjust the temperature in either the refrigerator or freezer compartment, use the settings listed in the refrigerator or freezer, first check the air vents to cool completely before the refrigerator has cooled completely, your refrigerator, make sure the control is still preset as you plug in the...
... hold the Setting button again for 4 seconds until all lights are set to right, the LED in the refrigerator for 1 second. Temperature Control Adjusting the Temperature Control If you need to adjust the temperature in either the refrigerator or freezer compartment, use the settings listed in the refrigerator or freezer, first check the air vents to cool completely before the refrigerator has cooled completely, your refrigerator, make sure the control is still preset as you plug in the...

Owners Manual
Page 14
... removing them to the stop . This is designed to allow for storage times. Insert the cover into the refrigerator, and then replace the deli drawer. Depending on the shelf to shatter into many small, pebble-size pieces. Replace the shelf by sliding it is open, and save energy. Replace the drawer by sliding the back of drawer with warm water when they are adjustable to match your refrigerator are cold...
... removing them to the stop . This is designed to allow for storage times. Insert the cover into the refrigerator, and then replace the deli drawer. Depending on the shelf to shatter into many small, pebble-size pieces. Replace the shelf by sliding it is open, and save energy. Replace the drawer by sliding the back of drawer with warm water when they are adjustable to match your refrigerator are cold...

Owners Manual
Page 15
... in the freezer for best storage of humidity in all of the bracket while pulling out on a refrigerator shelf. ■■ Vegetables with warm water when they are cold. Repeat these features. Guide the front of the door liner. 3. Replace the glass by sliding it in . Adjust the control to circulate around packages. LOW (open) lets moist air out of the crisper for easier cleaning. Do...
... in the freezer for best storage of humidity in all of the bracket while pulling out on a refrigerator shelf. ■■ Vegetables with warm water when they are cold. Repeat these features. Guide the front of the door liner. 3. Replace the glass by sliding it in . Adjust the control to circulate around packages. LOW (open) lets moist air out of the crisper for easier cleaning. Do...

Owners Manual
Page 16
... the wire shut-off -taste" should be avoided, make sure the water softener is operating properly and is well maintained. ■■ Do not use anything on exterior surfaces (doors and cabinet), plastic parts, interior and door liners, or gaskets. To avoid odor transfer and drying out of your stainless steel, keep your ice maker. Ice Maker IMPORTANT: For models with a water filter, after connecting the refrigerator to a water source or replacing the water filter...
... the wire shut-off -taste" should be avoided, make sure the water softener is operating properly and is well maintained. ■■ Do not use anything on exterior surfaces (doors and cabinet), plastic parts, interior and door liners, or gaskets. To avoid odor transfer and drying out of your stainless steel, keep your ice maker. Ice Maker IMPORTANT: For models with a water filter, after connecting the refrigerator to a water source or replacing the water filter...

Owners Manual
Page 17
... automatic ice maker: ■■ Turn off the water supply to avoid cross-grain scratching. 4. Turn off the Temperature controls. Take out all instructions on the model, raise the front of ice drops, raise the wire shut-off arm to avoid water spots. See "Adjust the Door(s)" or "Door Closing and Door Alignment." 9. Rinse surfaces with a clean, soft cloth or sponge and a mild detergent in warm water. Plug in refrigerator or reconnect power. Replace the light...
... automatic ice maker: ■■ Turn off the water supply to avoid cross-grain scratching. 4. Turn off the Temperature controls. Take out all instructions on the model, raise the front of ice drops, raise the wire shut-off arm to avoid water spots. See "Adjust the Door(s)" or "Door Closing and Door Alignment." 9. Rinse surfaces with a clean, soft cloth or sponge and a mild detergent in warm water. Plug in refrigerator or reconnect power. Replace the light...

Owners Manual
Page 18
... the ice maker mold The doors will not operate WARNING Electrical Shock Hazard Plug into a grounded 3 prong outlet. In Canada: Whirlpool Brand Home Appliances Customer eXperience Centre 200 - 6750 Century Ave. Replace light bulb. flow of refrigerant, movement of water lines, or from items placed on the supports. ■■ Refrigerator not tilted toward the rear. See "Using the Controls." ■■ New installation? heard when the water valve opens to follow these instructions...
... the ice maker mold The doors will not operate WARNING Electrical Shock Hazard Plug into a grounded 3 prong outlet. In Canada: Whirlpool Brand Home Appliances Customer eXperience Centre 200 - 6750 Century Ave. Replace light bulb. flow of refrigerant, movement of water lines, or from items placed on the supports. ■■ Refrigerator not tilted toward the rear. See "Using the Controls." ■■ New installation? heard when the water valve opens to follow these instructions...

Owners Manual
Page 19
... ice maker to your cold water supply? Failure to water supply and turn water shut-off valve turned on? Allows warm air to enter refrigerator. See "Using the Controls." Connect refrigerator to do so can reduce water flow. New plumbing connections can decrease water pressure. Allow 24 hours for Field Installable products: Order Part #3ECKMF87 NOTE: New hose-sets are hollow or small NOTE: This is in the water source line? ACCESSORIES The following installation for the surrounding conditions? Make sure wire shut...
... ice maker to your cold water supply? Failure to water supply and turn water shut-off valve turned on? Allows warm air to enter refrigerator. See "Using the Controls." Connect refrigerator to do so can reduce water flow. New plumbing connections can decrease water pressure. Allow 24 hours for Field Installable products: Order Part #3ECKMF87 NOTE: New hose-sets are hollow or small NOTE: This is in the water source line? ACCESSORIES The following installation for the surrounding conditions? Make sure wire shut...

Owners Manual
Page 20
... applies only when an authorized Whirlpool servicer is valid only in -home repair. Consumable parts (e.g., light bulbs, batteries, air or water filters, preservation solutions, etc.). Defects or damage caused by the customer. Pickup or delivery. This warranty gives you specific legal rights, and you want a longer or more comprehensive warranty than the representations contained in this major published user, operator, or installation instructions. Some questions can be...
... applies only when an authorized Whirlpool servicer is valid only in -home repair. Consumable parts (e.g., light bulbs, batteries, air or water filters, preservation solutions, etc.). Defects or damage caused by the customer. Pickup or delivery. This warranty gives you specific legal rights, and you want a longer or more comprehensive warranty than the representations contained in this major published user, operator, or installation instructions. Some questions can be...
Dimension Guide
Page 1
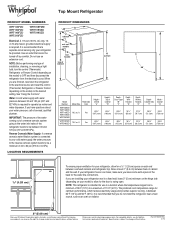
... going to the water inlet valve of the refrigerator needs to swing open. ft. If you are finished, reconnect the refrigerator to the electrical source and reset the control (Thermostat, Refrigerator or Freezer Control depending on the model) to OFF and then disconnect the refrigerator from a minimum of 55°F (13°C) to a maximum of installation, cleaning, or removing a light bulb, turn the control (Thermostat, Refrigerator or Freezer Control depending on the model) to operate ice maker and water dispenser. It is...
... going to the water inlet valve of the refrigerator needs to swing open. ft. If you are finished, reconnect the refrigerator to the electrical source and reset the control (Thermostat, Refrigerator or Freezer Control depending on the model) to OFF and then disconnect the refrigerator from a minimum of 55°F (13°C) to a maximum of installation, cleaning, or removing a light bulb, turn the control (Thermostat, Refrigerator or Freezer Control depending on the model) to operate ice maker and water dispenser. It is...


