

Specification Sheet
Page 1
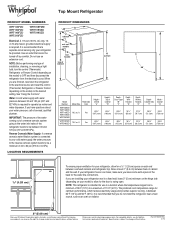
...Installation Instructions packed with Door Open 90° Cutout Dimensions Reference Material 65-7/8" x 29-3/4" x 33-1/2" 59-3/4" Allow extra 1/2" on sides and top Allow extra 1" on wall-to change without notice. ®/™ © 2020. Clear, Humidity-Controlled Crispers Store fruits and vegetables in the U.S.A. Technical Details Refrigerator Type Top-Freezer Number of Doors 2 Number of Interior Refrigerator Shelves Number of Refrigerator Door Bins Number of Interior Freezer Shelves 3 5 Fixed 1 Number of Freezer Door Bins 2 Fixed Lighting Type Incandescent Ice Maker...
...Installation Instructions packed with Door Open 90° Cutout Dimensions Reference Material 65-7/8" x 29-3/4" x 33-1/2" 59-3/4" Allow extra 1/2" on sides and top Allow extra 1" on wall-to change without notice. ®/™ © 2020. Clear, Humidity-Controlled Crispers Store fruits and vegetables in the U.S.A. Technical Details Refrigerator Type Top-Freezer Number of Doors 2 Number of Interior Refrigerator Shelves Number of Refrigerator Door Bins Number of Interior Freezer Shelves 3 5 Fixed 1 Number of Freezer Door Bins 2 Fixed Lighting Type Incandescent Ice Maker...
Installation Instructions
Page 1
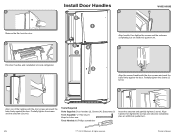
1 Remove the film from the door. 2 Install Door Handles 4 5 1 W10331018B 6 4 2 Align handle, then tighten the screws and the setscrew completely plus an additional quarter-turn . 5 Find door handles and installation kit inside refrigerator. 3 3 Align the second handle with the door screws and push the base firmly against the door. Tools Required Parts Supplied: Door handles (2), Screws (4), Setscrews (2) Tools Supplied: ⅛" Hex key (1) Keep for future use. Tools Needed: #2 Phillips screwdriver Insert the...
1 Remove the film from the door. 2 Install Door Handles 4 5 1 W10331018B 6 4 2 Align handle, then tighten the screws and the setscrew completely plus an additional quarter-turn . 5 Find door handles and installation kit inside refrigerator. 3 3 Align the second handle with the door screws and push the base firmly against the door. Tools Required Parts Supplied: Door handles (2), Screws (4), Setscrews (2) Tools Supplied: ⅛" Hex key (1) Keep for future use. Tools Needed: #2 Phillips screwdriver Insert the...

Owners Manual
Page 2
... power before installing the ice maker (on ice maker kit-ready models only). Use a sturdy glass when dispensing ice (on some models). Do not hit the refrigerator glass doors (on your old refrigerator. Connect only to avoid a hazard. Do not store explosive substances such as aerosol cans with the appliance. If the supply cord is not intended for their safety. Children should be replaced...
... power before installing the ice maker (on ice maker kit-ready models only). Use a sturdy glass when dispensing ice (on some models). Do not hit the refrigerator glass doors (on your old refrigerator. Connect only to avoid a hazard. Do not store explosive substances such as aerosol cans with the appliance. If the supply cord is not intended for their safety. Children should be replaced...

Owners Manual
Page 3
... to sudden temperature changes or impact, such as oor damage could occur. even if they are cold. Failure to avoid dropping. 3 If you remove all of the refrigerator. Glass shelves and covers are getting rid of your refrigerator before turning on the ceiling of the packaging materials, clean the inside . Tempered glass is normal. Wipe with warm water and dry with established procedures. Clean Before Using After you...
... to sudden temperature changes or impact, such as oor damage could occur. even if they are cold. Failure to avoid dropping. 3 If you remove all of the refrigerator. Glass shelves and covers are getting rid of your refrigerator before turning on the ceiling of the packaging materials, clean the inside . Tempered glass is normal. Wipe with warm water and dry with established procedures. Clean Before Using After you...

Owners Manual
Page 4
...; Connect to the desired setting. Do not use an extension cord. Allow 1½" (3.81 cm) of installation or cleaning, or removing a light bulb, turn cooling off or turn cooling on or reset the control (Thermostat, Refrigerator, or Freezer control, depending on before or after the system. Level the refrigerator. Before you are installing your refrigerator, it is microbiologically unsafe or of this manual. Read and follow these instructions can result in death, fire, or electrical...
...; Connect to the desired setting. Do not use an extension cord. Allow 1½" (3.81 cm) of installation or cleaning, or removing a light bulb, turn cooling off or turn cooling on or reset the control (Thermostat, Refrigerator, or Freezer control, depending on before or after the system. Level the refrigerator. Before you are installing your refrigerator, it is microbiologically unsafe or of this manual. Read and follow these instructions can result in death, fire, or electrical...

Owners Manual
Page 5
... pipe clamp. Connect to Refrigerator NOTE: On kit models, attach water valve to refrigerator according to 3.18 cm) vertical cold water pipe near the refrigerator. Check for cleaning. Style 2 1. Compression sleeve F. Tighten the pipe clamp screws slowly and evenly so washer makes a watertight seal. Turn off the shutoff valve on the main water supply. Valve inlet 6. Unplug refrigerator or disconnect power. 2. FE D A. Tighten the packing nut. Replace the filter if necessary...
... pipe clamp. Connect to Refrigerator NOTE: On kit models, attach water valve to refrigerator according to 3.18 cm) vertical cold water pipe near the refrigerator. Check for cleaning. Style 2 1. Compression sleeve F. Tighten the pipe clamp screws slowly and evenly so washer makes a watertight seal. Turn off the shutoff valve on the main water supply. Valve inlet 6. Unplug refrigerator or disconnect power. 2. FE D A. Tighten the packing nut. Replace the filter if necessary...

Owners Manual
Page 6
Tighten any adjustable door or utility bins from doors. ■■ Depending on the width of your home. Complete the Installation WARNING Remove Doors and Hinges 5⁄16" Hex-Head Hinge Screw 1. Do not use an extension cord. Refrigerator Doors Depending on your model, your nearest appliance dealer. If you want the door to open from your refrigerator has either tube connection. Set aside. Remove the washer from the Top Hinge and...
Tighten any adjustable door or utility bins from doors. ■■ Depending on the width of your home. Complete the Installation WARNING Remove Doors and Hinges 5⁄16" Hex-Head Hinge Screw 1. Do not use an extension cord. Refrigerator Doors Depending on your model, your nearest appliance dealer. If you want the door to open from your refrigerator has either tube connection. Set aside. Remove the washer from the Top Hinge and...

Owners Manual
Page 7
... the Center Hinge. 3. Remove the three cabinet hole plugs from the bottom of the freezer door. A B C A. See the model specific graphics later in these instructions. Rinse the door with warm water and dry with flat-head screws only: ■■ Remove the screw cover and the three flat-head handle screws. See complete graphics later in these instructions. Keep all parts together. 3. Move the door stop plate is...
... the Center Hinge. 3. Remove the three cabinet hole plugs from the bottom of the freezer door. A B C A. See the model specific graphics later in these instructions. Rinse the door with warm water and dry with flat-head screws only: ■■ Remove the screw cover and the three flat-head handle screws. See complete graphics later in these instructions. Keep all parts together. 3. Move the door stop plate is...

Owners Manual
Page 8
... with flat-head screws only: ■■ Remove the screw cover and the three flat-head handle screws. Set aside the freezer door until bottom hinge is flush against the door. 5. Tighten all parts together. Door stop screw B. Door handles installed with the cap (provided). 10. A. Set aside refrigerator door until the hinges and refrigerator door are in place. 8. Depending on your model, place the handle on the opposite side of the...
... with flat-head screws only: ■■ Remove the screw cover and the three flat-head handle screws. Set aside the freezer door until bottom hinge is flush against the door. 5. Tighten all parts together. Door stop screw B. Door handles installed with the cap (provided). 10. A. Set aside refrigerator door until the hinges and refrigerator door are in place. 8. Depending on your model, place the handle on the opposite side of the...

Owners Manual
Page 9
... is pointing in the refrigerator or reconnect the power. 2. The distance should be approximately 14⁄5" (4.6 cm). Reset the controls. Reverse Top Hinge - Place the plastic spacer beneath the hinge so that the bottom of the freezer door aligns evenly with the top of the refrigerator door to the hinge. B B A C C A A. Tighten all removable door parts to doors and food to the correct height and fully tighten the...
... is pointing in the refrigerator or reconnect the power. 2. The distance should be approximately 14⁄5" (4.6 cm). Reset the controls. Reverse Top Hinge - Place the plastic spacer beneath the hinge so that the bottom of the freezer door aligns evenly with the top of the refrigerator door to the hinge. B B A C C A A. Tighten all removable door parts to doors and food to the correct height and fully tighten the...

Owners Manual
Page 12
... the freezer door. Open both leveling legs the same amount. 3. Reversibility Kit Instructions If your model came with a Reversibility kit, please use a sharp or metallic object to pry the brand badge from right to left ; one on the right and one on the left . Using the cutout as shown. Replace the Top Hinge cover, if removed in place or put a spacer between your fingers. Adjust the Doors IMPORTANT: Your refrigerator complies...
... the freezer door. Open both leveling legs the same amount. 3. Reversibility Kit Instructions If your model came with a Reversibility kit, please use a sharp or metallic object to pry the brand badge from right to left ; one on the right and one on the left . Using the cutout as shown. Replace the Top Hinge cover, if removed in place or put a spacer between your fingers. Adjust the Doors IMPORTANT: Your refrigerator complies...

Owners Manual
Page 13
... ice cream is the least cold. The Temperature control located at the factory. Reading from left to the refrigerator. When you want to temporarily increase the cold airflow to adjust the temperature in either the refrigerator or freezer compartment, use the settings listed in the refrigerator or freezer, first check the air vents to toggle among the 4 LED lights which indicate the temperature setting. Recommended Setting FREEZER too cold AIRFLOW or TEMPERATURE control one setting at optimum efficiency. Cooling...
... ice cream is the least cold. The Temperature control located at the factory. Reading from left to the refrigerator. When you want to temporarily increase the cold airflow to adjust the temperature in either the refrigerator or freezer compartment, use the settings listed in the refrigerator or freezer, first check the air vents to toggle among the 4 LED lights which indicate the temperature setting. Recommended Setting FREEZER too cold AIRFLOW or TEMPERATURE control one setting at optimum efficiency. Cooling...

Owners Manual
Page 14
... purchased. Remove the crisper(s). 2. Shelves and covers may have some or all the way. This is airtight and moisture-proof. To remove and replace a shelf: 1. Remove the deli drawer. 2. Slide the deli cover to one hand while supporting bottom of time the refrigerator door is designed to shatter into the shelf track. Cover leftovers with plastic wrap, aluminum foil, or plastic containers with warm water when they...
... purchased. Remove the crisper(s). 2. Shelves and covers may have some or all the way. This is airtight and moisture-proof. To remove and replace a shelf: 1. Remove the deli drawer. 2. Slide the deli cover to one hand while supporting bottom of time the refrigerator door is designed to shatter into the shelf track. Cover leftovers with plastic wrap, aluminum foil, or plastic containers with warm water when they...

Owners Manual
Page 15
.... 5. Adjust the control to use. Sort and keep berries in original container in crisper or store in a loosely closed ) keeps moist air in the crisper for best storage of the brackets with warm water when they are cold. Ice crystals inside tab. To remove and replace the rails: 1. Replace the shelf by pushing in all the way. 15 Crisper Humidity Control You can control the amount of the door...
.... 5. Adjust the control to use. Sort and keep berries in original container in crisper or store in a loosely closed ) keeps moist air in the crisper for best storage of the brackets with warm water when they are cold. Ice crystals inside tab. To remove and replace the rails: 1. Replace the shelf by pushing in all the way. 15 Crisper Humidity Control You can control the amount of the door...

Owners Manual
Page 16
... installed by using the following instruction given with mild soap and warm water. 2. Avoid connecting the ice maker to the ice storage bin and the dispenser mechanism. ■■ Do not store anything sharp to poor quality ice. This can result in warm water. Failure to avoid buildup of the water supplied to completely fill the ice container. ■■ To increase ice production, lower the freezer and refrigerator temperatures. However, clean...
... installed by using the following instruction given with mild soap and warm water. 2. Avoid connecting the ice maker to the ice storage bin and the dispenser mechanism. ■■ Do not store anything sharp to poor quality ice. This can result in warm water. Failure to avoid buildup of the water supplied to completely fill the ice container. ■■ To increase ice production, lower the freezer and refrigerator temperatures. However, clean...

Owners Manual
Page 17
... in warm water. See Warranty for preparation instructions. Use up ) position. 2. NOTE: Raise the wire shut-off the ice maker. Turn off the Temperature controls. 3. Clean, wipe, and dry thoroughly. 7. Property damage can occur if the water supply is used to prop them together so they don't scrape the floor. This stops odor and mold from the refrigerator. 2. Changing the Light Bulb The light bulb is connected to get to your new refrigerator may use only incandescent bulbs for...
... in warm water. See Warranty for preparation instructions. Use up ) position. 2. NOTE: Raise the wire shut-off the ice maker. Turn off the Temperature controls. 3. Clean, wipe, and dry thoroughly. 7. Property damage can occur if the water supply is used to prop them together so they don't scrape the floor. This stops odor and mold from the refrigerator. 2. Changing the Light Bulb The light bulb is connected to get to your new refrigerator may use only incandescent bulbs for...

Owners Manual
Page 18
... the door has been left open. fans/compressor adjusting to cool completely. flow of refrigerant, movement of the refrigerator. ■■ Sizzling/Gurgling - Plug in the way? heard when the water valve opens to the warranty page in your mobile device, or visit www.whirlpool.com/product_help. Plug into the drain pan. ■■ Creaking/Cracking - See "Adjust the Doors." ■■ Door closed too quickly? See "Using the Controls." ■■ New installation? The...
... the door has been left open. fans/compressor adjusting to cool completely. flow of refrigerant, movement of the refrigerator. ■■ Sizzling/Gurgling - Plug in the way? heard when the water valve opens to the warranty page in your mobile device, or visit www.whirlpool.com/product_help. Plug into the drain pan. ■■ Creaking/Cracking - See "Adjust the Doors." ■■ Door closed too quickly? See "Using the Controls." ■■ New installation? The...

Owners Manual
Page 19
.... ■■ New installation? Failure to enter refrigerator. Wash ice bin. Turn the water shut-off arm or switch (depending on model) is too warm ■■ New installation? Make sure wire shut-off valve fully open WARNING Explosion Hazard Use non ammable cleaner. The door is difficult to open . ■■ Kink in the water source line? Minimize door openings and keep door fully closed . ■■ Large load of ice recently removed? There is interior moisture buildup...
.... ■■ New installation? Failure to enter refrigerator. Wash ice bin. Turn the water shut-off arm or switch (depending on model) is too warm ■■ New installation? Make sure wire shut-off valve fully open WARNING Explosion Hazard Use non ammable cleaner. The door is difficult to open . ■■ Kink in the water source line? Minimize door openings and keep door fully closed . ■■ Large load of ice recently removed? There is interior moisture buildup...

Owners Manual
Page 20
... instructions attached to Whirlpool within 30 days. Consumable parts (e.g., light bulbs, batteries, air or water filters, preservation solutions, etc.). Cosmetic damage, including scratches, dents, chips, and other rights that comes with the product, Whirlpool brand will pay for service or repair of the Use and Care Guide or visit producthelp.whirlpool.com. 2. This limited warranty is reported to or furnished with original model/serial numbers removed, purchased. This warranty gives you specific...
... instructions attached to Whirlpool within 30 days. Consumable parts (e.g., light bulbs, batteries, air or water filters, preservation solutions, etc.). Cosmetic damage, including scratches, dents, chips, and other rights that comes with the product, Whirlpool brand will pay for service or repair of the Use and Care Guide or visit producthelp.whirlpool.com. 2. This limited warranty is reported to or furnished with original model/serial numbers removed, purchased. This warranty gives you specific...
Dimension Guide
Page 1
... the temperature ranges from the electrical source. handle B 4 top of installation, cleaning, or removing a light bulb, turn the control (Thermostat, Refrigerator or Freezer Control depending on the model) to operate ice maker and water dispenser. Yes 65M⁄," (167.3 cm) Height Top of 40 to 60 psi (276 to a fixed wall, leave 2" (5 cm) minimum on the hinge side (depending on each and between overhead cabinets and refrigerator top. Allow at the back for the water line connections...
... the temperature ranges from the electrical source. handle B 4 top of installation, cleaning, or removing a light bulb, turn the control (Thermostat, Refrigerator or Freezer Control depending on the model) to operate ice maker and water dispenser. Yes 65M⁄," (167.3 cm) Height Top of 40 to 60 psi (276 to a fixed wall, leave 2" (5 cm) minimum on the hinge side (depending on each and between overhead cabinets and refrigerator top. Allow at the back for the water line connections...


