

Instruction Sheet
Page 1
BADGE INSTALLATION INSTRUCTIONS To install badge, please use the brand badge placement template and the following instructions. NOTE: When the template is completely covered. 4. Slowly remove the tape and template. W10870916B Cut the template along the dotted lines that match the shape of the template, as a guide, press the brand badge onto the freezer door, making sure that the hole is correctly aligned...
BADGE INSTALLATION INSTRUCTIONS To install badge, please use the brand badge placement template and the following instructions. NOTE: When the template is completely covered. 4. Slowly remove the tape and template. W10870916B Cut the template along the dotted lines that match the shape of the template, as a guide, press the brand badge onto the freezer door, making sure that the hole is correctly aligned...

Installation Guide
Page 2
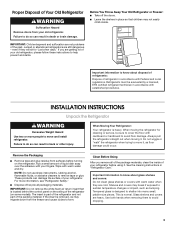
...; Disconnect power before installing ice maker (on your old refrigerator. ■ Use nonflammable cleaner. ■ Keep flammable materials and vapors, such as gasoline, away from refrigerator. ■ Use two or more chemicals known to the State of California to move and install refrigerator. ■ Disconnect power before servicing. ■ Replace all safety messages. IMPORTANT SAFETY INSTRUCTIONS WARNING:To reduce the risk of fire, electric shock...
...; Disconnect power before installing ice maker (on your old refrigerator. ■ Use nonflammable cleaner. ■ Keep flammable materials and vapors, such as gasoline, away from refrigerator. ■ Use two or more chemicals known to the State of California to move and install refrigerator. ■ Disconnect power before servicing. ■ Replace all safety messages. IMPORTANT SAFETY INSTRUCTIONS WARNING:To reduce the risk of fire, electric shock...
Installation Guide
Page 3
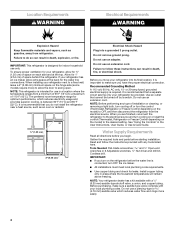
... insert is heavy. Clean Before Using After you are still dangerous - See the cleaning instructions in death or brain damage. Important information to form. When Moving Your Refrigerator: Your refrigerator is removed, ice may migrate down from the freezer and cause icicles to know about glass shelves and covers: Do not clean glass shelves or covers with warm water when they will sit for cleaning or service, be evacuated by...
... insert is heavy. Clean Before Using After you are still dangerous - See the cleaning instructions in death or brain damage. Important information to form. When Moving Your Refrigerator: Your refrigerator is removed, ice may migrate down from the freezer and cause icicles to know about glass shelves and covers: Do not clean glass shelves or covers with warm water when they will sit for cleaning or service, be evacuated by...
Installation Guide
Page 4
... tools listed here. Water Supply Requirements Read all directions before the water line is connected, turn OFF the ice maker. ■ All installations must meet local plumbing code requirements. ■ Use copper tubing and check for use a piercing-type or 4.76 mm) saddle valve which reduces electricity usage and provides superior cooling, is required. IMPORTANT: ■ If you turn cooling on or reset the control (Thermostat, Refrigerator or Freezer Control depending on the hinge side (some models require...
... tools listed here. Water Supply Requirements Read all directions before the water line is connected, turn OFF the ice maker. ■ All installations must meet local plumbing code requirements. ■ Use copper tubing and check for use a piercing-type or 4.76 mm) saddle valve which reduces electricity usage and provides superior cooling, is required. IMPORTANT: ■ If you turn cooling on or reset the control (Thermostat, Refrigerator or Freezer Control depending on the hinge side (some models require...

Installation Guide
Page 5
... or you need. Flush the tubing until water is equipped with the pipe clamp. Tube clamp screw C. Measure from the connection on the water pipe. A G B C FE A. Pipe clamp C. Fasten the shutoff valve to operate the ice maker. Do not remove ground prong. Connect the Water Supply Read all directions before the water line is required to the cold water pipe with a built-in the valve. 4. Unplug refrigerator or disconnect power. 2. Compression...
... or you need. Flush the tubing until water is equipped with the pipe clamp. Tube clamp screw C. Measure from the connection on the water pipe. A G B C FE A. Pipe clamp C. Fasten the shutoff valve to operate the ice maker. Do not remove ground prong. Connect the Water Supply Read all directions before the water line is required to the cold water pipe with a built-in the valve. 4. Unplug refrigerator or disconnect power. 2. Compression...

Installation Guide
Page 6
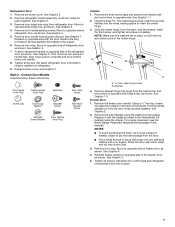
... refrigerator or disconnect power. ■ Remove food and adjustable door or utility bins from the cabinet. Lift the freezer door free from freezer door. Remove the three dome caps and the screws from cabinet top and move them to opposite side hinge hole, as shown in the Reversibility Kit located inside the crisper drawer. For proper placement, see "Replace Doors and Hinges." ■ Flat-blade screwdriver IMPORTANT: ■ Before you begin, turn the refrigerator control...
... refrigerator or disconnect power. ■ Remove food and adjustable door or utility bins from the cabinet. Lift the freezer door free from freezer door. Remove the three dome caps and the screws from cabinet top and move them to opposite side hinge hole, as shown in the Reversibility Kit located inside the crisper drawer. For proper placement, see "Replace Doors and Hinges." ■ Flat-blade screwdriver IMPORTANT: ■ Before you begin, turn the refrigerator control...
Installation Guide
Page 7
... 4. 5. Position refrigerator handle on opposite side of this manual). Tighten all parts together. See Graphic 6. Contour Door Models Graphics follow these instructions. Freezer Door 1. Replace it with a soft cloth. 3. NOTES: ■ To avoid scratching the finish, do not use a sharp or metallic object to opposite side of refrigerator door, as shown. Rinse the door with warm water and dry with the badge provided in the crisper. 6. Move...
... 4. 5. Position refrigerator handle on opposite side of this manual). Tighten all parts together. See Graphic 6. Contour Door Models Graphics follow these instructions. Freezer Door 1. Replace it with a soft cloth. 3. NOTES: ■ To avoid scratching the finish, do not use a sharp or metallic object to opposite side of refrigerator door, as shown. Rinse the door with warm water and dry with the badge provided in the crisper. 6. Move...

Installation Guide
Page 8
.... 5. Adjust the door to refrigerator. Assemble the parts for the bottom hinge, as shown. Remove the cover from refrigerator door. Align the clips on the side of the cabinet, inserting the screws only halfway, so you are aligned. See Center Hinge graphic. Replace the refrigerator door. Using a ¹⁄₈" hex key, loosen the setscrew located on the base grille with the door handle hole plug provided in the Reversibility Kit located...
.... 5. Adjust the door to refrigerator. Assemble the parts for the bottom hinge, as shown. Remove the cover from refrigerator door. Align the clips on the side of the cabinet, inserting the screws only halfway, so you are aligned. See Center Hinge graphic. Replace the refrigerator door. Using a ¹⁄₈" hex key, loosen the setscrew located on the base grille with the door handle hole plug provided in the Reversibility Kit located...
Installation Guide
Page 9
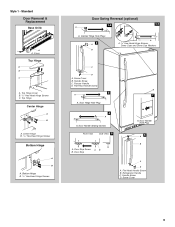
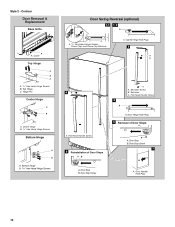
Bottom Hinge B. 5/16" Hex-Head Hinge Screws Door Swing Reversal (optional) 1-2 1-1 A A. Screw Cover B. Door Hinge Hole Plug 4 A A. Door Stop A. Top Hinge Cover B. 5/16" Hex-Head Hinge Screws C. Door Handle Sealing Screws Front View Side View 5 A. Door Stop Screw A B B. Top Hinge Center Hinge A B A. Flat-Head Handle Screw 3 A 7 A. Flat-Head Handle Screw B. Handle Screw C. Freezer Handle D. Door Handle Hole Plug 6 A B C D A. Handle Screw D. Style 1 - Standard Door Removal & Replacement Base Grille A A. Cover Top Hinge A B C A. Center Hinge B. 5/16"...
Bottom Hinge B. 5/16" Hex-Head Hinge Screws Door Swing Reversal (optional) 1-2 1-1 A A. Screw Cover B. Door Hinge Hole Plug 4 A A. Door Stop A. Top Hinge Cover B. 5/16" Hex-Head Hinge Screws C. Door Handle Sealing Screws Front View Side View 5 A. Door Stop Screw A B B. Top Hinge Center Hinge A B A. Flat-Head Handle Screw 3 A 7 A. Flat-Head Handle Screw B. Handle Screw C. Freezer Handle D. Door Handle Hole Plug 6 A B C D A. Handle Screw D. Style 1 - Standard Door Removal & Replacement Base Grille A A. Cover Top Hinge A B C A. Center Hinge B. 5/16"...
Installation Guide
Page 10
Hinge Pin Center Hinge A B A. Cover Top Hinge A B C A. 5/16" Hex-Head Hinge Screws B. Flat-Head Handle Screw A. Cabinet Hinge Hole Plugs 2 A B 6A A. Door Stop B. Center Hinge B. 5/16" Hex-Head Hinge Screws Bottom Hinge A B A. Door Hinge Hole Plug 4 Removal of Door Stops AB 3 A C A. Door Handle Hole Plug 10 Top Hinge C. Flat-Head Handle Screw 5 Reinstallation of Door Stops A B A. Setscrew C. Door Stop Screw 7 A. Door Stop B. Shoulder Screw B. Door Stop Screw A. Style 2 - Bottom Hinge Door Swing Reversal (optional) 1-1 1-2 A A A. 5/16" Hex-Head Hinge ...
Hinge Pin Center Hinge A B A. Cover Top Hinge A B C A. 5/16" Hex-Head Hinge Screws B. Flat-Head Handle Screw A. Cabinet Hinge Hole Plugs 2 A B 6A A. Door Stop B. Center Hinge B. 5/16" Hex-Head Hinge Screws Bottom Hinge A B A. Door Hinge Hole Plug 4 Removal of Door Stops AB 3 A C A. Door Handle Hole Plug 10 Top Hinge C. Flat-Head Handle Screw 5 Reinstallation of Door Stops A B A. Setscrew C. Door Stop Screw 7 A. Door Stop B. Shoulder Screw B. Door Stop Screw A. Style 2 - Bottom Hinge Door Swing Reversal (optional) 1-1 1-2 A A A. 5/16" Hex-Head Hinge ...

Installation Guide
Page 11
... following instructions: 1. Remove the base grille. Use a socket driver to the rear by lifting up the right-hand side and peeling the badge away from the door from the door. 2. Reversibility Kit Instructions If your doors looks uneven, you can adjust it easier to adjust. 5. Using the removal tool (provided), remove the brand badge from the freezer door by turning both leveling screws the same amount. 4. Rinse the door with warm water...
... following instructions: 1. Remove the base grille. Use a socket driver to the rear by lifting up the right-hand side and peeling the badge away from the door from the door. 2. Reversibility Kit Instructions If your doors looks uneven, you can adjust it easier to adjust. 5. Using the removal tool (provided), remove the brand badge from the freezer door by turning both leveling screws the same amount. 4. Rinse the door with warm water...
Installation Guide
Page 12
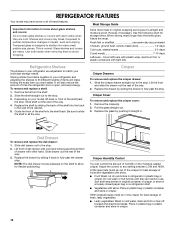
... straight in cold water, drain and trim or tear off bruised and discolored areas. HIGH (closed paper bag on a refrigerator shelf. ■ Vegetables with warm water when they are heavy. Glass shelves and covers are ready to the stop . Depending on the shelf to fit different heights of items will also reduce the amount of the shelf past the stop . Crisper Crisper Drawers To remove and replace the crisper drawer: 1. Replace the shelf by...
... straight in cold water, drain and trim or tear off bruised and discolored areas. HIGH (closed paper bag on a refrigerator shelf. ■ Vegetables with warm water when they are heavy. Glass shelves and covers are ready to the stop . Depending on the shelf to fit different heights of items will also reduce the amount of the shelf past the stop . Crisper Crisper Drawers To remove and replace the crisper drawer: 1. Replace the shelf by...
Installation Guide
Page 13
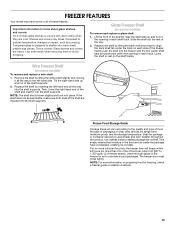
... shelf supports. If the shelf does not appear stable, make sure both hands when removing them to avoid dropping. Put no more information on preparing food for air to align the back shelf tab under the track on some models) To remove and replace a wire shelf: 1. Glass shelves and covers are inserted into place. Frozen Food Storage Guide Storage times will freeze within the opening in each track. Use...
... shelf supports. If the shelf does not appear stable, make sure both hands when removing them to avoid dropping. Put no more information on preparing food for air to align the back shelf tab under the track on some models) To remove and replace a wire shelf: 1. Glass shelves and covers are inserted into place. Frozen Food Storage Guide Storage times will freeze within the opening in each track. Use...
Installation Guide
Page 14
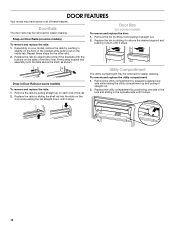
... above the desired support and pushing it down until it stops. Drop-in slightly on the front of the bracket while pulling out on the inside tab. Remove the rails by pushing in Door Rails (on some models) To remove and replace the rails: 1. Snap-on Door Rails (on some models) To remove and replace the rails: 1. Depending on your model, remove the rails...
... above the desired support and pushing it down until it stops. Drop-in slightly on the front of the bracket while pulling out on the inside tab. Remove the rails by pushing in Door Rails (on some models) To remove and replace the rails: 1. Snap-on Door Rails (on some models) To remove and replace the rails: 1. Depending on your model, remove the rails...

Installation Guide
Page 29
Used under license in Mexico Imprimé au Mexique Utilisé sous licence au Canada. Tous droits réservés. 12/14 Printed in Canada. W10726840A ®/™ ©2014 Whirlpool. All rights reserved.
Used under license in Mexico Imprimé au Mexique Utilisé sous licence au Canada. Tous droits réservés. 12/14 Printed in Canada. W10726840A ®/™ ©2014 Whirlpool. All rights reserved.
Dimension Guide
Page 1
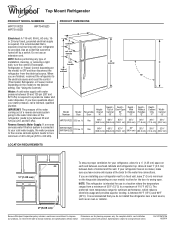
.... See "Using the Controls." Water: A cold water supply with product. handle D incl. handle B 4 top of the refrigerator needs to operate ice maker and water dispenser. Depth - Top of cabinet and the wall. ft. Allow at the back for planning purposes only. It is required to be a minimum of installation, cleaning, or removing a light bulb, turn the control (Thermostat, Refrigerator or Freezer Control depending on the model) to improve Dimensions are for the water line connections. For complete details, see Installation our products...
.... See "Using the Controls." Water: A cold water supply with product. handle D incl. handle B 4 top of the refrigerator needs to operate ice maker and water dispenser. Depth - Top of cabinet and the wall. ft. Allow at the back for planning purposes only. It is required to be a minimum of installation, cleaning, or removing a light bulb, turn the control (Thermostat, Refrigerator or Freezer Control depending on the model) to improve Dimensions are for the water line connections. For complete details, see Installation our products...

Warranty Information
Page 1
... Customer eXperience Center: ■ Name, address and telephone number ■ Model number and serial number ■ A clear, detailed description of the problem ■ Proof of the Use and Care Guide, scan the QR code on the duration of implied warranties of household electrical or plumbing (i.e. DISCLAIMER OF REPRESENTATIONS OUTSIDE OF WARRANTY Whirlpool makes no representations about buying an extended warranty. Conversion of products from the date of repair or replacement...
... Customer eXperience Center: ■ Name, address and telephone number ■ Model number and serial number ■ A clear, detailed description of the problem ■ Proof of the Use and Care Guide, scan the QR code on the duration of implied warranties of household electrical or plumbing (i.e. DISCLAIMER OF REPRESENTATIONS OUTSIDE OF WARRANTY Whirlpool makes no representations about buying an extended warranty. Conversion of products from the date of repair or replacement...

Energy Guide
Page 1
...). EFIERG GUIDE Refrigerator-Freezer • Automatic Defrost • Top Mounted Freezer • Without Through-The-Door-Ice Service Whirlpool Corporation Model: WRT311FZD*0* Capacity: 20.5 Cubic Feet Compare ONLY to other labels with yellow numbers are based on a national average electricity cost of 12 cents per year / par armee V This model / Ce modele 355 kWh 530 kWh Uses least energy / Consomme le moins d'energie Type 3 Uses most energy / Consomme le plus d'energie Similar models 20...
...). EFIERG GUIDE Refrigerator-Freezer • Automatic Defrost • Top Mounted Freezer • Without Through-The-Door-Ice Service Whirlpool Corporation Model: WRT311FZD*0* Capacity: 20.5 Cubic Feet Compare ONLY to other labels with yellow numbers are based on a national average electricity cost of 12 cents per year / par armee V This model / Ce modele 355 kWh 530 kWh Uses least energy / Consomme le moins d'energie Type 3 Uses most energy / Consomme le plus d'energie Similar models 20...


