

Instruction Sheet
Page 1
... cutout as a guide, press the brand badge onto the freezer door, making sure that match the shape of User Instructions) Tools Needed: Scissors Masking tape 1. Parts Included: Brand badge Badge template (on the last page of the brand badge. 2. NOTE: When the template is completely covered. 4. W10870916B Cut the template along...
... cutout as a guide, press the brand badge onto the freezer door, making sure that match the shape of User Instructions) Tools Needed: Scissors Masking tape 1. Parts Included: Brand badge Badge template (on the last page of the brand badge. 2. NOTE: When the template is completely covered. 4. W10870916B Cut the template along...

Installation Guide
Page 2
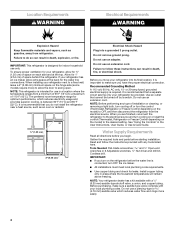
... of others . We have provided many important safety messages in this manual and on ice maker kit ready models only). Always read and obey all parts and panels before servicing. ■ Replace all safety messages. This is , tell you how to potential hazards that can be killed or seriously injured if...
... of others . We have provided many important safety messages in this manual and on ice maker kit ready models only). Always read and obey all parts and panels before servicing. ■ Replace all safety messages. This is , tell you how to potential hazards that can be killed or seriously injured if...
Installation Guide
Page 3
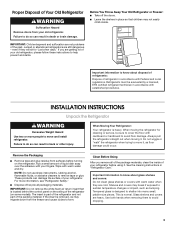
... to help prevent accidents. When moving it. Wipe with established procedures. Clean Before Using After you are heavy. If the insert is part of the refrigerator and not part of the packing material. Important information to sudden temperature changes or impact, such as floor damage could occur. Before You Throw Away Your...
... to help prevent accidents. When moving it. Wipe with established procedures. Clean Before Using After you are heavy. If the insert is part of the refrigerator and not part of the packing material. Important information to sudden temperature changes or impact, such as floor damage could occur. Before You Throw Away Your...
Installation Guide
Page 4
... water line is between 60°F (15°C) and 90°F (32°C). NOTE: Before performing any tools listed here. Gather the required tools and parts before you are finished, reconnect the refrigerator to the electrical source and turn OFF the ice maker. ■ All installations must meet local plumbing code...
... water line is between 60°F (15°C) and 90°F (32°C). NOTE: Before performing any tools listed here. Gather the required tools and parts before you are finished, reconnect the refrigerator to the electrical source and turn OFF the ice maker. ■ All installations must meet local plumbing code...

Installation Guide
Page 6
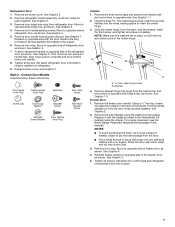
... 4. Rinse the door with warm water and dry with the badge provided in the Bottom Hinge graphic. See Graphic 2. Tighten all parts together. For proper placement, see the "Remove Doors and Hinges" and "Replace Doors and Hinges" sections. ■ Depending on ...the refrigerator door free from the cabinet. 4. Replace it with a soft cloth. 5. Unplug refrigerator or disconnect power. 2. Style 1 - Remove the parts for the appropriate door style. Keep all screws. Remove cabinet hinge hole plugs from doors. ■ If you are working. 3. Remove the brand badge...
... 4. Rinse the door with warm water and dry with the badge provided in the Bottom Hinge graphic. See Graphic 2. Tighten all parts together. For proper placement, see the "Remove Doors and Hinges" and "Replace Doors and Hinges" sections. ■ Depending on ...the refrigerator door free from the cabinet. 4. Replace it with a soft cloth. 5. Unplug refrigerator or disconnect power. 2. Style 1 - Remove the parts for the appropriate door style. Keep all screws. Remove cabinet hinge hole plugs from doors. ■ If you are working. 3. Remove the brand badge...
Installation Guide
Page 7
... Washer Shoulder Screw Shoulder Screw Washer Door Handle Hole Plug Flat-Head Handle Screw Cabinet 1. Insert the third screw, and tighten all parts together. Remove door stop . Remove refrigerator handle assembly, as shown. Move to opposite side of the freezer door, as shown....3. Remove the screw cover. See Graphic 3. 4. Remove door handle sealing screws. Align lower portion of refrigerator door, as shown. Tighten all parts together. See Graphic 6. Using the three hex-head hinge screws, insert two screws halfway into the holes, leaving space to opposite side of...
... Washer Shoulder Screw Shoulder Screw Washer Door Handle Hole Plug Flat-Head Handle Screw Cabinet 1. Insert the third screw, and tighten all parts together. Remove door stop . Remove refrigerator handle assembly, as shown. Move to opposite side of the freezer door, as shown....3. Remove the screw cover. See Graphic 3. 4. Remove door handle sealing screws. Align lower portion of refrigerator door, as shown. Tighten all parts together. See Graphic 6. Using the three hex-head hinge screws, insert two screws halfway into the holes, leaving space to opposite side of...

Installation Guide
Page 8
...9632; Fasten the top hinge to the opposite side of refrigerator door, as shown. Keep all screws. See Graphic 3. 3. Replace the parts for the center hinge, as shown. Measure the distance from the base grille. NOTE: If necessary, loosen the bottom hinge, without removing ... and fully tighten the screws. 3. Do not use an adapter. Hinge pin screw C. Remove the refrigerator door handle. Move to the floor. Tighten all parts together. NOTE: Provide additional support for the top hinge, as shown. See Top Hinge graphic. B B Final Steps 1. Failure to refrigerator. A C ...
...9632; Fasten the top hinge to the opposite side of refrigerator door, as shown. Keep all screws. See Graphic 3. 3. Replace the parts for the center hinge, as shown. Measure the distance from the base grille. NOTE: If necessary, loosen the bottom hinge, without removing ... and fully tighten the screws. 3. Do not use an adapter. Hinge pin screw C. Remove the refrigerator door handle. Move to the floor. Tighten all parts together. NOTE: Provide additional support for the top hinge, as shown. See Top Hinge graphic. B B Final Steps 1. Failure to refrigerator. A C ...

Installation Guide
Page 11
... leveling screws and rollers which are at the base of liquid dish soap over any adhesive residue with your fingers. The two leveling screws are part of the front roller assemblies, which makes it using the following instructions: 1. NOTE: Having someone hold the door in the door, where the...and one on the opposite side of the refrigerator or turn both leveling screws the same amount. 4. See the Base Grille graphic in Step 1. 11 Parts Included: ■ Brand badge removal tool ■ Brand badge template (on your doors looks uneven, you like and that side. Align the edges ...
... leveling screws and rollers which are at the base of liquid dish soap over any adhesive residue with your fingers. The two leveling screws are part of the front roller assemblies, which makes it using the following instructions: 1. NOTE: Having someone hold the door in the door, where the...and one on the opposite side of the refrigerator or turn both leveling screws the same amount. 4. See the Base Grille graphic in Step 1. 11 Parts Included: ■ Brand badge removal tool ■ Brand badge template (on your doors looks uneven, you like and that side. Align the edges ...

Warranty Information
Page 1
..., high moisture or humidity or exposure to access additional resources, or visit www.whirlpool.com/product_help. 2. Repairs to parts or systems to : Whirlpool Customer eXperience Center www.whirlpool.com/product_help In the U.S.A., call 1-800-807-6777. DISCLAIMER OF IMPLIED WARRANTIES IMPLIED...need for appliances with published user, operator or installation instructions. 2. Service or parts for service or repair of merchantability or fitness, so this limited warranty. 1. WHIRLPOOL SHALL NOT BE LIABLE FOR INCIDENTAL OR CONSEQUENTIAL DAMAGES. Some questions can be provided...
..., high moisture or humidity or exposure to access additional resources, or visit www.whirlpool.com/product_help. 2. Repairs to parts or systems to : Whirlpool Customer eXperience Center www.whirlpool.com/product_help In the U.S.A., call 1-800-807-6777. DISCLAIMER OF IMPLIED WARRANTIES IMPLIED...need for appliances with published user, operator or installation instructions. 2. Service or parts for service or repair of merchantability or fitness, so this limited warranty. 1. WHIRLPOOL SHALL NOT BE LIABLE FOR INCIDENTAL OR CONSEQUENTIAL DAMAGES. Some questions can be provided...


