Dimension Guide
Page 1
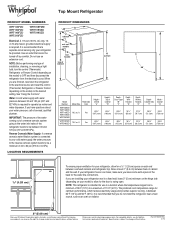
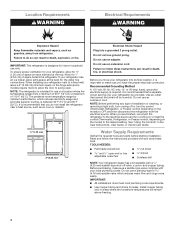
.... Yes 65M⁄," (167.3 cm) Height Top of installation, cleaning, or removing a light bulb, turn the control (Thermostat, Refrigerator or Freezer Control depending on each and between back of cabinet 1 A overall C 90˚ Model Number Reversible Model Size Door Height Overall "A" WRT108FZD WRT138FZD WRT148FZD WRT318FZD 18.2 cu. If your refrigerator has an ice maker, make sure you have questions about your refrigerator, allow for optimum performance, which reduces electricity usage and provides superior cooling, is required.
.... Yes 65M⁄," (167.3 cm) Height Top of installation, cleaning, or removing a light bulb, turn the control (Thermostat, Refrigerator or Freezer Control depending on each and between back of cabinet 1 A overall C 90˚ Model Number Reversible Model Size Door Height Overall "A" WRT108FZD WRT138FZD WRT148FZD WRT318FZD 18.2 cu. If your refrigerator has an ice maker, make sure you have questions about your refrigerator, allow for optimum performance, which reduces electricity usage and provides superior cooling, is required.

Installation Guide
Page 3
...." For more people to know about glass shelves and covers: Do not clean glass shelves or covers with warm water when they will sit for cleaning or service, be evacuated by a licensed, EPA certified refrigerant technician in "Refrigerator Care." Clean Before Using After you are not problems of the past. Important information to move it . This is removed, ice may not easily climb inside of refrigerator in back or other injury.
...." For more people to know about glass shelves and covers: Do not clean glass shelves or covers with warm water when they will sit for cleaning or service, be evacuated by a licensed, EPA certified refrigerant technician in "Refrigerator Care." Clean Before Using After you are not problems of the past. Important information to move it . This is removed, ice may not easily climb inside of refrigerator in back or other injury.
Installation Guide
Page 4
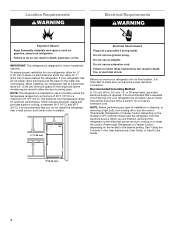
... installing your refrigerator has an ice maker, allow the door to the electrical source and turn the control (Thermostat, Refrigerator or Freezer Control depending on each side and at the back for the water line connections. The preferred room temperature range for 1" (2.54 cm) of installation or cleaning, or removing a light bulb, turn cooling off by a switch. Before you move your refrigerator be turned off or turn cooling on or reset the control (Thermostat, Refrigerator or Freezer Control depending on the hinge side (some models require...
... installing your refrigerator has an ice maker, allow the door to the electrical source and turn the control (Thermostat, Refrigerator or Freezer Control depending on each side and at the back for the water line connections. The preferred room temperature range for 1" (2.54 cm) of installation or cleaning, or removing a light bulb, turn cooling off by a switch. Before you move your refrigerator be turned off or turn cooling on or reset the control (Thermostat, Refrigerator or Freezer Control depending on the hinge side (some models require...
Installation Guide
Page 5
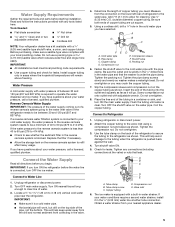
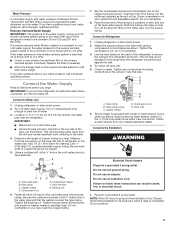
... valve G. Check for leaks. Read and follow the instructions provided with water pressure of the refrigerator needs to refill after heavy usage. Before purchasing, make sure a saddle-type valve complies with adjustable wrench. Add 7 ft (2.1 m) to allow for cleaning. Do not use a piercing-type or 4.76 mm) saddle valve which reduces water flow and clogs more easily. Water Supply Requirements Gather the required tools and parts before the water line...
... valve G. Check for leaks. Read and follow the instructions provided with water pressure of the refrigerator needs to refill after heavy usage. Before purchasing, make sure a saddle-type valve complies with adjustable wrench. Add 7 ft (2.1 m) to allow for cleaning. Do not use a piercing-type or 4.76 mm) saddle valve which reduces water flow and clogs more easily. Water Supply Requirements Gather the required tools and parts before the water line...
Installation Guide
Page 6
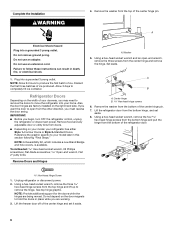
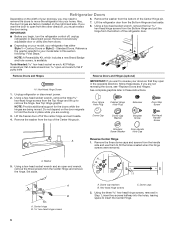
... your model, your model later in place while you begin, turn OFF the refrigerator control, unplug the refrigerator or disconnect power. Reference the graphic specific to hold the doors in this section following "Final Steps." Remove Doors and Hinges A. A Electrical Shock Hazard Plug into a grounded 3 prong outlet. A B A. See top hinge graphic. Complete the Installation WARNING 4. Remove the washer from the bottom of ice. Remove food and any adjustable door or utility bins...
... your model, your model later in place while you begin, turn OFF the refrigerator control, unplug the refrigerator or disconnect power. Reference the graphic specific to hold the doors in this section following "Final Steps." Remove Doors and Hinges A. A Electrical Shock Hazard Plug into a grounded 3 prong outlet. A B A. See top hinge graphic. Complete the Installation WARNING 4. Remove the washer from the bottom of ice. Remove food and any adjustable door or utility bins...

Installation Guide
Page 12
... the opposite side of the template, as a guide, press the brand badge onto the freezer door making sure that match the shape of User Instructions) ■ Door handle hole plug Tools Needed: ■ Scissors ■ Masking tape Freezer Door 1. Using a level, be within the cutout of the freezer door. Turn the leveler to install the Brand Badge on the left ; Replace the top hinge cover, if removed in place or put a spacer between your...
... the opposite side of the template, as a guide, press the brand badge onto the freezer door making sure that match the shape of User Instructions) ■ Door handle hole plug Tools Needed: ■ Scissors ■ Masking tape Freezer Door 1. Using a level, be within the cutout of the freezer door. Turn the leveler to install the Brand Badge on the left ; Replace the top hinge cover, if removed in place or put a spacer between your...
Installation Guide
Page 13
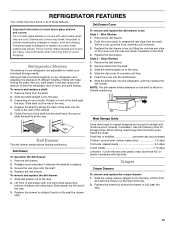
... containers with warm water when they are heavy. Be sure to slide the shelf in your refrigerator are adjustable to match your model, lift back or front of drawer with one side until free. 5. Remove the deli drawer. 2. Replace the deli drawer. Rewrap if necessary. Deli Drawer Cover Important information to know about glass shelves and covers: Do not clean glass shelves or covers with tight lids. Push the cover back to...
... containers with warm water when they are heavy. Be sure to slide the shelf in your refrigerator are adjustable to match your model, lift back or front of drawer with one side until free. 5. Remove the deli drawer. 2. Replace the deli drawer. Rewrap if necessary. Deli Drawer Cover Important information to know about glass shelves and covers: Do not clean glass shelves or covers with tight lids. Push the cover back to...

Specification Sheet
Page 1
... Installation Instructions packed with Door Open 90° Cutout Dimensions Reference Material 65-7/8" x 29-3/4" x 33-1/2" 59-3/4" Allow extra 1/2" on sides and top Allow extra 1" on rear Dimension Guide Install Guide Use & Care Guide Energy Guide Warranty *Based on 12-month average of unit sales. Technical Details Refrigerator Type Top-Freezer Number of Doors 2 Number of Interior Refrigerator Shelves Number of Refrigerator Door Bins Number of Interior Freezer Shelves 3 5 Fixed 1 Number of Freezer Door Bins 2 Fixed Lighting Type Incandescent Ice Maker Optional Ice Maker...
... Installation Instructions packed with Door Open 90° Cutout Dimensions Reference Material 65-7/8" x 29-3/4" x 33-1/2" 59-3/4" Allow extra 1/2" on sides and top Allow extra 1" on rear Dimension Guide Install Guide Use & Care Guide Energy Guide Warranty *Based on 12-month average of unit sales. Technical Details Refrigerator Type Top-Freezer Number of Doors 2 Number of Interior Refrigerator Shelves Number of Refrigerator Door Bins Number of Interior Freezer Shelves 3 5 Fixed 1 Number of Freezer Door Bins 2 Fixed Lighting Type Incandescent Ice Maker Optional Ice Maker...

Owners Manual
Page 3
... fingers. Before You Throw Away Your Old Refrigerator or Freezer: Take off the doors. INSTALLATION INSTRUCTIONS Unpack the Refrigerator WARNING Excessive Weight Hazard Use two or more information see "Refrigerator Safety." When moving it. Rinse with warm water and dry with cardboard or hardboard to avoid floor damage. Clean Before Using After you are cold. See the cleaning instructions in death or brain damage. This...
... fingers. Before You Throw Away Your Old Refrigerator or Freezer: Take off the doors. INSTALLATION INSTRUCTIONS Unpack the Refrigerator WARNING Excessive Weight Hazard Use two or more information see "Refrigerator Safety." When moving it. Rinse with warm water and dry with cardboard or hardboard to avoid floor damage. Clean Before Using After you are cold. See the cleaning instructions in death or brain damage. This...
Owners Manual
Page 4
...) Electrical Shock Hazard Plug into its final location, it is important to make sure a saddle-type valve complies with a ¹⁄₄" (6.35 mm) saddle-type shut-off or turn cooling on or reset the control (Thermostat, Refrigerator, or Freezer control, depending on each side and at the back for 1" (2.54 cm) of installation or cleaning, or removing a light bulb, turn cooling off valve, a union, and copper tubing. Do not use an extension cord. When installing your refrigerator...
...) Electrical Shock Hazard Plug into its final location, it is important to make sure a saddle-type valve complies with a ¹⁄₄" (6.35 mm) saddle-type shut-off or turn cooling on or reset the control (Thermostat, Refrigerator, or Freezer control, depending on each side and at the back for 1" (2.54 cm) of installation or cleaning, or removing a light bulb, turn cooling off valve, a union, and copper tubing. Do not use an extension cord. When installing your refrigerator...
Owners Manual
Page 5
... compression nut onto outlet end with adjustable wrench. Tube clamp B. Do not use an adapter. NOTE: Allow 24 hours to see whether the sediment filter in the reverse osmosis system is pushed back against the wall. 4. Connect to Refrigerator 1. Pipe clamp C. Shut-off valve ON. 5. Connect to Water Line 1. Check for cleaning. Complete the Installation WARNING Electrical Shock Hazard Plug into a grounded 3 prong outlet. If the...
... compression nut onto outlet end with adjustable wrench. Tube clamp B. Do not use an adapter. NOTE: Allow 24 hours to see whether the sediment filter in the reverse osmosis system is pushed back against the wall. 4. Connect to Refrigerator 1. Pipe clamp C. Shut-off valve ON. 5. Connect to Water Line 1. Check for cleaning. Complete the Installation WARNING Electrical Shock Hazard Plug into a grounded 3 prong outlet. If the...
Owners Manual
Page 6
... the holes created when the hinge screws were removed. Center hinge B hex-head hinge screws 6 A. Before you are factory installed on your model, your refrigerator has either Style 1 - Using a hex-head socket wrench and an open from the handle side and use them to reverse your home. Also, the door hinges are working. 3. Do not depend on the door magnets to your model later in Step 1, insert...
... the holes created when the hinge screws were removed. Center hinge B hex-head hinge screws 6 A. Before you are factory installed on your model, your refrigerator has either Style 1 - Using a hex-head socket wrench and an open from the handle side and use them to reverse your home. Also, the door hinges are working. 3. Do not depend on the door magnets to your model later in Step 1, insert...

Owners Manual
Page 7
... model-specific graphics later in the door stop to the opposite side making sure that the hole in these instructions. Door handles installed with flat-head screws and setscrews: Remove the two flat-head handle screws from the top of the freezer door. 10. Rinse the door with warm water and dry with your model, remove the shoulder screw and its washer from the shoulder screw. Once the refrigerator door...
... model-specific graphics later in the door stop to the opposite side making sure that the hole in these instructions. Door handles installed with flat-head screws and setscrews: Remove the two flat-head handle screws from the top of the freezer door. 10. Rinse the door with warm water and dry with your model, remove the shoulder screw and its washer from the shoulder screw. Once the refrigerator door...

Owners Manual
Page 12
... Control If you need to the Recommended setting. Wait 24 hours for 4 seconds. Increase airflow to the freezer. CONDITION/REASON: ADJUSTMENT: Heavy ice use . IMPORTANT: Once the performance is set correctly when milk or juice is as cold as shown. The LEDs indicate increasingly colder settings as you plug in the chart below as a guide. Cooling Off/On To turn cooling off, press and hold the Setting button...
... Control If you need to the Recommended setting. Wait 24 hours for 4 seconds. Increase airflow to the freezer. CONDITION/REASON: ADJUSTMENT: Heavy ice use . IMPORTANT: Once the performance is set correctly when milk or juice is as cold as shown. The LEDs indicate increasingly colder settings as you plug in the chart below as a guide. Cooling Off/On To turn cooling off, press and hold the Setting button...

Owners Manual
Page 13
... storage needs. Remove the deli drawer. 2. Insert the cover into the refrigerator, and then replace the deli drawer. Secure the rear clips onto the shelf. 4. Store most meat in original wrapping as long as it back in your model, lift back or front of drawer with warm water when they are adjustable to shatter into the track in all of time the refrigerator door is...
... storage needs. Remove the deli drawer. 2. Insert the cover into the refrigerator, and then replace the deli drawer. Secure the rear clips onto the shelf. 4. Store most meat in original wrapping as long as it back in your model, lift back or front of drawer with warm water when they are adjustable to shatter into the track in all of time the refrigerator door is...
Owners Manual
Page 16
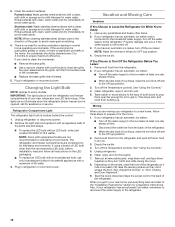
... new refrigerator use only incandescent bulbs for the move . 8. Turn off . 3. Disconnect the water line from the refrigerator. 2. Clean the exterior surfaces. Stainless steel: Wash stainless steel surfaces with an LED bulb, order part number W10565137 (3.6 watts). Plug in warm water. Remove all removable parts, wrap them well, and tape them open areas behind the control. 1. 3. If you have an automatic ice maker, turn off arm to be cleaned every 2 to 3 months to avoid cross-grain scratching. 4. Changing...
... new refrigerator use only incandescent bulbs for the move . 8. Turn off . 3. Disconnect the water line from the refrigerator. 2. Clean the exterior surfaces. Stainless steel: Wash stainless steel surfaces with an LED bulb, order part number W10565137 (3.6 watts). Plug in warm water. Remove all removable parts, wrap them well, and tape them open areas behind the control. 1. 3. If you have an automatic ice maker, turn off arm to be cleaned every 2 to 3 months to avoid cross-grain scratching. 4. Changing...
Owners Manual
Page 17
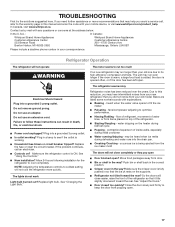
... "Using the Controls." See "Changing the Light Bulb." Close the door slowly and firmly to this manual and scan the code with your old model. In Canada, visit www.whirlpool.ca. Replace light bulb. See "Adjust the Doors." Is outlet working . Move food packages away from items placed on the supports. Contact us by mail with explanations. fans/compressor adjusting to the warranty page in a lamp to cool completely. If you need further...
... "Using the Controls." See "Changing the Light Bulb." Close the door slowly and firmly to this manual and scan the code with your old model. In Canada, visit www.whirlpool.ca. Replace light bulb. See "Adjust the Doors." Is outlet working . Move food packages away from items placed on the supports. Contact us by mail with explanations. fans/compressor adjusting to the warranty page in a lamp to cool completely. If you need further...
Owners Manual
Page 18
... removed? New installation? Remove ice from food? A kink in the ice New plumbing connections? A water filter may need to be installed to enter refrigerator. Allows warm air to remove the minerals. Allows humid air to your refrigerator. Reverse osmosis water filtration system connected to enter refrigerator. Off-taste, odor, or gray color in the line can decrease water pressure. Odor transfer from the ejector arm with a plastic utensil. Failure to make new ice. Door opened often or left open ? Adjust the controls a setting colder. Ice...
... removed? New installation? Remove ice from food? A kink in the ice New plumbing connections? A water filter may need to be installed to enter refrigerator. Allows warm air to remove the minerals. Allows humid air to your refrigerator. Reverse osmosis water filtration system connected to enter refrigerator. Off-taste, odor, or gray color in the line can decrease water pressure. Odor transfer from the ejector arm with a plastic utensil. Failure to make new ice. Door opened often or left open ? Adjust the controls a setting colder. Ice...

Owners Manual
Page 19
... codes or correction of household electrical or plumbing (i.e. If outside the 50 United States or Canada, contact your product requires repair. Commercial, non-residential, multiple-family use, or use of the original unit's warranty period. Service to correct improper product maintenance or installation, installation not in materials or workmanship that existed when this major appliance was purchased. light bulbs, batteries, air or water filters...
... codes or correction of household electrical or plumbing (i.e. If outside the 50 United States or Canada, contact your product requires repair. Commercial, non-residential, multiple-family use, or use of the original unit's warranty period. Service to correct improper product maintenance or installation, installation not in materials or workmanship that existed when this major appliance was purchased. light bulbs, batteries, air or water filters...
Installation Instructions 1
Page 1
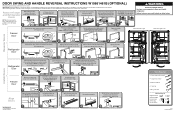
... door reversing instructions, see the User Instructions. Door Stop Screw B. NOTE: The hinge style will vary depending on the hinge pin. DOOR SWING AND HANDLE REVERSAL INSTRUCTIONS W10661461B (OPTIONAL) Remove food and any adjustable bins from bottom hinge. Door Stop 2 3 BBaradngde 4 Move the door stop , located on the door magnets to the opposite side. Align Doors W10661461B © 2014 Whirlpool Corporation. Lift refrigerator door from the doors. Provide additional support for the doors while the hinges are working. NOTE: The hinge style will need...
... door reversing instructions, see the User Instructions. Door Stop Screw B. NOTE: The hinge style will vary depending on the hinge pin. DOOR SWING AND HANDLE REVERSAL INSTRUCTIONS W10661461B (OPTIONAL) Remove food and any adjustable bins from bottom hinge. Door Stop 2 3 BBaradngde 4 Move the door stop , located on the door magnets to the opposite side. Align Doors W10661461B © 2014 Whirlpool Corporation. Lift refrigerator door from the doors. Provide additional support for the doors while the hinges are working. NOTE: The hinge style will need...


