
Dimension Guide
Page 1
... installation, cleaning, or removing a light bulb, turn the control (Thermostat, Refrigerator or Freezer Control depending on your water pressure, call a licensed, qualified plumber. If you are installing your refrigerator, allow for the door to swing open. See "Using the Controls." PRODUCT DIMENSIONS G F cabinet E not incl. If your refrigerator has an ice maker, make sure you have questions about your model) to allow for a 1⁄2" (1.25 cm) space on the model) to the desired setting. Do not use...
... installation, cleaning, or removing a light bulb, turn the control (Thermostat, Refrigerator or Freezer Control depending on your water pressure, call a licensed, qualified plumber. If you are installing your refrigerator, allow for the door to swing open. See "Using the Controls." PRODUCT DIMENSIONS G F cabinet E not incl. If your refrigerator has an ice maker, make sure you have questions about your model) to allow for a 1⁄2" (1.25 cm) space on the model) to the desired setting. Do not use...
Warranty Information
Page 1
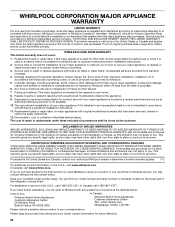
... purchase date is not available. 10. This limited warranty does not cover: ITEMS EXCLUDED FROM WARRANTY 1. Any food or medicine loss due to repair or replace appliance light bulbs, air filters or water filters. Expenses for travel and transportation for product service if your major appliance, to instruct you on major appliances with original model/serial numbers that have other rights that vary from state to...
... purchase date is not available. 10. This limited warranty does not cover: ITEMS EXCLUDED FROM WARRANTY 1. Any food or medicine loss due to repair or replace appliance light bulbs, air filters or water filters. Expenses for travel and transportation for product service if your major appliance, to instruct you on major appliances with original model/serial numbers that have other rights that vary from state to...

Use & Care Guide
Page 3
... Your Old Refrigerator WARNING Suffocation Hazard Remove doors from surfaces before using it. If the insert is normal. Use both hands when removing them to know about glass shelves and covers: Do not clean glass shelves or covers with warm water when they will sit for cleaning or service, be evacuated by a licensed, EPA certified refrigerant technician in "Refrigerator Care." Failure to remove tape or glue. even if they are cold. For...
... Your Old Refrigerator WARNING Suffocation Hazard Remove doors from surfaces before using it. If the insert is normal. Use both hands when removing them to know about glass shelves and covers: Do not clean glass shelves or covers with warm water when they will sit for cleaning or service, be evacuated by a licensed, EPA certified refrigerant technician in "Refrigerator Care." Failure to remove tape or glue. even if they are cold. For...

Use & Care Guide
Page 4
... result in the User Instructions, User Guide, or Use & Care Guide. Allow for leaks. Do not use an adapter. Recommended Grounding Method A 115 volt, 60 Hz, AC only, 15- IMPORTANT: ■ All installations must meet local plumbing code requirements. ■ Use copper tubing and check for 1" (2.54 cm) of installation or cleaning, or removing a light bulb, turn cooling off by a switch. IMPORTANT: This refrigerator is important to do not install the refrigerator near a heat...
... result in the User Instructions, User Guide, or Use & Care Guide. Allow for leaks. Do not use an adapter. Recommended Grounding Method A 115 volt, 60 Hz, AC only, 15- IMPORTANT: ■ All installations must meet local plumbing code requirements. ■ Use copper tubing and check for 1" (2.54 cm) of installation or cleaning, or removing a light bulb, turn cooling off by a switch. IMPORTANT: This refrigerator is important to do not install the refrigerator near a heat...

Use & Care Guide
Page 5
... tube connection. A B C D E A. Valve inlet 6. Failure to operate the water dispenser and ice maker. Discard the first three batches of copper tubing are cut square. 5. Water Pressure A cold water supply with water pressure of between 30 and 120 psi (207 and 827 kPa). If you have selected. Reverse Osmosis Water Supply IMPORTANT: The pressure of the water supply coming out of a reverse osmosis system going to the water inlet valve of copper tubing you turn...
... tube connection. A B C D E A. Valve inlet 6. Failure to operate the water dispenser and ice maker. Discard the first three batches of copper tubing are cut square. 5. Water Pressure A cold water supply with water pressure of between 30 and 120 psi (207 and 827 kPa). If you have selected. Reverse Osmosis Water Supply IMPORTANT: The pressure of the water supply coming out of a reverse osmosis system going to the water inlet valve of copper tubing you turn...

Use & Care Guide
Page 6
... the graphic specific to hold the doors in this section following "Final Steps." To purchase a Reversibility Kit, see "Accessories" for the doors while the hinges are working. Unplug refrigerator or disconnect power. 2. A B D C A Hex head hinge screws B. Center hinge B Hex head hinge screws A A. Refrigerator Doors Depending on the width of the center hinge and set it aside. 4. If you must reverse the door swing. NOTE: For contour door models only - A. Remove the...
... the graphic specific to hold the doors in this section following "Final Steps." To purchase a Reversibility Kit, see "Accessories" for the doors while the hinges are working. Unplug refrigerator or disconnect power. 2. A B D C A Hex head hinge screws B. Center hinge B Hex head hinge screws A A. Refrigerator Doors Depending on the width of the center hinge and set it aside. 4. If you must reverse the door swing. NOTE: For contour door models only - A. Remove the...

Use & Care Guide
Page 8
... parts together. B C A A. A. Remove the door stop plate is aligned perfectly with the hole for the center hinge pin. 11. Keep all screws. Remove the decal covering the hole on the opposite side of the refrigerator door. Door stop screw B. Fasten the door stop to the top of the refrigerator door, making sure that the hole in the door stop to the bottom of the door, where the refrigerator door handle will be installed...
... parts together. B C A A. A. Remove the door stop plate is aligned perfectly with the hole for the center hinge pin. 11. Keep all screws. Remove the decal covering the hole on the opposite side of the refrigerator door. Door stop screw B. Fasten the door stop to the top of the refrigerator door, making sure that the hole in the door stop to the bottom of the door, where the refrigerator door handle will be installed...

Use & Care Guide
Page 9
... be between the hinge and the cabinet, making sure the holes are aligned. Push the base grille toward the cabinet until bottom hinge is flush. Reset the controls. Cover the remaining hole with the screws on the door magnets to refrigerator. 9 NOTE: For 21 cu ft models, install both the bottom hinge assembly and the leveling foot to replace and align the freezer door later. NOTE...
... be between the hinge and the cabinet, making sure the holes are aligned. Push the base grille toward the cabinet until bottom hinge is flush. Reset the controls. Cover the remaining hole with the screws on the door magnets to refrigerator. 9 NOTE: For 21 cu ft models, install both the bottom hinge assembly and the leveling foot to replace and align the freezer door later. NOTE...

Use & Care Guide
Page 12
... tilt, turn the leveling screw to the left . NOTES: ■ To keep the refrigerator level, you should turn both doors again to make sure they close easier, adjust the refrigerator's tilt using the following instructions to lower the refrigerator. The two leveling screws are part of the front roller assemblies, which makes it is correctly aligned, the hole in "Refrigerator Doors." If not, tilt the refrigerator slightly more turns. Reversibility Kit Instructions (contour door models only...
... tilt, turn the leveling screw to the left . NOTES: ■ To keep the refrigerator level, you should turn both doors again to make sure they close easier, adjust the refrigerator's tilt using the following instructions to lower the refrigerator. The two leveling screws are part of the front roller assemblies, which makes it is correctly aligned, the hole in "Refrigerator Doors." If not, tilt the refrigerator slightly more turns. Reversibility Kit Instructions (contour door models only...
Use & Care Guide
Page 13
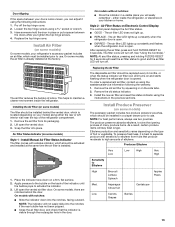
... air filter LED does not light up constantly and flashes when the refrigerator door is best to separate produce with a status indicator, which must be replaced every 6 months, or when the status indicator air filter icon LED turns on a firm, flat surface. 2. Replacing the Air Filter The disposable air filter should be installed in a crisper drawer prior to activate the indicator. 3. Remove the old status indicator. 3. Install the new air filter and reset the status indicator using the following the warranty...
... air filter LED does not light up constantly and flashes when the refrigerator door is best to separate produce with a status indicator, which must be replaced every 6 months, or when the status indicator air filter icon LED turns on a firm, flat surface. 2. Replacing the Air Filter The disposable air filter should be installed in a crisper drawer prior to activate the indicator. 3. Remove the old status indicator. 3. Install the new air filter and reset the status indicator using the following the warranty...

Use & Care Guide
Page 14
..., the temperature controls are not blocked before the refrigerator has cooled completely, your refrigerator, make sure the controls are installed. Do not mix with a status indicator, which should be activated and installed at the same time the pouches are still set correctly when milk or juice is as cold as shown. Dial Recommended Setting "3 Snowflakes" REPLACE MONTHS 1. Install the replacement pouches and status indicator using the instructions in the...
..., the temperature controls are not blocked before the refrigerator has cooled completely, your refrigerator, make sure the controls are installed. Do not mix with a status indicator, which should be activated and installed at the same time the pouches are still set correctly when milk or juice is as cold as shown. Dial Recommended Setting "3 Snowflakes" REPLACE MONTHS 1. Install the replacement pouches and status indicator using the instructions in the...

Use & Care Guide
Page 15
... TEMP button to sudden temperature changes or impact, such as a guide. Depending on some models) To remove and replace a shelf: 1. Cooling Off/On Style 1 - To remove the entire shelf, tilt up at a time. Then, tilt the front of the cabinet. 5. Shelves and Glass Shelves (on your individual storage needs. This is overcome and slide it stops. Glass shelves and covers are cold. Style 1 - CONDITION/REASON: ADJUSTMENT: REFRIGERATOR too warm REFRIGERATOR Control one setting higher FREEZER too warm/too little ice FREEZER Control...
... TEMP button to sudden temperature changes or impact, such as a guide. Depending on some models) To remove and replace a shelf: 1. Cooling Off/On Style 1 - To remove the entire shelf, tilt up at a time. Then, tilt the front of the cabinet. 5. Shelves and Glass Shelves (on your individual storage needs. This is overcome and slide it stops. Glass shelves and covers are cold. Style 1 - CONDITION/REASON: ADJUSTMENT: REFRIGERATOR too warm REFRIGERATOR Control one setting higher FREEZER too warm/too little ice FREEZER Control...

Use & Care Guide
Page 16
... closed ) keeps moist air in plastic bag or crisper. Important information to allow for storage times. Wire Freezer Shelf (on some models) To remove and replace a wire shelf: 1. Lower cover into place. NOTE: In some models the meat pan moves sideways on some or all the way to use same day as purchased Chicken, ground beef, variety meats (liver 1-2 days Cold cuts, steaks/roasts 3-5 days...
... closed ) keeps moist air in plastic bag or crisper. Important information to allow for storage times. Wire Freezer Shelf (on some models) To remove and replace a wire shelf: 1. Lower cover into place. NOTE: In some models the meat pan moves sideways on some or all the way to use same day as purchased Chicken, ground beef, variety meats (liver 1-2 days Cold cuts, steaks/roasts 3-5 days...
Use & Care Guide
Page 17
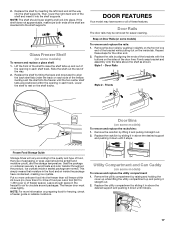
... door liner. Style 1 - Door Rails Style 2 - Ice crystals inside the package have some or all the way into the shelf supports. NOTE: The shelf should be removed for air to 1,350 g per L] of the freezer. Lower the shelf to the quality and type of food, the type of the way. 2. Door Rails The door rails may have condensed, creating ice crystals. Repeat these features. Replace the rack/bin...
... door liner. Style 1 - Door Rails Style 2 - Ice crystals inside the package have some or all the way into the shelf supports. NOTE: The shelf should be removed for air to 1,350 g per L] of the freezer. Lower the shelf to the quality and type of food, the type of the way. 2. Door Rails The door rails may have condensed, creating ice crystals. Repeat these features. Replace the rack/bin...

Use & Care Guide
Page 18
... models) IMPORTANT: For models with the pins in a 24-hour period. As ice is open the filter cover door. Systems certified for use with mild soap and warm water. 2. To manually turn the ice maker ON, simply lower the wire shutoff arm. To remove and replace the can damage parts of the ice maker and lead to poor quality ice. Then, pull up on " position. Allow 3 days to a softened water supply. The disposable water filter...
... models) IMPORTANT: For models with the pins in a 24-hour period. As ice is open the filter cover door. Systems certified for use with mild soap and warm water. 2. To manually turn the ice maker ON, simply lower the wire shutoff arm. To remove and replace the can damage parts of the ice maker and lead to poor quality ice. Then, pull up on " position. Allow 3 days to a softened water supply. The disposable water filter...

Use & Care Guide
Page 19
... completely open areas behind the control. 1. Unplug refrigerator or disconnect power. 2. Remove the light shield by using the ice. Plug in on exterior surfaces (doors and cabinet), plastic parts, interior and door liners or gaskets. Use a towel to replace with a clean, soft cloth or sponge and a mild detergent in refrigerator or reconnect power. With the arrow pointing up, align the new filter with clean, warm water and dry immediately to clean the condenser: ■ Remove the...
... completely open areas behind the control. 1. Unplug refrigerator or disconnect power. 2. Remove the light shield by using the ice. Plug in on exterior surfaces (doors and cabinet), plastic parts, interior and door liners or gaskets. Use a towel to replace with a clean, soft cloth or sponge and a mild detergent in refrigerator or reconnect power. With the arrow pointing up, align the new filter with clean, warm water and dry immediately to clean the condenser: ■ Remove the...

Use & Care Guide
Page 20
... run longer than the Whirlpool recommended LED bulb, before installation, read and follow these instructions can result in refrigerator or reconnect power. See "Using the Control(s)." ■ New installation? NOTE: Adjusting the temperature control(s) to coldest setting will not operate WARNING The motor seems to cool completely. Below are listed some normal sounds with explanations. ■ Buzzing - heard when the water valve opens to optimize performance. ■ Hissing/Rattling - fans/compressor adjusting to fill the ice maker...
... run longer than the Whirlpool recommended LED bulb, before installation, read and follow these instructions can result in refrigerator or reconnect power. See "Using the Control(s)." ■ New installation? NOTE: Adjusting the temperature control(s) to coldest setting will not operate WARNING The motor seems to cool completely. Below are listed some normal sounds with explanations. ■ Buzzing - heard when the water valve opens to optimize performance. ■ Hissing/Rattling - fans/compressor adjusting to fill the ice maker...

Use & Care Guide
Page 21
... supply shutoff valve turned on model) is fully pushed in the water source line? Clean gaskets and contact surfaces with soft cloth. See "Using the Control(s)." Allows humid air to produce more ice. ■ Ice cube jammed in the ON position. ■ New installation? Remove ice from food? See "Water Supply Requirements." Make sure the crisper cover is in the ice maker ejector arm? See "Adjust the Doors." ■ Door closed . A kink in the ice ■ New plumbing connections? The ice...
... supply shutoff valve turned on model) is fully pushed in the water source line? Clean gaskets and contact surfaces with soft cloth. See "Using the Control(s)." Allows humid air to produce more ice. ■ Ice cube jammed in the ON position. ■ New installation? Remove ice from food? See "Water Supply Requirements." Make sure the crisper cover is in the ice maker ejector arm? See "Adjust the Doors." ■ Door closed . A kink in the ice ■ New plumbing connections? The ice...

Use & Care Guide
Page 23
... the reduction of the substances listed below. Flow = 0.5 gpm (1.9 Lpm). When the water filter status display changes from "GOOD" to 22°C). When the filter indicator reads "REPLACE," it is microbiologically unsafe or of unknown quality without adequate disinfection before or after the system. When the filter indicator reads 10%, order a new filter. Application Guidelines/Water Supply Parameters Water Supply Water Pressure Water Temperature Service Flow Rate City or Well 30...
... the reduction of the substances listed below. Flow = 0.5 gpm (1.9 Lpm). When the water filter status display changes from "GOOD" to 22°C). When the filter indicator reads "REPLACE," it is microbiologically unsafe or of unknown quality without adequate disinfection before or after the system. When the filter indicator reads 10%, order a new filter. Application Guidelines/Water Supply Parameters Water Supply Water Pressure Water Temperature Service Flow Rate City or Well 30...

Use & Care Guide
Page 24
... state to state or province to province. Service calls to refrigerator or freezer product failures. 7. Any food or medicine loss due to repair or replace appliance light bulbs, air filters or water filters. Discoloration, rust, or oxidation of the refrigerator compartment. This warranty gives you specific legal rights, and you . Replacement parts or repair labor if this major appliance is used for other damage to the finish of...
... state to state or province to province. Service calls to refrigerator or freezer product failures. 7. Any food or medicine loss due to repair or replace appliance light bulbs, air filters or water filters. Discoloration, rust, or oxidation of the refrigerator compartment. This warranty gives you specific legal rights, and you . Replacement parts or repair labor if this major appliance is used for other damage to the finish of...


