Warranty Information
Page 1
...according to instructions attached to or furnished with the product, Whirlpool Corporation or Whirlpool Canada LP (hereafter "Whirlpool") will pay for future reference. 24 Service calls to correct house wiring or plumbing. 3. Replacement parts or repair labor on the duration of implied warranties of incidental... an inaccessible location or is used in the country in which it is not installed in the U.S.A., visit www.whirlpool.com. Repairs to parts or systems resulting from warranty coverage. 4. If outside the 50 United States and Canada, contact your complete model ...
...according to instructions attached to or furnished with the product, Whirlpool Corporation or Whirlpool Canada LP (hereafter "Whirlpool") will pay for future reference. 24 Service calls to correct house wiring or plumbing. 3. Replacement parts or repair labor on the duration of implied warranties of incidental... an inaccessible location or is used in the country in which it is not installed in the U.S.A., visit www.whirlpool.com. Repairs to parts or systems resulting from warranty coverage. 4. If outside the 50 United States and Canada, contact your complete model ...
Use & Care Guide
Page 2
... and install refrigerator. ■ Disconnect power before operating. ■ Remove doors from your appliance. All safety messages will follow instructions. Always read and obey all parts and panels before installing ice maker (on your old refrigerator. ■ Use nonflammable cleaner. ■ Keep flammable materials and vapors, such as gasoline, away from...
... and install refrigerator. ■ Disconnect power before operating. ■ Remove doors from your appliance. All safety messages will follow instructions. Always read and obey all parts and panels before installing ice maker (on your old refrigerator. ■ Use nonflammable cleaner. ■ Keep flammable materials and vapors, such as gasoline, away from...

Use & Care Guide
Page 4
... a piercing-type or 4.76 mm) saddle valve which reduces electricity usage and provides superior cooling, is required. Water Supply Requirements Gather the required tools and parts before starting installation.
... a piercing-type or 4.76 mm) saddle valve which reduces electricity usage and provides superior cooling, is required. Water Supply Requirements Gather the required tools and parts before starting installation.

Use & Care Guide
Page 6
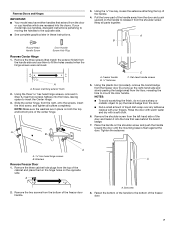
... Hinge pin. Remove the washer from the top of the refrigerator door. Hex Head Hinge Screw 1. NOTE: Provide additional support for contact information, and order Part Number W10395148. Remove the washer from the bottom of the refrigerator. Using a hex head socket wrench, remove the three screws from the bottom front of...
... Hinge pin. Remove the washer from the top of the refrigerator door. Hex Head Hinge Screw 1. NOTE: Provide additional support for contact information, and order Part Number W10395148. Remove the washer from the bottom of the refrigerator. Using a hex head socket wrench, remove the three screws from the bottom front of...
Use & Care Guide
Page 7
... all screws completely. Screws matching exterior finish 2. Slide the center hinge, from the right, onto the screws, insert the third screw, and tighten all parts together. Using the plastic tool (provided), remove the brand badge from the freezer door by prying up the right-hand side and slowly peeling the ... IMPORTANT: ■ Your model may have either handles that extend from the door or cup handles which are in these instructions. 3. Pull the lower part of the handle away from the top of the cabinet and place them to pry the brand badge from the door. ■ Rub a small amount...
... all screws completely. Screws matching exterior finish 2. Slide the center hinge, from the right, onto the screws, insert the third screw, and tighten all parts together. Using the plastic tool (provided), remove the brand badge from the freezer door by prying up the right-hand side and slowly peeling the ... IMPORTANT: ■ Your model may have either handles that extend from the door or cup handles which are in these instructions. 3. Pull the lower part of the handle away from the top of the cabinet and place them to pry the brand badge from the door. ■ Rub a small amount...

Use & Care Guide
Page 8
... 11. Move the door stop to the opposite side making sure that was behind the decal. 9. AB A. Remove the screws from the lower part of the refrigerator door handle. 5. Tighten the setscrew. 10. Remove the door stop screw B. B C A A. Using the screw removed in place. Tighten all... parts together. Remove the setscrew from the top of the handle. 8. Place the handle on the shoulder screw and push the handle toward the door until...
... 11. Move the door stop to the opposite side making sure that was behind the decal. 9. AB A. Remove the screws from the lower part of the refrigerator door handle. 5. Tighten the setscrew. 10. Remove the door stop screw B. B C A A. Using the screw removed in place. Tighten all... parts together. Remove the setscrew from the top of the handle. 8. Place the handle on the shoulder screw and push the handle toward the door until...

Use & Care Guide
Page 9
... aligned. The distance should be 3.46" (8.8 cm). 3. Plastic spacer B. Install Refrigerator Door 1. NOTE: The shorter cover must be approximately 16 mm). Return all removable door parts to doors and food to the opposite side. Place the freezer door on the door magnets to ensure proper alignment. Fasten the Top Hinge to...
... aligned. The distance should be 3.46" (8.8 cm). 3. Plastic spacer B. Install Refrigerator Door 1. NOTE: The shorter cover must be approximately 16 mm). Return all removable door parts to doors and food to the opposite side. Place the freezer door on the door magnets to ensure proper alignment. Fasten the Top Hinge to...

Use & Care Guide
Page 12
... adjusting the refrigerator to the desired tilt, turn the leveling screw to the left to lower that match the shape of the brand badge. 4. Parts Included: Brand badge removal tool Brand badge template (on either side. 2. Rinse the door with warm water and dry with the side and top... Hole cover decal (color coordinated to install the Brand Badge on the left. On some weight off the leveling screws and rollers which are part of the front roller assemblies, which makes it is correctly aligned, the hole in "Refrigerator Doors." Door Closing Your refrigerator has two front adjustable...
... adjusting the refrigerator to the desired tilt, turn the leveling screw to the left to lower that match the shape of the brand badge. 4. Parts Included: Brand badge removal tool Brand badge template (on either side. 2. Rinse the door with warm water and dry with the side and top... Hole cover decal (color coordinated to install the Brand Badge on the left. On some weight off the leveling screws and rollers which are part of the front roller assemblies, which makes it is correctly aligned, the hole in "Refrigerator Doors." Door Closing Your refrigerator has two front adjustable...

Use & Care Guide
Page 18
..., or sooner depending on the sides with mild soap and warm water. 2. Lift open . ■ When it will light up ) position. Replace the can damage parts of the caddy until the stoppers have been overcome, and slide it is released from the door. 3. See "Using the Control(s)." Water softener chemicals (such...
..., or sooner depending on the sides with mild soap and warm water. 2. Lift open . ■ When it will light up ) position. Replace the can damage parts of the caddy until the stoppers have been overcome, and slide it is released from the door. 3. See "Using the Control(s)." Water softener chemicals (such...

Use & Care Guide
Page 19
... and drying out of odors. To Clean Your Refrigerator: NOTE: Do not use paper towels, scouring pads, or other than the Whirlpool recommended LED bulb, before using a brand of LED bulb other harsh cleaning tools. 1. Clean the exterior surfaces. If the environment is...sections defrost automatically. If you need for household appliances with an LED light bulb, order Whirlpool part number W10565137 (3.6 watts). Use a towel to press hard. 7. Hand wash, rinse, and dry removable parts and interior surfaces thoroughly. Use a clean sponge or soft cloth and a mild detergent ...
... and drying out of odors. To Clean Your Refrigerator: NOTE: Do not use paper towels, scouring pads, or other than the Whirlpool recommended LED bulb, before using a brand of LED bulb other harsh cleaning tools. 1. Clean the exterior surfaces. If the environment is...sections defrost automatically. If you need for household appliances with an LED light bulb, order Whirlpool part number W10565137 (3.6 watts). Use a towel to press hard. 7. Hand wash, rinse, and dry removable parts and interior surfaces thoroughly. Use a clean sponge or soft cloth and a mild detergent ...

Use & Care Guide
Page 20
... on the LED packaging. ■ If an incandescent bulb is used to this reduction, you may run longer than the Whirlpool recommended LED bulb, before installation, read and follow these instructions can result in refrigerator or reconnect power. Make sure the refrigerator...or from the light assembly. 3. The refrigerator and freezer compartments are not recommended for household appliances with an LED light bulb, order Whirlpool part number W10574850 (2.0 watts). Plug in death, fire, or electrical shock. ■ Power cord unplugged? fans/compressor adjusting to see ...
... on the LED packaging. ■ If an incandescent bulb is used to this reduction, you may run longer than the Whirlpool recommended LED bulb, before installation, read and follow these instructions can result in refrigerator or reconnect power. Make sure the refrigerator...or from the light assembly. 3. The refrigerator and freezer compartments are not recommended for household appliances with an LED light bulb, order Whirlpool part number W10574850 (2.0 watts). Plug in death, fire, or electrical shock. ■ Power cord unplugged? fans/compressor adjusting to see ...
Use & Care Guide
Page 22
In the U.S.A., visit www.whirlpool.com/accessories or call 1-800-807-6777. ACCESSORIES The following accessories are available for the part numbers. In Canada, visit www.whirlpoolparts.ca or call 1-800-901-2042. To order, contact us and ask for your refrigerator. affresh® Stainless Steel Cleaner: In U.S.A., order Part #W10355016 In Canada, order...
In the U.S.A., visit www.whirlpool.com/accessories or call 1-800-807-6777. ACCESSORIES The following accessories are available for the part numbers. In Canada, visit www.whirlpoolparts.ca or call 1-800-901-2042. To order, contact us and ask for your refrigerator. affresh® Stainless Steel Cleaner: In U.S.A., order Part #W10355016 In Canada, order...

Use & Care Guide
Page 23
... for use with state and local laws and regulations. ■ Do not use . ■ These contaminants are not followed. ■ Use replacement filter P4RRWB/P4RFWB12, part #W10295370. 2012 suggested retail price of Live Cysts, Asbestos, Lead, Lindane, Toxaphene, Atrazine, and 2,4 - When the filter indicator reads 10%, order a new filter. and against...
... for use with state and local laws and regulations. ■ Do not use . ■ These contaminants are not followed. ■ Use replacement filter P4RRWB/P4RFWB12, part #W10295370. 2012 suggested retail price of Live Cysts, Asbestos, Lead, Lindane, Toxaphene, Atrazine, and 2,4 - When the filter indicator reads 10%, order a new filter. and against...

Use & Care Guide
Page 24
... 4. In Canada, call 1-800-253-1301. Service must be borne by a Whirlpool designated service company. This limited warranty does not cover: ITEMS EXCLUDED FROM WARRANTY 1. Replacement parts or repair labor if this major appliance is used for other rights that vary from... appliance is operated and maintained according to instructions attached to or furnished with the product, Whirlpool Corporation or Whirlpool Canada LP (hereafter "Whirlpool") will pay for Factory Specified Parts and repair labor to correct defects in materials or workmanship that existed when this major appliance...
... 4. In Canada, call 1-800-253-1301. Service must be borne by a Whirlpool designated service company. This limited warranty does not cover: ITEMS EXCLUDED FROM WARRANTY 1. Replacement parts or repair labor if this major appliance is used for other rights that vary from... appliance is operated and maintained according to instructions attached to or furnished with the product, Whirlpool Corporation or Whirlpool Canada LP (hereafter "Whirlpool") will pay for Factory Specified Parts and repair labor to correct defects in materials or workmanship that existed when this major appliance...


