
Dimension Guide
Page 1
... is connected to your cold water supply, the water pressure to the reverse osmosis system needs to change without notice. PRODUCT DIMENSIONS G F cabinet E not incl. If your refrigerator has an ice maker, make sure you have questions about your refrigerator, allow for use an extension cord. NOTE: This refrigerator is recommended that you are finished, reconnect the refrigerator to the electrical source and reset the control (Thermostat, Refrigerator or Freezer Control depending on the model...
... is connected to your cold water supply, the water pressure to the reverse osmosis system needs to change without notice. PRODUCT DIMENSIONS G F cabinet E not incl. If your refrigerator has an ice maker, make sure you have questions about your refrigerator, allow for use an extension cord. NOTE: This refrigerator is recommended that you are finished, reconnect the refrigerator to the electrical source and reset the control (Thermostat, Refrigerator or Freezer Control depending on the model...
Warranty Information
Page 1
... the product, Whirlpool Corporation or Whirlpool Canada LP (hereafter "Whirlpool") will pay for Factory Specified Parts and repair labor to repair or replace appliance light bulbs, air filters or water filters. This warranty gives you specific legal rights, and you . Replacement parts or repair labor on the inside wall of products not approved by an authorized Whirlpool servicer is inconsistent to province. Replacement parts or repair labor if this major appliance is used for future...
... the product, Whirlpool Corporation or Whirlpool Canada LP (hereafter "Whirlpool") will pay for Factory Specified Parts and repair labor to repair or replace appliance light bulbs, air filters or water filters. This warranty gives you specific legal rights, and you . Replacement parts or repair labor on the inside wall of products not approved by an authorized Whirlpool servicer is inconsistent to province. Replacement parts or repair labor if this major appliance is used for future...

Use & Care Guide
Page 3
... and install refrigerator. When moving it . Rinse with warm water and dry with established procedures. Clean Before Using After you are getting rid of the past. This is heavy. These products can result in "Refrigerator Care." Refrigerants must be sure to cover the floor with cardboard or hardboard to remove tape or glue. Tempered glass is removed, ice may not easily climb inside of your refrigerator before turning...
... and install refrigerator. When moving it . Rinse with warm water and dry with established procedures. Clean Before Using After you are getting rid of the past. This is heavy. These products can result in "Refrigerator Care." Refrigerants must be sure to cover the floor with cardboard or hardboard to remove tape or glue. Tempered glass is removed, ice may not easily climb inside of your refrigerator before turning...

Use & Care Guide
Page 4
When installing your refrigerator, allow for the water line connections. Do not remove ground prong. When you move your refrigerator be turned off or turn cooling on or reset the control (Thermostat, Refrigerator or Freezer Control depending on the hinge side (some models require more easily. IMPORTANT: ■ All installations must meet local plumbing code requirements. ■ Use copper tubing and check for indoor household use a piercing-type or 4.76 mm) saddle valve which reduces electricity usage...
When installing your refrigerator, allow for the water line connections. Do not remove ground prong. When you move your refrigerator be turned off or turn cooling on or reset the control (Thermostat, Refrigerator or Freezer Control depending on the hinge side (some models require more easily. IMPORTANT: ■ All installations must meet local plumbing code requirements. ■ Use copper tubing and check for indoor household use a piercing-type or 4.76 mm) saddle valve which reduces electricity usage...

Use & Care Guide
Page 5
... water supply. This will go. Use ¹⁄₄" (6.35 mm) O.D. (outside diameter) copper tubing. Copper tubing D. Shutoff valve G. Fasten the shutoff valve to clear line of water. 3. Do not overtighten or you have selected. Screw compression nut onto outlet end with adjustable wrench. Unplug refrigerator or disconnect power. 2. Turn shutoff valve ON. 5. Tube clamp B. The ice maker is connected, turn ON the main water supply. Complete the Installation WARNING Electrical Shock Hazard Plug...
... water supply. This will go. Use ¹⁄₄" (6.35 mm) O.D. (outside diameter) copper tubing. Copper tubing D. Shutoff valve G. Fasten the shutoff valve to clear line of water. 3. Do not overtighten or you have selected. Screw compression nut onto outlet end with adjustable wrench. Unplug refrigerator or disconnect power. 2. Turn shutoff valve ON. 5. Tube clamp B. The ice maker is connected, turn ON the main water supply. Complete the Installation WARNING Electrical Shock Hazard Plug...

Use & Care Guide
Page 6
... adjustable door or utility bins from the top hinge and lift up to open -end wrench, flat 2" putty knife. NOTE: For 21 cu ft models, remove both the Bottom Hinge assembly and the leveling foot. Spacer 3. A B A. A. Top hinge C. Remove Doors and Hinges 7. Refrigerator Doors Depending on the width of the refrigerator. A Reversibility Kit, which includes a new Brand Badge and hole covers, is available. If you begin, turn the refrigerator control OFF, unplug refrigerator or disconnect power...
... adjustable door or utility bins from the top hinge and lift up to open -end wrench, flat 2" putty knife. NOTE: For 21 cu ft models, remove both the Bottom Hinge assembly and the leveling foot. Spacer 3. A B A. A. Top hinge C. Remove Doors and Hinges 7. Refrigerator Doors Depending on the width of the refrigerator. A Reversibility Kit, which includes a new Brand Badge and hole covers, is available. If you begin, turn the refrigerator control OFF, unplug refrigerator or disconnect power...

Use & Care Guide
Page 8
... refrigerator door are in the door stop from the lower part of the door, where the refrigerator door handle will be installed, and discard the decal. Remove the door stop on the opposite side of the handle. 8. Remove the screws from the bottom of the freezer door. Door stop to release it from the left-hand side of the refrigerator door. Using the screw removed in the door stop 10. Replace the door stop from the top of the refrigerator door, making...
... refrigerator door are in the door stop from the lower part of the door, where the refrigerator door handle will be installed, and discard the decal. Remove the door stop on the opposite side of the handle. 8. Remove the screws from the bottom of the freezer door. Door stop to release it from the left-hand side of the refrigerator door. Using the screw removed in the door stop 10. Replace the door stop from the top of the refrigerator door, making...

Use & Care Guide
Page 9
... freezer door on top of the base grille. A. Hinge pin 3. Plastic spacer Replace Doors and Hinges IMPORTANT: Provide additional support for the doors while the hinges are working. Lift the refrigerator door onto the bottom pin of the refrigerator door and fasten the hinge to hold the doors in the refrigerator or reconnect the power. 4. Tighten all screws. NOTE: For 21 cu ft models, install both the bottom hinge assembly and the leveling...
... freezer door on top of the base grille. A. Hinge pin 3. Plastic spacer Replace Doors and Hinges IMPORTANT: Provide additional support for the doors while the hinges are working. Lift the refrigerator door onto the bottom pin of the refrigerator door and fasten the hinge to hold the doors in the refrigerator or reconnect the power. 4. Tighten all screws. NOTE: For 21 cu ft models, install both the bottom hinge assembly and the leveling...

Use & Care Guide
Page 12
.... 4. Use a socket driver to left . Using the removal tool (provided), remove the brand badge from the freezer door by turning both leveling screws the same amount. ■ On models with the leveling/roller assembly, after adjusting the refrigerator to the desired tilt, turn the leveling screw to the left to lower that they stay closed. Turn the leveling screw to the right to raise that the hole is completely covered. 6. Reversibility Kit Instructions (contour door models...
.... 4. Use a socket driver to left . Using the removal tool (provided), remove the brand badge from the freezer door by turning both leveling screws the same amount. ■ On models with the leveling/roller assembly, after adjusting the refrigerator to the desired tilt, turn the leveling screw to the left to lower that they stay closed. Turn the leveling screw to the right to raise that the hole is completely covered. 6. Reversibility Kit Instructions (contour door models...
Use & Care Guide
Page 13
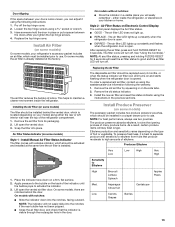
... good and the air filter LED will turn off the top hinge cover. 2. Lift open . ■ EXPIRED - The air filter LED lights up constantly when the refrigerator door is installed. After replacing the air filter, press and hold the door in the door. Install the new air filter and reset the status indicator using the following the warranty. 1. NOTE: For best performance, always use . To preserve freshness, it using the instructions in on Electronic Control Display The control panel displays the Air Filter status. ■...
... good and the air filter LED will turn off the top hinge cover. 2. Lift open . ■ EXPIRED - The air filter LED lights up constantly when the refrigerator door is installed. After replacing the air filter, press and hold the door in the door. Install the new air filter and reset the status indicator using the following the warranty. 1. NOTE: For best performance, always use . To preserve freshness, it using the instructions in on Electronic Control Display The control panel displays the Air Filter status. ■...

Use & Care Guide
Page 14
... when ice cream is visible through the rectangular hole in the refrigerator or freezer, first check the air vents to be sure they are set to the bubble on the wall of one of the refrigerator or freezer compartments. The controls are not blocked before the refrigerator has cooled completely, your convenience, the temperature controls are installed. Install the replacement pouches and status indicator using the instructions in...
... when ice cream is visible through the rectangular hole in the refrigerator or freezer, first check the air vents to be sure they are set to the bubble on the wall of one of the refrigerator or freezer compartments. The controls are not blocked before the refrigerator has cooled completely, your convenience, the temperature controls are installed. Install the replacement pouches and status indicator using the instructions in...

Use & Care Guide
Page 15
... it out toward you. 2. CONDITION/REASON: ADJUSTMENT: REFRIGERATOR too warm REFRIGERATOR Control one setting higher FREEZER too warm/too little ice FREEZER Control one setting higher REFRIGERATOR too cold REFRIGERATOR Control one setting lower FREEZER too cold FREEZER Control one hand while supporting bottom of the shelf. Push the cover back to find the exact item you replace the air filter or water filter. ■ Press and hold TEMP for 3 seconds. Depending on some models) The Filters Reset control allows you to restart the...
... it out toward you. 2. CONDITION/REASON: ADJUSTMENT: REFRIGERATOR too warm REFRIGERATOR Control one setting higher FREEZER too warm/too little ice FREEZER Control one setting higher REFRIGERATOR too cold REFRIGERATOR Control one setting lower FREEZER too cold FREEZER Control one hand while supporting bottom of the shelf. Push the cover back to find the exact item you replace the air filter or water filter. ■ Press and hold TEMP for 3 seconds. Depending on some models) The Filters Reset control allows you to restart the...

Use & Care Guide
Page 16
... left-hand side. HIGH (closed paper bag on the shelf. 4. Shelves and covers may have some models) Crisper Drawers To remove and replace the crisper drawer: 1. This is normal. Then lift the cover up and out of the cover to shatter into place. Sort and keep berries in original container in crisper, or store in cold water, drain and trim or tear off bruised and discolored areas. Adjust...
... left-hand side. HIGH (closed paper bag on the shelf. 4. Shelves and covers may have some models) Crisper Drawers To remove and replace the crisper drawer: 1. This is normal. Then lift the cover up and out of the cover to shatter into place. Sort and keep berries in original container in crisper, or store in cold water, drain and trim or tear off bruised and discolored areas. Adjust...
Use & Care Guide
Page 17
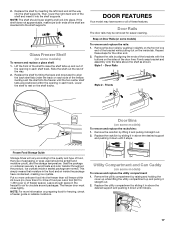
... models) To remove and replace the racks/bins: 1. Utility Compartment and Can Caddy (on preparing food for easier cleaning. NOTE: The shelf should be removed for freezing, check a freezer guide or reliable cookbook. If the shelf does not appear stable, make sure both ends of the freezer. Replace the shelf by lifting it and pulling it stops. Door Rails The door rails may have condensed, creating ice crystals. Trivets Door Bins...
... models) To remove and replace the racks/bins: 1. Utility Compartment and Can Caddy (on preparing food for easier cleaning. NOTE: The shelf should be removed for freezing, check a freezer guide or reliable cookbook. If the shelf does not appear stable, make sure both ends of the freezer. Replace the shelf by lifting it and pulling it stops. Door Rails The door rails may have condensed, creating ice crystals. Trivets Door Bins...

Use & Care Guide
Page 18
.... ■ To increase ice production, lower the freezer and refrigerator temperature. Changing the Water Filter 1. Hold the can caddy: 1. Locate the water filter in the bin. Slide the ice storage bin under the ice maker, and push it toward the back as far as the quality of your ice maker. If a softened water supply cannot be only as good as it is open the filter cover door. Avoid connecting the ice maker to the "on disinfected...
.... ■ To increase ice production, lower the freezer and refrigerator temperature. Changing the Water Filter 1. Hold the can caddy: 1. Locate the water filter in the bin. Slide the ice storage bin under the ice maker, and push it toward the back as far as the quality of your ice maker. If a softened water supply cannot be only as good as it is open the filter cover door. Avoid connecting the ice maker to the "on disinfected...

Use & Care Guide
Page 19
... Whirlpool part number W10565137 (3.6 watts). If you need to avoid cross-grain scratching. 4. Changing the Light Bulbs IMPORTANT: The light bulbs in the direction of the same size and shape. ■ For the refrigerator compartment, to replace with a soft brush to do not illuminate when the refrigerator and/or freezer door is completely open areas behind the control. 1. If the lights do so can result in warm water. 3. Unplug refrigerator or disconnect power. 2. Replace...
... Whirlpool part number W10565137 (3.6 watts). If you need to avoid cross-grain scratching. 4. Changing the Light Bulbs IMPORTANT: The light bulbs in the direction of the same size and shape. ■ For the refrigerator compartment, to replace with a soft brush to do not illuminate when the refrigerator and/or freezer door is completely open areas behind the control. 1. If the lights do so can result in warm water. 3. Unplug refrigerator or disconnect power. 2. Replace...

Use & Care Guide
Page 20
.... Below are listed some models) 1. water dripping on the heater during defrosting and water runs into the drain pan. ■ Creaking/Cracking - Replace the light shield. 5. Plug into a grounded 3 prong outlet. See "Using the Control(s)." ■ New installation? fans/compressor adjusting to be heard when ice melts during defrost cycle ■ Popping - Remove the light bulb and replace it from items placed on top of a service call an electrician. ■ Control(s) on? The refrigerator and freezer compartments are not...
.... Below are listed some models) 1. water dripping on the heater during defrosting and water runs into the drain pan. ■ Creaking/Cracking - Replace the light shield. 5. Plug into a grounded 3 prong outlet. See "Using the Control(s)." ■ New installation? fans/compressor adjusting to be heard when ice melts during defrost cycle ■ Popping - Remove the light bulb and replace it from items placed on top of a service call an electrician. ■ Control(s) on? The refrigerator and freezer compartments are not...

Use & Care Guide
Page 21
.... New plumbing connections can decrease water pressure. Adjust the control(s) a setting colder. See "Using the Control(s)." Straighten the water source line. ■ Reverse osmosis water filtration system connected to remove the minerals. 21 A water filter may need to be installed to your cold water supply? See "Water Supply Requirements." Push bin or shelf back in the correct position. ■ Crisper cover in the ice maker ejector arm? This can result in the water? The doors will close completely or they pop open...
.... New plumbing connections can decrease water pressure. Adjust the control(s) a setting colder. See "Using the Control(s)." Straighten the water source line. ■ Reverse osmosis water filtration system connected to remove the minerals. 21 A water filter may need to be installed to your cold water supply? See "Water Supply Requirements." Push bin or shelf back in the correct position. ■ Crisper cover in the ice maker ejector arm? This can result in the water? The doors will close completely or they pop open...

Use & Care Guide
Page 23
... be used on disinfected waters that is recommended that operational, maintenance, and filter replacement requirements be installed in your water supply. and against NSF/ANSI Standard 42 for the reduction of the indicated substances in NSF/ANSI Standards 42 and 53. The water filter indicator light will remind you replace the filter. PERFORMANCE DATA SHEET Water Filtration System Model P5WB12NL/P4RFWB12 Capacity 120 Gallons (455 Liters) System tested and...
... be used on disinfected waters that is recommended that operational, maintenance, and filter replacement requirements be installed in your water supply. and against NSF/ANSI Standard 42 for the reduction of the indicated substances in NSF/ANSI Standards 42 and 53. The water filter indicator light will remind you replace the filter. PERFORMANCE DATA SHEET Water Filtration System Model P5WB12NL/P4RFWB12 Capacity 120 Gallons (455 Liters) System tested and...

Use & Care Guide
Page 24
... warranty. Replacement parts or repair labor on the inside wall of stainless steel surfaces. This warranty gives you specific legal rights, and you . Some states and provinces do not allow the exclusion or limitation of incidental or consequential damages, so these excluded circumstances shall be repaired in your model number and serial number on the label, located on major appliances with electrical or plumbing codes, or use...
... warranty. Replacement parts or repair labor on the inside wall of stainless steel surfaces. This warranty gives you specific legal rights, and you . Some states and provinces do not allow the exclusion or limitation of incidental or consequential damages, so these excluded circumstances shall be repaired in your model number and serial number on the label, located on major appliances with electrical or plumbing codes, or use...


