
Dimension Guide
Page 1
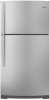
...If a reverse osmosis water filtration system is recommended that you do not install the refrigerator near a heat source, such as an oven or radiator. 2" (5.08 cm) Because Whirlpool Corporation policy includes a continuous commitment to improve Dimensions are for planning purposes only. ... 4 top of cabinet 1 A overall C 90˚ Model Height Overall "A" WRT311FZB 665⁄16" (168.4 cm) Height Top of the refrigerator needs to change materials and specifications without notice. Ref. Water: A cold water supply with product. IMPORTANT: The pressure of the water coming out ...
...If a reverse osmosis water filtration system is recommended that you do not install the refrigerator near a heat source, such as an oven or radiator. 2" (5.08 cm) Because Whirlpool Corporation policy includes a continuous commitment to improve Dimensions are for planning purposes only. ... 4 top of cabinet 1 A overall C 90˚ Model Height Overall "A" WRT311FZB 665⁄16" (168.4 cm) Height Top of the refrigerator needs to change materials and specifications without notice. Ref. Water: A cold water supply with product. IMPORTANT: The pressure of the water coming out ...
Warranty Information
Page 1
... was purchased. Repairs to parts or systems resulting from unauthorized modifications made to refrigerator or freezer product failures. 7. Discoloration, rust, or oxidation of God, improper installation, installation not in your complete model number ready. Have your correspondence. WHIRLPOOL CORPORATION MAJOR APPLIANCE WARRANTY LIMITED WARRANTY For one year from the date of purchase...
... was purchased. Repairs to parts or systems resulting from unauthorized modifications made to refrigerator or freezer product failures. 7. Discoloration, rust, or oxidation of God, improper installation, installation not in your complete model number ready. Have your correspondence. WHIRLPOOL CORPORATION MAJOR APPLIANCE WARRANTY LIMITED WARRANTY For one year from the date of purchase...
Use & Care Guide
Page 2
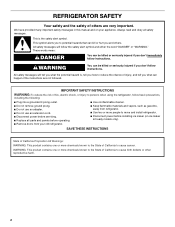
...nonflammable cleaner. ■ Keep flammable materials and vapors, such as gasoline, away from refrigerator. ■ Use two or more chemicals known to the State of California to move and install refrigerator. ■ Disconnect power before operating. ■ Remove doors from your appliance. SAVE...the State of California to cause birth defects or other reproductive harm. 2 REFRIGERATOR SAFETY Your safety and the safety of others . This symbol alerts you to persons when using the refrigerator, follow instructions. IMPORTANT SAFETY INSTRUCTIONS WARNING:To reduce the risk of injury,...
...nonflammable cleaner. ■ Keep flammable materials and vapors, such as gasoline, away from refrigerator. ■ Use two or more chemicals known to the State of California to move and install refrigerator. ■ Disconnect power before operating. ■ Remove doors from your appliance. SAVE...the State of California to cause birth defects or other reproductive harm. 2 REFRIGERATOR SAFETY Your safety and the safety of others . This symbol alerts you to persons when using the refrigerator, follow instructions. IMPORTANT SAFETY INSTRUCTIONS WARNING:To reduce the risk of injury,...

Use & Care Guide
Page 3
... water and dry with warm water when they will sit for cleaning or service, be evacuated by a licensed, EPA certified refrigerant technician in "Refrigerator Care." For more people to avoid floor damage. Tempered glass is heavy. Use both hands when removing them to sudden temperature...or hardboard to move it, as bumping. Failure to remove tape or glue. Clean Before Using After you are not problems of the refrigerator. Rub a small amount of your fingers. Important information to know about glass shelves and covers: Do not clean glass shelves or covers...
... water and dry with warm water when they will sit for cleaning or service, be evacuated by a licensed, EPA certified refrigerant technician in "Refrigerator Care." For more people to avoid floor damage. Tempered glass is heavy. Use both hands when removing them to sudden temperature...or hardboard to move it, as bumping. Failure to remove tape or glue. Clean Before Using After you are not problems of the refrigerator. Rub a small amount of your fingers. Important information to know about glass shelves and covers: Do not clean glass shelves or covers...

Use & Care Guide
Page 4
...blade screwdriver Nut driver and ¹⁄₂" Open-end or two adjustable wrenches Drill bit ■ Cordless drill NOTE: Your refrigerator dealer has a kit available with any type of 110°F (43°C). Before you have the proper electrical connection. Before ...32°C). Do not use only. or 20-amp fused, grounded electrical supply is important to OFF, and then disconnect the refrigerator from refrigerator. Water Supply Requirements Gather the required tools and parts before starting installation. NOTE: Before performing any tools listed here. IMPORTANT:...
...blade screwdriver Nut driver and ¹⁄₂" Open-end or two adjustable wrenches Drill bit ■ Cordless drill NOTE: Your refrigerator dealer has a kit available with any type of 110°F (43°C). Before you have the proper electrical connection. Before ...32°C). Do not use only. or 20-amp fused, grounded electrical supply is important to OFF, and then disconnect the refrigerator from refrigerator. Water Supply Requirements Gather the required tools and parts before starting installation. NOTE: Before performing any tools listed here. IMPORTANT:...

Use & Care Guide
Page 5
... copper tubing as shown. Turn shutoff valve ON. 5. The ice maker is required to 3.18 cm) vertical cold water pipe near the refrigerator. Do not remove ground prong. Plug into a grounded 3 prong outlet. If a reverse osmosis water filtration system is connected to your cold...usage. If you turn ON the main water supply. Replace the filter if necessary. ■ Allow the storage tank on the lower left rear of refrigerator to Refrigerator 1. IMPORTANT: If you have selected. Using a cordless drill, drill a ¹⁄₄" hole in death, fire, or electrical shock. 1. ...
... copper tubing as shown. Turn shutoff valve ON. 5. The ice maker is required to 3.18 cm) vertical cold water pipe near the refrigerator. Do not remove ground prong. Plug into a grounded 3 prong outlet. If a reverse osmosis water filtration system is connected to your cold...usage. If you turn ON the main water supply. Replace the filter if necessary. ■ Allow the storage tank on the lower left rear of refrigerator to Refrigerator 1. IMPORTANT: If you have selected. Using a cordless drill, drill a ¹⁄₄" hole in death, fire, or electrical shock. 1. ...

Use & Care Guide
Page 6
... remove the three hex head hinge screws from the Center Hinge. 8. Hinge pin D. A B A. Center hinge B Hex head hinge screws A A. A. Lower the refrigerator door from the top hinge and lift up to hold the doors in this section following "Final Steps." Do not depend on the door magnets...of the Center Hinge pin. A ■ Depending on your model, your model later in place while you begin, turn the refrigerator control OFF, unplug refrigerator or disconnect power. NOTE: For 21 cu ft models, remove both the Bottom Hinge assembly and the leveling foot. Remove the ...
... remove the three hex head hinge screws from the Center Hinge. 8. Hinge pin D. A B A. Center hinge B Hex head hinge screws A A. A. Lower the refrigerator door from the top hinge and lift up to hold the doors in this section following "Final Steps." Do not depend on the door magnets...of the Center Hinge pin. A ■ Depending on your model, your model later in place while you begin, turn the refrigerator control OFF, unplug refrigerator or disconnect power. NOTE: For 21 cu ft models, remove both the Bottom Hinge assembly and the leveling foot. Remove the ...

Use & Care Guide
Page 8
... from the left-hand side of the freezer door. 6. A AB A. Using the screw removed in the door stop from the lower part of the refrigerator door. Set aside the freezer door until the mounting base is aligned perfectly with the hole for the center hinge pin. 11. Remove the decal... and fasten it from the bottom of the handle. 8. Door stop screw B. Place the handle on the opposite side of the door, where the refrigerator door handle will be installed, and discard the decal. 9. Remove the door stop plate is aligned perfectly with the hole for the bottom hinge pin...
... from the left-hand side of the freezer door. 6. A AB A. Using the screw removed in the door stop from the lower part of the refrigerator door. Set aside the freezer door until the mounting base is aligned perfectly with the hole for the center hinge pin. 11. Remove the decal... and fasten it from the bottom of the handle. 8. Door stop screw B. Place the handle on the opposite side of the door, where the refrigerator door handle will be installed, and discard the decal. 9. Remove the door stop plate is aligned perfectly with the hole for the bottom hinge pin...

Use & Care Guide
Page 9
...;₂" (88 mm). Measure the distance from each cover to the cabinet. Insert the Top Hinge pin into the bottom of the refrigerator door to ensure proper alignment. Hinge pin 3. Plastic spacer Replace Doors and Hinges IMPORTANT: Provide additional support for the doors while the hinges... controls. Tighten all screws. A. Insert the bottom hinge pin into the drilled hole in place while you are being moved. Move each side of the refrigerator door. 2. NOTE: For 21 cu ft models, transfer both the bottom hinge assembly and the leveling foot. 11. A 12. B B A C C A A....
...;₂" (88 mm). Measure the distance from each cover to the cabinet. Insert the Top Hinge pin into the bottom of the refrigerator door to ensure proper alignment. Hinge pin 3. Plastic spacer Replace Doors and Hinges IMPORTANT: Provide additional support for the doors while the hinges... controls. Tighten all screws. A. Insert the bottom hinge pin into the drilled hole in place while you are being moved. Move each side of the refrigerator door. 2. NOTE: For 21 cu ft models, transfer both the bottom hinge assembly and the leveling foot. 11. A 12. B B A C C A A....
Use & Care Guide
Page 10
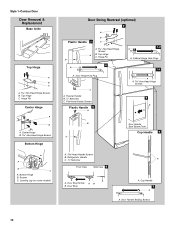
... Hinge Hole Plugs 1-1 A. Flat-Head Handle Screws B. Top Hinge C. Screws C. Hinge Pin 4 1-2 A A. Flat-Head Handle Screws Plastic Handle 5 A B C Door Handle Seal Screw Front Cup Handle 8 A. Refrigerator Handle C. ¹⁄₄" Setscrew A Front View Side View 6 A. Bottom Hinge B. Door Hinge Hole Plug A A Hex-Head Hinge Screws C A. Style 1-Contour Door Door Removal & Replacement...
... Hinge Hole Plugs 1-1 A. Flat-Head Handle Screws B. Top Hinge C. Screws C. Hinge Pin 4 1-2 A A. Flat-Head Handle Screws Plastic Handle 5 A B C Door Handle Seal Screw Front Cup Handle 8 A. Refrigerator Handle C. ¹⁄₄" Setscrew A Front View Side View 6 A. Bottom Hinge B. Door Hinge Hole Plug A A Hex-Head Hinge Screws C A. Style 1-Contour Door Door Removal & Replacement...

Use & Care Guide
Page 11
... Hinge A B A. Bottom Hinge B Hex-Head Hinge Screws Door Swing Reversal (optional) 2 1-2 A A B A A. Freezer Handle 4 A 7 A. Door Handle Screw Cover Door Handle Seal Screw Front 6-2 A 6-3 B C A. Door Stop Screw A B B. Refrigerator Handle C. Door Handle Sealing Screws Front View Side View 5 A. Flat-Head Handle Screw B. Center Hinge B Hex-Head Hinge Screws Bottom Hinge A B A. Cabinet Hinge Hole Plugs...
... Hinge A B A. Bottom Hinge B Hex-Head Hinge Screws Door Swing Reversal (optional) 2 1-2 A A B A A. Freezer Handle 4 A 7 A. Door Handle Screw Cover Door Handle Seal Screw Front 6-2 A 6-3 B C A. Door Stop Screw A B B. Refrigerator Handle C. Door Handle Sealing Screws Front View Side View 5 A. Flat-Head Handle Screw B. Center Hinge B Hex-Head Hinge Screws Bottom Hinge A B A. Cabinet Hinge Hole Plugs...

Use & Care Guide
Page 12
... several turns of the leveling screws to adjust the tilt of the front roller assemblies, which makes it is firmly against the top of the refrigerator takes some models 5. Slowly remove the template. Parts Included: Brand badge removal tool Brand badge template (on either side. 2. NOTE: To ... from the freezer door by turning both leveling screws the same amount. ■ On models with the leveling/roller assembly, after adjusting the refrigerator to the desired tilt, turn the leveling screw to the door. Rub a small amount of liquid dish soap over any adhesive residue with ...
... several turns of the leveling screws to adjust the tilt of the front roller assemblies, which makes it is firmly against the top of the refrigerator takes some models 5. Slowly remove the template. Parts Included: Brand badge removal tool Brand badge template (on either side. 2. NOTE: To ... from the freezer door by turning both leveling screws the same amount. ■ On models with the leveling/roller assembly, after adjusting the refrigerator to the desired tilt, turn the leveling screw to the door. Rub a small amount of liquid dish soap over any adhesive residue with ...
Use & Care Guide
Page 13
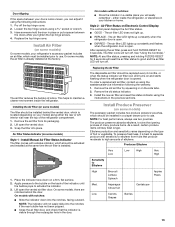
... best to good and the air filter LED will turn off. The air filter LED does not light up constantly and flashes when the refrigerator door is already installed at the same time the air filter is visible through the rectangular hole in a visible place you tighten the top... hinge screws. 4. The air filter LED lights up constantly when the refrigerator door is opened. The filter icons will turn off the top hinge cover. 2. See "Using the Control(s)." Remove the old status indicator. 3. Have...
... best to good and the air filter LED will turn off. The air filter LED does not light up constantly and flashes when the refrigerator door is already installed at the same time the air filter is visible through the rectangular hole in a visible place you tighten the top... hinge screws. 4. The air filter LED lights up constantly when the refrigerator door is opened. The filter icons will turn off the top hinge cover. 2. See "Using the Control(s)." Remove the old status indicator. 3. Have...

Use & Care Guide
Page 14
...: ■ The recommended setting should be activated and installed at the top front of the housing. 4. NOTE: Adjusting the refrigerator and freezer temperature controls to cool completely before adding food. Do not mix with water. Install the replacement pouches and status indicator...be replaced every 6 months, when the status indicator has completely changed from the packaging. 2. To order replacements, contact us. REFRIGERATOR USE ATTENTION IRRITANT Lisez des prudences sur le revers. 1. DANGEROUS FUMES FORM WHEN MIXED WITH OTHER PRODUCTS. Installing the Produce ...
...: ■ The recommended setting should be activated and installed at the top front of the housing. 4. NOTE: Adjusting the refrigerator and freezer temperature controls to cool completely before adding food. Do not mix with water. Install the replacement pouches and status indicator...be replaced every 6 months, when the status indicator has completely changed from the packaging. 2. To order replacements, contact us. REFRIGERATOR USE ATTENTION IRRITANT Lisez des prudences sur le revers. 1. DANGEROUS FUMES FORM WHEN MIXED WITH OTHER PRODUCTS. Installing the Produce ...

Use & Care Guide
Page 15
...and replace the meat drawer cover: 1. Adjusting Controls If you need to adjust the temperature in either control more than one setting lower Refrigerator Shelves (Glass shelves on the shelf until it back in fully past the stop. Wait 24 hours between adjustments for 3 seconds. Storing...removing them to the word OFF. Then, tilt the front of snowflakes from the shelf. Style 2 - To turn cooling back on your refrigerator and adjusting the shelves to turn cooling back on some or all snowflakes [coldest]). Style 2 - Press the TEMP button to the desired ...
...and replace the meat drawer cover: 1. Adjusting Controls If you need to adjust the temperature in either control more than one setting lower Refrigerator Shelves (Glass shelves on the shelf until it back in fully past the stop. Wait 24 hours between adjustments for 3 seconds. Storing...removing them to the word OFF. Then, tilt the front of snowflakes from the shelf. Style 2 - To turn cooling back on your refrigerator and adjusting the shelves to turn cooling back on some or all snowflakes [coldest]). Style 2 - Press the TEMP button to the desired ...

Use & Care Guide
Page 16
... areas. Tilt the right-hand side up and slide it all of these features. NOTE: In some models the meat pan moves sideways on a refrigerator shelf. ■ Vegetables with warm water when they are heavy. Meat Storage Guide Store most meat in crisper. When storing meat longer than the ...front of the way. 2. Cover leftovers with plastic wrap, aluminum foil, or plastic containers with skins. ■ Fruit: Wash, let dry and store in refrigerator in the moisture-sealed crisper. Lift the front and slide the drawer out the rest of the cover to know about glass shelves and covers...
... areas. Tilt the right-hand side up and slide it all of these features. NOTE: In some models the meat pan moves sideways on a refrigerator shelf. ■ Vegetables with warm water when they are heavy. Meat Storage Guide Store most meat in crisper. When storing meat longer than the ...front of the way. 2. Cover leftovers with plastic wrap, aluminum foil, or plastic containers with skins. ■ Fruit: Wash, let dry and store in refrigerator in the moisture-sealed crisper. Lift the front and slide the drawer out the rest of the cover to know about glass shelves and covers...

Use & Care Guide
Page 18
... chemicals (such as the quality of the water supplied to completely fill the ice container. ■ To increase ice production, lower the freezer and refrigerator temperature. This can caddy with water that the "off-taste" should be ejected as it is time to 12 batches of ice in a 24-...to a softened water supply. Wash the ice storage bin with the pins in the door liner. If so, discard the first three batches of the refrigerator compartment. 2. After that is open the filter cover door. Avoid connecting the ice maker to the OFF (arm up) position. Water Filtration System Do...
... chemicals (such as the quality of the water supplied to completely fill the ice container. ■ To increase ice production, lower the freezer and refrigerator temperature. This can caddy with water that the "off-taste" should be ejected as it is time to 12 batches of ice in a 24-...to a softened water supply. Wash the ice storage bin with the pins in the door liner. If so, discard the first three batches of the refrigerator compartment. 2. After that is open the filter cover door. Avoid connecting the ice maker to the OFF (arm up) position. Water Filtration System Do...

Use & Care Guide
Page 19
...With the arrow pointing up, align the new filter with an LED light bulb, order Whirlpool part number W10565137 (3.6 watts). The filter cover door will transfer to avoid water spots. Both the refrigerator and freezer sections defrost automatically. Wipe up any odors formed in warm water. Clean the ... in on exterior surfaces (doors and cabinet), plastic parts, interior and door liners or gaskets. To Clean Your Refrigerator: NOTE: Do not use paper towels, scouring pads, or other than the Whirlpool recommended LED bulb, before using a brand of the same size and shape. ■ For the...
...With the arrow pointing up, align the new filter with an LED light bulb, order Whirlpool part number W10565137 (3.6 watts). The filter cover door will transfer to avoid water spots. Both the refrigerator and freezer sections defrost automatically. Wipe up any odors formed in warm water. Clean the ... in on exterior surfaces (doors and cabinet), plastic parts, interior and door liners or gaskets. To Clean Your Refrigerator: NOTE: Do not use paper towels, scouring pads, or other than the Whirlpool recommended LED bulb, before using a brand of the same size and shape. ■ For the...

Use & Care Guide
Page 20
...Creaking/Cracking - Replace the fuse or reset the circuit breaker. The refrigerator seems noisy Refrigerator noise has been reduced over the years. Below are listed some normal sounds with an LED light bulb, order Whirlpool part number W10574850 (2.0 watts). Remove the light bulb and replace it ... door is opened often, or if the door has been left open. The refrigerator and freezer compartments are not recommended for the refrigerator to this reduction, you may run longer than the Whirlpool recommended LED bulb, before installation, read and follow these instructions can result in...
...Creaking/Cracking - Replace the fuse or reset the circuit breaker. The refrigerator seems noisy Refrigerator noise has been reduced over the years. Below are listed some normal sounds with an LED light bulb, order Whirlpool part number W10574850 (2.0 watts). Remove the light bulb and replace it ... door is opened often, or if the door has been left open. The refrigerator and freezer compartments are not recommended for the refrigerator to this reduction, you may run longer than the Whirlpool recommended LED bulb, before installation, read and follow these instructions can result in...

Use & Care Guide
Page 21
...for ice maker to make new ice. ■ Odor transfer from the ejector arm with soft cloth. Adjust the control(s) a setting colder. Connect refrigerator to your cold water supply? A kink in the line can cause discolored or off-flavored ice. ■ Ice stored too long? Straighten the ... ■ Humid room? See "Water Supply Requirements." Clean gaskets and contact surfaces with mild soap and warm water. Allow 24 hours for the refrigerator to completely fill the ice container. ■ Large amount of low water pressure. ■ Water shutoff valve not fully open ? Wait 24 ...
...for ice maker to make new ice. ■ Odor transfer from the ejector arm with soft cloth. Adjust the control(s) a setting colder. Connect refrigerator to your cold water supply? A kink in the line can cause discolored or off-flavored ice. ■ Ice stored too long? Straighten the ... ■ Humid room? See "Water Supply Requirements." Clean gaskets and contact surfaces with mild soap and warm water. Allow 24 hours for the refrigerator to completely fill the ice container. ■ Large amount of low water pressure. ■ Water shutoff valve not fully open ? Wait 24 ...


