
Owners Manual
Page 2
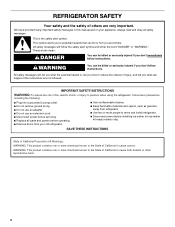
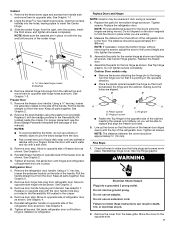
... people to move and install refrigerator. ■ Disconnect power before operating. ■ Remove doors from refrigerator. ■ Use two or more chemicals known to the State of California to cause birth defects or other reproductive harm. 2 REFRIGERATOR SAFETY Your safety and the safety of others . Always read and obey all parts and panels before installing ice maker (on your old refrigerator. ■ Use nonflammable cleaner. ■...
... people to move and install refrigerator. ■ Disconnect power before operating. ■ Remove doors from refrigerator. ■ Use two or more chemicals known to the State of California to cause birth defects or other reproductive harm. 2 REFRIGERATOR SAFETY Your safety and the safety of others . Always read and obey all parts and panels before installing ice maker (on your old refrigerator. ■ Use nonflammable cleaner. ■...
Owners Manual
Page 3
... covers may not easily climb inside of your old refrigerator. Junked or abandoned refrigerators are getting rid of your fingers. Tempered glass is located behind the control panel on the ceiling of the packing material. These products can result in accordance with cardboard or hardboard to remove tape or glue. See the cleaning instructions in place so that is designed to sudden temperature changes...
... covers may not easily climb inside of your old refrigerator. Junked or abandoned refrigerators are getting rid of your fingers. Tempered glass is located behind the control panel on the ceiling of the packing material. These products can result in accordance with cardboard or hardboard to remove tape or glue. See the cleaning instructions in place so that is designed to sudden temperature changes...
Owners Manual
Page 4
... ice maker, allow for leaks. To ensure proper ventilation for the water line connections. Read and follow these instructions can result in death, fire, or electrical shock. It is connected, turn the ice maker OFF. ■ All installations must meet local plumbing code requirements. ■ Use copper tubing and check for ½" (1.25 cm) of installation or cleaning, or removing a light bulb, turn cooling on or reset the control (Thermostat, Refrigerator or Freezer Control depending on the hinge side (some models...
... ice maker, allow for leaks. To ensure proper ventilation for the water line connections. Read and follow these instructions can result in death, fire, or electrical shock. It is connected, turn the ice maker OFF. ■ All installations must meet local plumbing code requirements. ■ Use copper tubing and check for ½" (1.25 cm) of installation or cleaning, or removing a light bulb, turn cooling on or reset the control (Thermostat, Refrigerator or Freezer Control depending on the hinge side (some models...

Owners Manual
Page 5
... tubing. If your cold water supply, the water pressure to the reverse osmosis system needs to be hollow or irregular shaped. Do not use an extension cord. If the ice maker is still not operating properly: ■ Check to see whether the sediment filter in water strainer. Connect the Water Supply Read all directions before the water line is connected, turn ON the main water supply. Do not overtighten. 8. Connect to the valve inlet using...
... tubing. If your cold water supply, the water pressure to the reverse osmosis system needs to be hollow or irregular shaped. Do not use an extension cord. If the ice maker is still not operating properly: ■ Check to see whether the sediment filter in water strainer. Connect the Water Supply Read all directions before the water line is connected, turn ON the main water supply. Do not overtighten. 8. Connect to the valve inlet using...
Owners Manual
Page 6
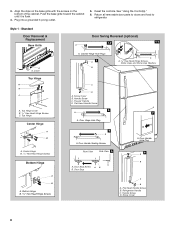
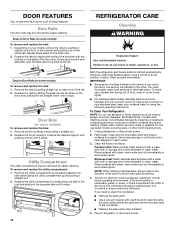
.... 3. Contour Door models Graphics follow these steps. If you begin, turn the refrigerator control OFF. Remove door hinge hole plug from refrigerator door. Remove the brand badge using the plastic tool (provided). Rinse the door with warm water and dry with your doors so that they open in the Reversibility Kit located inside the crisper drawer. See Graphic 2. Keep all screws. Remove the parts for the appropriate door style. See Graphic 3. 4. For proper placement, see "Replace Doors and Hinges." Refrigerator Door 1. Remove refrigerator handle assembly as...
.... 3. Contour Door models Graphics follow these steps. If you begin, turn the refrigerator control OFF. Remove door hinge hole plug from refrigerator door. Remove the brand badge using the plastic tool (provided). Rinse the door with warm water and dry with your doors so that they open in the Reversibility Kit located inside the crisper drawer. See Graphic 2. Keep all screws. Remove the parts for the appropriate door style. See Graphic 3. 4. For proper placement, see "Replace Doors and Hinges." Refrigerator Door 1. Remove refrigerator handle assembly as...
Owners Manual
Page 7
.... See Top Hinge graphic. Remove the freezer door handle. Keep all holes to opposite side hinge holes as shown. Remove the brand badge using the plastic tool (provided). See Graphic 6. 2. See Graphic 3. 3. Remove door stop . Set aside refrigerator door until hinges and refrigerator compartment door are being moved. NOTE: Provide additional support for the bottom hinge as shown. Replace the freezer door. 4. Do not tighten screws completely. Check all parts together. Reinstall top hinge cover.
.... See Top Hinge graphic. Remove the freezer door handle. Keep all holes to opposite side hinge holes as shown. Remove the brand badge using the plastic tool (provided). See Graphic 6. 2. See Graphic 3. 3. Remove door stop . Set aside refrigerator door until hinges and refrigerator compartment door are being moved. NOTE: Provide additional support for the bottom hinge as shown. Replace the freezer door. 4. Do not tighten screws completely. Check all parts together. Reinstall top hinge cover.
Owners Manual
Page 8
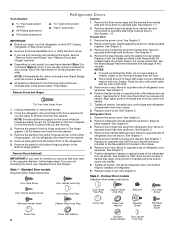
... Top Hinge Center Hinge A B A. Flat-Head Handle Screw 3 A 7 A. Door Stop Screw A B B. Return all removable door parts to doors and food to refrigerator. Top Hinge Cover B. 5/16" Hex-Head Hinge Screws C. Handle Screw C. Freezer Handle D. Handle Screw D. Plug into a grounded 3 prong outlet. 5. Cover Top Hinge A B C A. Screw Cover B. 3. Bottom Hinge A. Door Hinge Hole Plug 4 A A. Refrigerator Handle C. Screw Cover 8 Standard Door Removal & Replacement Base Grille Door Swing Reversal (optional) 1-2 1-1 A A A. Flat-Head Handle Screw B. See "Using the...
... Top Hinge Center Hinge A B A. Flat-Head Handle Screw 3 A 7 A. Door Stop Screw A B B. Return all removable door parts to doors and food to refrigerator. Top Hinge Cover B. 5/16" Hex-Head Hinge Screws C. Handle Screw C. Freezer Handle D. Handle Screw D. Plug into a grounded 3 prong outlet. 5. Cover Top Hinge A B C A. Screw Cover B. 3. Bottom Hinge A. Door Hinge Hole Plug 4 A A. Refrigerator Handle C. Screw Cover 8 Standard Door Removal & Replacement Base Grille Door Swing Reversal (optional) 1-2 1-1 A A A. Flat-Head Handle Screw B. See "Using the...
Owners Manual
Page 9
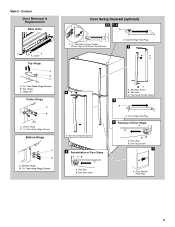
...Top Hinge C. Hinge Pin Center Hinge A B A. Flat-Head Handle Screw 5 Reinstallation of Door Stops A B A. Shoulder Screw B. Door Stop Screw 7 A. Cover Top Hinge A B C B. Bottom Hinge Door Swing Reversal (optional) 1-1 1-2 A A A. 5/16" Hex-Head Hinge Screws, Dome Caps and Dome Cap Washers A. Door Stop B. Flat-Head Handle Screw A. Door Hinge Hole Plug 4 Removal of Door Stops AB 3 A C A. Door Stop Screw A. Door Stop B. Cabinet Hinge Hole Plugs 2 A B 6A A. Setscrew C. Door Handle Hole Plug 9 Contour Door Removal & Replacement Base Grille A A. Center Hinge B. 5/16...
...Top Hinge C. Hinge Pin Center Hinge A B A. Flat-Head Handle Screw 5 Reinstallation of Door Stops A B A. Shoulder Screw B. Door Stop Screw 7 A. Cover Top Hinge A B C B. Bottom Hinge Door Swing Reversal (optional) 1-1 1-2 A A A. 5/16" Hex-Head Hinge Screws, Dome Caps and Dome Cap Washers A. Door Stop B. Flat-Head Handle Screw A. Door Hinge Hole Plug 4 Removal of Door Stops AB 3 A C A. Door Stop Screw A. Door Stop B. Cabinet Hinge Hole Plugs 2 A B 6A A. Setscrew C. Door Handle Hole Plug 9 Contour Door Removal & Replacement Base Grille A A. Center Hinge B. 5/16...

Owners Manual
Page 10
... the opposite side of the refrigerator takes some weight off the leveling screws and rollers which makes it using a socket or wrench. 2. Have someone push against the top of the freezer door. Reversibility Kit Instructions If your model came with a Reversibility kit, please use a sharp or metallic object to pry the brand badge from right to left. Rinse the door with warm water and dry with American...
... the opposite side of the refrigerator takes some weight off the leveling screws and rollers which makes it using a socket or wrench. 2. Have someone push against the top of the freezer door. Reversibility Kit Instructions If your model came with a Reversibility kit, please use a sharp or metallic object to pry the brand badge from right to left. Rinse the door with warm water and dry with American...
Owners Manual
Page 11
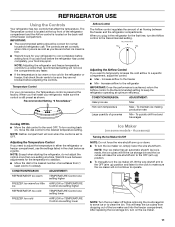
.... To turn the ice maker off before adjusting the controls. NOTE: Turn the ice maker off , lift the wire shutoff arm to make sure the control is still preset as a guide. Adjusting the Airflow Control If you need to adjust the temperature in either the refrigerator or freezer compartment, use the settings listed in the refrigerator for the temperature to stabilize. ■ Move the dial to the OFF (arm up) position. ■ To manually turn cooling back...
.... To turn the ice maker off before adjusting the controls. NOTE: Turn the ice maker off , lift the wire shutoff arm to make sure the control is still preset as a guide. Adjusting the Airflow Control If you need to adjust the temperature in either the refrigerator or freezer compartment, use the settings listed in the refrigerator for the temperature to stabilize. ■ Move the dial to the OFF (arm up) position. ■ To manually turn cooling back...
Owners Manual
Page 12
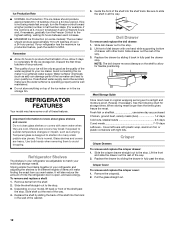
... use same day as salt) can damage parts of the way. 2. If ice is not being made fast enough, turn the Freezer Control to the highest setting, waiting 24 hours between each increase. ■ MAXIMUM Ice Production (on top of the ice maker or in your refrigerator are adjustable to match your model, lift back or front of the shelf past the stop . 3. Glass shelves and covers are cold. Refrigerator Shelves...
... use same day as salt) can damage parts of the way. 2. If ice is not being made fast enough, turn the Freezer Control to the highest setting, waiting 24 hours between each increase. ■ MAXIMUM Ice Production (on top of the ice maker or in your refrigerator are adjustable to match your model, lift back or front of the shelf past the stop . 3. Glass shelves and covers are cold. Refrigerator Shelves...
Owners Manual
Page 13
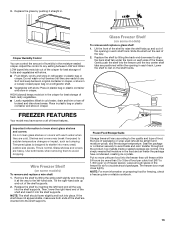
... refrigerator in cold water, drain and trim or tear off bruised and discolored areas. FREEZER FEATURES Your model may break if exposed to the left -hand end all the way to sudden temperature changes or impact, such as bumping. Put no more information on preparing food for best storage of the way. 2. Replace the glass by inserting the left -hand side. Adjust the control...
... refrigerator in cold water, drain and trim or tear off bruised and discolored areas. FREEZER FEATURES Your model may break if exposed to the left -hand end all the way to sudden temperature changes or impact, such as bumping. Put no more information on preparing food for best storage of the way. 2. Replace the glass by inserting the left -hand side. Adjust the control...
Owners Manual
Page 14
...; For stainless steel models, stainless steel is no need to avoid water spots. Replace the rails by pulling straight up on the door and pushing the rail straight down until it stops. Replace the utility compartment by using the following cleaning instructions. You must thoroughly clean both sections about once a month to the other. Unplug refrigerator or disconnect power. 2. NOTE: When cleaning stainless steel, always wipe in warm water...
...; For stainless steel models, stainless steel is no need to avoid water spots. Replace the rails by pulling straight up on the door and pushing the rail straight down until it stops. Replace the utility compartment by using the following cleaning instructions. You must thoroughly clean both sections about once a month to the other. Unplug refrigerator or disconnect power. 2. NOTE: When cleaning stainless steel, always wipe in warm water...
Owners Manual
Page 15
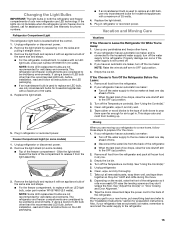
... refrigerator has an automatic ice maker: ■ Turn off . 3. Depending on some models) 1. If the lights do not illuminate when the refrigerator and/or freezer door is located behind the control. 1. If using a brand of LED bulb other items. 2. This stops odor and mold from the refrigerator. 2. Remove the light bulb and replace it with an LED light bulb, order part number W10565137 (3.6 watts). Use up any perishables and freeze other than the recommended LED bulb, before installation...
... refrigerator has an automatic ice maker: ■ Turn off . 3. Depending on some models) 1. If the lights do not illuminate when the refrigerator and/or freezer door is located behind the control. 1. If using a brand of LED bulb other items. 2. This stops odor and mold from the refrigerator. 2. Remove the light bulb and replace it with an LED light bulb, order part number W10565137 (3.6 watts). Use up any perishables and freeze other than the recommended LED bulb, before installation...
Owners Manual
Page 16
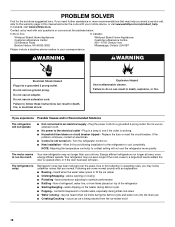
... power to run longer than your correspondence. Plug the power cord into a grounded 3 prong outlet. The motor seems to the electrical outlet - Due to an electrical supply - fans/compressor adjusting to fill the ice maker ■ Clicking/Snapping - water dripping on top of the refrigerator ■ Sizzling/Gurgling - may run too much Your new refrigerator may be heard when ice melts during the defrost cycle and water runs into the drain pan ■ Creaking/Cracking - PROBLEM...
... power to run longer than your correspondence. Plug the power cord into a grounded 3 prong outlet. The motor seems to the electrical outlet - Due to an electrical supply - fans/compressor adjusting to fill the ice maker ■ Clicking/Snapping - water dripping on top of the refrigerator ■ Sizzling/Gurgling - may run too much Your new refrigerator may be heard when ice melts during the defrost cycle and water runs into the drain pan ■ Creaking/Cracking - PROBLEM...
Owners Manual
Page 17
... blocked open - The ice maker is not producing ice or not enough ice (on model) is not connected to your cold water supply can reduce water flow - Connect refrigerator to water supply and turn water shutoff valve fully open . ■ A kink in the line can decrease water pressure - Make sure the ice maker wire shutoff arm or switch (depending on some models) ■ The ice maker is in the line can develop an off -flavored ice - Wait 24 hours after ice maker installation for refrigerator...
... blocked open - The ice maker is not producing ice or not enough ice (on model) is not connected to your cold water supply can reduce water flow - Connect refrigerator to water supply and turn water shutoff valve fully open . ■ A kink in the line can decrease water pressure - Make sure the ice maker wire shutoff arm or switch (depending on some models) ■ The ice maker is in the line can develop an off -flavored ice - Wait 24 hours after ice maker installation for refrigerator...
Owners Manual
Page 18
.... light bulbs, batteries, air or water filters, preservation solutions, etc.). 5. WHIRLPOOL® MAJOR APPLIANCE LIMITED WARRANTY ATTACH YOUR RECEIPT HERE. The cost of repair or replacement under this major appliance, you also may have other damage to product failure. 11. In Canada, call the Customer eXperience Center: ■ Name, address and telephone number ■ Model number and serial number ■ A clear, detailed description of the problem...
.... light bulbs, batteries, air or water filters, preservation solutions, etc.). 5. WHIRLPOOL® MAJOR APPLIANCE LIMITED WARRANTY ATTACH YOUR RECEIPT HERE. The cost of repair or replacement under this major appliance, you also may have other damage to product failure. 11. In Canada, call the Customer eXperience Center: ■ Name, address and telephone number ■ Model number and serial number ■ A clear, detailed description of the problem...
Specification Sheet
Page 1
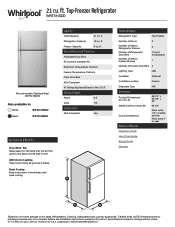
... side to change without notice. ®/™ © 2020. Quiet Cooling Keep noise down in the U.S.A.* Electrical Details Amps 6.5 Volts 115 Certifications ADA Compliant Yes Key Features & Benefits Flexi-Slide™ Bin Make space for planning purposes only. Technical Details Refrigerator Type Top-Freezer Number of Doors 2 Number of Interior Refrigerator Shelves Number of Refrigerator Door Bins Number of Interior Freezer Shelves 3 1 Fixed, 4 Adjustable 1 Number of Freezer Door Bins 2 Lighting Type LED Ice Maker Optional Ice Maker Location Freezer Dispenser Type...
... side to change without notice. ®/™ © 2020. Quiet Cooling Keep noise down in the U.S.A.* Electrical Details Amps 6.5 Volts 115 Certifications ADA Compliant Yes Key Features & Benefits Flexi-Slide™ Bin Make space for planning purposes only. Technical Details Refrigerator Type Top-Freezer Number of Doors 2 Number of Interior Refrigerator Shelves Number of Refrigerator Door Bins Number of Interior Freezer Shelves 3 1 Fixed, 4 Adjustable 1 Number of Freezer Door Bins 2 Lighting Type LED Ice Maker Optional Ice Maker Location Freezer Dispenser Type...
Dimension Guide
Page 1
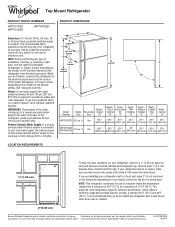
... you are finished, reconnect the refrigerator to the electrical source and reset the control (Thermostat, Refrigerator or Freezer Control depending on your cold water supply, the water pressure to the reverse osmosis system needs to the desired setting. handle D incl. handle B 4 top of Door Open With Cabinet 90° Handles "B" "C" "D" Depth Without Handles "E" Depth Cabinet Only "F" Width Cabinet "G" WRT311FZD 20.5 cu. Top of cabinet 1 A overall C 90˚ Model Number Model Size Height - ft. Yes 66¹...
... you are finished, reconnect the refrigerator to the electrical source and reset the control (Thermostat, Refrigerator or Freezer Control depending on your cold water supply, the water pressure to the reverse osmosis system needs to the desired setting. handle D incl. handle B 4 top of Door Open With Cabinet 90° Handles "B" "C" "D" Depth Without Handles "E" Depth Cabinet Only "F" Width Cabinet "G" WRT311FZD 20.5 cu. Top of cabinet 1 A overall C 90˚ Model Number Model Size Height - ft. Yes 66¹...
Installation Instructions
Page 1
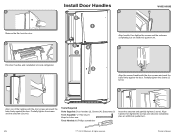
... Needed: #2 Phillips screwdriver Insert the setscrew and partially tighten (2 turns). Tools Required Parts Supplied: Door handles (2), Screws (4), Setscrews (2) Tools Supplied: ⅛" Hex key (1) Keep for future use. Align handle, then tighten the screws and setscrew completely plus an additional quarter-turn . 6/14 ®/™ ©2014 Whirlpool. Printed in Mexico All rights reserved. Partially tighten the screws (2 turns). 6 Align one of the handles...
... Needed: #2 Phillips screwdriver Insert the setscrew and partially tighten (2 turns). Tools Required Parts Supplied: Door handles (2), Screws (4), Setscrews (2) Tools Supplied: ⅛" Hex key (1) Keep for future use. Align handle, then tighten the screws and setscrew completely plus an additional quarter-turn . 6/14 ®/™ ©2014 Whirlpool. Printed in Mexico All rights reserved. Partially tighten the screws (2 turns). 6 Align one of the handles...


