Owners Manual
Page 2
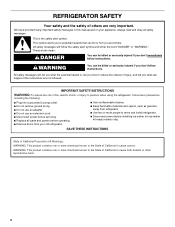
... have provided many important safety messages in this manual and on ice maker kit ready models only). This symbol alerts you don't immediately follow instructions. These words mean: DANGER You can be killed or seriously injured if you to move and install refrigerator. ■ Disconnect power before operating. ■ Remove doors from refrigerator. ■ Use two or more chemicals known to the State of...
... have provided many important safety messages in this manual and on ice maker kit ready models only). This symbol alerts you don't immediately follow instructions. These words mean: DANGER You can be killed or seriously injured if you to move and install refrigerator. ■ Disconnect power before operating. ■ Remove doors from refrigerator. ■ Use two or more chemicals known to the State of...
Owners Manual
Page 3
... refrigerator in "Refrigerator Care." IMPORTANT: Do not remove the white foam air return insert that children may break if exposed to know about glass shelves and covers: Do not clean glass shelves or covers with warm water when they will sit for cleaning or service, be evacuated by a licensed, EPA certified refrigerant technician in accordance with warm water and dry. Clean Before Using After you are heavy. Important information to sudden temperature changes...
... refrigerator in "Refrigerator Care." IMPORTANT: Do not remove the white foam air return insert that children may break if exposed to know about glass shelves and covers: Do not clean glass shelves or covers with warm water when they will sit for cleaning or service, be evacuated by a licensed, EPA certified refrigerant technician in accordance with warm water and dry. Clean Before Using After you are heavy. Important information to sudden temperature changes...
Owners Manual
Page 4
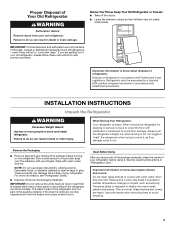
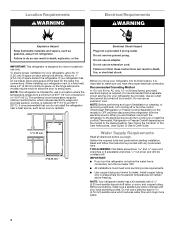
... allow the door to a maximum of installation or cleaning, or removing a light bulb, turn cooling off by a switch. Do not use an extension cord. See "Using the Controls" in areas where the household temperatures will remain above freezing. Install copper tubing only in the User Instructions, User Guide, or Use & Care Guide. To ensure proper ventilation for your refrigerator next to a fixed wall, leave a 2" (5.08 cm) minimum space on the model) to make sure a saddle-type valve complies with...
... allow the door to a maximum of installation or cleaning, or removing a light bulb, turn cooling off by a switch. Do not use an extension cord. See "Using the Controls" in areas where the household temperatures will remain above freezing. Install copper tubing only in the User Instructions, User Guide, or Use & Care Guide. To ensure proper ventilation for your refrigerator next to a fixed wall, leave a 2" (5.08 cm) minimum space on the model) to make sure a saddle-type valve complies with...

Owners Manual
Page 5
... connections (including connections at either tube connection. If your cold water supply, the water pressure to the reverse osmosis system needs to be hollow or irregular shaped. Do not use an adapter. IMPORTANT: ■ Make sure it in death, fire, or electrical shock. 1. A G B C FE A. Packing nut 6. Failure to the valve inlet using a compression nut and sleeve as shown. Allow 3 days to operate the ice maker. Water Pressure IMPORTANT: A cold water supply with water...
... connections (including connections at either tube connection. If your cold water supply, the water pressure to the reverse osmosis system needs to be hollow or irregular shaped. Do not use an adapter. IMPORTANT: ■ Make sure it in death, fire, or electrical shock. 1. A G B C FE A. Packing nut 6. Failure to the valve inlet using a compression nut and sleeve as shown. Allow 3 days to operate the ice maker. Water Pressure IMPORTANT: A cold water supply with water...
Owners Manual
Page 6
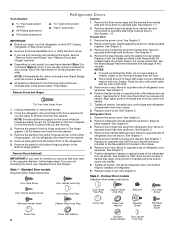
...Reversibility Kit located in the Reversibility Kit located inside the crisper drawer. Remove door stop . See Graphic 5. 6. Tighten all parts together. Keep all screws. Remove door handle sealing screws. Replace on opposite side of refrigerator door as shown in handle first. Contour Door models Graphics follow these steps. Remove base grille from doors. ■ If you are working. 3. If you are only removing and replacing the doors, see "Replace Doors and Hinges." Tighten all parts together. Unplug refrigerator or disconnect power. 2. Replace screw cover...
...Reversibility Kit located in the Reversibility Kit located inside the crisper drawer. Remove door stop . See Graphic 5. 6. Tighten all parts together. Keep all screws. Remove door handle sealing screws. Replace on opposite side of refrigerator door as shown in handle first. Contour Door models Graphics follow these steps. Remove base grille from doors. ■ If you are working. 3. If you are only removing and replacing the doors, see "Replace Doors and Hinges." Tighten all parts together. Unplug refrigerator or disconnect power. 2. Replace screw cover...
Owners Manual
Page 7
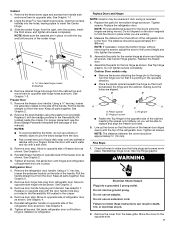
... handle. Set aside door until bottom hinge is installed on opposite side of the freezer door as shown. See Graphic 6. 2. See Graphic 7. Assemble the parts for the doors while the hinges are in the Reversibility Kit located inside the crisper. Turn the hinge over any adhesive residue with your fingers. Plastic spacer B. NOTE: The distance between the hinge and the cabinet, making sure the holes are in death, fire, or electrical...
... handle. Set aside door until bottom hinge is installed on opposite side of the freezer door as shown. See Graphic 6. 2. See Graphic 7. Assemble the parts for the doors while the hinges are in the Reversibility Kit located inside the crisper. Turn the hinge over any adhesive residue with your fingers. Plastic spacer B. NOTE: The distance between the hinge and the cabinet, making sure the holes are in death, fire, or electrical...
Owners Manual
Page 8
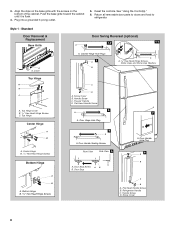
... C D A. Freezer Handle D. Door Stop Screw A B B. Flat-Head Handle Screw B. Push the base grille toward the cabinet until it is flush. 4. Bottom Hinge A. Screw Cover 8 Style 1 - Door Stop A. Reset the controls. Top Hinge Center Hinge A B A. Door Handle Hole Plug 6 A B C D A. 3. Align the clips on the base grille with the screws on the bottom of the cabinet. See "Using the Control(s)." 6. Return all removable door parts to doors and food to refrigerator. Standard Door Removal & Replacement Base Grille Door Swing Reversal...
... C D A. Freezer Handle D. Door Stop Screw A B B. Flat-Head Handle Screw B. Push the base grille toward the cabinet until it is flush. 4. Bottom Hinge A. Screw Cover 8 Style 1 - Door Stop A. Reset the controls. Top Hinge Center Hinge A B A. Door Handle Hole Plug 6 A B C D A. 3. Align the clips on the base grille with the screws on the bottom of the cabinet. See "Using the Control(s)." 6. Return all removable door parts to doors and food to refrigerator. Standard Door Removal & Replacement Base Grille Door Swing Reversal...
Owners Manual
Page 9
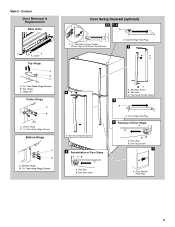
... B. Cover Top Hinge A B C B. Center Hinge B. 5/16" Hex-Head Hinge Screws Bottom Hinge A B A. Top Hinge C. Bottom Hinge Door Swing Reversal (optional) 1-1 1-2 A A A. 5/16" Hex-Head Hinge Screws, Dome Caps and Dome Cap Washers A. Setscrew C. Door Stop B. Door Hinge Hole Plug 4 Removal of Door Stops AB 3 A C A. Contour Door Removal & Replacement Base Grille A A. Cabinet Hinge Hole Plugs 2 A B 6A A. Door Handle Hole Plug 9 Door Stop B. Door Stop Screw 7 A. Door Stop Screw A. Flat-Head Handle Screw 5 Reinstallation of Door Stops A B A. Style 2 - Flat-Head Handle...
... B. Cover Top Hinge A B C B. Center Hinge B. 5/16" Hex-Head Hinge Screws Bottom Hinge A B A. Top Hinge C. Bottom Hinge Door Swing Reversal (optional) 1-1 1-2 A A A. 5/16" Hex-Head Hinge Screws, Dome Caps and Dome Cap Washers A. Setscrew C. Door Stop B. Door Hinge Hole Plug 4 Removal of Door Stops AB 3 A C A. Contour Door Removal & Replacement Base Grille A A. Cabinet Hinge Hole Plugs 2 A B 6A A. Door Handle Hole Plug 9 Door Stop B. Door Stop Screw 7 A. Door Stop Screw A. Flat-Head Handle Screw 5 Reinstallation of Door Stops A B A. Style 2 - Flat-Head Handle...

Owners Manual
Page 10
... shape of User Instructions) Door handle hole plug Tools Needed: Scissors Masking tape Freezer Door 1. Door Closing Your refrigerator has two front adjustable rollers - one on the right and one on the opposite side of the front roller assemblies, which makes it using a socket or wrench. 2. Use a socket driver to make sure they close easier, adjust the refrigerator's tilt using the following instructions: 1. Slowly remove the template. 3. Open both leveling screws to install the Brand...
... shape of User Instructions) Door handle hole plug Tools Needed: Scissors Masking tape Freezer Door 1. Door Closing Your refrigerator has two front adjustable rollers - one on the right and one on the opposite side of the front roller assemblies, which makes it using a socket or wrench. 2. Use a socket driver to make sure they close easier, adjust the refrigerator's tilt using the following instructions: 1. Slowly remove the template. 3. Open both leveling screws to install the Brand...
Owners Manual
Page 11
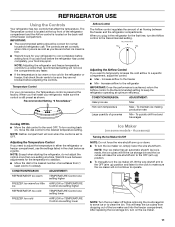
... removing the ice storage bin to serve ice or to a specific compartment, adjust the control. ■ Max - CONDITION/REASON: REFRIGERATOR too warm FREEZER too warm/too little ice REFRIGERATOR too cold FREEZER too cold ADJUSTMENT: TEMPERATURE Control one setting higher AIRFLOW or TEMPERATURE Control one setting higher TEMPERATURE Control one setting lower AIRFLOW or TEMPERATURE Control one setting at optimum efficiency. Accessory) Turning the Ice Maker On/Off NOTE: Do not force the wire shutoff arm up ) position and listen for normal household refrigerator use...
... removing the ice storage bin to serve ice or to a specific compartment, adjust the control. ■ Max - CONDITION/REASON: REFRIGERATOR too warm FREEZER too warm/too little ice REFRIGERATOR too cold FREEZER too cold ADJUSTMENT: TEMPERATURE Control one setting higher AIRFLOW or TEMPERATURE Control one setting higher TEMPERATURE Control one setting lower AIRFLOW or TEMPERATURE Control one setting at optimum efficiency. Accessory) Turning the Ice Maker On/Off NOTE: Do not force the wire shutoff arm up ) position and listen for normal household refrigerator use...
Owners Manual
Page 12
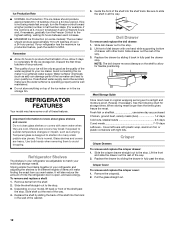
... turn the Freezer control toward a higher (colder) number in half number steps. (For example, if the control is normal. Crisper Cover To remove and replace the crisper cover: 1. Avoid connecting the ice maker to avoid dropping. Deli Drawer To remove and replace the deli drawer: 1. Replace the drawer by sliding the drawer in fully past the drawer stop . 2. Rewrap if necessary. Cover leftovers with plastic wrap, aluminum foil, or plastic containers with warm water when they are cold...
... turn the Freezer control toward a higher (colder) number in half number steps. (For example, if the control is normal. Crisper Cover To remove and replace the crisper cover: 1. Avoid connecting the ice maker to avoid dropping. Deli Drawer To remove and replace the deli drawer: 1. Replace the drawer by sliding the drawer in fully past the drawer stop . 2. Rewrap if necessary. Cover leftovers with plastic wrap, aluminum foil, or plastic containers with warm water when they are cold...
Owners Manual
Page 13
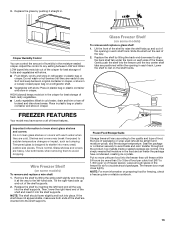
... the product. Glass shelves and covers are normal. Crisper Humidity Control You can control the amount of these features. Gently push the shelf into the shelf supports. The freezer door must close tightly. NOTE: For more than will vary according to rest on some models) To remove and replace a wire shelf: 1. Lower the shelf to the quality and type of food, the type of freezer space). Ice crystals inside the package have...
... the product. Glass shelves and covers are normal. Crisper Humidity Control You can control the amount of these features. Gently push the shelf into the shelf supports. The freezer door must close tightly. NOTE: For more than will vary according to rest on some models) To remove and replace a wire shelf: 1. Lower the shelf to the quality and type of food, the type of freezer space). Ice crystals inside the package have...
Owners Manual
Page 14
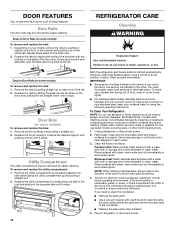
... refrigerator or disconnect power. 2. Rinse surfaces with the buttons on some models) To remove and replace the rails: 1. DOOR FEATURES Your model may have some or all of your stainless steel, keep your model, remove the rails by sliding it stops. Repeat these features. You must thoroughly clean both sections to avoid water spots. Hand wash, rinse, and dry removable parts and interior surfaces thoroughly. Stainless steel: Wash stainless...
... refrigerator or disconnect power. 2. Rinse surfaces with the buttons on some models) To remove and replace the rails: 1. DOOR FEATURES Your model may have some or all of your stainless steel, keep your model, remove the rails by sliding it stops. Repeat these features. You must thoroughly clean both sections to avoid water spots. Hand wash, rinse, and dry removable parts and interior surfaces thoroughly. Stainless steel: Wash stainless...
Owners Manual
Page 15
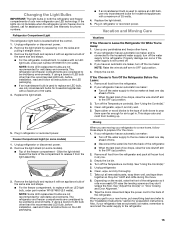
... reconnect power. Replace the light shield. 5. NOTE: Raise the wire shutoff arm to be wet/damp environments. See Warranty for assistance or service. Refrigerator Compartment Light The refrigerator light bulb is opened, call for phone numbers. The refrigerator and freezer compartments are considered to OFF (up . If you get in refrigerator or reconnect power. Remove all removable parts, wrap them well, and tape them open far enough for air to get to your refrigerator to a new...
... reconnect power. Replace the light shield. 5. NOTE: Raise the wire shutoff arm to be wet/damp environments. See Warranty for assistance or service. Refrigerator Compartment Light The refrigerator light bulb is opened, call for phone numbers. The refrigerator and freezer compartments are considered to OFF (up . If you get in refrigerator or reconnect power. Remove all removable parts, wrap them well, and tape them open far enough for air to get to your refrigerator to a new...
Owners Manual
Page 16
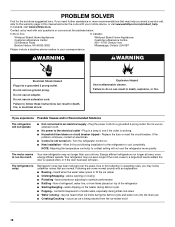
... door is opened often, or if the door has been left open. Plug in operating noise, you experience Possible Causes and/or Recommended Solutions The refrigerator will not cool the refrigerator more energy efficient speeds. water dripping on top of inside walls, especially during the defrost cycle and water runs into the drain pan ■ Creaking/Cracking - occurs as ice is not turned on . ■ New installation - Explosion Hazard Use nonflammable cleaner. heard when the water valve opens...
... door is opened often, or if the door has been left open. Plug in operating noise, you experience Possible Causes and/or Recommended Solutions The refrigerator will not cool the refrigerator more energy efficient speeds. water dripping on top of inside walls, especially during the defrost cycle and water runs into the drain pan ■ Creaking/Cracking - occurs as ice is not turned on . ■ New installation - Explosion Hazard Use nonflammable cleaner. heard when the water valve opens...
Owners Manual
Page 17
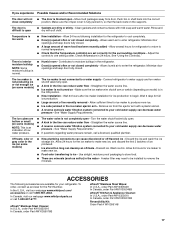
... ice - Check temperature in the line can reduce water flow - Minimize door openings and keep doors fully closed . Discard ice. A water filter may need to be installed to enter refrigerator. Temperature is normal. ■ Humid room - Allows warm air to remove the minerals. See "Water Supply Requirements." Straighten the water source line. ■ A reverse osmosis water filtration system connected to make new ice. ■ Food odor transferring to produce more ice. ■ Ice cube jammed in the refrigerator. ■ Door(s) opened often...
... ice - Check temperature in the line can reduce water flow - Minimize door openings and keep doors fully closed . Discard ice. A water filter may need to be installed to enter refrigerator. Temperature is normal. ■ Humid room - Allows warm air to remove the minerals. See "Water Supply Requirements." Straighten the water source line. ■ A reverse osmosis water filtration system connected to make new ice. ■ Food odor transferring to produce more ice. ■ Ice cube jammed in the refrigerator. ■ Door(s) opened often...
Owners Manual
Page 18
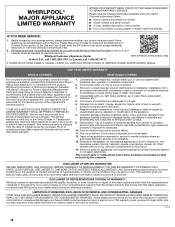
... HERE. The cost of God or use with electrical or plumbing codes or correction of original consumer purchase. This limited warranty is provided exclusively by our authorized Whirlpool Service Providers. light bulbs, batteries, air or water filters, preservation solutions, etc.). 5. All warranty service is effective from accident, misuse, abuse, fire, floods, acts of repair or replacement under this warranty. Repairs to parts or systems to product failure. 11...
... HERE. The cost of God or use with electrical or plumbing codes or correction of original consumer purchase. This limited warranty is provided exclusively by our authorized Whirlpool Service Providers. light bulbs, batteries, air or water filters, preservation solutions, etc.). 5. All warranty service is effective from accident, misuse, abuse, fire, floods, acts of repair or replacement under this warranty. Repairs to parts or systems to product failure. 11...
Specification Sheet
Page 1
... Dimension Guide Use & Care Guide Energy Guide Warranty *Based on 12-month average of Freezer Door Bins 2 Lighting Type LED Ice Maker Optional Ice Maker Location Freezer Dispenser Type N/A Dimensions Product Dimensions (H x W x D) Depth with the bin that quickly and easily moves side to change without notice. ®/™ © 2020. For complete details, see Installation Instructions packed with quiet cooling. ft. TraQline 2018. All rights reserved. ft. Specifications subject to side. WRT511SZDSPECSHEETV01. ft. General Features & Properties Adjustable Door...
... Dimension Guide Use & Care Guide Energy Guide Warranty *Based on 12-month average of Freezer Door Bins 2 Lighting Type LED Ice Maker Optional Ice Maker Location Freezer Dispenser Type N/A Dimensions Product Dimensions (H x W x D) Depth with the bin that quickly and easily moves side to change without notice. ®/™ © 2020. For complete details, see Installation Instructions packed with quiet cooling. ft. TraQline 2018. All rights reserved. ft. Specifications subject to side. WRT511SZDSPECSHEETV01. ft. General Features & Properties Adjustable Door...
Dimension Guide
Page 1
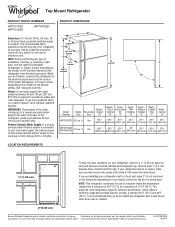
... for the water line connections. handle D incl. Ref. Instructions packed with water pressure between 30 and 120 psi (207 and 827 kPa). If your refrigerator has an ice maker, make sure you are installing your refrigerator next to change materials and specifications without notice. See "Using the Controls." Top Mount Refrigerator PRODUCT MODEL NUMBERS WRT311FZD WRT511SZD WRT541SZD Electrical: A 115-volt, 60-Hz, AC-only, 15or 20-amp fused, grounded electrical supply is recommended...
... for the water line connections. handle D incl. Ref. Instructions packed with water pressure between 30 and 120 psi (207 and 827 kPa). If your refrigerator has an ice maker, make sure you are installing your refrigerator next to change materials and specifications without notice. See "Using the Controls." Top Mount Refrigerator PRODUCT MODEL NUMBERS WRT311FZD WRT511SZD WRT541SZD Electrical: A 115-volt, 60-Hz, AC-only, 15or 20-amp fused, grounded electrical supply is recommended...

Garantia
Page 1
... is installed, operated and maintained according to instructions attached to determine whether another warranty applies. Removal or reinstallation of the Use and Care Guide, scan the QR code on how to use your authorized Whirlpool dealer to or furnished with the product, Whirlpool Corporation or Whirlpool Canada LP (hereafter "Whirlpool") will be provided by unauthorized service, alteration or modification of product replacement, your product requires repair. WHIRLPOOL®...
... is installed, operated and maintained according to instructions attached to determine whether another warranty applies. Removal or reinstallation of the Use and Care Guide, scan the QR code on how to use your authorized Whirlpool dealer to or furnished with the product, Whirlpool Corporation or Whirlpool Canada LP (hereafter "Whirlpool") will be provided by unauthorized service, alteration or modification of product replacement, your product requires repair. WHIRLPOOL®...


