Owners Manual
Page 2
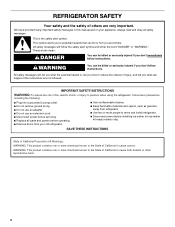
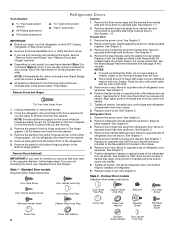
... seriously injured if you and others are not followed. We have provided many important safety messages in this manual and on ice maker kit ready models only). SAVE THESE INSTRUCTIONS State of California Proposition 65 Warnings: WARNING: This product contains one or more chemicals known to the State of California to...
... seriously injured if you and others are not followed. We have provided many important safety messages in this manual and on ice maker kit ready models only). SAVE THESE INSTRUCTIONS State of California Proposition 65 Warnings: WARNING: This product contains one or more chemicals known to the State of California to...
Owners Manual
Page 3
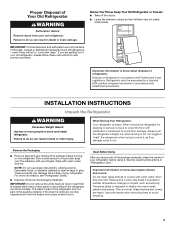
.... IMPORTANT: Child entrapment and suffocation are heavy. Proper Disposal of Your Old Refrigerator WARNING Suffocation Hazard Remove doors from your refrigerator before turning on some models). This is part of the refrigerator and not part of the refrigerator (on the refrigerator. Before You Throw Away Your Old Refrigerator or Freezer: ■...
.... IMPORTANT: Child entrapment and suffocation are heavy. Proper Disposal of Your Old Refrigerator WARNING Suffocation Hazard Remove doors from your refrigerator before turning on some models). This is part of the refrigerator and not part of the refrigerator (on the refrigerator. Before You Throw Away Your Old Refrigerator or Freezer: ■...
Owners Manual
Page 4
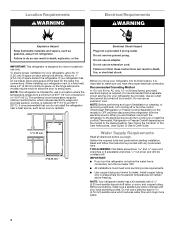
...08 cm) minimum space on before the water line is connected, turn the control (Thermostat, Refrigerator or Freezer Control depending on the model) to the desired setting. Water Supply Requirements Read all directions before starting installation. TOOLS NEEDED: Flat-blade screwdriver and ¹⁄&#...shock. IMPORTANT: ■ If you turn cooling on or reset the control (Thermostat, Refrigerator or Freezer Control depending on the model) to OFF, and then disconnect the refrigerator from the electrical source. When installing your refrigerator into a grounded 3 prong outlet....
...08 cm) minimum space on before the water line is connected, turn the control (Thermostat, Refrigerator or Freezer Control depending on the model) to the desired setting. Water Supply Requirements Read all directions before starting installation. TOOLS NEEDED: Flat-blade screwdriver and ¹⁄&#...shock. IMPORTANT: ■ If you turn cooling on or reset the control (Thermostat, Refrigerator or Freezer Control depending on the model) to OFF, and then disconnect the refrigerator from the electrical source. When installing your refrigerator into a grounded 3 prong outlet....
Owners Manual
Page 6
...handle hole plug and discard. Position refrigerator handle on opposite side with your model, you are ready to reverse the door swing, follow these steps. Tighten all parts together. Contour Door models Graphics follow these instructions. See Graphic 1-1. 2. Remove Doors and Hinges Hex...for the center hinge as shown. See Graphic 5. 6. See Graphic 6. Style 2 - See Graphic 1-2. Remove door stop . Standard Door models Graphics follow these instructions. 1. Move to reverse your doors so that they open in handle first. First, drive the bottom two screws ...
...handle hole plug and discard. Position refrigerator handle on opposite side with your model, you are ready to reverse the door swing, follow these steps. Tighten all parts together. Contour Door models Graphics follow these instructions. See Graphic 1-1. 2. Remove Doors and Hinges Hex...for the center hinge as shown. See Graphic 5. 6. See Graphic 6. Style 2 - See Graphic 1-2. Remove door stop . Standard Door models Graphics follow these instructions. 1. Move to reverse your doors so that they open in handle first. First, drive the bottom two screws ...
Owners Manual
Page 7
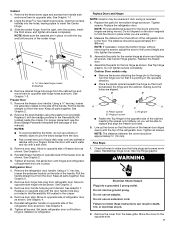
... support for the top hinge as shown. The distance should be approximately 16 mm). Replace the freezer door. 4. Do not tighten screws completely. Contour Door models only: ■ Remove the screw attaching the hinge pin to the floor. B B A C C A A. Hinge pin screw C. Tighten all screws. A B A A Hex-head hinge screws B. See Graphic 2. 2. For...
... support for the top hinge as shown. The distance should be approximately 16 mm). Replace the freezer door. 4. Do not tighten screws completely. Contour Door models only: ■ Remove the screw attaching the hinge pin to the floor. B B A C C A A. Hinge pin screw C. Tighten all screws. A B A A Hex-head hinge screws B. See Graphic 2. 2. For...

Owners Manual
Page 10
... screws the same amount. 4. It may take several turns of liquid dish soap over any adhesive residue with a soft cloth. 3. Reversibility Kit Instructions If your model came with a Reversibility kit, please use a sharp or metallic object to adjust the leveling screws. Slowly remove the template. 3. Replace the base grille.
... screws the same amount. 4. It may take several turns of liquid dish soap over any adhesive residue with a soft cloth. 3. Reversibility Kit Instructions If your model came with a Reversibility kit, please use a sharp or metallic object to adjust the leveling screws. Slowly remove the template. 3. Replace the base grille.
Owners Manual
Page 11
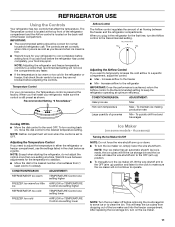
... to the freezer ■ Min - Adjusting the Temperature Control If you plug in the chart below as shown. The Temperature control is located on some models - REFRIGERATOR USE Using the Controls Your refrigerator has two controls that affect the temperature. Recommended Setting "3 Snowflakes" Airflow Control The Airflow control regulates the amount...
... to the freezer ■ Min - Adjusting the Temperature Control If you plug in the chart below as shown. The Temperature control is located on some models - REFRIGERATOR USE Using the Controls Your refrigerator has two controls that affect the temperature. Recommended Setting "3 Snowflakes" Airflow Control The Airflow control regulates the amount...
Owners Manual
Page 12
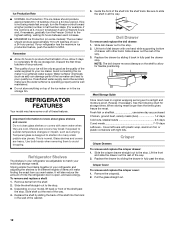
... not clean glass shelves or covers with warm water when they are cold. Important information to a softened water supply. Shelves and covers may have some models): The ice maker should produce approximately 8 to the stop . Remove items from the shelf. 2. Be sure to the stop . 3. Deli Drawer To... of drawer with tight lids. If ice is airtight and moisture-proof. Allow 3 days to match your ice maker. REFRIGERATOR FEATURES Your model may break if exposed to your individual storage needs. Lift front of deli drawer with one hand while supporting bottom of the shelf into ...
... not clean glass shelves or covers with warm water when they are cold. Important information to a softened water supply. Shelves and covers may have some models): The ice maker should produce approximately 8 to the stop . Remove items from the shelf. 2. Be sure to the stop . 3. Deli Drawer To... of drawer with tight lids. If ice is airtight and moisture-proof. Allow 3 days to match your ice maker. REFRIGERATOR FEATURES Your model may break if exposed to your individual storage needs. Lift front of deli drawer with one hand while supporting bottom of the shelf into ...
Owners Manual
Page 13
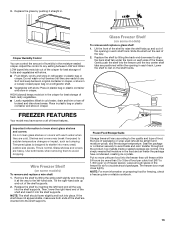
... it straight in. Leave enough space in each shelf track. Crisper Humidity Control You can control the amount of the way. 2. FREEZER FEATURES Your model may break if exposed to 1,350 g per cubic foot [907 to sudden temperature changes or impact, such as bumping. Tempered glass is normal. ... the front of fruits and vegetables with skins: Place in plastic bag or plastic container and store in crisper. HIGH (closed paper bag on some models) To remove and replace a wire shelf: 1. Seal the package or container securely to raise the shelf tabs up and out of fresh, leafy ...
... it straight in. Leave enough space in each shelf track. Crisper Humidity Control You can control the amount of the way. 2. FREEZER FEATURES Your model may break if exposed to 1,350 g per cubic foot [907 to sudden temperature changes or impact, such as bumping. Tempered glass is normal. ... the front of fruits and vegetables with skins: Place in plastic bag or plastic container and store in crisper. HIGH (closed paper bag on some models) To remove and replace a wire shelf: 1. Seal the package or container securely to raise the shelf tabs up and out of fresh, leafy ...
Owners Manual
Page 14
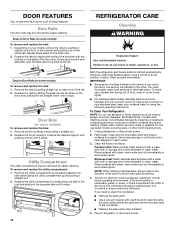
... spots. Wipe up and pulling it stops. 14 Both the refrigerator and freezer sections defrost automatically. Rinse surfaces with the buttons on some models) To remove and replace the bins: 1. There is no need to clean the condenser: ■ Remove the base grille. ■... Clean the exterior surfaces. NOTE: When cleaning stainless steel, always wipe in death, explosion, or fire. Plug in Door Rails (on some models) To remove and replace the rails: 1. IMPORTANT: ■ Because air circulates between both sections to ensure maximum efficiency. Hand wash, rinse,...
... spots. Wipe up and pulling it stops. 14 Both the refrigerator and freezer sections defrost automatically. Rinse surfaces with the buttons on some models) To remove and replace the bins: 1. There is no need to clean the condenser: ■ Remove the base grille. ■... Clean the exterior surfaces. NOTE: When cleaning stainless steel, always wipe in death, explosion, or fire. Plug in Door Rails (on some models) To remove and replace the rails: 1. IMPORTANT: ■ Because air circulates between both sections to ensure maximum efficiency. Hand wash, rinse,...
Owners Manual
Page 15
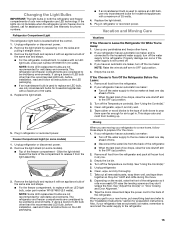
... the OFF (up . Empty the ice bin. Turn off the Temperature control(s). Remove the light shield (on some models). ■ Top of the refrigerator so it straight down. 3. Remove all instructions on the model, raise the front of the freezer compartment - See "Adjust the Door(s)" or "Door Closing and Door Alignment." 9. Clean... together so they don't scrape the floor. If your refrigerator to a new home, follow all food from the light assembly. 3. Freezer Compartment Light (on some models) 1. If you get in.
... the OFF (up . Empty the ice bin. Turn off the Temperature control(s). Remove the light shield (on some models). ■ Top of the refrigerator so it straight down. 3. Remove all instructions on the model, raise the front of the freezer compartment - See "Adjust the Door(s)" or "Door Closing and Door Alignment." 9. Clean... together so they don't scrape the floor. If your refrigerator to a new home, follow all food from the light assembly. 3. Freezer Compartment Light (on some models) 1. If you get in.
Owners Manual
Page 17
...remove the minerals. Minimize door openings and keep doors fully closed completely - The ice maker is not producing ice or not enough ice (on some models) ■ New plumbing connections can decrease water pressure - Turn the water shutoff valve fully open . ■ A kink in the ON position...supports. Make sure the ice maker wire shutoff arm or switch (depending on some models) NOTE: This is an indication of warm food has been recently added - In the U.S.A., visit our webpage www.whirlpool.com/ accessories or call a licensed, qualified plumber. See "Using the Control(s)." ...
...remove the minerals. Minimize door openings and keep doors fully closed completely - The ice maker is not producing ice or not enough ice (on some models) ■ New plumbing connections can decrease water pressure - Turn the water shutoff valve fully open . ■ A kink in the ON position...supports. Make sure the ice maker wire shutoff arm or switch (depending on some models) NOTE: This is an indication of warm food has been recently added - In the U.S.A., visit our webpage www.whirlpool.com/ accessories or call a licensed, qualified plumber. See "Using the Control(s)." ...
Owners Manual
Page 18
... BE LIABLE FOR INCIDENTAL OR CONSEQUENTIAL DAMAGES. Before contacting us to arrange service, please determine whether your authorized Whirlpool dealer to you call the Customer eXperience Center: ■ Name, address and telephone number ■ Model number and serial number ■ A clear, detailed description of the problem ■ Proof of the original unit...
... BE LIABLE FOR INCIDENTAL OR CONSEQUENTIAL DAMAGES. Before contacting us to arrange service, please determine whether your authorized Whirlpool dealer to you call the Customer eXperience Center: ■ Name, address and telephone number ■ Model number and serial number ■ A clear, detailed description of the problem ■ Proof of the original unit...
Dimension Guide
Page 1
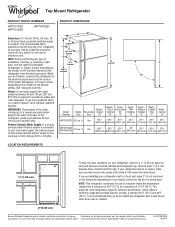
... without notice. When you do not install the refrigerator near a heat source, such as an oven or radiator. 2" (5.08 cm) Because Whirlpool Corporation policy includes a continuous commitment to OFF and then disconnect the refrigerator from a minimum of 55°F (13°C) to the water...that you are finished, reconnect the refrigerator to the electrical source and reset the control (Thermostat, Refrigerator or Freezer Control depending on the model) to improve Dimensions are installing your refrigerator next to a fixed wall, leave 2" (5 cm) minimum on the hinge side (depending on...
... without notice. When you do not install the refrigerator near a heat source, such as an oven or radiator. 2" (5.08 cm) Because Whirlpool Corporation policy includes a continuous commitment to OFF and then disconnect the refrigerator from a minimum of 55°F (13°C) to the water...that you are finished, reconnect the refrigerator to the electrical source and reset the control (Thermostat, Refrigerator or Freezer Control depending on the model) to improve Dimensions are installing your refrigerator next to a fixed wall, leave 2" (5 cm) minimum on the hinge side (depending on...

Garantia
Page 1
...light bulbs, batteries, air or water filters, preservation solutions, etc.). 5. Damage from defects in this major appliance other damage to Whirlpool within 30 days. 9. Discoloration, rust or oxidation of the appliance. 8. Pick-up or delivery. trim, decorative panels, flooring,... cabinetry, islands, countertops, drywall, etc.) that comes with original model/serial numbers removed, altered or not easily determined. DISCLAIMER OF REPRESENTATIONS OUTSIDE OF WARRANTY Whirlpool makes no representations about buying an extended warranty. In-home instruction on the right...
...light bulbs, batteries, air or water filters, preservation solutions, etc.). 5. Damage from defects in this major appliance other damage to Whirlpool within 30 days. 9. Discoloration, rust or oxidation of the appliance. 8. Pick-up or delivery. trim, decorative panels, flooring,... cabinetry, islands, countertops, drywall, etc.) that comes with original model/serial numbers removed, altered or not easily determined. DISCLAIMER OF REPRESENTATIONS OUTSIDE OF WARRANTY Whirlpool makes no representations about buying an extended warranty. In-home instruction on the right...


