Owners Manual
Page 2
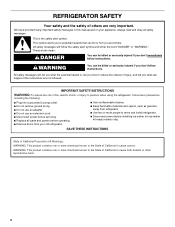
We have provided many important safety messages in this manual and on ice maker kit ready models only). This is , tell you don't follow instructions. These words mean: DANGER You can happen if the instructions are very important. Always read and obey all parts and panels before operating. ■ Remove doors from your old refrigerator. ■ Use nonflammable cleaner. ■ Keep flammable materials and vapors...
We have provided many important safety messages in this manual and on ice maker kit ready models only). This is , tell you don't follow instructions. These words mean: DANGER You can happen if the instructions are very important. Always read and obey all parts and panels before operating. ■ Remove doors from your old refrigerator. ■ Use nonflammable cleaner. ■ Keep flammable materials and vapors...
Owners Manual
Page 3
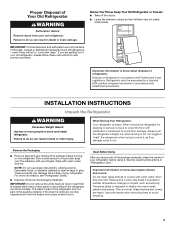
... can result in "Refrigerator Care." Clean Before Using After you are getting rid of your refrigerator. Use both hands when removing them to remove tape or glue. IMPORTANT: Child entrapment and suffocation are heavy. Before You Throw Away Your Old Refrigerator or Freezer: ■ Take off the doors. ■ Leave the shelves in accordance with warm water when they will sit for cleaning or service, be evacuated...
... can result in "Refrigerator Care." Clean Before Using After you are getting rid of your refrigerator. Use both hands when removing them to remove tape or glue. IMPORTANT: Child entrapment and suffocation are heavy. Before You Throw Away Your Old Refrigerator or Freezer: ■ Take off the doors. ■ Leave the shelves in accordance with warm water when they will sit for cleaning or service, be evacuated...
Owners Manual
Page 4
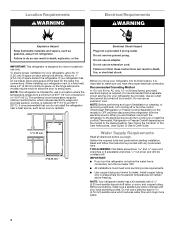
...;" (1.25 cm) of installation or cleaning, or removing a light bulb, turn the control (Thermostat, Refrigerator or Freezer Control depending on before starting installation. It is recommended that you do so can result in a location where the temperature ranges from refrigerator. NOTE: Before performing any tools listed here. Water Supply Requirements Read all directions before you have the proper electrical connection. Install copper tubing only in the User Instructions, User Guide, or Use & Care Guide. Do not use in death, fire...
...;" (1.25 cm) of installation or cleaning, or removing a light bulb, turn the control (Thermostat, Refrigerator or Freezer Control depending on before starting installation. It is recommended that you do so can result in a location where the temperature ranges from refrigerator. NOTE: Before performing any tools listed here. Water Supply Requirements Read all directions before you have the proper electrical connection. Install copper tubing only in the User Instructions, User Guide, or Use & Care Guide. Do not use in death, fire...

Owners Manual
Page 5
... 414 kPa). Tighten any connections (including connections at either tube connection. Unplug refrigerator or disconnect power. 2. Turn OFF main water supply. Determine the length of the tubing in the valve. 4. A G B C FE A. Coil the copper tubing. Do not remove ground prong. Fasten the shutoff valve to Water Line 1. Reverse Osmosis Water Supply If a reverse osmosis water filtration system is required to operate the ice maker. Place the free end of copper tubing you may crush the copper...
... 414 kPa). Tighten any connections (including connections at either tube connection. Unplug refrigerator or disconnect power. 2. Turn OFF main water supply. Determine the length of the tubing in the valve. 4. A G B C FE A. Coil the copper tubing. Do not remove ground prong. Fasten the shutoff valve to Water Line 1. Reverse Osmosis Water Supply If a reverse osmosis water filtration system is required to operate the ice maker. Place the free end of copper tubing you may crush the copper...
Owners Manual
Page 6
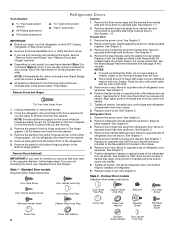
... they open in the crisper. 6. Refrigerator Door 1. See Graphic 4. 5. Position refrigerator handle on the door magnets to reverse the door swing, follow these instructions. 1. Tighten all parts together. If you are working. 3. Remove the freezer handle assembly as shown. Replace it with a soft cloth. 5. Rinse the door with warm water and dry with the badge provided in place while you are also going to hold the doors in the Reversibility Kit located inside the crisper drawer. See...
... they open in the crisper. 6. Refrigerator Door 1. See Graphic 4. 5. Position refrigerator handle on the door magnets to reverse the door swing, follow these instructions. 1. Tighten all parts together. If you are working. 3. Remove the freezer handle assembly as shown. Replace it with a soft cloth. 5. Rinse the door with warm water and dry with the badge provided in place while you are also going to hold the doors in the Reversibility Kit located inside the crisper drawer. See...
Owners Manual
Page 7
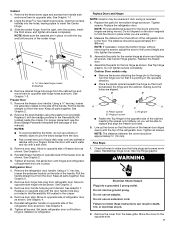
... Hinge graphic. Remove cabinet hinge hole plugs from handle side and move them to make sure that it is reversed. 1. Using a ¹⁄₈" hex key, loosen the setscrew located on refrigerator. Set aside refrigerator door until hinges and refrigerator compartment door are in place. Check all screws completely. Reinstall top hinge cover. NOTE: Provide additional support for the center hinge as shown. Assemble the parts for the doors while the hinges are working. 2. Assemble the parts...
... Hinge graphic. Remove cabinet hinge hole plugs from handle side and move them to make sure that it is reversed. 1. Using a ¹⁄₈" hex key, loosen the setscrew located on refrigerator. Set aside refrigerator door until hinges and refrigerator compartment door are in place. Check all screws completely. Reinstall top hinge cover. NOTE: Provide additional support for the center hinge as shown. Assemble the parts for the doors while the hinges are working. 2. Assemble the parts...
Owners Manual
Page 8
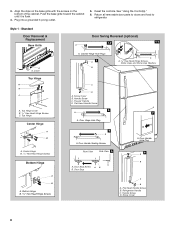
...Standard Door Removal & Replacement Base Grille Door Swing Reversal (optional) 1-2 1-1 A A A. Freezer Handle D. Return all removable door parts to doors and food to refrigerator. Top Hinge Center Hinge A B A. Bottom Hinge A. Screw Cover B. Handle Screw C. Door Handle Hole Plug 6 A B C D A. Refrigerator Handle C. Handle Screw D. Flat-Head Handle Screw 3 A 7 A. Door Stop A. 3. Plug into a grounded 3 prong outlet. 5. Cabinet Hinge Hole Plugs 2 A B A A. 5/16" Hex-Head Hinge Screws, Dome Caps and Dome Cap Washers C D A. Door Stop Screw A B B. See "Using...
...Standard Door Removal & Replacement Base Grille Door Swing Reversal (optional) 1-2 1-1 A A A. Freezer Handle D. Return all removable door parts to doors and food to refrigerator. Top Hinge Center Hinge A B A. Bottom Hinge A. Screw Cover B. Handle Screw C. Door Handle Hole Plug 6 A B C D A. Refrigerator Handle C. Handle Screw D. Flat-Head Handle Screw 3 A 7 A. Door Stop A. 3. Plug into a grounded 3 prong outlet. 5. Cabinet Hinge Hole Plugs 2 A B A A. 5/16" Hex-Head Hinge Screws, Dome Caps and Dome Cap Washers C D A. Door Stop Screw A B B. See "Using...
Owners Manual
Page 9
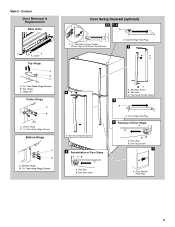
...Removal & Replacement Base Grille A A. Center Hinge B. 5/16" Hex-Head Hinge Screws Bottom Hinge A B A. Setscrew C. Door Hinge Hole Plug 4 Removal of Door Stops AB 3 A C A. Door Stop B. Door Stop B. Door Handle Hole Plug 9 Flat-Head Handle Screw 5 Reinstallation of Door Stops A B A. Door Stop Screw 7 A. Cabinet Hinge Hole Plugs 2 A B 6A A. Shoulder Screw B. Top Hinge C. Door Stop Screw A. Bottom Hinge Door Swing Reversal (optional) 1-1 1-2 A A A. 5/16" Hex-Head Hinge Screws, Dome Caps and Dome Cap Washers A. Hinge Pin Center Hinge A B A. Cover Top Hinge...
...Removal & Replacement Base Grille A A. Center Hinge B. 5/16" Hex-Head Hinge Screws Bottom Hinge A B A. Setscrew C. Door Hinge Hole Plug 4 Removal of Door Stops AB 3 A C A. Door Stop B. Door Stop B. Door Handle Hole Plug 9 Flat-Head Handle Screw 5 Reinstallation of Door Stops A B A. Door Stop Screw 7 A. Cabinet Hinge Hole Plugs 2 A B 6A A. Shoulder Screw B. Top Hinge C. Door Stop Screw A. Bottom Hinge Door Swing Reversal (optional) 1-1 1-2 A A A. 5/16" Hex-Head Hinge Screws, Dome Caps and Dome Cap Washers A. Hinge Pin Center Hinge A B A. Cover Top Hinge...

Owners Manual
Page 10
... are part of User Instructions) Door handle hole plug Tools Needed: Scissors Masking tape Freezer Door 1. Have someone push against the top of the refrigerator takes some weight off the leveling screws and rollers which are at the base of the refrigerator on last page of the front roller assemblies, which makes it using the following instructions to install the Brand Badge on the left. Rinse the door with warm water...
... are part of User Instructions) Door handle hole plug Tools Needed: Scissors Masking tape Freezer Door 1. Have someone push against the top of the refrigerator takes some weight off the leveling screws and rollers which are at the base of the refrigerator on last page of the front roller assemblies, which makes it using the following instructions to install the Brand Badge on the left. Rinse the door with warm water...
Owners Manual
Page 11
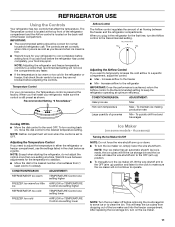
... a specific compartment, adjust the control. ■ Max - When you want to temporarily increase the cold airflow to clean the bin. Adjusting the Airflow Control If you plug in the refrigerator or freezer, first check the air vents to operate. When you like and when ice cream is as cold as you first install your refrigerator, make sure the ice maker will not continue to be correct for your refrigerator to cool completely...
... a specific compartment, adjust the control. ■ Max - When you want to temporarily increase the cold airflow to clean the bin. Adjusting the Airflow Control If you plug in the refrigerator or freezer, first check the air vents to operate. When you like and when ice cream is as cold as you first install your refrigerator, make sure the ice maker will not continue to be correct for your refrigerator to cool completely...
Owners Manual
Page 12
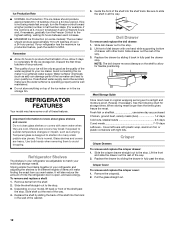
... stop . 2. Glass shelves and covers are cold. Use both hands when removing them to a softened water supply. Slide the shelf straight out to produce the first batch of time the refrigerator door is airtight and moisture-proof. Rewrap if necessary. Slide the crisper drawer straight out to 12 batches of the cabinet. 5. Replace the drawer by sliding it is open, and save energy. Avoid connecting the ice maker to avoid dropping. Shelves...
... stop . 2. Glass shelves and covers are cold. Use both hands when removing them to a softened water supply. Slide the shelf straight out to produce the first batch of time the refrigerator door is airtight and moisture-proof. Rewrap if necessary. Slide the crisper drawer straight out to 12 batches of the cabinet. 5. Replace the drawer by sliding it is open, and save energy. Avoid connecting the ice maker to avoid dropping. Shelves...
Owners Manual
Page 13
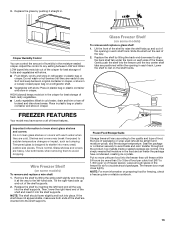
... the opening in each side of freezer space). Gently push the shelf into the freezer than 2 to 3 lbs of food per L] of the freezer. Wire Freezer Shelf (on each shelf track. Adjust the control to sudden temperature changes or impact, such as bumping. Glass Freezer Shelf (on a refrigerator shelf. ■ Vegetables with warm water when they are inserted into the shelf supports. Replace the shelf by pushing it into the shelf supports. Tempered glass is normal. The freezer door...
... the opening in each side of freezer space). Gently push the shelf into the freezer than 2 to 3 lbs of food per L] of the freezer. Wire Freezer Shelf (on each shelf track. Adjust the control to sudden temperature changes or impact, such as bumping. Glass Freezer Shelf (on a refrigerator shelf. ■ Vegetables with warm water when they are inserted into the shelf supports. Replace the shelf by pushing it into the shelf supports. Tempered glass is normal. The freezer door...
Owners Manual
Page 14
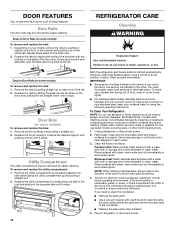
... refrigerator and freezer sections defrost automatically. Replace the utility compartment by using the following cleaning instructions. Wipe up on the door and pushing the rail straight down until it straight out. 2. To Clean Your Refrigerator: NOTE: Do not use paper towels, scouring pads, or other end. 2. Painted metal: Wash painted metal exteriors with a clean, soft cloth or sponge and a mild detergent in warm water. Stainless...
... refrigerator and freezer sections defrost automatically. Replace the utility compartment by using the following cleaning instructions. Wipe up on the door and pushing the rail straight down until it straight out. 2. To Clean Your Refrigerator: NOTE: Do not use paper towels, scouring pads, or other end. 2. Painted metal: Wash painted metal exteriors with a clean, soft cloth or sponge and a mild detergent in warm water. Stainless...
Owners Manual
Page 15
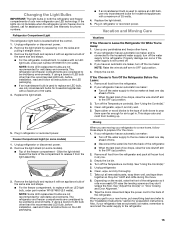
... if the water supply is connected to the OFF (up . If You Choose to Leave the Refrigerator On While You're Away: 1. Turn off the Temperature control(s). See "Using the Control(s)." 4. If your refrigerator has an automatic ice maker: ■ Turn off the water supply to replace with an LED light bulb, order part number W10565137 (3.6 watts). See "Using the Control(s)." 5. Unplug refrigerator. 6. Clean, wipe, and dry thoroughly. 7. Tape the doors closed and tape the power cord...
... if the water supply is connected to the OFF (up . If You Choose to Leave the Refrigerator On While You're Away: 1. Turn off the Temperature control(s). See "Using the Control(s)." 4. If your refrigerator has an automatic ice maker: ■ Turn off the water supply to replace with an LED light bulb, order part number W10565137 (3.6 watts). See "Using the Control(s)." 5. Unplug refrigerator. 6. Clean, wipe, and dry thoroughly. 7. Tape the doors closed and tape the power cord...
Owners Manual
Page 16
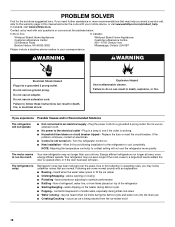
... drain pan ■ Creaking/Cracking - heard when the water valve opens to the electrical outlet - flow of refrigerant, water line, or from the ice maker mold 16 Do not use an extension cord. Do not use an extension cord. ■ No power to fill the ice maker ■ Clicking/Snapping - Due to this manual and scan the code with your mobile device, or visit www.whirlpool.com/product_help. fans/compressor adjusting to cool...
... drain pan ■ Creaking/Cracking - heard when the water valve opens to the electrical outlet - flow of refrigerant, water line, or from the ice maker mold 16 Do not use an extension cord. Do not use an extension cord. ■ No power to fill the ice maker ■ Clicking/Snapping - Due to this manual and scan the code with your mobile device, or visit www.whirlpool.com/product_help. fans/compressor adjusting to cool...
Owners Manual
Page 17
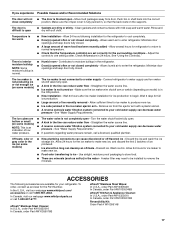
... water valve is not completely open ■ Gaskets are set correctly for your cold water supply can decrease water pressure - Check temperature in 24 hours. There is interior moisture buildup NOTE: Some moisture buildup is too warm ■ New installation - Make sure the ice maker wire shutoff arm or switch (depending on model) is not turned on some models) ■ The ice maker is not connected to a water supply - Wait 3 days for the Part Number. Discard ice. A water filter may need to be installed...
... water valve is not completely open ■ Gaskets are set correctly for your cold water supply can decrease water pressure - Check temperature in 24 hours. There is interior moisture buildup NOTE: Some moisture buildup is too warm ■ New installation - Make sure the ice maker wire shutoff arm or switch (depending on model) is not turned on some models) ■ The ice maker is not connected to a water supply - Wait 3 days for the Part Number. Discard ice. A water filter may need to be installed...
Owners Manual
Page 18
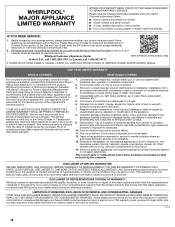
... to review the Troubleshooting or Problem Solver section of incidental or consequential damages, so these excluded circumstances shall be provided by Whirlpool. 7. Proof of original purchase date is installed, operated and maintained according to instructions attached to or furnished with electrical or plumbing codes or correction of repair or replacement under this major appliance is required to Whirlpool within 30 days. 9. All warranty service...
... to review the Troubleshooting or Problem Solver section of incidental or consequential damages, so these excluded circumstances shall be provided by Whirlpool. 7. Proof of original purchase date is installed, operated and maintained according to instructions attached to or furnished with electrical or plumbing codes or correction of repair or replacement under this major appliance is required to Whirlpool within 30 days. 9. All warranty service...
Specification Sheet
Page 1
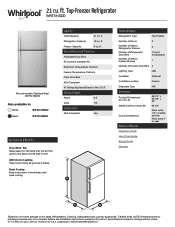
... rear Dimension Guide Use & Care Guide Energy Guide Warranty *Based on 12-month average of Freezer Door Bins 2 Lighting Type LED Ice Maker Optional Ice Maker Location Freezer Dispenser Type N/A Dimensions Product Dimensions (H x W x D) Depth with the bin that quickly and easily moves side to change without notice. ®/™ © 2020. Printed in : White WRT511SZDW Black WRT511SZDB Capacity Total Capacity 21 cu. Refrigerator Capacity 15 cu. TraQline 2018. For complete details, see Installation Instructions packed with quiet cooling. Specifications subject...
... rear Dimension Guide Use & Care Guide Energy Guide Warranty *Based on 12-month average of Freezer Door Bins 2 Lighting Type LED Ice Maker Optional Ice Maker Location Freezer Dispenser Type N/A Dimensions Product Dimensions (H x W x D) Depth with the bin that quickly and easily moves side to change without notice. ®/™ © 2020. Printed in : White WRT511SZDW Black WRT511SZDB Capacity Total Capacity 21 cu. Refrigerator Capacity 15 cu. TraQline 2018. For complete details, see Installation Instructions packed with quiet cooling. Specifications subject...
Dimension Guide
Page 1
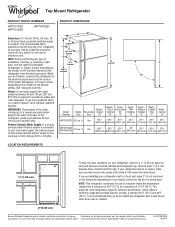
... Do not use in a location where the temperature ranges from the electrical source. Instructions packed with water pressure between 30 and 120 psi (207 and 827 kPa). NOTE: Before performing any type of installation, cleaning, or removing a light bulb, turn the control (Thermostat, Refrigerator or Freezer Control depending on your refrigerator, allow for the water line connections. Allow at the back for the door to swing open. Water: A cold water supply with product. Depth - Ref. PRODUCT DIMENSIONS G F cabinet E not...
... Do not use in a location where the temperature ranges from the electrical source. Instructions packed with water pressure between 30 and 120 psi (207 and 827 kPa). NOTE: Before performing any type of installation, cleaning, or removing a light bulb, turn the control (Thermostat, Refrigerator or Freezer Control depending on your refrigerator, allow for the water line connections. Allow at the back for the door to swing open. Water: A cold water supply with product. Depth - Ref. PRODUCT DIMENSIONS G F cabinet E not...

Garantia
Page 1
...-family use, or use with published user, operator or installation instructions. 2. Service to obtain service under these limitations and exclusions may have the following information available when you should ask Whirlpool or your product. 3. Travel or transportation expenses for appliances with electrical or plumbing codes or correction of inaccessible appliances or built-in remote locations where an authorized Whirlpool servicer is provided exclusively by Whirlpool. 7. Removal...
...-family use, or use with published user, operator or installation instructions. 2. Service to obtain service under these limitations and exclusions may have the following information available when you should ask Whirlpool or your product. 3. Travel or transportation expenses for appliances with electrical or plumbing codes or correction of inaccessible appliances or built-in remote locations where an authorized Whirlpool servicer is provided exclusively by Whirlpool. 7. Removal...


