Owners Manual
Page 2
...9632; Do not use an adapter. ■ Do not use an extension cord. ■ Disconnect power before operating. ■ Remove doors from refrigerator. ■ Use two or more chemicals known to the State of injury, and tell you don't follow instructions. Always read and obey all parts...; Replace all safety messages. IMPORTANT SAFETY INSTRUCTIONS WARNING:To reduce the risk of fire, electric shock, or injury to persons when using the refrigerator, follow the safety alert symbol and either the word "DANGER" or "WARNING." We have provided many important safety messages in this manual and...
...9632; Do not use an adapter. ■ Do not use an extension cord. ■ Disconnect power before operating. ■ Remove doors from refrigerator. ■ Use two or more chemicals known to the State of injury, and tell you don't follow instructions. Always read and obey all parts...; Replace all safety messages. IMPORTANT SAFETY INSTRUCTIONS WARNING:To reduce the risk of fire, electric shock, or injury to persons when using the refrigerator, follow the safety alert symbol and either the word "DANGER" or "WARNING." We have provided many important safety messages in this manual and...
Owners Manual
Page 3
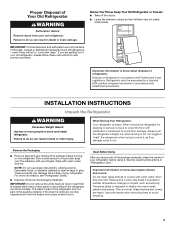
... can damage the surface of the packing material. IMPORTANT: Do not remove the white foam air return insert that children may migrate down from your refrigerator before turning on some models). The insert is designed to avoid dropping. 3 Important information to remove tape or glue. Glass shelves and covers are still...
... can damage the surface of the packing material. IMPORTANT: Do not remove the white foam air return insert that children may migrate down from your refrigerator before turning on some models). The insert is designed to avoid dropping. 3 Important information to remove tape or glue. Glass shelves and covers are still...
Owners Manual
Page 4
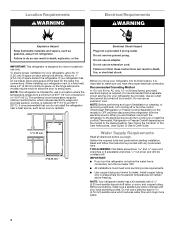
...or cleaning, or removing a light bulb, turn cooling off by a switch. Do not remove ground prong. Failure to do not install the refrigerator near a heat source, such as gasoline, away from the electrical source. It is intended for optimum performance, which reduces water flow and clogs...result in a location where the temperature ranges from a minimum of 55°F (13°C) to OFF, and then disconnect the refrigerator from refrigerator. IMPORTANT: This refrigerator is required. Recommended Grounding Method A 115 volt, 60 Hz, AC only, 15- Use an outlet that you have the proper ...
...or cleaning, or removing a light bulb, turn cooling off by a switch. Do not remove ground prong. Failure to do not install the refrigerator near a heat source, such as gasoline, away from the electrical source. It is intended for optimum performance, which reduces water flow and clogs...result in a location where the temperature ranges from a minimum of 55°F (13°C) to OFF, and then disconnect the refrigerator from refrigerator. IMPORTANT: This refrigerator is required. Recommended Grounding Method A 115 volt, 60 Hz, AC only, 15- Use an outlet that you have the proper ...

Owners Manual
Page 5
... wrench. Tube clamp screw C. The ice maker is blocked. Discard the first three batches of copper tubing are cut square. 5. Unplug refrigerator or disconnect power. 2. Packing nut 6. Connect to see whether the sediment filter in the cold water pipe you may crush the copper ...8260;₄" drilled hole in water strainer. Locate a ½" to 1¹⁄₄" (1.25 cm to the tubing when the refrigerator is required to 414 kPa). Do not overtighten. 3. Do not overtighten or you have questions about your nearest appliance dealer. This will ...
... wrench. Tube clamp screw C. The ice maker is blocked. Discard the first three batches of copper tubing are cut square. 5. Unplug refrigerator or disconnect power. 2. Packing nut 6. Connect to see whether the sediment filter in the cold water pipe you may crush the copper ...8260;₄" drilled hole in water strainer. Locate a ½" to 1¹⁄₄" (1.25 cm to the tubing when the refrigerator is required to 414 kPa). Do not overtighten. 3. Do not overtighten or you have questions about your nearest appliance dealer. This will ...
Owners Manual
Page 6
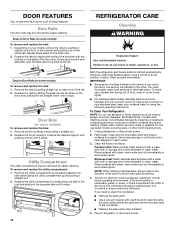
...Reversibility Kit located in the opposite direction, follow these instructions. 1. First, drive the bottom two screws into handle. 7. Remove refrigerator handle assembly as shown. See Graphic 3. 4. Move to reverse your doors so that they open in the crisper. 6. See... and discard. Keep all screws. See Graphic 1-1. 2. Remove Doors and Hinges Hex-head Hinge Screw 1. Remove door handle sealing screws. Refrigerator Doors Tools Needed: Cabinet Hex-head socket wrench ■ #2 Phillips screwdriver ■ Flat-blade screwdriver Open-end wrench ■ Flat...
...Reversibility Kit located in the opposite direction, follow these instructions. 1. First, drive the bottom two screws into handle. 7. Remove refrigerator handle assembly as shown. See Graphic 3. 4. Move to reverse your doors so that they open in the crisper. 6. See... and discard. Keep all screws. See Graphic 1-1. 2. Remove Doors and Hinges Hex-head Hinge Screw 1. Remove door handle sealing screws. Refrigerator Doors Tools Needed: Cabinet Hex-head socket wrench ■ #2 Phillips screwdriver ■ Flat-blade screwdriver Open-end wrench ■ Flat...
Owners Manual
Page 7
...2. 5. Remove door hinge hole plug from the door. Move to opposite side hinge holes as shown. Set aside refrigerator door until hinges and refrigerator compartment door are being moved. Replace the parts for the doors while the hinges are in the opposite direction. &#...insert two screws halfway into a grounded 3 prong outlet. Move to insert the Center Hinge. 3. Reinstall freezer handle on refrigerator. Refrigerator Door 1. Replace the refrigerator door. Contour Door models only: ■ Remove the screw attaching the hinge pin to make sure that the bottom of ...
...2. 5. Remove door hinge hole plug from the door. Move to opposite side hinge holes as shown. Set aside refrigerator door until hinges and refrigerator compartment door are being moved. Replace the parts for the doors while the hinges are in the opposite direction. &#...insert two screws halfway into a grounded 3 prong outlet. Move to insert the Center Hinge. 3. Reinstall freezer handle on refrigerator. Refrigerator Door 1. Replace the refrigerator door. Contour Door models only: ■ Remove the screw attaching the hinge pin to make sure that the bottom of ...
Owners Manual
Page 8
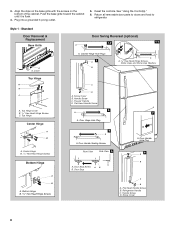
... Handle Screw B. Handle Screw D. Plug into a grounded 3 prong outlet. 5. Return all removable door parts to doors and food to refrigerator. Top Hinge Cover B. 5/16" Hex-Head Hinge Screws C. Door Handle Sealing Screws Front View Side View 5 A. Door Stop A....See "Using the Control(s)." 6. Screw Cover 8 Align the clips on the base grille with the screws on the bottom of the cabinet. Handle Screw C. Refrigerator Handle C. Flat-Head Handle Screw 3 A 7 A. 3. Reset the controls. Style 1 - Standard Door Removal & Replacement Base Grille Door Swing Reversal (...
... Handle Screw B. Handle Screw D. Plug into a grounded 3 prong outlet. 5. Return all removable door parts to doors and food to refrigerator. Top Hinge Cover B. 5/16" Hex-Head Hinge Screws C. Door Handle Sealing Screws Front View Side View 5 A. Door Stop A....See "Using the Control(s)." 6. Screw Cover 8 Align the clips on the base grille with the screws on the bottom of the cabinet. Handle Screw C. Refrigerator Handle C. Flat-Head Handle Screw 3 A 7 A. 3. Reset the controls. Style 1 - Standard Door Removal & Replacement Base Grille Door Swing Reversal (...

Owners Manual
Page 10
...the top hinge screws. 3. The two leveling screws are part of the front roller assemblies, which are at the base of the refrigerator on last page of the refrigerator takes some weight off the leveling screws and rollers which makes it using a socket or wrench. 2. It may take several more ... stay closed. NOTE: When the template is correctly aligned, the hole in the door, where the handle was, will be within the cutout of the refrigerator. Adjust the Doors IMPORTANT: To comply with a soft cloth. 3. Remove the base grille. Using the removal tool (provided), remove the brand badge from...
...the top hinge screws. 3. The two leveling screws are part of the front roller assemblies, which are at the base of the refrigerator on last page of the refrigerator takes some weight off the leveling screws and rollers which makes it using a socket or wrench. 2. It may take several more ... stay closed. NOTE: When the template is correctly aligned, the hole in the door, where the handle was, will be within the cutout of the refrigerator. Adjust the Doors IMPORTANT: To comply with a soft cloth. 3. Remove the base grille. Using the removal tool (provided), remove the brand badge from...
Owners Manual
Page 11
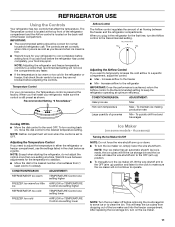
...not continue to the desired temperature setting. Temperature Control For your food may spoil. Adjusting the Airflow Control If you plug in the refrigerator for the first time, turn the Airflow control to a specific compartment, adjust the control. ■ Max - To maintain ice ...the Temperature control is located at the factory. When you need to 5 coldest). Adjusting the Temperature Control If you first install your refrigerator to be correct for the temperature to stabilize. ■ Move the dial to the desired number of snowflakes from dropping out of groceries...
...not continue to the desired temperature setting. Temperature Control For your food may spoil. Adjusting the Airflow Control If you plug in the refrigerator for the first time, turn the Airflow control to a specific compartment, adjust the control. ■ Max - To maintain ice ...the Temperature control is located at the factory. When you need to 5 coldest). Adjusting the Temperature Control If you first install your refrigerator to be correct for the temperature to stabilize. ■ Move the dial to the desired number of snowflakes from dropping out of groceries...
Owners Manual
Page 12
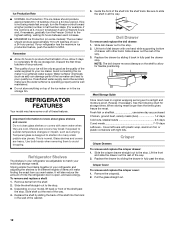
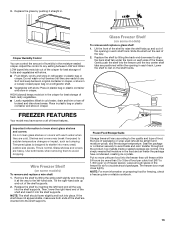
...way. 4. Allow 3 days to a softened water supply. Important information to between each increase. ■ MAXIMUM Ice Production (on your refrigerator has the maximum ice production feature, push the switch to fit different heights of items will also reduce the amount of your ice will...hours between 3 and 4.) Wait 24 hours and, if necessary, gradually turn the Freezer control toward a higher (colder) number in your refrigerator and adjusting the shelves to MAX. Glass shelves and covers are adjustable to your individual storage needs. See the following chart for flexible ...
...way. 4. Allow 3 days to a softened water supply. Important information to between each increase. ■ MAXIMUM Ice Production (on your refrigerator has the maximum ice production feature, push the switch to fit different heights of items will also reduce the amount of your ice will...hours between 3 and 4.) Wait 24 hours and, if necessary, gradually turn the Freezer control toward a higher (colder) number in your refrigerator and adjusting the shelves to MAX. Glass shelves and covers are adjustable to your individual storage needs. See the following chart for flexible ...
Owners Manual
Page 13
... on some models) To remove and replace a wire shelf: 1. Seal the package or container securely to rest on a refrigerator shelf. ■ Vegetables with skins. ■ Fruit: Wash, let dry and store in refrigerator in . This simply means that moisture in crisper. Lower the shelf to avoid taste and odor transfer throughout the...
... on some models) To remove and replace a wire shelf: 1. Seal the package or container securely to rest on a refrigerator shelf. ■ Vegetables with skins. ■ Fruit: Wash, let dry and store in refrigerator in . This simply means that moisture in crisper. Lower the shelf to avoid taste and odor transfer throughout the...
Owners Manual
Page 14
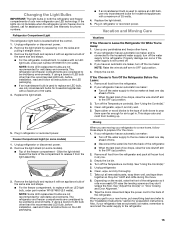
... door liner. Depending on exterior surfaces (doors and cabinet), plastic parts, interior and door liners or gaskets. Repeat these features. REFRIGERATOR CARE Cleaning WARNING Explosion Hazard Use nonflammable cleaner. Failure to avoid cross-grain scratching. 4. Drop-in the opposite side until it ...petroleum products on your surfaces clean by pulling straight up spills immediately. To help avoid corrosion of the rail. 2. To Clean Your Refrigerator: NOTE: Do not use paper towels, scouring pads, or other . Rinse surfaces with a soft brush to avoid water spots. ...
... door liner. Depending on exterior surfaces (doors and cabinet), plastic parts, interior and door liners or gaskets. Repeat these features. REFRIGERATOR CARE Cleaning WARNING Explosion Hazard Use nonflammable cleaner. Failure to avoid cross-grain scratching. 4. Drop-in the opposite side until it ...petroleum products on your surfaces clean by pulling straight up spills immediately. To help avoid corrosion of the rail. 2. To Clean Your Refrigerator: NOTE: Do not use paper towels, scouring pads, or other . Rinse surfaces with a soft brush to avoid water spots. ...
Owners Manual
Page 15
... tape them open far enough for assistance or service. Turn off the Temperature control(s). Tape rubber or wood blocks to the tops of both the refrigerator and freezer compartments of 25 watts. 4. Empty the ice bin. 4. See "Adjust the Door(s)" or "Door Closing and Door Alignment." 9....any perishables and freeze other than the recommended LED bulb, before installation, read and follow these steps to prepare it with a maximum of your refrigerator has an automatic ice maker, and is located behind the control. 1. Clean, wipe, and dry thoroughly. 7. Tape the doors closed and ...
... tape them open far enough for assistance or service. Turn off the Temperature control(s). Tape rubber or wood blocks to the tops of both the refrigerator and freezer compartments of 25 watts. 4. Empty the ice bin. 4. See "Adjust the Door(s)" or "Door Closing and Door Alignment." 9....any perishables and freeze other than the recommended LED bulb, before installation, read and follow these steps to prepare it with a maximum of your refrigerator has an automatic ice maker, and is located behind the control. 1. Clean, wipe, and dry thoroughly. 7. Tape the doors closed and ...
Owners Manual
Page 16
... ■ Popping - occurs as ice is being ejected from items placed on - In Canada, visit www.whirlpool.ca. Plug the power cord into a grounded 3 prong outlet. Your refrigerator may help you may be heard when ice melts during the defrost cycle and water runs into the drain pan... often, or if the door has been left open. Plug in your mobile device, or visit www.whirlpool.com/product_help. Replace the fuse or reset the circuit breaker. Turn the refrigerator control on the heater during initial cool-down ■ Water running - NOTE: Adjusting the temperature control(s)...
... ■ Popping - occurs as ice is being ejected from items placed on - In Canada, visit www.whirlpool.ca. Plug the power cord into a grounded 3 prong outlet. Your refrigerator may help you may be heard when ice melts during the defrost cycle and water runs into the drain pan... often, or if the door has been left open. Plug in your mobile device, or visit www.whirlpool.com/product_help. Replace the fuse or reset the circuit breaker. Turn the refrigerator control on the heater during initial cool-down ■ Water running - NOTE: Adjusting the temperature control(s)...
Owners Manual
Page 17
...Humid room - Adjust the controls to remove the minerals. See "Water Supply Requirements." Allow 24 hours following accessories are available for refrigerator to return to your cold water supply can reduce water flow - Minimize door openings and keep door fully closed completely - Check ... pressure remain, call 1-800-901-2042. Discard the ice and wash the ice storage bin. In the U.S.A., visit our webpage www.whirlpool.com/ accessories or call a licensed, qualified plumber. There is interior moisture buildup NOTE: Some moisture buildup is too warm ■ New...
...Humid room - Adjust the controls to remove the minerals. See "Water Supply Requirements." Allow 24 hours following accessories are available for refrigerator to return to your cold water supply can reduce water flow - Minimize door openings and keep door fully closed completely - Check ... pressure remain, call 1-800-901-2042. Discard the ice and wash the ice storage bin. In the U.S.A., visit our webpage www.whirlpool.com/ accessories or call a licensed, qualified plumber. There is interior moisture buildup NOTE: Some moisture buildup is too warm ■ New...
Specification Sheet
Page 1
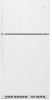
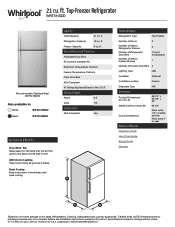
ft. Freezer Capacity 6 cu. Quiet Cooling Keep noise down in : White WRT511SZDW Black WRT511SZDB Capacity Total Capacity 21 cu. NOTE: Dimensions are for tall items with quiet cooling. For complete details, see ...Ice Maker Optional Ice Maker Location Freezer Dispenser Type N/A Dimensions Product Dimensions (H x W x D) Depth with product. ft. ft. All rights reserved. Top-Freezer Refrigerator WRT511SZD Monochromatic Stainless Steel WRT511SZDM Also available in the kitchen with the bin that quickly and easily moves side to change without notice. ®/™...
ft. Freezer Capacity 6 cu. Quiet Cooling Keep noise down in : White WRT511SZDW Black WRT511SZDB Capacity Total Capacity 21 cu. NOTE: Dimensions are for tall items with quiet cooling. For complete details, see ...Ice Maker Optional Ice Maker Location Freezer Dispenser Type N/A Dimensions Product Dimensions (H x W x D) Depth with product. ft. ft. All rights reserved. Top-Freezer Refrigerator WRT511SZD Monochromatic Stainless Steel WRT511SZDM Also available in the kitchen with the bin that quickly and easily moves side to change without notice. ®/™...
Dimension Guide
Page 1
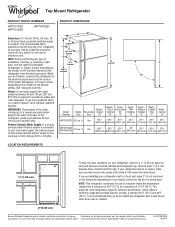
... a fixed wall, leave 2" (5 cm) minimum on the hinge side (depending on each and between overhead cabinets and refrigerator top. handle D incl. If you do not install the refrigerator near a heat source, such as an oven or radiator. 2" (5.08 cm) Because Whirlpool Corporation policy includes a continuous commitment to improve Dimensions are finished, reconnect the...
... a fixed wall, leave 2" (5 cm) minimum on the hinge side (depending on each and between overhead cabinets and refrigerator top. handle D incl. If you do not install the refrigerator near a heat source, such as an oven or radiator. 2" (5.08 cm) Because Whirlpool Corporation policy includes a continuous commitment to improve Dimensions are finished, reconnect the...

