Whirlpool WRT518SZKV Support and Manuals
Get Help and Manuals for this Whirlpool item

View All Support Options Below
Free Whirlpool WRT518SZKV manuals!
Problems with Whirlpool WRT518SZKV?
Ask a Question
Free Whirlpool WRT518SZKV manuals!
Problems with Whirlpool WRT518SZKV?
Ask a Question
Popular Whirlpool WRT518SZKV Manual Pages
Installation Instructions - Page 2

... THE WATER SUPPLY 17 FINAL INSTALLATION 19
Installing the access cover and forming the copper tubing 19 Connecting the power/leveling the unit 20 STARTING THE ICE MAKER 21 TROUBLESHOOTING 22 Operational notes 22 Troubleshooting chart 22 The modular ice maker service sheet 23 Ice maker replacement parts list 24 Ice maker replacement parts list (cont'd 25
Requesting Assistance...
Installation Instructions - Page 4

... in each set of a specific step you are meant to clarify the installation steps you need to perform. When you are instructed to the diagram...install a part, position the part as shown in this Installation Guide are to perform. Step stool (optional)
Installation notes
1. Before You Begin
Tools
Gather required tools and parts before you perform it before starting installation...
Installation Instructions - Page 5

...tubing from the styrofoam packing insert, do not remove the tubing from the shipping carton and set them . KEY 1 2 3 4 5 6 7 8 9 10 11 12 13...installation in Side-By-Side Models only.
15
16
17
18
** For installation in 11 Cubic Foot Top Freezer Models only (kit 24ECKMF). 5 Components
Remove the contents from the valve.
IMPORTANT: When you account for the Ice Maker, a replacement parts...
Installation Instructions - Page 6

...will use it later to support the ice bucket. On top-mount models without a full-width freezer ...installing ice maker. Place the shelf aside, as you
can result in death or electrical shock.
4. Detail
2.
If you have a side-by -side model refrigeratorfreezer, be working in DETAIL A below for the procedure). On appliances with a top or a bottom freezer, proceed to your "Use and Care Guide...
Installation Instructions - Page 10
... the plastic fill tube extension (See components table on the fill tube).
Fill tube
Spout
Foam gasket
Installing the fill tube/gasket (14 to 18 cubic foot and Bottom Freezer models)
DETAIL A
2. Flat wiring cover: Install the wiring cover over the end of the fill tube as far as it with the screw...
Installation Instructions - Page 11

...models
Remove 7 hexhead screws from rear access cover
Right channel
DETAIL B
Tubing clip
Top and SXS freezers
Tubing clip
Bottom freezers
Metal panel
Access cover
Remove hexhead screw from rear access cover DETAIL A Installing... remove the 7 hex-head screws from the rear access cover, then remove the cover and set it aside. Press the clips against the back of the tubing clips. If you have a...
Installation Instructions - Page 15
... of the wiring harness connector, and pull the blank connector off.
2. For Side-By-Side Models Only: Refer to DETAIL A and mount the two mounting clips (from the wiring harness. Bend...tab
Blank connector (remove and discard)
Wiring harness connector
Installing the ice maker clips
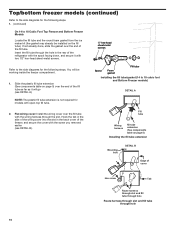
15 For Top/Bottom Freezers Only: Partially install two 3⁄4" hexhead sheet-metal screws into the two...
Installation Instructions - Page 16

...way.
2. Center the top tabs under clips
Insert fill tube into place (you installed earlier. For Top/Bottom Freezers Only: Hang the ice maker over the tabs and lock into...8260;2" hex-head sheet-metal screw
Wiring harness connectors
Mounting the ice maker (sideby-side models)
16 Screws Tabs
Bottom mounting bracket
1/2" hex-head Wiring
sheet-metal harness
screw
connectors
...
Installation Instructions - Page 18

...inlet port.
Compression sleeve
3. Connect to Refrigerator Follow the connection instructions specific to the valve inlet using the original screw in the panel slot above the valve.... tubing. Attach the
copper tubing to your model. 1. Tighten the compression nut. Create a service loop with a "P" clamp, using a compression nut and sleeve as shown. Copper tubing
...
Installation Instructions - Page 20

... If it is crooked and needs to re-level the refrigerator, follow these instructions can result in your refrigerator's "Use and Care Guide."
3. Do not use an extension cord. Place a level on top of ...
Failure to follow the procedure to 18 Cubic Foot Top Freezer Models)
Sheet-metal screw (for 11 Cubic Foot Top Freezer Models only)
Leveling the ice maker
20 Check the position of the ...
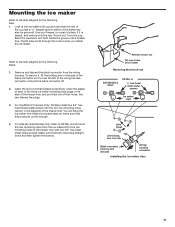
Installation Instructions - Page 21

...any problems, refer to
start it will need to begin to its "on top of ice and discard them. Installing the ice bucket
DETAIL A
Tabs Slots
Raise arm to stop ice
Off On Lower arm to "Troubleshooting" ... you may notice that , the "off taste." Ice maker
Ice bucket
IMPORTANT: On top-mount models without a full-width freezer shelf, you will go. This will not function properly if the ice...
Installation Instructions - Page 22

... arm is operating. PROBLEM One or more ice, adjust the freezer control for a colder setting.
CAUSE The water valve...common problems that the water shut-off the water and disassembling the water valve (your service center should consider installing ... from your local service center. If you should be between 20 and 120 pounds per-square-inch (psi). Troubleshooting chart
The following...
Installation Instructions - Page 23

... 40CC OR 2.4 SEC. ‡ MAXIMUM ADJUSTMENT IS ONE FULL TURN EITHER
DIRECTION. MODULE, MOTOR, AND SUPPORT ASSEMBLY INSERT PHILLIPS DRIVER IN ACCESS PORTS IN MODULE. PULL MOLD FROM SUPPORT ASSEMBLY. FILL CUP REMOVE MODULE, MOTOR, AND SUPPORT ASSEMBLY. Service Procedures
COVER PULL WATER ADJUSTMENT KNOB FIRST AND SNAP OFF COVER. MOLD AND HEATER REMOVE MODULE...
Installation Instructions - Page 24

...Part Number 628228 628356 627843 627788 627790 627796 627985 489322 628358 628258 489136 489276 627792 628256 2155021 489128 1115846 628366 627929 1115844 628229 628379
Description Mold and Heater Assembly Bearing and Inlet Ejector Ice Stripper Support...14 8 19
22
17
13
24
20 18
21 Ice maker replacement parts list
When you place an order for a part, use the "Part Number," not the "Key Number."
Installation Instructions - Page 25

... Foot Top Freezer Models) Fitting, Water Tube (for 11 Cubic Foot Top Freezer Models) Accessory Bag, Inside (for 11 Cubic Foot Top Freezer Models) Tube, Water Inlet (for 11 Cubic Foot Top Freezer Models)
* Components of Accessory Bag Outside. ** Components of Accessory Bag Inside.
25
Ice maker replacement parts list (cont'd)
The following parts are not included...
Whirlpool WRT518SZKV Reviews
We have not received any reviews for Whirlpool yet.