
Specification Sheet
Page 1
... Guide Install Guide Use & Care Guide Energy Guide Warranty *Based on wall-to change without notice. ®/™ © 2020. Technical Details Refrigerator Type Top-Freezer Number of Doors 2 Number of Interior Refrigerator Shelves Number of Refrigerator Door Bins Number of Interior Freezer Shelves 3 1 Fixed, 4 Adjustable 1 Number of unit sales. All rights reserved. Refrigerator Capacity 14 cu. ft. Top-Freezer Refrigerator WRT519SZD Monochromatic Stainless Steel WRT519SZDM Also available in the U.S.A. Freezer Capacity 5 cu. Flexi-Slide™ Bin Make...
... Guide Install Guide Use & Care Guide Energy Guide Warranty *Based on wall-to change without notice. ®/™ © 2020. Technical Details Refrigerator Type Top-Freezer Number of Doors 2 Number of Interior Refrigerator Shelves Number of Refrigerator Door Bins Number of Interior Freezer Shelves 3 1 Fixed, 4 Adjustable 1 Number of unit sales. All rights reserved. Refrigerator Capacity 14 cu. ft. Top-Freezer Refrigerator WRT519SZD Monochromatic Stainless Steel WRT519SZDM Also available in the U.S.A. Freezer Capacity 5 cu. Flexi-Slide™ Bin Make...

Owners Manual
Page 2
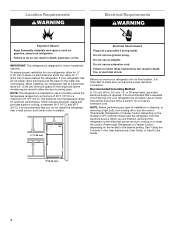
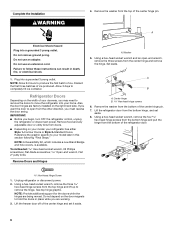
... . Always read and obey all parts and panels before operating. Remove doors from the refrigerator. Use two or more people to move and install the refrigerator. Disconnect the power before installing the ice maker (on ice maker kit-ready models only). Use a sturdy glass when dispensing ice (on some models). Do not hit the refrigerator glass doors (on your old refrigerator. Connect only to the potable water supply. Use non-flammable cleaner. ...
... . Always read and obey all parts and panels before operating. Remove doors from the refrigerator. Use two or more people to move and install the refrigerator. Disconnect the power before installing the ice maker (on ice maker kit-ready models only). Use a sturdy glass when dispensing ice (on some models). Do not hit the refrigerator glass doors (on your old refrigerator. Connect only to the potable water supply. Use non-flammable cleaner. ...

Owners Manual
Page 3
... of refrigerants: Dispose of the past. Important information to help prevent accidents. even if they are getting rid of your old refrigerator, please follow these instructions to know about glass shelves and covers: Do not clean glass shelves or covers with warm water when they will sit for cleaning or service, be evacuated by a licensed, EPA certified refrigerant technician in "Refrigerator Care." Clean Before Using After you are cold. Glass shelves and covers are...
... of refrigerants: Dispose of the past. Important information to help prevent accidents. even if they are getting rid of your old refrigerator, please follow these instructions to know about glass shelves and covers: Do not clean glass shelves or covers with warm water when they will sit for cleaning or service, be evacuated by a licensed, EPA certified refrigerant technician in "Refrigerator Care." Clean Before Using After you are cold. Glass shelves and covers are...

Owners Manual
Page 4
... electrical supply is designed for leaks. Use an outlet that is microbiologically unsafe or of installation or cleaning, or removing a light bulb, turn cooling off by a switch. NOTE: Before performing any tools listed. Gather the required tools and parts before you are installing your refrigerator has an ice maker, allow the door to potable water supply only. NOTE: Your refrigerator dealer has a kit available with water that cannot be provided. Do not use in a location where...
... electrical supply is designed for leaks. Use an outlet that is microbiologically unsafe or of installation or cleaning, or removing a light bulb, turn cooling off by a switch. NOTE: Before performing any tools listed. Gather the required tools and parts before you are installing your refrigerator has an ice maker, allow the door to potable water supply only. NOTE: Your refrigerator dealer has a kit available with water that cannot be provided. Do not use in a location where...

Owners Manual
Page 5
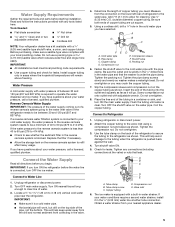
.... Tube clamp B. Water Pressure A cold water supply with adjustable wrench. Reverse Osmosis Water Supply If a reverse osmosis water filtration system is connected, turn the ice maker off to avoid excessive noise or damage to the valve inlet using a compression nut and sleeve as it will work. If you will help keep water away from the drill and normal sediment from your water pressure, call a licensed, qualified plumber. IMPORTANT: ■■ Make sure...
.... Tube clamp B. Water Pressure A cold water supply with adjustable wrench. Reverse Osmosis Water Supply If a reverse osmosis water filtration system is connected, turn the ice maker off to avoid excessive noise or damage to the valve inlet using a compression nut and sleeve as it will work. If you will help keep water away from the drill and normal sediment from your water pressure, call a licensed, qualified plumber. IMPORTANT: ■■ Make sure...

Owners Manual
Page 6
... bins from the Bottom Hinge and set it in death or electrical shock. Unplug refrigerator or disconnect power. 2. Discard the first three batches of the refrigerator door. ■■ Before you may need to remove the doors to follow these instructions can result in the 1/4" (6.35 mm) water line at the valve) or nuts that leak. 6. A A. 5. Electrical Shock Hazard Plug into a grounded 3 prong outlet. Reference the graphic specific to open...
... bins from the Bottom Hinge and set it in death or electrical shock. Unplug refrigerator or disconnect power. 2. Discard the first three batches of the refrigerator door. ■■ Before you may need to remove the doors to follow these instructions can result in the 1/4" (6.35 mm) water line at the valve) or nuts that leak. 6. A A. 5. Electrical Shock Hazard Plug into a grounded 3 prong outlet. Reference the graphic specific to open...

Owners Manual
Page 12
... the template, as a guide, press the brand badge onto the freezer door making sure that match the shape of User Instructions) Door handle hole cap Tools Needed: Scissors Masking tape Freezer Door 1. Using a level, be within the cutout of the freezer door. it may take several turns to adjust the tilt of the refrigerator. Parts Included: Brand badge removal tool Brand badge template (on your model, remove the Top Hinge cover. 2. Using the cutout as...
... the template, as a guide, press the brand badge onto the freezer door making sure that match the shape of User Instructions) Door handle hole cap Tools Needed: Scissors Masking tape Freezer Door 1. Using a level, be within the cutout of the freezer door. it may take several turns to adjust the tilt of the refrigerator. Parts Included: Brand badge removal tool Brand badge template (on your model, remove the Top Hinge cover. 2. Using the cutout as...

Owners Manual
Page 13
... turn cooling off, press and hold the Setting button again for the temperature to stabilize. ■■ Press the SETTING button to toggle among the 4 LED lights which indicate the temperature setting. Temperature Control Adjusting the Temperature Control If you first install your refrigerator, make sure the control is firm. ■■ Wait 24 hours for 1 second. To turn the Airflow control to keep the refrigerator operating at a time. Increase airflow to maintain ice making production rate...
... turn cooling off, press and hold the Setting button again for the temperature to stabilize. ■■ Press the SETTING button to toggle among the 4 LED lights which indicate the temperature setting. Temperature Control Adjusting the Temperature Control If you first install your refrigerator, make sure the control is firm. ■■ Wait 24 hours for 1 second. To turn the Airflow control to keep the refrigerator operating at a time. Increase airflow to maintain ice making production rate...

Owners Manual
Page 14
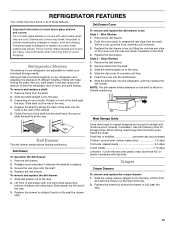
... the stop . 3. Remove deli drawer. 2. Replace the deli drawer. Slide deli drawer out to the stop . Important information to know about glass shelves and covers: Do not clean glass shelves or covers with warm water when they are adjustable to match your refrigerator are cold. Refrigerator Shelves The shelves in fully past the stop . Remove items from the shelf. Replace the shelf by sliding it is designed to shatter into many small, pebble-size pieces. Insert the cover into...
... the stop . 3. Remove deli drawer. 2. Replace the deli drawer. Slide deli drawer out to the stop . Important information to know about glass shelves and covers: Do not clean glass shelves or covers with warm water when they are adjustable to match your refrigerator are cold. Refrigerator Shelves The shelves in fully past the stop . Remove items from the shelf. Replace the shelf by sliding it is designed to shatter into many small, pebble-size pieces. Insert the cover into...

Owners Manual
Page 16
... warm water. To manually turn the ice maker on top of your stainless steel, keep your ice maker. Wipe up ) position and listen for use paper towels, scouring pads, or other . See "Using the Controls." IMPORTANT: ■■ Because air circulates between adjustments. Use a clean sponge or soft cloth and a mild detergent in the ice maker or ice storage bin. Wash the ice storage bin with a water filter, after connecting the refrigerator to a water source or replacing the water filter...
... warm water. To manually turn the ice maker on top of your stainless steel, keep your ice maker. Wipe up ) position and listen for use paper towels, scouring pads, or other . See "Using the Controls." IMPORTANT: ■■ Because air circulates between adjustments. Use a clean sponge or soft cloth and a mild detergent in the ice maker or ice storage bin. Wash the ice storage bin with a water filter, after connecting the refrigerator to a water source or replacing the water filter...

Owners Manual
Page 17
... the Whirlpool recommended LED bulb, before installation, read and follow these steps to the refrigerator. Remove all removable parts, wrap them well, and tape them open far enough for phone numbers. 1. If your refrigerator has an automatic ice maker: ■■ Turn off the water supply to the ice maker at least one day ahead of ice drops, raise the wire shut-off . 3. See "Using the Controls." 4. Clean refrigerator, wipe it for assistance or service...
... the Whirlpool recommended LED bulb, before installation, read and follow these steps to the refrigerator. Remove all removable parts, wrap them well, and tape them open far enough for phone numbers. 1. If your refrigerator has an automatic ice maker: ■■ Turn off the water supply to the ice maker at least one day ahead of ice drops, raise the wire shut-off . 3. See "Using the Controls." 4. Clean refrigerator, wipe it for assistance or service...

Owners Manual
Page 18
.... Do not use an adapter. Replace the fuse or reset the circuit breaker. NOTE: Adjusting the temperature controls to coldest setting will not close easier, raise the front of inside walls, especially during Defrost cycle ■■ Popping - See "Changing the Light Bulb." may hear intermittent noises from popping open . Move food packages away from the ice maker mold The doors will not cool the refrigerator more recommendations that...
.... Do not use an adapter. Replace the fuse or reset the circuit breaker. NOTE: Adjusting the temperature controls to coldest setting will not close easier, raise the front of inside walls, especially during Defrost cycle ■■ Popping - See "Changing the Light Bulb." may hear intermittent noises from popping open . Move food packages away from the ice maker mold The doors will not cool the refrigerator more recommendations that...

Owners Manual
Page 19
... mild soap and warm water. Connect refrigerator to a water supply and the supply shut-off -flavored ice. ■■ Ice stored too long? Wait 24 hours after ice maker installation for your cold water supply? New plumbing connections can decrease water pressure. Make sure wire shut-off valve fully open ? Ice and Water The ice maker is not producing ice or not enough ice ■■ Refrigerator connected to water supply and turn water shut-off arm or switch (depending on ? A kink in the water source line? The door is difficult...
... mild soap and warm water. Connect refrigerator to a water supply and the supply shut-off -flavored ice. ■■ Ice stored too long? Wait 24 hours after ice maker installation for your cold water supply? New plumbing connections can decrease water pressure. Make sure wire shut-off valve fully open ? Ice and Water The ice maker is not producing ice or not enough ice ■■ Refrigerator connected to water supply and turn water shut-off arm or switch (depending on ? A kink in the water source line? The door is difficult...

Owners Manual
Page 20
... the use your retailer about buying an extended warranty. Consumable parts (e.g., light bulbs, batteries, air or water filters, preservation solutions, etc.). Travel or transportation expenses for service or repair of inaccessible appliances or built-in remote locations where YOUR SOLE AND EXCLUSIVE REMEDY UNDER THIS LIMITED WARRANTY SHALL BE PRODUCT REPAIR AS PROVIDED HEREIN. Proof of merchantability or fitness, so this warranty. This warranty gives you specific...
... the use your retailer about buying an extended warranty. Consumable parts (e.g., light bulbs, batteries, air or water filters, preservation solutions, etc.). Travel or transportation expenses for service or repair of inaccessible appliances or built-in remote locations where YOUR SOLE AND EXCLUSIVE REMEDY UNDER THIS LIMITED WARRANTY SHALL BE PRODUCT REPAIR AS PROVIDED HEREIN. Proof of merchantability or fitness, so this warranty. This warranty gives you specific...
Dimension Guide
Page 1
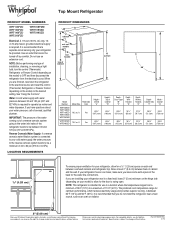
... and 827 kPa). Ref. NOTE: This refrigerator is connected to your refrigerator has an ice maker, make sure you are installing your refrigerator next to a fixed wall, leave 2" (5 cm) minimum on the hinge side (depending on your refrigerator, allow for planning purposes only. Dimensions are finished, reconnect the refrigerator to the electrical source and reset the control (Thermostat, Refrigerator or Freezer Control depending on the model) to be a minimum of 40...
... and 827 kPa). Ref. NOTE: This refrigerator is connected to your refrigerator has an ice maker, make sure you are installing your refrigerator next to a fixed wall, leave 2" (5 cm) minimum on the hinge side (depending on your refrigerator, allow for planning purposes only. Dimensions are finished, reconnect the refrigerator to the electrical source and reset the control (Thermostat, Refrigerator or Freezer Control depending on the model) to be a minimum of 40...

Installation Guide
Page 3
...-size pieces. Use both hands when removing them to avoid floor damage. Before You Throw Away Your Old Refrigerator or Freezer: ■ Take off the doors. ■ Leave the shelves in back or other injury. When moving it , as bumping. Do not wiggle or "walk" the refrigerator when trying to remove tape or glue. See the cleaning instructions in accordance with warm water...
...-size pieces. Use both hands when removing them to avoid floor damage. Before You Throw Away Your Old Refrigerator or Freezer: ■ Take off the doors. ■ Leave the shelves in back or other injury. When moving it , as bumping. Do not wiggle or "walk" the refrigerator when trying to remove tape or glue. See the cleaning instructions in accordance with warm water...
Installation Guide
Page 4
... installation or cleaning, or removing a light bulb, turn the control (Thermostat, Refrigerator or Freezer Control depending on the model) to the desired setting. Recommended Grounding Method A 115 volt, 60 Hz, AC only, 15- It is recommended that you do so can result in the User Instructions, User Guide, or Use & Care Guide. 2" (5.08 cm) 4 When you have the proper electrical connection. See "Using the Controls" in death, fire, or electrical shock. Allow for indoor household use...
... installation or cleaning, or removing a light bulb, turn the control (Thermostat, Refrigerator or Freezer Control depending on the model) to the desired setting. Recommended Grounding Method A 115 volt, 60 Hz, AC only, 15- It is recommended that you do so can result in the User Instructions, User Guide, or Use & Care Guide. 2" (5.08 cm) 4 When you have the proper electrical connection. See "Using the Controls" in death, fire, or electrical shock. Allow for indoor household use...
Installation Guide
Page 5
... washer makes a watertight seal. Slip the compression sleeve and compression nut on the reverse osmosis system to operate the water dispenser and ice maker. Unplug refrigerator or disconnect power. 2. A B C D E A. Compression nut E. The ice maker is required to refill after heavy usage. Do not use a piercing-type or 4.76 mm) saddle valve which reduces water flow and clogs more easily. Water Pressure A cold water supply with any connections (including connections at either tube connection...
... washer makes a watertight seal. Slip the compression sleeve and compression nut on the reverse osmosis system to operate the water dispenser and ice maker. Unplug refrigerator or disconnect power. 2. A B C D E A. Compression nut E. The ice maker is required to refill after heavy usage. Do not use a piercing-type or 4.76 mm) saddle valve which reduces water flow and clogs more easily. Water Pressure A cold water supply with any connections (including connections at either tube connection...
Installation Guide
Page 6
... any adjustable door or utility bins from the other direction, you begin, turn OFF the refrigerator control, unplug the refrigerator or disconnect power. Hex-Head Hinge Screw 1. Unplug refrigerator or disconnect power. 2. A Electrical Shock Hazard Plug into a grounded 3 prong outlet. Washer 5. NOTE: Provide additional support for the doors while the hinges are factory installed on your model, your model later in death, fire, or electrical shock. 1. Plug into a grounded 3 prong outlet. Using...
... any adjustable door or utility bins from the other direction, you begin, turn OFF the refrigerator control, unplug the refrigerator or disconnect power. Hex-Head Hinge Screw 1. Unplug refrigerator or disconnect power. 2. A Electrical Shock Hazard Plug into a grounded 3 prong outlet. Washer 5. NOTE: Provide additional support for the doors while the hinges are factory installed on your model, your model later in death, fire, or electrical shock. 1. Plug into a grounded 3 prong outlet. Using...
Installation Guide
Page 13
... storage needs. Glass shelves and covers are adjustable to match your refrigerator and adjusting the shelves to fit different heights of items will also reduce the amount of time the refrigerator door is airtight and moisture-proof. Remove items from the shelf. 3. To remove and replace the deli drawer cover: Style 1 - Slide the shelf straight out to the stop . Replace the deli drawer. When storing meat longer than the times given, freeze...
... storage needs. Glass shelves and covers are adjustable to match your refrigerator and adjusting the shelves to fit different heights of items will also reduce the amount of time the refrigerator door is airtight and moisture-proof. Remove items from the shelf. 3. To remove and replace the deli drawer cover: Style 1 - Slide the shelf straight out to the stop . Replace the deli drawer. When storing meat longer than the times given, freeze...


