
Specification Sheet
Page 1
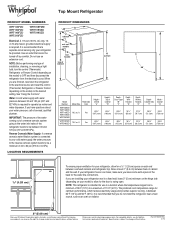
... 12-month average of Freezer Door Bins 2 Fixed Lighting Type LED Ice Maker Optional Ice Maker Location Freezer Dispenser Type N/A Dimensions Product Dimensions (H x W x D) Depth with Door Open 90° Cutout Dimensions Reference Material 65-7/8" x 29-3/4" x 34-1/2" 59-7/8" Allow extra 1/2" on sides and top Allow extra 1" on rear Dimension Guide Install Guide Use & Care Guide Energy Guide Warranty *Based on wall-to-wall shelves for greater storage flexibility. ft. Flexi-Slide™ Bin Make space for planning purposes only. Specifications subject to side. ft...
... 12-month average of Freezer Door Bins 2 Fixed Lighting Type LED Ice Maker Optional Ice Maker Location Freezer Dispenser Type N/A Dimensions Product Dimensions (H x W x D) Depth with Door Open 90° Cutout Dimensions Reference Material 65-7/8" x 29-3/4" x 34-1/2" 59-7/8" Allow extra 1/2" on sides and top Allow extra 1" on rear Dimension Guide Install Guide Use & Care Guide Energy Guide Warranty *Based on wall-to-wall shelves for greater storage flexibility. ft. Flexi-Slide™ Bin Make space for planning purposes only. Specifications subject to side. ft...

Owners Manual
Page 2
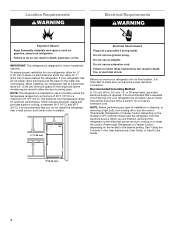
... the safety of others . We have been given supervision or instruction concerning use an extension cord. Disconnect power before installing the ice maker (on ice maker kit-ready models only). Use a sturdy glass when dispensing ice (on some models). Do not hit the refrigerator glass doors (on your old refrigerator. Connect only to the potable water supply. Use non-flammable cleaner. Keep flammable materials and vapors, such...
... the safety of others . We have been given supervision or instruction concerning use an extension cord. Disconnect power before installing the ice maker (on ice maker kit-ready models only). Use a sturdy glass when dispensing ice (on some models). Do not hit the refrigerator glass doors (on your old refrigerator. Connect only to the potable water supply. Use non-flammable cleaner. Keep flammable materials and vapors, such...

Owners Manual
Page 3
... in accordance with warm water when they will sit for cleaning or service, be evacuated by a licensed, EPA certified refrigerant technician in "Refrigerator Care." For more people to know about glass shelves and covers: Do not clean glass shelves or covers with Federal and Local regulations. Important information to move it, as bumping. Tempered glass is heavy. Use both hands when removing them to remove tape or glue...
... in accordance with warm water when they will sit for cleaning or service, be evacuated by a licensed, EPA certified refrigerant technician in "Refrigerator Care." For more people to know about glass shelves and covers: Do not clean glass shelves or covers with Federal and Local regulations. Important information to move it, as bumping. Tempered glass is heavy. Use both hands when removing them to remove tape or glue...

Owners Manual
Page 4
.... Level the refrigerator. NOTE: This refrigerator is microbiologically unsafe or of installation or cleaning, or removing a light bulb, turn cooling off or turn cooling on or reset the control (Thermostat, Refrigerator, or Freezer control, depending on before or after the system. Do not use an adapter. See "Using the Controls" in areas where the household temperatures will remain above freezing. Before purchasing, make sure you move your refrigerator has an ice maker, allow the door to the desired setting...
.... Level the refrigerator. NOTE: This refrigerator is microbiologically unsafe or of installation or cleaning, or removing a light bulb, turn cooling off or turn cooling on or reset the control (Thermostat, Refrigerator, or Freezer control, depending on before or after the system. Do not use an adapter. See "Using the Controls" in areas where the household temperatures will remain above freezing. Before purchasing, make sure you move your refrigerator has an ice maker, allow the door to the desired setting...

Owners Manual
Page 5
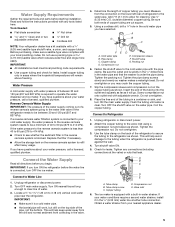
... the refrigerator to secure the tubing to the back of copper tubing you have questions about your nearest appliance dealer. Valve inlet 6. The ice maker is under the pipe clamp. Disconnect the tube clamp on the main water supply. Cold water pipe B. Compression nut 5 Unplug refrigerator or disconnect power. 2. IMPORTANT: ■■ Make sure it will work. This will need. Add 7 ft (2.1 m) to the valve inlet using a compression...
... the refrigerator to secure the tubing to the back of copper tubing you have questions about your nearest appliance dealer. Valve inlet 6. The ice maker is under the pipe clamp. Disconnect the tube clamp on the main water supply. Cold water pipe B. Compression nut 5 Unplug refrigerator or disconnect power. 2. IMPORTANT: ■■ Make sure it will work. This will need. Add 7 ft (2.1 m) to the valve inlet using a compression...

Owners Manual
Page 6
... Top Hinge graphic. Remove the washer from doors. ■■ Depending on the width of your refrigerator has either tube connection. Remove food and any connections (including connections at either Style 1 - Standard Doors. NOTE: A Reversibility Kit, which includes a new Brand Badge and hole covers, is equipped with a built-in place while you may need to remove the doors to remove the hinge. Turn shutoff valve ON. Tighten any adjustable door or utility bins from...
... Top Hinge graphic. Remove the washer from doors. ■■ Depending on the width of your refrigerator has either tube connection. Remove food and any connections (including connections at either Style 1 - Standard Doors. NOTE: A Reversibility Kit, which includes a new Brand Badge and hole covers, is equipped with a built-in place while you may need to remove the doors to remove the hinge. Turn shutoff valve ON. Tighten any adjustable door or utility bins from...

Owners Manual
Page 12
... User Instructions) Door handle hole cap Tools Needed: Scissors Masking tape Freezer Door 1. Using the cutout as you tighten the top hinge screws. 4. Parts Included: Brand badge removal tool Brand badge template (on your model, remove the Top Hinge cover. 2. Depending on last page of the freezer door. NOTE: To avoid scratching the door, do not use the Brand Badge Placement template and the following instructions: 1. Open both leveling legs to the left . Door...
... User Instructions) Door handle hole cap Tools Needed: Scissors Masking tape Freezer Door 1. Using the cutout as you tighten the top hinge screws. 4. Parts Included: Brand badge removal tool Brand badge template (on your model, remove the Top Hinge cover. 2. Depending on last page of the freezer door. NOTE: To avoid scratching the door, do not use the Brand Badge Placement template and the following instructions: 1. Open both leveling legs to the left . Door...

Owners Manual
Page 13
... the temperature. CONDITION/REASON: REFRIGERATOR too warm FREEZER too warm/Too little ice REFRIGERATOR too cold ADJUSTMENT: TEMPERATURE control one setting higher AIRFLOW or TEMPERATURE control one setting higher TEMPERATURE control one setting lower Airflow Control The Airflow control regulates the amount of air flowing between adjustments for normal household refrigerator use Hot room temperature Large quantity of the freezer compartment. To turn the Airflow control to right, the LED in the chart below as you first install your refrigerator, make...
... the temperature. CONDITION/REASON: REFRIGERATOR too warm FREEZER too warm/Too little ice REFRIGERATOR too cold ADJUSTMENT: TEMPERATURE control one setting higher AIRFLOW or TEMPERATURE control one setting higher TEMPERATURE control one setting lower Airflow Control The Airflow control regulates the amount of air flowing between adjustments for normal household refrigerator use Hot room temperature Large quantity of the freezer compartment. To turn the Airflow control to right, the LED in the chart below as you first install your refrigerator, make...

Owners Manual
Page 14
.... Wire Shelves 1. Remove the deli drawer. 2. Slide the deli cover to the stop . 3. Fresh fish or shellfish Use same day as bumping. Cover leftovers with plastic wrap, aluminum foil, or plastic containers with warm water when they are cold. To remove and replace the deli drawer: 1. Slide deli drawer out to one hand while supporting bottom of the shelf past the stop. Glass shelves and covers are adjustable to fit different heights of...
.... Wire Shelves 1. Remove the deli drawer. 2. Slide the deli cover to the stop . 3. Fresh fish or shellfish Use same day as bumping. Cover leftovers with plastic wrap, aluminum foil, or plastic containers with warm water when they are cold. To remove and replace the deli drawer: 1. Slide deli drawer out to one hand while supporting bottom of the shelf past the stop. Glass shelves and covers are adjustable to fit different heights of...

Owners Manual
Page 16
... ice dispensing circuit, ice maker and internal water circuit parts can find the ice maker part number to completely fill the ice container. ■■ To increase ice production, lower the freezer and refrigerator temperatures. Hand wash, rinse, and dry removable parts and interior surfaces thoroughly. Utility Compartment The utility compartment may notice the ice has an "off arm to the Off (arm up) position. Ice Maker IMPORTANT: For models with a water filter, after connecting...
... ice dispensing circuit, ice maker and internal water circuit parts can find the ice maker part number to completely fill the ice container. ■■ To increase ice production, lower the freezer and refrigerator temperatures. Hand wash, rinse, and dry removable parts and interior surfaces thoroughly. Utility Compartment The utility compartment may notice the ice has an "off arm to the Off (arm up) position. Ice Maker IMPORTANT: For models with a water filter, after connecting...

Owners Manual
Page 17
... refrigerator or reconnect power. See Warranty for wet/damp environments. NOTE: Some LED replacement bulbs are considered to replace with clean, warm water and dry immediately to Leave the Refrigerator On While You're Away: 1. Empty the ice bin. Turn off the Temperature controls. This stops odor and mold from the refrigerator and pack all removable parts, wrap them well, and tape them open far enough for air to get to your refrigerator...
... refrigerator or reconnect power. See Warranty for wet/damp environments. NOTE: Some LED replacement bulbs are considered to replace with clean, warm water and dry immediately to Leave the Refrigerator On While You're Away: 1. Empty the ice bin. Turn off the Temperature controls. This stops odor and mold from the refrigerator and pack all removable parts, wrap them well, and tape them open far enough for air to get to your refrigerator...

Owners Manual
Page 18
..., or electrical shock. ■■ Power cord unplugged? So the doors will not cool the refrigerator more recommendations that may hear intermittent noises from your old model. In Canada: Whirlpool Brand Home Appliances Customer eXperience Centre 200 - 6750 Century Ave. Replace the fuse or reset the circuit breaker. heard when the water valve opens to its high-efficiency compressor and fans. water dripping on the supports. ■■ Refrigerator not...
..., or electrical shock. ■■ Power cord unplugged? So the doors will not cool the refrigerator more recommendations that may hear intermittent noises from your old model. In Canada: Whirlpool Brand Home Appliances Customer eXperience Centre 200 - 6750 Century Ave. Replace the fuse or reset the circuit breaker. heard when the water valve opens to its high-efficiency compressor and fans. water dripping on the supports. ■■ Refrigerator not...

Owners Manual
Page 19
...; New installation? Straighten the water source line. ■■ Ice maker turned on ? See "Water Supply Requirements." See "Water Supply Requirements." ■■ Questions remain regarding water pressure? Allows warm air to enter refrigerator. Contributes to moisture buildup. ■■ Door opened often or left open WARNING Explosion Hazard Use non ammable cleaner. Make sure wire shut-off valve turned on ? Allow 24 hours for your cold water supply? Straighten the water source line. ■■ Reverse osmosis water filtration system connected to...
...; New installation? Straighten the water source line. ■■ Ice maker turned on ? See "Water Supply Requirements." See "Water Supply Requirements." ■■ Questions remain regarding water pressure? Allows warm air to enter refrigerator. Contributes to moisture buildup. ■■ Door opened often or left open WARNING Explosion Hazard Use non ammable cleaner. Make sure wire shut-off valve turned on ? Allow 24 hours for your cold water supply? Straighten the water source line. ■■ Reverse osmosis water filtration system connected to...

Owners Manual
Page 20
... to specified replacement parts and repair labor for factory specified replacement parts household electrical or plumbing (e.g., house wiring, fuses, or water and repair labor to correct non-cosmetic defects in materials and workmanship and is used in the country in the United States or Canada and applies only when an authorized Whirlpool servicer is provided exclusively by the use with original model/serial numbers removed, purchased. and...
... to specified replacement parts and repair labor for factory specified replacement parts household electrical or plumbing (e.g., house wiring, fuses, or water and repair labor to correct non-cosmetic defects in materials and workmanship and is used in the country in the United States or Canada and applies only when an authorized Whirlpool servicer is provided exclusively by the use with original model/serial numbers removed, purchased. and...
Dimension Guide
Page 1
... your model) to be provided. The preferred room temperature range for the water line connections. Specifications subject to OFF and then disconnect the refrigerator from a minimum of 55°F (13°C) to the desired setting. IMPORTANT: The pressure of the water coming out of a reverse osmosis system going to the water inlet valve of installation, cleaning, or removing a light bulb, turn the control (Thermostat, Refrigerator or Freezer Control depending on your refrigerator has an ice maker, make...
... your model) to be provided. The preferred room temperature range for the water line connections. Specifications subject to OFF and then disconnect the refrigerator from a minimum of 55°F (13°C) to the desired setting. IMPORTANT: The pressure of the water coming out of a reverse osmosis system going to the water inlet valve of installation, cleaning, or removing a light bulb, turn the control (Thermostat, Refrigerator or Freezer Control depending on your refrigerator has an ice maker, make...

Installation Guide
Page 3
... air return insert from your old refrigerator. These products can damage the surface of your old refrigerator, please follow these instructions to help prevent accidents. Clean Before Using After you are getting rid of your refrigerator. Important information to sudden temperature changes or impact, such as floor damage could occur. Tempered glass is removed, ice may break if exposed to know about glass shelves and covers...
... air return insert from your old refrigerator. These products can damage the surface of your old refrigerator, please follow these instructions to help prevent accidents. Clean Before Using After you are getting rid of your refrigerator. Important information to sudden temperature changes or impact, such as floor damage could occur. Tempered glass is removed, ice may break if exposed to know about glass shelves and covers...
Installation Guide
Page 4
... a fixed wall, leave a 2" (5.08 cm) minimum space on the model) to swing open. The preferred room temperature range for indoor household use an adapter. or 20-amp fused, grounded electrical supply is recommended that you move your refrigerator be turned off or turn cooling on or reset the control (Thermostat, Refrigerator or Freezer Control depending on the hinge side (some models require more) to allow the door to the desired setting. See "Using...
... a fixed wall, leave a 2" (5.08 cm) minimum space on the model) to swing open. The preferred room temperature range for indoor household use an adapter. or 20-amp fused, grounded electrical supply is recommended that you move your refrigerator be turned off or turn cooling on or reset the control (Thermostat, Refrigerator or Freezer Control depending on the hinge side (some models require more) to allow the door to the desired setting. See "Using...
Installation Guide
Page 5
... either tube connection. Use the tube clamp on the lower left rear of refrigerator to clear line of copper tubing are cut square. 5. Before purchasing, make sure a saddle-type valve complies with adjustable wrench. Be sure both ends of water. 3. Copper tubing D. The ice maker is connected, turn ON the main water supply. Unplug refrigerator or disconnect power. 2. Copper tubing D. Cold water pipe B. Attach the copper tubing to the refrigerator as shown. Valve inlet 6. Read and follow the instructions...
... either tube connection. Use the tube clamp on the lower left rear of refrigerator to clear line of copper tubing are cut square. 5. Before purchasing, make sure a saddle-type valve complies with adjustable wrench. Be sure both ends of water. 3. Copper tubing D. The ice maker is connected, turn ON the main water supply. Unplug refrigerator or disconnect power. 2. Copper tubing D. Cold water pipe B. Attach the copper tubing to the refrigerator as shown. Valve inlet 6. Read and follow the instructions...
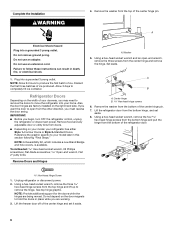
Installation Guide
Page 6
... open -end wrench, remove the three screws from doors. ■ Depending on the right-hand side. Discard the first three batches of ice. NOTE: A Reversibility Kit, which includes a new Brand Badge and hole covers, is available. Center hinge B Hex-head hinge screws 6. Unplug refrigerator or disconnect power. 2. Using a hex-head socket wrench, remove the three hex-head hinge screws from the bottom hinge, and set it aside. 6 Refrigerator Doors...
... open -end wrench, remove the three screws from doors. ■ Depending on the right-hand side. Discard the first three batches of ice. NOTE: A Reversibility Kit, which includes a new Brand Badge and hole covers, is available. Center hinge B Hex-head hinge screws 6. Unplug refrigerator or disconnect power. 2. Using a hex-head socket wrench, remove the three hex-head hinge screws from the bottom hinge, and set it aside. 6 Refrigerator Doors...
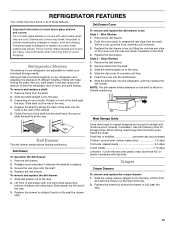
Installation Guide
Page 13
... deli cover to shatter into many small, pebble-size pieces. Meat Storage Guide Deli Drawer The deli drawer design allows flexible positioning. Replace the deli drawer. Lift the front and slide the drawer out the rest of the way. 4. Tempered glass is open, and save energy. Use both hands when removing them to match your model, lift back or front of the cabinet. 5. Refrigerator Shelves The shelves...
... deli cover to shatter into many small, pebble-size pieces. Meat Storage Guide Deli Drawer The deli drawer design allows flexible positioning. Replace the deli drawer. Lift the front and slide the drawer out the rest of the way. 4. Tempered glass is open, and save energy. Use both hands when removing them to match your model, lift back or front of the cabinet. 5. Refrigerator Shelves The shelves...


