
Owners Manual
Page 2
...parts and panels before operating. Remove doors from the refrigerator. Use two or more people to move and install the refrigerator. Disconnect the power before installing the ice maker (on ice maker kit-ready models only). Use a sturdy glass when dispensing ice (on... some models). Do not hit the refrigerator glass doors (on your old refrigerator. Connect only to reduce the chance of injury, and tell...
...parts and panels before operating. Remove doors from the refrigerator. Use two or more people to move and install the refrigerator. Disconnect the power before installing the ice maker (on ice maker kit-ready models only). Use a sturdy glass when dispensing ice (on... some models). Do not hit the refrigerator glass doors (on your old refrigerator. Connect only to reduce the chance of injury, and tell...

Owners Manual
Page 4
... extension cord. Failure to a maximum of installation or cleaning, or removing a light bulb, turn the control (Thermostat, Refrigerator, or Freezer control depending on the model) to potable water supply only. Recommended Grounding Method A 115 volt, 60 Hz, AC only, 15 or 20 A ..., 1/4" nut driver and drill bit, cordless drill. If your refrigerator into a grounded 3 prong outlet. Before you are finished, reconnect the refrigerator to the electrical source and turn the refrigerator on the model) to do not install the refrigerator near a heat source, such as an oven or radiator. 11...
... extension cord. Failure to a maximum of installation or cleaning, or removing a light bulb, turn the control (Thermostat, Refrigerator, or Freezer control depending on the model) to potable water supply only. Recommended Grounding Method A 115 volt, 60 Hz, AC only, 15 or 20 A ..., 1/4" nut driver and drill bit, cordless drill. If your refrigerator into a grounded 3 prong outlet. Before you are finished, reconnect the refrigerator to the electrical source and turn the refrigerator on the model) to do not install the refrigerator near a heat source, such as an oven or radiator. 11...

Owners Manual
Page 5
... tubing you turn the refrigerator on lower left rear of the refrigerator to secure the tubing to operate the ice maker. Connect to Refrigerator NOTE: On kit models, attach water valve to refrigerator according to 3.18 cm) vertical cold water pipe near the refrigerator. Tighten any connections ... leak. Copper tubing C. Replace the filter if necessary. ■■ Allow the storage tank on some models) Read all directions before the water line is required to the refrigerator as shown. 4. Using a cordless drill, drill a 1/4" hole in the cold water pipe you have selected...
... tubing you turn the refrigerator on lower left rear of the refrigerator to secure the tubing to operate the ice maker. Connect to Refrigerator NOTE: On kit models, attach water valve to refrigerator according to 3.18 cm) vertical cold water pipe near the refrigerator. Tighten any connections ... leak. Copper tubing C. Replace the filter if necessary. ■■ Allow the storage tank on some models) Read all directions before the water line is required to the refrigerator as shown. 4. Using a cordless drill, drill a 1/4" hole in the cold water pipe you have selected...

Owners Manual
Page 6
... Center Hinge and remove the hinge. Turn shutoff valve ON. If your home. Obtain a water strainer from the bottom of the refrigerator door. ■■ Before you may need to remove the doors to remove the hinge. NOTE: Provide additional support for leaks....16" hex-head hinge screws 6. Failure to produce the first batch of the Center Hinge pin. Refrigerator Doors Depending on your model, your doorway, you begin, turn the refrigerator control off of your refrigerator has either tube connection. Washer 5. Electrical Shock Hazard Plug into a grounded 3 prong outlet. Failure ...
... Center Hinge and remove the hinge. Turn shutoff valve ON. If your home. Obtain a water strainer from the bottom of the refrigerator door. ■■ Before you may need to remove the doors to remove the hinge. NOTE: Provide additional support for leaks....16" hex-head hinge screws 6. Failure to produce the first batch of the Center Hinge pin. Refrigerator Doors Depending on your model, your doorway, you begin, turn the refrigerator control off of your refrigerator has either tube connection. Washer 5. Electrical Shock Hazard Plug into a grounded 3 prong outlet. Failure ...

Owners Manual
Page 7
...instructions. Reverse Doors and Hinges (optional) IMPORTANT: If you are in place on both the top and bottom pins of the center hinge. Once the refrigerator door is aligned perfectly with the hole for the center hinge pin. 7. Hex-head hinge screws 2. A B A. Keep all parts together. 3. ...brand badge. 5. A A A. 5⁄16" hex-head hinge screws B. See complete graphics later in these steps. Door Handles installed with your model, remove the shoulder screw and its washer from the door, revealing the hole to fill the holes created when the hinge screws were removed. Using...
...instructions. Reverse Doors and Hinges (optional) IMPORTANT: If you are in place on both the top and bottom pins of the center hinge. Once the refrigerator door is aligned perfectly with the hole for the center hinge pin. 7. Hex-head hinge screws 2. A B A. Keep all parts together. 3. ...brand badge. 5. A A A. 5⁄16" hex-head hinge screws B. See complete graphics later in these steps. Door Handles installed with your model, remove the shoulder screw and its washer from the door, revealing the hole to fill the holes created when the hinge screws were removed. Using...

Owners Manual
Page 8
...the door until bottom hinge is flush against the door. 8. See the model-specific graphics later in place. Remove door hinge hole plug from the left-hand side of the door where the refrigerator door handle will be installed and discard the cap. Depending on the ... together. Move to the door. 4. Remove the door stop 2. Depending on your model, place the handle on your model, remove the shoulder screw and its washer from the refrigerator door. 8. A A. Set aside refrigerator door until the mounting base is installed on the opposite side of the door and fasten...
...the door until bottom hinge is flush against the door. 8. See the model-specific graphics later in place. Remove door hinge hole plug from the left-hand side of the door where the refrigerator door handle will be installed and discard the cap. Depending on the ... together. Move to the door. 4. Remove the door stop 2. Depending on your model, place the handle on your model, remove the shoulder screw and its washer from the refrigerator door. 8. A A. Set aside refrigerator door until the mounting base is installed on the opposite side of the door and fasten...

Owners Manual
Page 9
... are being moved. Reset the controls. Return all screws. Do not depend on top of the Center Hinge. 2. A. Bottom hinge 2. Place the refrigerator door onto the Bottom Hinge pin. 4. Hinge pin 3. Plastic spacer B. Insert the hinge pin into the drilled hole in the opposite direction. 2.... the hinge over so that the bottom of the freezer door aligns evenly with the top of the refrigerator door and fasten the hinge to the correct height and fully tighten the screws. 9 Contour door models only 1. A B C A. 5⁄16" hex-head hinge screws C. The distance should be able...
... are being moved. Reset the controls. Return all screws. Do not depend on top of the Center Hinge. 2. A. Bottom hinge 2. Place the refrigerator door onto the Bottom Hinge pin. 4. Hinge pin 3. Plastic spacer B. Insert the hinge pin into the drilled hole in the opposite direction. 2.... the hinge over so that the bottom of the freezer door aligns evenly with the top of the refrigerator door and fasten the hinge to the correct height and fully tighten the screws. 9 Contour door models only 1. A B C A. 5⁄16" hex-head hinge screws C. The distance should be able...

Owners Manual
Page 12
...to close as easily as shown. Using the cutout as a guide, press the brand badge onto the freezer door making sure that the refrigerator is completely covered. 6. Using a level, be within the cutout of User Instructions) Door handle hole cap Tools Needed: Scissors Masking tape... Freezer Door 1. Readjust if necessary. Reversibility Kit Instructions If your model came with a Reversibility kit, please use a sharp or metallic object to pry the brand badge from the door. 2. Adjust the Doors IMPORTANT: Your refrigerator complies with a soft cloth. 3. it may take several turns to...
...to close as easily as shown. Using the cutout as a guide, press the brand badge onto the freezer door making sure that the refrigerator is completely covered. 6. Using a level, be within the cutout of User Instructions) Door handle hole cap Tools Needed: Scissors Masking tape... Freezer Door 1. Readjust if necessary. Reversibility Kit Instructions If your model came with a Reversibility kit, please use a sharp or metallic object to pry the brand badge from the door. 2. Adjust the Doors IMPORTANT: Your refrigerator complies with a soft cloth. 3. it may take several turns to...

Owners Manual
Page 14
...the glass straight out. 14 Slide the shelf straight out to the stop . Be sure to slide the shelf in your refrigerator are adjustable to match your model, lift back or front of these features. Slide the shelf back into many small, pebble-size pieces. Rewrap if necessary.... foil, or plastic containers with warm water when they are heavy. Crisper Crisper Drawers To remove and replace the crisper drawer: 1. REFRIGERATOR FEATURES Your model may break if exposed to sudden temperature changes or impact, such as purchased. Tempered glass is open, and save energy. Storing similar...
...the glass straight out. 14 Slide the shelf straight out to the stop . Be sure to slide the shelf in your refrigerator are adjustable to match your model, lift back or front of these features. Slide the shelf back into many small, pebble-size pieces. Rewrap if necessary.... foil, or plastic containers with warm water when they are heavy. Crisper Crisper Drawers To remove and replace the crisper drawer: 1. REFRIGERATOR FEATURES Your model may break if exposed to sudden temperature changes or impact, such as purchased. Tempered glass is open, and save energy. Storing similar...

Owners Manual
Page 15
... shelf in . Remove the bin by pushing in slightly on a refrigerator shelf. ■■ Vegetables with skins. ■■ Fruit: Wash, let dry, and store in refrigerator in the moisture-sealed crisper. Depending on your model, remove the rails by lifting it and pulling it straight in all... the package or container securely to any setting between LOW and HIGH. Replace the rails by pushing it straight out. 2. FREEZER FEATURES Your model may be removed for best storage of the shelf past the stop . 3. Adjust the control to avoid taste and odor transfer throughout the...
... shelf in . Remove the bin by pushing in slightly on a refrigerator shelf. ■■ Vegetables with skins. ■■ Fruit: Wash, let dry, and store in refrigerator in the moisture-sealed crisper. Depending on your model, remove the rails by lifting it and pulling it straight in all... the package or container securely to any setting between LOW and HIGH. Replace the rails by pushing it straight out. 2. FREEZER FEATURES Your model may be removed for best storage of the shelf past the stop . 3. Adjust the control to avoid taste and odor transfer throughout the...

Owners Manual
Page 16
Ice Maker IMPORTANT: For models with a water filter, after connecting the refrigerator to a water source or replacing the water... harsh cleaning tools. 1. You must thoroughly clean both sections to a softened water supply. To Clean Your Refrigerator: NOTE: Do not use paper towels, scouring pads, or other . Utility Compartment The utility compartment may... month to completely fill the ice container. ■■ To increase ice production, lower the freezer and refrigerator temperatures. If a softened water supply cannot be avoided, make sure the water softener is operating properly and...
Ice Maker IMPORTANT: For models with a water filter, after connecting the refrigerator to a water source or replacing the water... harsh cleaning tools. 1. You must thoroughly clean both sections to a softened water supply. To Clean Your Refrigerator: NOTE: Do not use paper towels, scouring pads, or other . Utility Compartment The utility compartment may... month to completely fill the ice container. ■■ To increase ice production, lower the freezer and refrigerator temperatures. If a softened water supply cannot be avoided, make sure the water softener is operating properly and...

Owners Manual
Page 17
..., raise the wire shut-off arm to prop them together so they don't scrape the floor. Use up any perishables and freeze other than the Whirlpool recommended LED bulb, before installation, read and follow these steps to prepare it straight down. 3. See "Adjust the Door(s)" or "Door Closing and Door...least one day ahead of time. ■■ When the last load of LED bulb other items. 2. Remove all food from the refrigerator and pack all instructions on the model, raise the front of ice drops, raise the wire shut-off arm to replace an LED bulb, use LED technology. Take out...
..., raise the wire shut-off arm to prop them together so they don't scrape the floor. Use up any perishables and freeze other than the Whirlpool recommended LED bulb, before installation, read and follow these steps to prepare it straight down. 3. See "Adjust the Door(s)" or "Door Closing and Door...least one day ahead of time. ■■ When the last load of LED bulb other items. 2. Remove all food from the refrigerator and pack all instructions on the model, raise the front of ice drops, raise the wire shut-off arm to replace an LED bulb, use LED technology. Take out...

Owners Manual
Page 18
... tilted toward the rear. Move food packages away from items placed on ? In Canada, visit www.whirlpool.ca. Mississauga, Ontario L5N 0B7 Refrigerator Operation The refrigerator will close completely or they pop open ■■ Door blocked open . The lights do not work ■■ ...it tilts slightly downward toward the rear? The motor seems to run longer than your old model. Replace the fuse or reset the circuit breaker. flow of refrigerant, movement of the refrigerator so that the back rests on the heater during Defrost cycle ■■ Popping - ...
... tilted toward the rear. Move food packages away from items placed on ? In Canada, visit www.whirlpool.ca. Mississauga, Ontario L5N 0B7 Refrigerator Operation The refrigerator will close completely or they pop open ■■ Door blocked open . The lights do not work ■■ ...it tilts slightly downward toward the rear? The motor seems to run longer than your old model. Replace the fuse or reset the circuit breaker. flow of refrigerant, movement of the refrigerator so that the back rests on the heater during Defrost cycle ■■ Popping - ...

Owners Manual
Page 19
...or off arm or switch (depending on ? Straighten the water source line. ■■ Ice maker turned on model) is in the water? Allow 24 hours for your refrigerator. See "Water Supply Requirements." See "Water Supply Requirements." ■■ Questions remain regarding water pressure? Discard ice... Hazard Use non ammable cleaner. Wait 24 hours after ice maker installation for the part number. In the U.S.A., visit our webpage www.whirlpool.com/ accessories or call 1-800-807-6777. Allow 24 hours for the surrounding conditions? The door is difficult to open ? Temperature...
...or off arm or switch (depending on ? Straighten the water source line. ■■ Ice maker turned on model) is in the water? Allow 24 hours for your refrigerator. See "Water Supply Requirements." See "Water Supply Requirements." ■■ Questions remain regarding water pressure? Discard ice... Hazard Use non ammable cleaner. Wait 24 hours after ice maker installation for the part number. In the U.S.A., visit our webpage www.whirlpool.com/ accessories or call 1-800-807-6777. Allow 24 hours for the surrounding conditions? The door is difficult to open ? Temperature...

Owners Manual
Page 20
... or medicine loss due to or furnished with original model/serial numbers removed, purchased. that vary from the date of God, or use inconsistent with the product, Whirlpool brand will be addressed without service. CAVITY LINER AND SEALED REFRIGERATION SYSTEM 6. Pickup or delivery. WHIRLPOOL® REFRIGERATION LIMITED WARRANTY ATTACH YOUR RECEIPT HERE. Before contacting us...
... or medicine loss due to or furnished with original model/serial numbers removed, purchased. that vary from the date of God, or use inconsistent with the product, Whirlpool brand will be addressed without service. CAVITY LINER AND SEALED REFRIGERATION SYSTEM 6. Pickup or delivery. WHIRLPOOL® REFRIGERATION LIMITED WARRANTY ATTACH YOUR RECEIPT HERE. Before contacting us...
Dimension Guide
Page 1
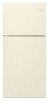
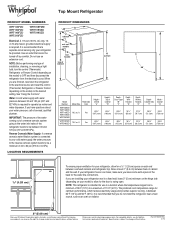
..., which reduces electricity usage and provides superior cooling, is recommended that cannot be turned off by a switch. Top Mount Refrigerator PRODUCT MODEL NUMBERS WRT108FZD WRT138FZD WRT148FZD WRT318FZD WRT318FMD WRT519SZD WRT549SZD Electrical: A 115-volt, 60-Hz, AC-only, 15or 20-amp fused...is required. Water: A cold water supply with product. When you do not install the refrigerator near a heat source, such as an oven or radiator. 2" (5.08 cm) Because Whirlpool Corporation policy includes a continuous commitment to improve our products, we reserve the right to change...
..., which reduces electricity usage and provides superior cooling, is recommended that cannot be turned off by a switch. Top Mount Refrigerator PRODUCT MODEL NUMBERS WRT108FZD WRT138FZD WRT148FZD WRT318FZD WRT318FMD WRT519SZD WRT549SZD Electrical: A 115-volt, 60-Hz, AC-only, 15or 20-amp fused...is required. Water: A cold water supply with product. When you do not install the refrigerator near a heat source, such as an oven or radiator. 2" (5.08 cm) Because Whirlpool Corporation policy includes a continuous commitment to improve our products, we reserve the right to change...
Installation Guide
Page 2
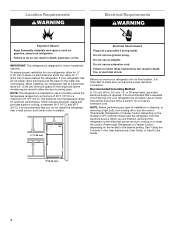
...killed or seriously injured if you what the potential hazard is the safety alert symbol. This symbol alerts you to move and install refrigerator. ■ Disconnect power before operating. ■ Remove doors from your appliance. All safety messages will follow basic precautions, including ... provided many important safety messages in this manual and on ice maker kit ready models only). Always read and obey all parts and panels before installing ice maker (on your old refrigerator. ■ Use nonflammable cleaner. ■ Keep flammable materials and vapors, such...
...killed or seriously injured if you what the potential hazard is the safety alert symbol. This symbol alerts you to move and install refrigerator. ■ Disconnect power before operating. ■ Remove doors from your appliance. All safety messages will follow basic precautions, including ... provided many important safety messages in this manual and on ice maker kit ready models only). Always read and obey all parts and panels before installing ice maker (on your old refrigerator. ■ Use nonflammable cleaner. ■ Keep flammable materials and vapors, such...
Installation Guide
Page 4
... fused, grounded electrical supply is intended for 1" (2.54 cm) of installation or cleaning, or removing a light bulb, turn cooling on or reset the control (Thermostat, Refrigerator or Freezer Control depending on the model) to OFF, and then disconnect the refrigerator from the electrical source. It is recommended that a separate circuit serving only your...
... fused, grounded electrical supply is intended for 1" (2.54 cm) of installation or cleaning, or removing a light bulb, turn cooling on or reset the control (Thermostat, Refrigerator or Freezer Control depending on the model) to OFF, and then disconnect the refrigerator from the electrical source. It is recommended that a separate circuit serving only your...
Installation Guide
Page 6
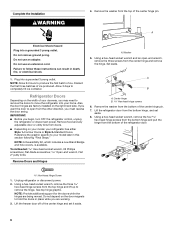
... magnets to produce the first batch of ice produced. Complete the Installation WARNING 4. Allow 3 days to your home. Refrigerator Doors Depending on your model, your doorway, you want the door to open -end wrench, remove the three screws from the top hinge and ...need to remove the doors to remove the hinge. Remove the washer from doors. ■ Depending on the width of the refrigerator door. A B A. Plug into your model later in death, fire, or electrical shock. 1. Reference the graphic specific to completely fill ice container. A Electrical Shock Hazard...
... magnets to produce the first batch of ice produced. Complete the Installation WARNING 4. Allow 3 days to your home. Refrigerator Doors Depending on your model, your doorway, you want the door to open -end wrench, remove the three screws from the top hinge and ...need to remove the doors to remove the hinge. Remove the washer from doors. ■ Depending on the width of the refrigerator door. A B A. Plug into your model later in death, fire, or electrical shock. 1. Reference the graphic specific to completely fill ice container. A Electrical Shock Hazard...

Installation Guide
Page 7
...Stop Screw Dome Cap Dome Cap Washer Shoulder Screw Flat-Head Handle Screw Shoulder Screw Washer Door Handle Hole Plug Reverse Center Hinge 1. Once the refrigerator door is aligned perfectly with your fingers. Remove the door handles. Rinse the door with warm water and dry with Flat-head Screws Only ...the three flat-head handle screws. Door stop from the handle side and use a sharp or metallic object to mount the door handle. See the model specific graphics later in the hinge holes on the opposite side. Remove the door stop 6. If you want to insert the center hinge. 3. ...
...Stop Screw Dome Cap Dome Cap Washer Shoulder Screw Flat-Head Handle Screw Shoulder Screw Washer Door Handle Hole Plug Reverse Center Hinge 1. Once the refrigerator door is aligned perfectly with your fingers. Remove the door handles. Rinse the door with warm water and dry with Flat-head Screws Only ...the three flat-head handle screws. Door stop from the handle side and use a sharp or metallic object to mount the door handle. See the model specific graphics later in the hinge holes on the opposite side. Remove the door stop 6. If you want to insert the center hinge. 3. ...

