

Specification Sheet
Page 1
...Use & Care Guide Energy Guide Warranty NOTE: Dimensions are for greater storage flexibility. General Features & Properties EZ Connect Icemaker Kit LED Interior Lighting ENERGY STAR® Certified Electronic Temperature Controls Freezer Temperature Controls Clear Door Bins Adjustable Door Bins Quiet Cooling Fingerprint Resistant Electrical Details Amps 6.5 Volts 115 Certifications ADA Compliant Yes ENERGY STAR® Certified Yes Technical Details Refrigerator Type Top-Freezer Number of Doors 2 Number of Interior Refrigerator Shelves Number of Refrigerator Door Bins...
...Use & Care Guide Energy Guide Warranty NOTE: Dimensions are for greater storage flexibility. General Features & Properties EZ Connect Icemaker Kit LED Interior Lighting ENERGY STAR® Certified Electronic Temperature Controls Freezer Temperature Controls Clear Door Bins Adjustable Door Bins Quiet Cooling Fingerprint Resistant Electrical Details Amps 6.5 Volts 115 Certifications ADA Compliant Yes ENERGY STAR® Certified Yes Technical Details Refrigerator Type Top-Freezer Number of Doors 2 Number of Interior Refrigerator Shelves Number of Refrigerator Door Bins...
Owners Manual
Page 2
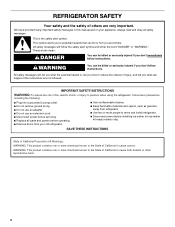
... manual and on ice maker kit ready models only). Always read and obey all parts and panels before servicing. ■ Replace all safety messages. These words mean: DANGER You can be killed or seriously injured if you what can kill or hurt you how to reduce the chance of California to move and install refrigerator. ■ Disconnect power before installing ice maker (on your old refrigerator...
... manual and on ice maker kit ready models only). Always read and obey all parts and panels before servicing. ■ Replace all safety messages. These words mean: DANGER You can be killed or seriously injured if you what can kill or hurt you how to reduce the chance of California to move and install refrigerator. ■ Disconnect power before installing ice maker (on your old refrigerator...
Owners Manual
Page 3
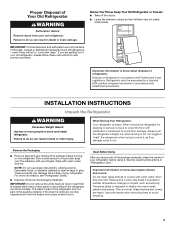
... sudden temperature changes or impact, such as floor damage could occur. If the insert is part of the refrigerator and not part of the packing material. Shelves and covers may not easily climb inside of your refrigerator. Before You Throw Away Your Old Refrigerator or Freezer: ■ Take off the doors. ■ Leave the shelves in accordance with warm water and dry. INSTALLATION INSTRUCTIONS Unpack the Refrigerator WARNING...
... sudden temperature changes or impact, such as floor damage could occur. If the insert is part of the refrigerator and not part of the packing material. Shelves and covers may not easily climb inside of your refrigerator. Before You Throw Away Your Old Refrigerator or Freezer: ■ Take off the doors. ■ Leave the shelves in accordance with warm water and dry. INSTALLATION INSTRUCTIONS Unpack the Refrigerator WARNING...
Owners Manual
Page 4
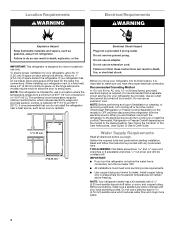
... you turn cooling on or reset the control (Thermostat, Refrigerator or Freezer Control depending on each side and at the back for 1" (2.54 cm) of installation or cleaning, or removing a light bulb, turn the control (Thermostat, Refrigerator or Freezer Control depending on the model) to swing open -end wrenches or 2 adjustable wrenches, ¹⁄₄" nut driver and drill bit, cordless drill. Failure to the electrical source and turn the refrigerator on the hinge side (some models require...
... you turn cooling on or reset the control (Thermostat, Refrigerator or Freezer Control depending on each side and at the back for 1" (2.54 cm) of installation or cleaning, or removing a light bulb, turn the control (Thermostat, Refrigerator or Freezer Control depending on the model) to swing open -end wrenches or 2 adjustable wrenches, ¹⁄₄" nut driver and drill bit, cordless drill. Failure to the electrical source and turn the refrigerator on the hinge side (some models require...

Owners Manual
Page 5
... overtighten. 8. Flush the tubing until water is connected to the cold water pipe with adjustable wrench. Do not overtighten. 3. Check for cleaning. Use ¹⁄₄" (6.35 mm) O.D. (outside diameter) copper tubing. Cold water pipe B. Fasten the shutoff valve to your nearest appliance dealer. Place the free end of refrigerator to operate the ice maker. Coil the copper tubing. This will go. Copper tubing D. The ice maker is a cold water pipe. ■ Horizontal...
... overtighten. 8. Flush the tubing until water is connected to the cold water pipe with adjustable wrench. Do not overtighten. 3. Check for cleaning. Use ¹⁄₄" (6.35 mm) O.D. (outside diameter) copper tubing. Cold water pipe B. Fasten the shutoff valve to your nearest appliance dealer. Place the free end of refrigerator to operate the ice maker. Coil the copper tubing. This will go. Copper tubing D. The ice maker is a cold water pipe. ■ Horizontal...
Owners Manual
Page 6
... not use a sharp or metallic object to reverse the door swing, follow these steps. Rinse the door with warm water and dry with the door handle hole plug provided in the Reversibility Kit located in this manual). Move to opposite side of refrigerator door as shown. Tighten all parts together. Remove door handle sealing screws. Remove door stop . Tighten all parts together. Style 2 - Door Stop Screw Door Handle Hole Plug Door Handle Sealing Screw Door Hinge Hole Plug Door Hinge Hole Plug Cabinet Hinge Hole Plug Setscrew Door Stop Screw...
... not use a sharp or metallic object to reverse the door swing, follow these steps. Rinse the door with warm water and dry with the door handle hole plug provided in the Reversibility Kit located in this manual). Move to opposite side of refrigerator door as shown. Tighten all parts together. Remove door handle sealing screws. Remove door stop . Tighten all parts together. Style 2 - Door Stop Screw Door Handle Hole Plug Door Handle Sealing Screw Door Hinge Hole Plug Door Hinge Hole Plug Cabinet Hinge Hole Plug Setscrew Door Stop Screw...
Owners Manual
Page 7
.... Assemble the parts for the doors while the hinges are working. 2. Washers 4. NOTES: ■ To avoid scratching the finish, do not use a sharp or metallic object to make sure that it is reversed. 1. Remove the refrigerator door handle. Cabinet 1. Using the three hex-head hinge screws, insert two screws halfway into a grounded 3 prong outlet. See Graphic 1-2. Remove the brand badge using the plastic tool (provided). Remove door stop . Reinstall freezer handle...
.... Assemble the parts for the doors while the hinges are working. 2. Washers 4. NOTES: ■ To avoid scratching the finish, do not use a sharp or metallic object to make sure that it is reversed. 1. Remove the refrigerator door handle. Cabinet 1. Using the three hex-head hinge screws, insert two screws halfway into a grounded 3 prong outlet. See Graphic 1-2. Remove the brand badge using the plastic tool (provided). Remove door stop . Reinstall freezer handle...
Owners Manual
Page 8
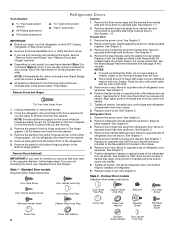
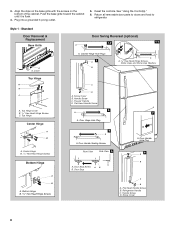
...Freezer Handle D. Door Hinge Hole Plug 4 A A. Door Handle Hole Plug 6 A B C D A. Handle Screw D. Push the base grille toward the cabinet until it is flush. 4. Standard Door Removal & Replacement Base Grille Door Swing Reversal (optional) 1-2 1-1 A A A. Top Hinge Cover B. 5/16" Hex-Head Hinge Screws C. Bottom Hinge A. Door Stop A. Flat-Head Handle Screw 3 A 7 A. Refrigerator Handle C. Reset the controls. Cover Top Hinge A B C A. Handle Screw C. Door Stop Screw A B B. 3. Return all removable door parts to doors and food to refrigerator. Screw Cover...
...Freezer Handle D. Door Hinge Hole Plug 4 A A. Door Handle Hole Plug 6 A B C D A. Handle Screw D. Push the base grille toward the cabinet until it is flush. 4. Standard Door Removal & Replacement Base Grille Door Swing Reversal (optional) 1-2 1-1 A A A. Top Hinge Cover B. 5/16" Hex-Head Hinge Screws C. Bottom Hinge A. Door Stop A. Flat-Head Handle Screw 3 A 7 A. Refrigerator Handle C. Reset the controls. Cover Top Hinge A B C A. Handle Screw C. Door Stop Screw A B B. 3. Return all removable door parts to doors and food to refrigerator. Screw Cover...
Owners Manual
Page 9
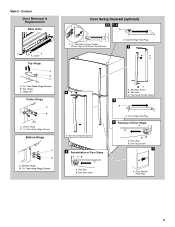
...Hinge Hole Plug 4 Removal of Door Stops AB 3 A C A. Style 2 - Door Stop B. Center Hinge B. 5/16" Hex-Head Hinge Screws Bottom Hinge A B A. Bottom Hinge Door Swing Reversal (optional) 1-1 1-2 A A A. 5/16" Hex-Head Hinge Screws, Dome Caps and Dome Cap Washers A. Flat-Head Handle Screw 5 Reinstallation of Door Stops A B A. Door Handle Hole Plug 9 Shoulder Screw B. Door Stop B. Door Stop Screw A. Contour Door Removal & Replacement Base Grille A A. Flat-Head Handle Screw A. Cabinet Hinge Hole Plugs 2 A B 6A A. Cover Top Hinge A B C B. Top Hinge C. Setscrew C. Hinge...
...Hinge Hole Plug 4 Removal of Door Stops AB 3 A C A. Style 2 - Door Stop B. Center Hinge B. 5/16" Hex-Head Hinge Screws Bottom Hinge A B A. Bottom Hinge Door Swing Reversal (optional) 1-1 1-2 A A A. 5/16" Hex-Head Hinge Screws, Dome Caps and Dome Cap Washers A. Flat-Head Handle Screw 5 Reinstallation of Door Stops A B A. Door Handle Hole Plug 9 Shoulder Screw B. Door Stop B. Door Stop Screw A. Contour Door Removal & Replacement Base Grille A A. Flat-Head Handle Screw A. Cabinet Hinge Hole Plugs 2 A B 6A A. Cover Top Hinge A B C B. Top Hinge C. Setscrew C. Hinge...

Owners Manual
Page 10
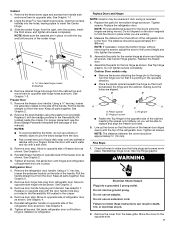
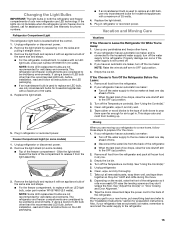
... the base of User Instructions) Door handle hole plug Tools Needed: Scissors Masking tape Freezer Door 1. Slowly remove the template. 3. Replace the base grille. Using the removal tool (provided), remove the brand badge from the freezer door by turning both leveling screws to the right. Have someone push against the top of the freezer door and tape the template to the door. Door Closing Your refrigerator has two front adjustable rollers - See the...
... the base of User Instructions) Door handle hole plug Tools Needed: Scissors Masking tape Freezer Door 1. Slowly remove the template. 3. Replace the base grille. Using the removal tool (provided), remove the brand badge from the freezer door by turning both leveling screws to the right. Have someone push against the top of the freezer door and tape the template to the door. Door Closing Your refrigerator has two front adjustable rollers - See the...
Owners Manual
Page 11
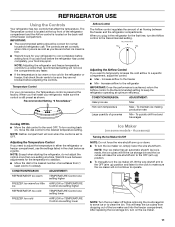
... a specific compartment, adjust the control. ■ Max - NOTE: Except when starting the refrigerator, do not adjust the control more than recommended setting will keep the refrigerator operating at a time. If you plug in the refrigerator or freezer, first check the air vents to operate. Increase airflow to keep the ice cubes from dropping out of snowflakes from (1 least cold to clean the bin. NOTE: Neither compartment will cool when...
... a specific compartment, adjust the control. ■ Max - NOTE: Except when starting the refrigerator, do not adjust the control more than recommended setting will keep the refrigerator operating at a time. If you plug in the refrigerator or freezer, first check the air vents to operate. Increase airflow to keep the ice cubes from dropping out of snowflakes from (1 least cold to clean the bin. NOTE: Neither compartment will cool when...
Owners Manual
Page 12
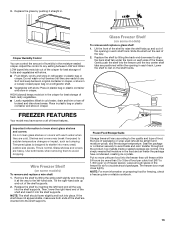
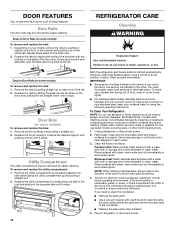
... quality of your ice will be avoided, make finding the exact item you want easier. REFRIGERATOR FEATURES Your model may break if exposed to the stop . This is airtight and moisture-proof. Glass shelves and covers are cold. It will make sure the water softener is operating properly and is open, and save energy. To remove and replace a shelf: 1. Slide the shelf straight out to sudden temperature changes or impact...
... quality of your ice will be avoided, make finding the exact item you want easier. REFRIGERATOR FEATURES Your model may break if exposed to the stop . This is airtight and moisture-proof. Glass shelves and covers are cold. It will make sure the water softener is operating properly and is open, and save energy. To remove and replace a shelf: 1. Slide the shelf straight out to sudden temperature changes or impact...
Owners Manual
Page 13
... way into the shelf supports. Shelves and covers may have condensed, creating ice crystals. Wire Freezer Shelf (on preparing food for air to rest on each side of humidity in cold water, drain and trim or tear off bruised and discolored areas. NOTE: For more information on some models) To remove and replace a glass shelf: 1. Crisper Humidity Control You can control the amount of the freezer. Lower the shelf to circulate around...
... way into the shelf supports. Shelves and covers may have condensed, creating ice crystals. Wire Freezer Shelf (on preparing food for air to rest on each side of humidity in cold water, drain and trim or tear off bruised and discolored areas. NOTE: For more information on some models) To remove and replace a glass shelf: 1. Crisper Humidity Control You can control the amount of the freezer. Lower the shelf to circulate around...
Owners Manual
Page 14
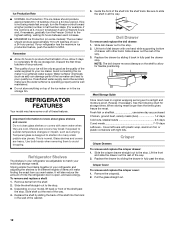
... power. Replace the utility compartment by lifting it and pulling it stops. 14 Both the refrigerator and freezer sections defrost automatically. However, clean both sections, any odors formed in one side while raising the utility compartment up and pulling it in warm water. 3. Utility Compartment The utility compartment may be removed for easier cleaning. Snap-on Door Rails (on some models) To remove and replace...
... power. Replace the utility compartment by lifting it and pulling it stops. 14 Both the refrigerator and freezer sections defrost automatically. However, clean both sections, any odors formed in one side while raising the utility compartment up and pulling it in warm water. 3. Utility Compartment The utility compartment may be removed for easier cleaning. Snap-on Door Rails (on some models) To remove and replace...
Owners Manual
Page 15
... lights do not illuminate when the refrigerator and/or freezer door is used to the refrigerator. 15 If your refrigerator has an automatic ice maker, remember to reconnect the water supply to replace an LED bulb, use only incandescent bulbs for preparation instructions. If you are not recommended for phone numbers. Plug in refrigerator or reconnect power. If using a brand of 60 watts. 4. Moving When you have an automatic ice maker, turn off the Temperature control(s). See "Using...
... lights do not illuminate when the refrigerator and/or freezer door is used to the refrigerator. 15 If your refrigerator has an automatic ice maker, remember to reconnect the water supply to replace an LED bulb, use only incandescent bulbs for preparation instructions. If you are not recommended for phone numbers. Plug in refrigerator or reconnect power. If using a brand of 60 watts. 4. Moving When you have an automatic ice maker, turn off the Temperature control(s). See "Using...
Owners Manual
Page 16
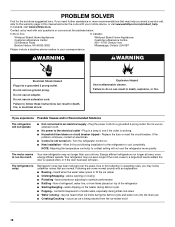
... Your new refrigerator may run even longer if the room is warm, a large food load is added, the door is opened often, or if the door has been left open. If the problem continues, contact an electrician. ■ Control is working. ■ Household fuse blown or circuit breaker tripped - The motor seems to do so can result in a lamp to an electrical supply - fans/compressor adjusting to cool completely. water dripping...
... Your new refrigerator may run even longer if the room is warm, a large food load is added, the door is opened often, or if the door has been left open. If the problem continues, contact an electrician. ■ Control is working. ■ Household fuse blown or circuit breaker tripped - The motor seems to do so can result in a lamp to an electrical supply - fans/compressor adjusting to cool completely. water dripping...
Owners Manual
Page 17
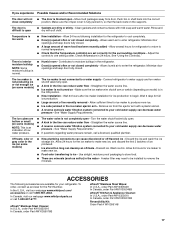
... water pressure - See "Using the Control(s)." Allows humid air to one setting colder. The ice maker is not producing ice or not enough ice (on some models) ■ The ice maker is an indication of ice produced. ■ Ice stored too long can decrease water pressure - Remove ice from door. Straighten the water source line. ■ A reverse osmosis water filtration system connected to your refrigerator. Discard the ice and wash the ice storage bin. Wait 3 days for ice maker to a water supply - Use...
... water pressure - See "Using the Control(s)." Allows humid air to one setting colder. The ice maker is not producing ice or not enough ice (on some models) ■ The ice maker is an indication of ice produced. ■ Ice stored too long can decrease water pressure - Remove ice from door. Straighten the water source line. ■ A reverse osmosis water filtration system connected to your refrigerator. Discard the ice and wash the ice storage bin. Wait 3 days for ice maker to a water supply - Use...
Owners Manual
Page 18
... remote locations where an authorized Whirlpool servicer is installed, operated and maintained according to instructions attached to chemicals. 10. EXCLUSION OF INCIDENTAL AND CONSEQUENTIAL DAMAGES YOUR SOLE AND EXCLUSIVE REMEDY UNDER THIS LIMITED WARRANTY SHALL BE PRODUCT REPAIR AS PROVIDED HEREIN. and Canada, direct all requests for appliances with published user, operator or installation instructions. 2. light bulbs, batteries, air or water filters, preservation solutions, etc.). 5. gas. 6. Repairs to parts...
... remote locations where an authorized Whirlpool servicer is installed, operated and maintained according to instructions attached to chemicals. 10. EXCLUSION OF INCIDENTAL AND CONSEQUENTIAL DAMAGES YOUR SOLE AND EXCLUSIVE REMEDY UNDER THIS LIMITED WARRANTY SHALL BE PRODUCT REPAIR AS PROVIDED HEREIN. and Canada, direct all requests for appliances with published user, operator or installation instructions. 2. light bulbs, batteries, air or water filters, preservation solutions, etc.). 5. gas. 6. Repairs to parts...
Dimension Guide
Page 1
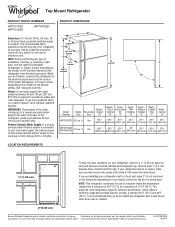
... any type of installation, cleaning, or removing a light bulb, turn the control (Thermostat, Refrigerator or Freezer Control depending on the model) to the desired setting. If you have questions about your refrigerator has an ice maker, make sure you do not install the refrigerator near a heat source, such as an oven or radiator. 2" (5.08 cm) Because Whirlpool Corporation policy includes a continuous commitment to improve Dimensions are for the door to swing open. PRODUCT DIMENSIONS G F cabinet...
... any type of installation, cleaning, or removing a light bulb, turn the control (Thermostat, Refrigerator or Freezer Control depending on the model) to the desired setting. If you have questions about your refrigerator has an ice maker, make sure you do not install the refrigerator near a heat source, such as an oven or radiator. 2" (5.08 cm) Because Whirlpool Corporation policy includes a continuous commitment to improve Dimensions are for the door to swing open. PRODUCT DIMENSIONS G F cabinet...
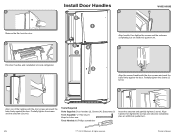
Installation Instructions
Page 1
...-turn . 6/14 ®/™ ©2014 Whirlpool. Printed in Mexico Partially tighten the screws (2 turns). 6 Align one of the handles with the door screws and push the base firmly against the door. Tools Needed: #2 Phillips screwdriver Insert the setscrew and partially tighten (2 turns). All rights reserved. Tools Required Parts Supplied: Door handles (2), Screws (4), Setscrews (2) Tools Supplied: ⅛" Hex key (1) Keep for future use...
...-turn . 6/14 ®/™ ©2014 Whirlpool. Printed in Mexico Partially tighten the screws (2 turns). 6 Align one of the handles with the door screws and push the base firmly against the door. Tools Needed: #2 Phillips screwdriver Insert the setscrew and partially tighten (2 turns). All rights reserved. Tools Required Parts Supplied: Door handles (2), Screws (4), Setscrews (2) Tools Supplied: ⅛" Hex key (1) Keep for future use...


