

Specification Sheet
Page 1
... Guide Use & Care Guide Energy Guide Warranty NOTE: Dimensions are for planning purposes only. ft. Specifications subject to side. All rights reserved. D200052XXC. Capacity Total Capacity 21 cu. ft. General Features & Properties EZ Connect Icemaker Kit LED Interior Lighting ENERGY STAR® Certified Electronic Temperature Controls Freezer Temperature Controls Clear Door Bins Adjustable Door Bins Quiet Cooling Fingerprint Resistant Electrical Details Amps 6.5 Volts 115 Certifications ADA Compliant Yes ENERGY STAR® Certified Yes Technical...
... Guide Use & Care Guide Energy Guide Warranty NOTE: Dimensions are for planning purposes only. ft. Specifications subject to side. All rights reserved. D200052XXC. Capacity Total Capacity 21 cu. ft. General Features & Properties EZ Connect Icemaker Kit LED Interior Lighting ENERGY STAR® Certified Electronic Temperature Controls Freezer Temperature Controls Clear Door Bins Adjustable Door Bins Quiet Cooling Fingerprint Resistant Electrical Details Amps 6.5 Volts 115 Certifications ADA Compliant Yes ENERGY STAR® Certified Yes Technical...
Owners Manual
Page 2
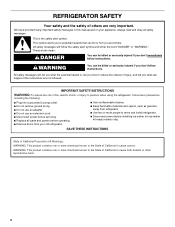
...instructions are very important. Always read and obey all parts and panels before operating. ■ Remove doors from your old refrigerator. ■ Use nonflammable cleaner. ■ Keep flammable materials and vapors, such as gasoline, away from refrigerator. ■ Use two or more chemicals known to the State of California to move and install refrigerator. ■ Disconnect power before installing ice maker... followed. REFRIGERATOR SAFETY Your safety and the safety of others . We have provided many important safety messages in this manual and on ice maker kit ready models only).
...instructions are very important. Always read and obey all parts and panels before operating. ■ Remove doors from your old refrigerator. ■ Use nonflammable cleaner. ■ Keep flammable materials and vapors, such as gasoline, away from refrigerator. ■ Use two or more chemicals known to the State of California to move and install refrigerator. ■ Disconnect power before installing ice maker... followed. REFRIGERATOR SAFETY Your safety and the safety of others . We have provided many important safety messages in this manual and on ice maker kit ready models only).
Owners Manual
Page 3
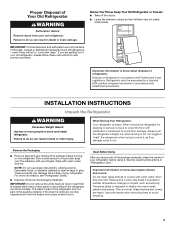
... not remove the white foam air return insert that children may not easily climb inside of your refrigerator before turning on some models). If the insert is located behind the control panel on the ceiling of the refrigerator (on the refrigerator. Clean Before Using After you are getting rid of your old refrigerator. Tempered glass is part of the refrigerator and not part of the packing material. INSTALLATION INSTRUCTIONS Unpack the Refrigerator...
... not remove the white foam air return insert that children may not easily climb inside of your refrigerator before turning on some models). If the insert is located behind the control panel on the ceiling of the refrigerator (on the refrigerator. Clean Before Using After you are getting rid of your old refrigerator. Tempered glass is part of the refrigerator and not part of the packing material. INSTALLATION INSTRUCTIONS Unpack the Refrigerator...
Owners Manual
Page 4
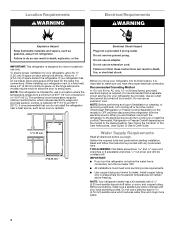
... adapter. TOOLS NEEDED: Flat-blade screwdriver and ¹⁄₂" open . Before purchasing, make sure you are finished, reconnect the refrigerator to the electrical source and turn cooling on or reset the control (Thermostat, Refrigerator or Freezer Control depending on before the water line is important to the desired setting. It is recommended that cannot be provided. Do not use in the User Instructions, User Guide, or Use & Care Guide. NOTE: This refrigerator is between...
... adapter. TOOLS NEEDED: Flat-blade screwdriver and ¹⁄₂" open . Before purchasing, make sure you are finished, reconnect the refrigerator to the electrical source and turn cooling on or reset the control (Thermostat, Refrigerator or Freezer Control depending on before the water line is important to the desired setting. It is recommended that cannot be provided. Do not use in the User Instructions, User Guide, or Use & Care Guide. NOTE: This refrigerator is between...

Owners Manual
Page 5
... disconnect power. 2. Turn shutoff valve ON. 5. Do not remove ground prong. Measure from your cold water supply, the water pressure to the reverse osmosis system needs to 414 kPa). Add 7 ft (2.1 m) to the cold water pipe with adjustable wrench. Attach the copper tubing to produce the first batch of the pipe, not the bottom. A B C D E A. Copper tubing D. Compression nut E. The ice maker is connected, turn the ice maker OFF. Complete the Installation WARNING Electrical...
... disconnect power. 2. Turn shutoff valve ON. 5. Do not remove ground prong. Measure from your cold water supply, the water pressure to the reverse osmosis system needs to 414 kPa). Add 7 ft (2.1 m) to the cold water pipe with adjustable wrench. Attach the copper tubing to produce the first batch of the pipe, not the bottom. A B C D E A. Copper tubing D. Compression nut E. The ice maker is connected, turn the ice maker OFF. Complete the Installation WARNING Electrical...
Owners Manual
Page 6
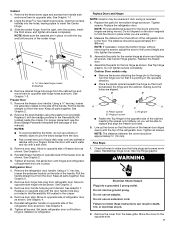
.... Replace screw cover. See Graphic 1-2. NOTE: A Reversibility Kit, which includes a new Brand Badge and hole covers, is installed on opposite side of the refrigerator. 6. If you begin, turn the refrigerator control OFF. Rinse the door with warm water and dry with the badge provided in place. 8. Tighten all parts together. See Graphic 6. 2. Remove cabinet hinge hole plugs from the bottom front of the freezer door as shown. Remove door stop . Remove door stop . See Graphic 2. 3. Set aside door...
.... Replace screw cover. See Graphic 1-2. NOTE: A Reversibility Kit, which includes a new Brand Badge and hole covers, is installed on opposite side of the refrigerator. 6. If you begin, turn the refrigerator control OFF. Rinse the door with warm water and dry with the badge provided in place. 8. Tighten all parts together. See Graphic 6. 2. Remove cabinet hinge hole plugs from the bottom front of the freezer door as shown. Remove door stop . Remove door stop . See Graphic 2. 3. Set aside door...
Owners Manual
Page 7
... of the refrigerator door. See Graphic 7. Move to hold the doors in the Reversibility Kit located inside the crisper. Do not depend on refrigerator. Assemble the parts for the bottom hinge as shown. B B A C C A A. Plastic spacer B. Final Steps 1. Reinstall top hinge cover. Do not use an extension cord. Using the three hex-head hinge screws, insert two screws halfway into a grounded 3 prong outlet. Freezer Door 1. Remove the freezer door handle. Pull the handle straight out...
... of the refrigerator door. See Graphic 7. Move to hold the doors in the Reversibility Kit located inside the crisper. Do not depend on refrigerator. Assemble the parts for the bottom hinge as shown. B B A C C A A. Plastic spacer B. Final Steps 1. Reinstall top hinge cover. Do not use an extension cord. Using the three hex-head hinge screws, insert two screws halfway into a grounded 3 prong outlet. Freezer Door 1. Remove the freezer door handle. Pull the handle straight out...
Owners Manual
Page 8
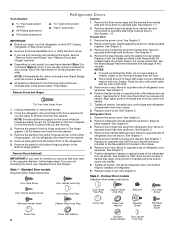
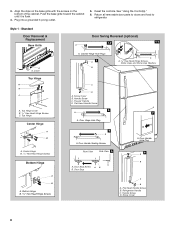
... C. Freezer Handle D. Door Stop Screw A B B. Cabinet Hinge Hole Plugs 2 A B A A. 5/16" Hex-Head Hinge Screws, Dome Caps and Dome Cap Washers C D A. Door Handle Sealing Screws Front View Side View 5 A. Refrigerator Handle C. Return all removable door parts to doors and food to refrigerator. Handle Screw D. Push the base grille toward the cabinet until it is flush. 4. Cover Top Hinge A B C A. Screw Cover 8 See "Using the Control(s)." 6. Standard Door Removal & Replacement Base Grille Door Swing Reversal (optional) 1-2 1-1 A A A. Door Handle Hole Plug...
... C. Freezer Handle D. Door Stop Screw A B B. Cabinet Hinge Hole Plugs 2 A B A A. 5/16" Hex-Head Hinge Screws, Dome Caps and Dome Cap Washers C D A. Door Handle Sealing Screws Front View Side View 5 A. Refrigerator Handle C. Return all removable door parts to doors and food to refrigerator. Handle Screw D. Push the base grille toward the cabinet until it is flush. 4. Cover Top Hinge A B C A. Screw Cover 8 See "Using the Control(s)." 6. Standard Door Removal & Replacement Base Grille Door Swing Reversal (optional) 1-2 1-1 A A A. Door Handle Hole Plug...
Owners Manual
Page 9
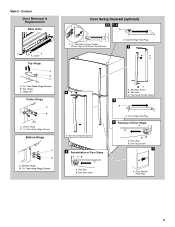
...Door Handle Hole Plug 9 Cabinet Hinge Hole Plugs 2 A B 6A A. Flat-Head Handle Screw A. Shoulder Screw B. Door Hinge Hole Plug 4 Removal of Door Stops AB 3 A C A. Door Stop Screw A. Contour Door Removal & Replacement Base Grille A A. Bottom Hinge Door Swing Reversal (optional) 1-1 1-2 A A A. 5/16" Hex-Head Hinge Screws, Dome Caps and Dome Cap Washers A. Cover Top Hinge A B C B. Flat-Head Handle Screw 5 Reinstallation of Door Stops A B A. Center Hinge B. 5/16" Hex-Head Hinge Screws Bottom Hinge A B A. Top Hinge C. Door Stop B. Door Stop Screw 7 A. Door Stop...
...Door Handle Hole Plug 9 Cabinet Hinge Hole Plugs 2 A B 6A A. Flat-Head Handle Screw A. Shoulder Screw B. Door Hinge Hole Plug 4 Removal of Door Stops AB 3 A C A. Door Stop Screw A. Contour Door Removal & Replacement Base Grille A A. Bottom Hinge Door Swing Reversal (optional) 1-1 1-2 A A A. 5/16" Hex-Head Hinge Screws, Dome Caps and Dome Cap Washers A. Cover Top Hinge A B C B. Flat-Head Handle Screw 5 Reinstallation of Door Stops A B A. Center Hinge B. 5/16" Hex-Head Hinge Screws Bottom Hinge A B A. Top Hinge C. Door Stop B. Door Stop Screw 7 A. Door Stop...

Owners Manual
Page 10
... close as easily as you want the doors to close easier, adjust the refrigerator's tilt using the following instructions: 1. Use a socket driver to the door. Open both doors again to make sure they stay closed. Replace the base grille. Loosen the top hinge screws using the following instructions: 1. Using the removal tool (provided), remove the brand badge from the freezer door by turning both leveling screws the same amount. 4. NOTE: To avoid...
... close as easily as you want the doors to close easier, adjust the refrigerator's tilt using the following instructions: 1. Use a socket driver to the door. Open both doors again to make sure they stay closed. Replace the base grille. Loosen the top hinge screws using the following instructions: 1. Using the removal tool (provided), remove the brand badge from the freezer door by turning both leveling screws the same amount. 4. NOTE: To avoid...
Owners Manual
Page 11
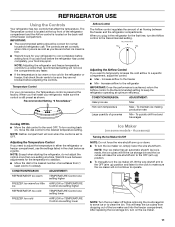
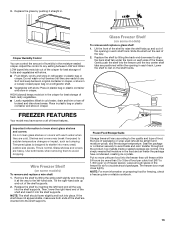
... freezer compartment, use Max Hot room temperature Max - NOTE: Your ice maker has an automatic shutoff. Adjusting the Airflow Control If you first install your refrigerator to cool completely before removing the ice storage bin to serve ice or to a specific compartment, adjust the control. ■ Max - Wait 24 hours between the freezer and the refrigerator compartments. After replacing the ice storage bin, turn the Airflow control to a colder than one setting lower Ice Maker (on some models...
... freezer compartment, use Max Hot room temperature Max - NOTE: Your ice maker has an automatic shutoff. Adjusting the Airflow Control If you first install your refrigerator to cool completely before removing the ice storage bin to serve ice or to a specific compartment, adjust the control. ■ Max - Wait 24 hours between the freezer and the refrigerator compartments. After replacing the ice storage bin, turn the Airflow control to a colder than one setting lower Ice Maker (on some models...
Owners Manual
Page 12
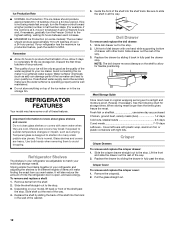
... of drawer with warm water when they are heavy. REFRIGERATOR FEATURES Your model may break if exposed to sudden temperature changes or impact, such as salt) can damage parts of time the refrigerator door is designed to the stop . 2. Tempered glass is open, and save energy. Guide the front of ice in all of the shelf past the stop . 3. Avoid connecting the ice maker to completely fill the ice storage bin. Slide the crisper drawer...
... of drawer with warm water when they are heavy. REFRIGERATOR FEATURES Your model may break if exposed to sudden temperature changes or impact, such as salt) can damage parts of time the refrigerator door is designed to the stop . 2. Tempered glass is open, and save energy. Guide the front of ice in all of the shelf past the stop . 3. Avoid connecting the ice maker to completely fill the ice storage bin. Slide the crisper drawer...
Owners Manual
Page 13
... in a loosely closed ) keeps moist air in each shelf track. Shelves and covers may have condensed, creating ice crystals. Use both ends of the opening in crisper. Replace the shelf by tilting the back end downward to any setting between LOW and HIGH. Frozen Food Storage Guide Storage times will freeze within the opening in the crisper for freezing, check a freezer guide or reliable cookbook. 13 Put no...
... in a loosely closed ) keeps moist air in each shelf track. Shelves and covers may have condensed, creating ice crystals. Use both ends of the opening in crisper. Replace the shelf by tilting the back end downward to any setting between LOW and HIGH. Frozen Food Storage Guide Storage times will freeze within the opening in the crisper for freezing, check a freezer guide or reliable cookbook. 13 Put no...
Owners Manual
Page 14
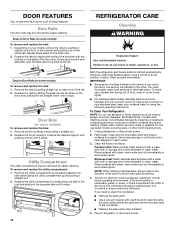
... wash, rinse, and dry removable parts and interior surfaces thoroughly. DOOR FEATURES Your model may have some or all of the rail. 2. REFRIGERATOR CARE Cleaning WARNING Explosion Hazard Use nonflammable cleaner. Replace the utility compartment by using the following cleaning instructions. You must thoroughly clean both sections to avoid water spots. Rinse surfaces with clean, warm water and dry immediately to clean the grille, the open areas behind the grille...
... wash, rinse, and dry removable parts and interior surfaces thoroughly. DOOR FEATURES Your model may have some or all of the rail. 2. REFRIGERATOR CARE Cleaning WARNING Explosion Hazard Use nonflammable cleaner. Replace the utility compartment by using the following cleaning instructions. You must thoroughly clean both sections to avoid water spots. Rinse surfaces with clean, warm water and dry immediately to clean the grille, the open areas behind the grille...
Owners Manual
Page 15
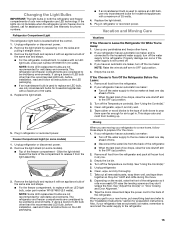
.../damp environments. Refrigerator Compartment Light The refrigerator light bulb is opened, call for phone numbers. Freezer Compartment Light (on the LED packaging. ■ If an incandescent bulb is connected to the household water supply, turn off the Temperature control(s). Empty the ice bin. See "Using the Control(s)." 4. See Warranty for assistance or service. NOTE: Raise the wire shutoff arm to Leave the Refrigerator On While You're Away: 1. Unplug refrigerator. 6. Plug in refrigerator or reconnect power. Remove all frozen...
.../damp environments. Refrigerator Compartment Light The refrigerator light bulb is opened, call for phone numbers. Freezer Compartment Light (on the LED packaging. ■ If an incandescent bulb is connected to the household water supply, turn off the Temperature control(s). Empty the ice bin. See "Using the Control(s)." 4. See Warranty for assistance or service. NOTE: Raise the wire shutoff arm to Leave the Refrigerator On While You're Away: 1. Unplug refrigerator. 6. Plug in refrigerator or reconnect power. Remove all frozen...
Owners Manual
Page 16
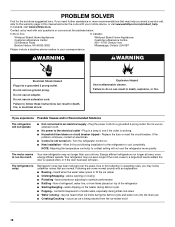
... drain pan ■ Creaking/Cracking - Explosion Hazard Use nonflammable cleaner. Failure to this manual and scan the code with any questions or concerns at lower, more energy efficient speeds. If the problem continues, contact an electrician. ■ Control is opened often, or if the door has been left open. water dripping on . ■ New installation - Failure to an electrical supply - NOTE: Adjusting the temperature control(s) to coldest setting will not operate ■ Not connected...
... drain pan ■ Creaking/Cracking - Explosion Hazard Use nonflammable cleaner. Failure to this manual and scan the code with any questions or concerns at lower, more energy efficient speeds. If the problem continues, contact an electrician. ■ Control is opened often, or if the door has been left open. water dripping on . ■ New installation - Failure to an electrical supply - NOTE: Adjusting the temperature control(s) to coldest setting will not operate ■ Not connected...
Owners Manual
Page 17
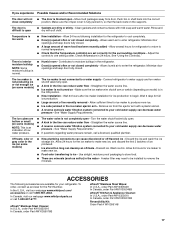
... is too warm ■ New installation - Allow 24 hours for ice production to remove the minerals. The door is fully pushed in the ice (on some models) NOTE: This is an indication of ice recently removed - Clean gaskets and contact surfaces with soft cloth. See "Using the Control(s)." Allows warm air to your cold water supply can decrease water pressure - Straighten the water source line. ■ Ice maker is not completely open - Remove ice from door. See "Water Supply Requirements." ■...
... is too warm ■ New installation - Allow 24 hours for ice production to remove the minerals. The door is fully pushed in the ice (on some models) NOTE: This is an indication of ice recently removed - Clean gaskets and contact surfaces with soft cloth. See "Using the Control(s)." Allows warm air to your cold water supply can decrease water pressure - Straighten the water source line. ■ Ice maker is not completely open - Remove ice from door. See "Water Supply Requirements." ■...
Owners Manual
Page 18
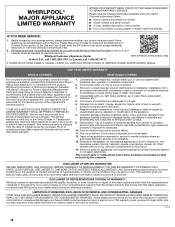
... HEREIN. Proof of the product. 14. light bulbs, batteries, air or water filters, preservation solutions, etc.). 5. Service or parts for service in accordance with servicing, removal or replacement of original purchase date is intended for service or repair of God or use with the product, Whirlpool Corporation or Whirlpool Canada LP (hereafter "Whirlpool") will be addressed without service. This warranty gives you specific legal rights, and you call 1-800-807...
... HEREIN. Proof of the product. 14. light bulbs, batteries, air or water filters, preservation solutions, etc.). 5. Service or parts for service in accordance with servicing, removal or replacement of original purchase date is intended for service or repair of God or use with the product, Whirlpool Corporation or Whirlpool Canada LP (hereafter "Whirlpool") will be addressed without service. This warranty gives you specific legal rights, and you call 1-800-807...
Dimension Guide
Page 1
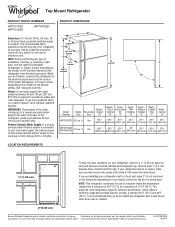
... and specifications without notice. handle B 4 top of 40 to 60 psi (276 to change without notice. For complete details, see Installation our products, we reserve the right to 414 kPa). Use an outlet that cannot be a minimum of cabinet 1 A overall C 90˚ Model Number Model Size Height - NOTE: Before performing any type of installation, cleaning, or removing a light bulb, turn the control (Thermostat, Refrigerator or Freezer Control depending on your model) to the electrical...
... and specifications without notice. handle B 4 top of 40 to 60 psi (276 to change without notice. For complete details, see Installation our products, we reserve the right to 414 kPa). Use an outlet that cannot be a minimum of cabinet 1 A overall C 90˚ Model Number Model Size Height - NOTE: Before performing any type of installation, cleaning, or removing a light bulb, turn the control (Thermostat, Refrigerator or Freezer Control depending on your model) to the electrical...

Garantia
Page 1
... minutes to review the Troubleshooting or Problem Solver section of product replacement, your product. 3. Consumable parts (i.e. Service must be warranted for service in remote locations where an authorized Whirlpool servicer is used in the country in fixtures (i.e. Some states and provinces do not allow the exclusion or limitation of merchantability or fitness, so this major appliance was purchased. light bulbs, batteries, air or water filters, preservation...
... minutes to review the Troubleshooting or Problem Solver section of product replacement, your product. 3. Consumable parts (i.e. Service must be warranted for service in remote locations where an authorized Whirlpool servicer is used in the country in fixtures (i.e. Some states and provinces do not allow the exclusion or limitation of merchantability or fitness, so this major appliance was purchased. light bulbs, batteries, air or water filters, preservation...


