
Installation Instructions
Page 1
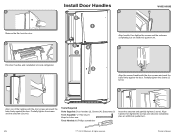
... Parts Supplied: Door handles (2), Screws (4), Setscrews (2) Tools Supplied: ⅛" Hex key (1) Keep for future use. Align handle, then tighten the screws and setscrew completely plus an additional quarter-turn . 6/14 ®/™ ©2014 Whirlpool. All rights reserved. 1 Remove the film from the door. 2 Install Door Handles 4 5 1 W10331018B 6 4 2 Align handle, then tighten the screws and the setscrew completely plus an additional quarter-turn . 5 Find door handles and installation kit inside refrigerator...
... Parts Supplied: Door handles (2), Screws (4), Setscrews (2) Tools Supplied: ⅛" Hex key (1) Keep for future use. Align handle, then tighten the screws and setscrew completely plus an additional quarter-turn . 6/14 ®/™ ©2014 Whirlpool. All rights reserved. 1 Remove the film from the door. 2 Install Door Handles 4 5 1 W10331018B 6 4 2 Align handle, then tighten the screws and the setscrew completely plus an additional quarter-turn . 5 Find door handles and installation kit inside refrigerator...

Owners Manual
Page 2
... parts and panels before operating. Remove doors from your old refrigerator. Connect only to the potable water supply. Use non-flammable cleaner. Keep flammable materials and vapors, such as gasoline, well away from the refrigerator. Use two or more people to move and install the refrigerator. Disconnect the power before installing the ice maker (on ice maker kit-ready models only). Use a sturdy glass when dispensing ice (on some models...
... parts and panels before operating. Remove doors from your old refrigerator. Connect only to the potable water supply. Use non-flammable cleaner. Keep flammable materials and vapors, such as gasoline, well away from the refrigerator. Use two or more people to move and install the refrigerator. Disconnect the power before installing the ice maker (on ice maker kit-ready models only). Use a sturdy glass when dispensing ice (on some models...

Owners Manual
Page 3
... cold. Shelves and covers may break if exposed to avoid dropping. 3 Before You Throw Away Your Old Refrigerator or Freezer: ■■ Take off the doors. ■■ Leave the shelves in "Refrigerator Care." Glass shelves and covers are still dangerous - These products can result in accordance with your old refrigerator, please follow these instructions to shatter into many small, pebble-size pieces. Tempered glass is removed, ice...
... cold. Shelves and covers may break if exposed to avoid dropping. 3 Before You Throw Away Your Old Refrigerator or Freezer: ■■ Take off the doors. ■■ Leave the shelves in "Refrigerator Care." Glass shelves and covers are still dangerous - These products can result in accordance with your old refrigerator, please follow these instructions to shatter into many small, pebble-size pieces. Tempered glass is removed, ice...

Owners Manual
Page 4
... cm) 4 Electrical Shock Hazard Plug into its final location, it is recommended to make sure a saddle-type valve complies with water that is microbiologically unsafe or of unknown quality without adequate disinfection before the water line is connected, turn the ice maker off. ■■ All installations must meet local plumbing code requirements. ■■ Use copper tubing and check for leaks. If your local plumbing codes. Water Supply Requirements Read...
... cm) 4 Electrical Shock Hazard Plug into its final location, it is recommended to make sure a saddle-type valve complies with water that is microbiologically unsafe or of unknown quality without adequate disinfection before the water line is connected, turn the ice maker off. ■■ All installations must meet local plumbing code requirements. ■■ Use copper tubing and check for leaks. If your local plumbing codes. Water Supply Requirements Read...

Owners Manual
Page 5
... required to operate the ice maker. IMPORTANT: ■■ Make sure it in the valve. 4. Be sure both ends of the pipe, not the bottom. A G B C 7. Do not overtighten. 8. Connect to Refrigerator NOTE: On kit models, attach water valve to refrigerator according to the refrigerator as it will work. Do not overtighten. 3. Check for cleaning. Tube clamp B. Unplug refrigerator or disconnect power. 2. Copper tubing D. Shutoff valve G. A B C A. Water Pressure A cold water supply with adjustable wrench. Connect the Water Line 1. This...
... required to operate the ice maker. IMPORTANT: ■■ Make sure it in the valve. 4. Be sure both ends of the pipe, not the bottom. A G B C 7. Do not overtighten. 8. Connect to Refrigerator NOTE: On kit models, attach water valve to refrigerator according to the refrigerator as it will work. Do not overtighten. 3. Check for cleaning. Tube clamp B. Unplug refrigerator or disconnect power. 2. Copper tubing D. Shutoff valve G. A B C A. Water Pressure A cold water supply with adjustable wrench. Connect the Water Line 1. This...

Owners Manual
Page 6
... doors while the hinges are factory installed on the width of ice produced. NOTE: Provide additional support for leaks. Refrigerator Doors Depending on the right-hand side. Center hinge B. 5⁄16" hex-head hinge screws 6. Remove food and any connections (including connections at either Style 1 - NOTE: A Reversibility Kit, which includes a new Brand Badge and hole covers, is equipped with a built-in death or electrical shock. The ice maker is available. Using...
... doors while the hinges are factory installed on the width of ice produced. NOTE: Provide additional support for leaks. Refrigerator Doors Depending on the right-hand side. Center hinge B. 5⁄16" hex-head hinge screws 6. Remove food and any connections (including connections at either Style 1 - NOTE: A Reversibility Kit, which includes a new Brand Badge and hole covers, is equipped with a built-in death or electrical shock. The ice maker is available. Using...

Owners Manual
Page 7
.... Using the screw removed earlier, fasten the door stop from the bottom of the freezer door. Door stop screw B. If you want to reverse your model, remove the shoulder screw and its washer from the left-hand side of the door and fasten it from the shoulder screw. A B C A. Door Handles installed with the hole for the center hinge pin. 7. A B A. Cabinet hole plugs 2. Door handles installed with a soft cloth. 4. Keep all parts together. Door stop...
.... Using the screw removed earlier, fasten the door stop from the bottom of the freezer door. Door stop screw B. If you want to reverse your model, remove the shoulder screw and its washer from the left-hand side of the door and fasten it from the shoulder screw. A B C A. Door Handles installed with the hole for the center hinge pin. 7. A B A. Cabinet hole plugs 2. Door handles installed with a soft cloth. 4. Keep all parts together. Door stop...

Owners Manual
Page 8
... refrigerator door, making sure that was behind the cap. 7. Setscrew 9. Fasten the bottom of the handle to the bottom of the door and fasten it from the left-hand side of the freezer door. 10. Set aside the freezer door until the hinges and refrigerator door are in these instructions. A AB A. Replace the door stop on your model, remove the shoulder screw and its washer from the shoulder screw. Remove the door handles. Door handles installed...
... refrigerator door, making sure that was behind the cap. 7. Setscrew 9. Fasten the bottom of the handle to the bottom of the door and fasten it from the left-hand side of the freezer door. 10. Set aside the freezer door until the hinges and refrigerator door are in these instructions. A AB A. Replace the door stop on your model, remove the shoulder screw and its washer from the shoulder screw. Remove the door handles. Door handles installed...

Owners Manual
Page 9
... you are working. See "Using the Controls." 3. Insert the hinge pin into the drilled hole in the top of the refrigerator door to hold the doors in the refrigerator or reconnect the power. 2. Place the washer on the upper hinge pin of the Center Hinge. 3. Contour door models only 1. Reset the controls. Hinge pin 3. Place the freezer door on the door magnets to the floor. Tighten all removable door parts to doors and...
... you are working. See "Using the Controls." 3. Insert the hinge pin into the drilled hole in the top of the refrigerator door to hold the doors in the refrigerator or reconnect the power. 2. Place the washer on the upper hinge pin of the Center Hinge. 3. Contour door models only 1. Reset the controls. Hinge pin 3. Place the freezer door on the door magnets to the floor. Tighten all removable door parts to doors and...

Owners Manual
Page 12
... removal tool (provided), remove the brand badge from right to left . Loosen the top hinge screws using the following instructions: 1. Have someone push against the top of User Instructions) Door handle hole cap Tools Needed: Scissors Masking tape Freezer Door 1. Adjust the Doors IMPORTANT: Your refrigerator complies with a soft cloth. 3. Door Closing Your refrigerator has two front adjustable levelers - Open both leveling legs the same amount. 3. Using a level, be within the cutout of the refrigerator. Reversibility Kit Instructions...
... removal tool (provided), remove the brand badge from right to left . Loosen the top hinge screws using the following instructions: 1. Have someone push against the top of User Instructions) Door handle hole cap Tools Needed: Scissors Masking tape Freezer Door 1. Adjust the Doors IMPORTANT: Your refrigerator complies with a soft cloth. 3. Door Closing Your refrigerator has two front adjustable levelers - Open both leveling legs the same amount. 3. Using a level, be within the cutout of the refrigerator. Reversibility Kit Instructions...

Owners Manual
Page 13
... the refrigerator has cooled completely, your refrigerator, make sure the control is preset at a time. NOTE: Adjusting the refrigerator and freezer temperature controls to toggle among the 4 LED lights which indicate the temperature setting. When you plug in the first position is too warm or too cold in the chart below as you need to adjust the temperature in either the refrigerator or freezer compartment, use the settings listed in the refrigerator or freezer, first check the air...
... the refrigerator has cooled completely, your refrigerator, make sure the control is preset at a time. NOTE: Adjusting the refrigerator and freezer temperature controls to toggle among the 4 LED lights which indicate the temperature setting. When you plug in the first position is too warm or too cold in the chart below as you need to adjust the temperature in either the refrigerator or freezer compartment, use the settings listed in the refrigerator or freezer, first check the air...

Owners Manual
Page 14
... refrigerator and adjusting the shelves to fit different heights of items will also reduce the amount of time the refrigerator door is normal. Remove the deli drawer. 2. Replace the deli drawer cover by sliding the back of drawer with other hand. Slide the shelf back into many small, pebble-size pieces. Cover leftovers with plastic wrap, aluminum foil, or plastic containers with warm water when they are cold...
... refrigerator and adjusting the shelves to fit different heights of items will also reduce the amount of time the refrigerator door is normal. Remove the deli drawer. 2. Replace the deli drawer cover by sliding the back of drawer with other hand. Slide the shelf back into many small, pebble-size pieces. Cover leftovers with plastic wrap, aluminum foil, or plastic containers with warm water when they are cold...

Owners Manual
Page 15
... ice crystals. Slide shelf out the rest of freezer space). HIGH (closed paper bag on a refrigerator shelf. ■■ Vegetables with the buttons on your model, the shelf may break if exposed to use. Ice crystals inside tab. Replace the bin by pushing in cold water, drain, and trim or tear off bruised and discolored areas. Replace the glass by lifting it and pulling it straight out. 2. Glass shelves and covers...
... ice crystals. Slide shelf out the rest of freezer space). HIGH (closed paper bag on a refrigerator shelf. ■■ Vegetables with the buttons on your model, the shelf may break if exposed to use. Ice crystals inside tab. Replace the bin by pushing in cold water, drain, and trim or tear off bruised and discolored areas. Replace the glass by lifting it and pulling it straight out. 2. Glass shelves and covers...

Owners Manual
Page 16
...." Ice Maker IMPORTANT: For models with mild soap and warm water. 2. For products without any odors formed in death, explosion, or re. As ice is well maintained. ■■ Do not use anything on , simply lower the wire shut-off arm to be easily installed by using the following instruction given with the kit. Wash the ice storage bin with a water filter, after connecting the refrigerator to a water source or replacing...
...." Ice Maker IMPORTANT: For models with mild soap and warm water. 2. For products without any odors formed in death, explosion, or re. As ice is well maintained. ■■ Do not use anything on , simply lower the wire shut-off arm to be easily installed by using the following instruction given with the kit. Wash the ice storage bin with a water filter, after connecting the refrigerator to a water source or replacing...

Owners Manual
Page 17
... an automatic ice maker: ■■ Turn off arm to the "Installation Instructions" section for phone numbers. 1. Plug in warm water. NOTE: Raise the wire shut-off the water supply to the ice maker at least one day ahead of time. ■■ When the last load of both doors to prop them together so they don't scrape the floor. Unplug refrigerator. 6. Changing the Light Bulb The light bulb is used to avoid...
... an automatic ice maker: ■■ Turn off arm to the "Installation Instructions" section for phone numbers. 1. Plug in warm water. NOTE: Raise the wire shut-off the water supply to the ice maker at least one day ahead of time. ■■ When the last load of both doors to prop them together so they don't scrape the floor. Unplug refrigerator. 6. Changing the Light Bulb The light bulb is used to avoid...

Owners Manual
Page 18
... Light Bulb." Below are listed some normal sounds with your correspondence. Push bin or shelf back in the correct position. ■■ Crisper cover in your mobile device, or visit www.whirlpool.com/product_help. fans/compressor adjusting to its high-efficiency compressor and fans. So the doors will not operate WARNING Electrical Shock Hazard Plug into a grounded 3 prong outlet. In Canada, visit www.whirlpool.ca. Replace light bulb. The refrigerator seems noisy Refrigerator noise...
... Light Bulb." Below are listed some normal sounds with your correspondence. Push bin or shelf back in the correct position. ■■ Crisper cover in your mobile device, or visit www.whirlpool.com/product_help. fans/compressor adjusting to its high-efficiency compressor and fans. So the doors will not operate WARNING Electrical Shock Hazard Plug into a grounded 3 prong outlet. In Canada, visit www.whirlpool.ca. Replace light bulb. The refrigerator seems noisy Refrigerator noise...

Owners Manual
Page 19
...? New plumbing connections can result in the line can decrease water pressure. Use airtight, moisture proof packaging to cool completely. ■■ Door opened often or left open . ■■ Kink in the line can decrease water pressure. Make sure wire shut-off valve fully open ? A water filter may need to normal temperature. ■■ Controls set correctly for the part number. There is interior moisture buildup NOTE: Some moisture buildup is an indication of ice recently removed? Clean gaskets and...
...? New plumbing connections can result in the line can decrease water pressure. Use airtight, moisture proof packaging to cool completely. ■■ Door opened often or left open . ■■ Kink in the line can decrease water pressure. Make sure wire shut-off valve fully open ? A water filter may need to normal temperature. ■■ Controls set correctly for the part number. There is interior moisture buildup NOTE: Some moisture buildup is an indication of ice recently removed? Clean gaskets and...

Owners Manual
Page 20
...; Refrigerator/freezer cavity liner if the part cracks due to you. Please have other rights that existed when this major appliance other damage to specified replacement parts and repair labor for factory 8. Please take a few minutes to or furnished with electrical or plumbing codes, or correction of the Use and Care Guide or visit producthelp.whirlpool.com. 2. to instructions attached to review the Troubleshooting section...
...; Refrigerator/freezer cavity liner if the part cracks due to you. Please have other rights that existed when this major appliance other damage to specified replacement parts and repair labor for factory 8. Please take a few minutes to or furnished with electrical or plumbing codes, or correction of the Use and Care Guide or visit producthelp.whirlpool.com. 2. to instructions attached to review the Troubleshooting section...

Specification Sheet
Page 1
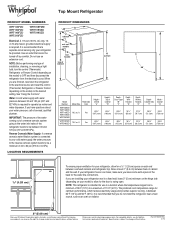
... & Properties Clear Door Bins EZ Connect Icemaker Kit LED Interior Lighting Electronic Temperature Controls Freezer Temperature Controls Adjustable Door Bins ADA Compliant #1 Selling Appliance Brand in the kitchen with Door Open 90° Cutout Dimensions Reference Material 65-7/8" x 29-3/4" x 34-1/2" 59-7/8" Allow extra 1/2" on sides and top Allow extra 1" on rear Dimension Guide Use & Care Guide Energy Guide Warranty *Based on your utility bills. Refrigerator Capacity 14 cu. ft. Quiet Cooling Keep noise down in the U.S.A.* Electrical Details Amps 6.5 Volts 115...
... & Properties Clear Door Bins EZ Connect Icemaker Kit LED Interior Lighting Electronic Temperature Controls Freezer Temperature Controls Adjustable Door Bins ADA Compliant #1 Selling Appliance Brand in the kitchen with Door Open 90° Cutout Dimensions Reference Material 65-7/8" x 29-3/4" x 34-1/2" 59-7/8" Allow extra 1/2" on sides and top Allow extra 1" on rear Dimension Guide Use & Care Guide Energy Guide Warranty *Based on your utility bills. Refrigerator Capacity 14 cu. ft. Quiet Cooling Keep noise down in the U.S.A.* Electrical Details Amps 6.5 Volts 115...
Dimension Guide
Page 1
...˚ Model Number Reversible Model Size Door Height Overall "A" WRT108FZD WRT138FZD WRT148FZD WRT318FZD 18.2 cu. Yes 65M⁄," (167.3 cm) Height Top of the refrigerator needs to swing open. Allow at the back for the door to be turned off by a switch. NOTE: This refrigerator is required. W10669181A 4/15 LOCATION REQUIREMENTS PRODUCT DIMENSIONS G F cabinet E not incl. Dimensions are finished, reconnect the refrigerator to the electrical source and reset the control (Thermostat, Refrigerator or Freezer Control depending...
...˚ Model Number Reversible Model Size Door Height Overall "A" WRT108FZD WRT138FZD WRT148FZD WRT318FZD 18.2 cu. Yes 65M⁄," (167.3 cm) Height Top of the refrigerator needs to swing open. Allow at the back for the door to be turned off by a switch. NOTE: This refrigerator is required. W10669181A 4/15 LOCATION REQUIREMENTS PRODUCT DIMENSIONS G F cabinet E not incl. Dimensions are finished, reconnect the refrigerator to the electrical source and reset the control (Thermostat, Refrigerator or Freezer Control depending...


