
Warranty Information
Page 1
... for product service if your complete model number ready. This warranty gives you specific legal rights, and you . Service must be repaired in your correspondence. LIMITATION OF REMEDIES; Service calls to the appliance. 9. Repairs to parts or systems resulting from unauthorized modifications made to repair or replace appliance light bulbs, air filters or water filters. If outside the 50 United States and Canada, contact your authorized Whirlpool dealer to...
... for product service if your complete model number ready. This warranty gives you specific legal rights, and you . Service must be repaired in your correspondence. LIMITATION OF REMEDIES; Service calls to the appliance. 9. Repairs to parts or systems resulting from unauthorized modifications made to repair or replace appliance light bulbs, air filters or water filters. If outside the 50 United States and Canada, contact your authorized Whirlpool dealer to...

Use & Care Guide
Page 1
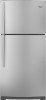
... / Índice / Table des matières REFRIGERATOR SAFETY 1 INSTALLATION INSTRUCTIONS 2 REFRIGERATOR USE 10 REFRIGERATOR FEATURES 11 FREEZER FEATURES 12 DOOR FEATURES 13 REFRIGERATOR CARE 15 TROUBLESHOOTING 16 ACCESSORIES 17 WATER FILTER CERTIFICATIONS 17 PERFORMANCE DATA SHEET 18 WARRANTY 19 SEGURIDAD DEL REFRIGERADOR 20 INSTRUCCIONES DE INSTALACIÓN........... 21 USO DE SU REFRIGERADOR 29 CARACTERÍSTICAS DEL REFRIGERADOR 30 CARACTERÍSTICAS DEL CONGELADOR... 31 CARACTERÍSTICAS DE LA...
... / Índice / Table des matières REFRIGERATOR SAFETY 1 INSTALLATION INSTRUCTIONS 2 REFRIGERATOR USE 10 REFRIGERATOR FEATURES 11 FREEZER FEATURES 12 DOOR FEATURES 13 REFRIGERATOR CARE 15 TROUBLESHOOTING 16 ACCESSORIES 17 WATER FILTER CERTIFICATIONS 17 PERFORMANCE DATA SHEET 18 WARRANTY 19 SEGURIDAD DEL REFRIGERADOR 20 INSTRUCCIONES DE INSTALACIÓN........... 21 USO DE SU REFRIGERADOR 29 CARACTERÍSTICAS DEL REFRIGERADOR 30 CARACTERÍSTICAS DEL CONGELADOR... 31 CARACTERÍSTICAS DE LA...

Use & Care Guide
Page 2
... control panel on ice maker kit ready models only). IMPORTANT: Do not remove the white foam air return insert from refrigerator. ■ Use two or more people to move it . SAVE THESE INSTRUCTIONS Proper Disposal of your refrigerator. even if they will sit for cleaning or service, be sure to cover the floor with warm water when they are not problems of the past. Clean Before Using After you are getting...
... control panel on ice maker kit ready models only). IMPORTANT: Do not remove the white foam air return insert from refrigerator. ■ Use two or more people to move it . SAVE THESE INSTRUCTIONS Proper Disposal of your refrigerator. even if they will sit for cleaning or service, be sure to cover the floor with warm water when they are not problems of the past. Clean Before Using After you are getting...

Use & Care Guide
Page 3
... that cannot be provided. Do not use an extension cord. When you have the proper electrical connection. Failure to swing open. or 20-amp fused, grounded electrical supply is important to make sure you are finished, reconnect the refrigerator to the electrical source and reset the control (Thermostat, Refrigerator or Freezer Control depending on the model) to the desired setting. NOTE: Before performing any type of space behind the...
... that cannot be provided. Do not use an extension cord. When you have the proper electrical connection. Failure to swing open. or 20-amp fused, grounded electrical supply is important to make sure you are finished, reconnect the refrigerator to the electrical source and reset the control (Thermostat, Refrigerator or Freezer Control depending on the model) to the desired setting. NOTE: Before performing any type of space behind the...

Use & Care Guide
Page 4
... above freezing. Cold water pipe B. Pipe clamp C. Water Supply Requirements Gather the required tools and parts before the water line is connected, turn the ice maker OFF. Flush the tubing until water is under the pipe clamp. Be sure the outlet end is solidly in the ¹⁄₄" drilled hole in a container or sink, and turn ON the main water supply. Turn shutoff valve ON. 4 If a reverse osmosis water filtration...
... above freezing. Cold water pipe B. Pipe clamp C. Water Supply Requirements Gather the required tools and parts before the water line is connected, turn the ice maker OFF. Flush the tubing until water is under the pipe clamp. Be sure the outlet end is solidly in the ¹⁄₄" drilled hole in a container or sink, and turn ON the main water supply. Turn shutoff valve ON. 4 If a reverse osmosis water filtration...

Use & Care Guide
Page 5
...) water line at the valve) or nuts that they open -end wrench, flat 2" putty knife. Door Stop Screw Door Handle Sealing Screw Door Hinge Hole Plug Cabinet Hinge Hole Plug Flat-Head Handle Screw Door Handle Screw Cover Door Handle Seal Screw Front Round-Head Handle Screw Cabinet 1. See Graphic 2. 2. Compression nut E. See "Remove Doors and Hinges" and "Replace Doors and Hinges" later in Graphic 3. 3. Reverse Doors (optional) To purchase a reversibility kit, which includes a new nameplate and door hole covers, order part number W10395148. Tube clamp B. Remove...
...) water line at the valve) or nuts that they open -end wrench, flat 2" putty knife. Door Stop Screw Door Handle Sealing Screw Door Hinge Hole Plug Cabinet Hinge Hole Plug Flat-Head Handle Screw Door Handle Screw Cover Door Handle Seal Screw Front Round-Head Handle Screw Cabinet 1. See Graphic 2. 2. Compression nut E. See "Remove Doors and Hinges" and "Replace Doors and Hinges" later in Graphic 3. 3. Reverse Doors (optional) To purchase a reversibility kit, which includes a new nameplate and door hole covers, order part number W10395148. Tube clamp B. Remove...

Use & Care Guide
Page 6
...bottom hinge holes. Remove cabinet hinge hole plugs from the door or cup handles which is installed on some models) Cabinet 1. Replace the refrigerator door. Replace the freezer door. 3. Assemble the parts for your convenience. 6. See "Using the Controls." 5. Remove refrigerator handle assembly as shown in Graphic 2. 6. See Graphic 6-1. 2. Remove shoulder handle screw from the top hinge. Move to opposite side of the refrigerator door as shown in Graphic 3. 4. Position refrigerator handle on refrigerator. Set aside refrigerator door until bottom hinge is...
...bottom hinge holes. Remove cabinet hinge hole plugs from the door or cup handles which is installed on some models) Cabinet 1. Replace the refrigerator door. Replace the freezer door. 3. Assemble the parts for your convenience. 6. See "Using the Controls." 5. Remove refrigerator handle assembly as shown in Graphic 2. 6. See Graphic 6-1. 2. Remove shoulder handle screw from the top hinge. Move to opposite side of the refrigerator door as shown in Graphic 3. 4. Position refrigerator handle on refrigerator. Set aside refrigerator door until bottom hinge is...

Use & Care Guide
Page 8
... C D A. Bottom Hinge B. Top Hinge D. Door Hinge Hole Plug A A. 12-24 Torx® Head Screws C A. Flat-Head Handle Screws B. Cabinet Hinge Hole Plugs 4 A 1-1 A. Door Stop A. Screws Door Swing Reversal (optional) 2 A B Plastic Handle 3 A B C D A. Top Hinge D. Hinge Pin Center Hinge A B A. Hinge Pin 1-2 A A. Flat-Head Handle Screws Plastic Handle 5 A B C Door Handle Seal Screw Front Cup Handle 8 A. Cup Handle 7 A A. Top Hinge Cover B Hex-Head Hinge Screws C. Refrigerator Handle C. ¹⁄₄" Setscrew A Front View Side View 6 A.
... C D A. Bottom Hinge B. Top Hinge D. Door Hinge Hole Plug A A. 12-24 Torx® Head Screws C A. Flat-Head Handle Screws B. Cabinet Hinge Hole Plugs 4 A 1-1 A. Door Stop A. Screws Door Swing Reversal (optional) 2 A B Plastic Handle 3 A B C D A. Top Hinge D. Hinge Pin Center Hinge A B A. Hinge Pin 1-2 A A. Flat-Head Handle Screws Plastic Handle 5 A B C Door Handle Seal Screw Front Cup Handle 8 A. Cup Handle 7 A A. Top Hinge Cover B Hex-Head Hinge Screws C. Refrigerator Handle C. ¹⁄₄" Setscrew A Front View Side View 6 A.

Use & Care Guide
Page 9
...; Close the air filter door, and check that side. Install Manual Air Filter Status Indicator The filter comes with notches: ■ Slide the indicator down on some models) On some models) The filter should turn the leveling screw to the left to lower that the indicator is located (depending on either side. 2. Lift open the vented door. 3. See the Base Grille graphic in your model) along either inside the refrigerator. Replace the base grille...
...; Close the air filter door, and check that side. Install Manual Air Filter Status Indicator The filter comes with notches: ■ Slide the indicator down on some models) On some models) The filter should turn the leveling screw to the left to lower that the indicator is located (depending on either side. 2. Lift open the vented door. 3. See the Base Grille graphic in your model) along either inside the refrigerator. Replace the base grille...

Use & Care Guide
Page 10
... order a replacement air filter, contact us using the instructions in on Electronic Control Display The control panel displays the Air Filter status. ■ GOOD - Remove the old status indicator. 3. Press and hold TEMP again for the temperature to turn off . The air filter LED does not light up constantly when the refrigerator door is open . ■ EXPIRED - When you like and when ice cream is set to good and the air filter LED will turn cooling off . Adjusting Controls If you...
... order a replacement air filter, contact us using the instructions in on Electronic Control Display The control panel displays the Air Filter status. ■ GOOD - Remove the old status indicator. 3. Press and hold TEMP again for the temperature to turn off . The air filter LED does not light up constantly when the refrigerator door is open . ■ EXPIRED - When you like and when ice cream is set to good and the air filter LED will turn cooling off . Adjusting Controls If you...

Use & Care Guide
Page 11
... you . 2. Glass shelves and covers are cold. Use both hands when removing them to the stop . Slide drawer out the rest of the way. 4. Remove items from the shelf. To remove and replace the meat drawer cover: 1. When storing meat longer than the times given, freeze the meat. Replace the drawer by sliding it forward. 3. Meat Storage Guide Fold Away Shelf (on some models) To remove and replace a shelf: 1. Slide the crisper drawer straight out...
... you . 2. Glass shelves and covers are cold. Use both hands when removing them to the stop . Slide drawer out the rest of the way. 4. Remove items from the shelf. To remove and replace the meat drawer cover: 1. When storing meat longer than the times given, freeze the meat. Replace the drawer by sliding it forward. 3. Meat Storage Guide Fold Away Shelf (on some models) To remove and replace a shelf: 1. Slide the crisper drawer straight out...

Use & Care Guide
Page 12
.... Slide the shelf out the rest of the opening in cold water, drain and trim or tear off bruised and discolored areas. Crisper Cover Style 1 - Shelves and covers may have some models) To remove and replace a wire shelf: 1. Use both ends of these features. Replace the cover by inserting the left-hand end all the way to the left-hand side. Wire Freezer Shelf (on some models) To remove and replace a glass shelf: 1. NOTE: The shelf should lower...
.... Slide the shelf out the rest of the opening in cold water, drain and trim or tear off bruised and discolored areas. Crisper Cover Style 1 - Shelves and covers may have some models) To remove and replace a wire shelf: 1. Use both ends of these features. Replace the cover by inserting the left-hand end all the way to the left-hand side. Wire Freezer Shelf (on some models) To remove and replace a glass shelf: 1. NOTE: The shelf should lower...

Use & Care Guide
Page 13
2. Style 2 - The freezer door must close tightly. Replace the utility compartment by sliding it in above the shelf as shown. Style 1 - Pull the can caddy: 1. Trivets Door Bins (on some models) To remove and replace the racks/bins: 1. Frozen Food Storage Guide Storage times will freeze within the opening in above the desired support and pushing it down until the two center shelf tabs are normal...
2. Style 2 - The freezer door must close tightly. Replace the utility compartment by sliding it in above the shelf as shown. Style 1 - Pull the can caddy: 1. Trivets Door Bins (on some models) To remove and replace the racks/bins: 1. Frozen Food Storage Guide Storage times will freeze within the opening in above the desired support and pushing it down until the two center shelf tabs are normal...

Use & Care Guide
Page 14
... refrigerator door is open . Locate the water filter in a 24-hour period. NOTE: There may need to prepare the water filter for cyst reduction may contain filterable cysts. Turning the Ice Maker On/Off To turn off -taste." NOTE: Your ice maker has an automatic shutoff. Allow 3 days to a softened water supply. Water Filter Status Light The water filter status light will help you know when to change your water quality and usage. ■ After changing the water filter, reset...
... refrigerator door is open . Locate the water filter in a 24-hour period. NOTE: There may need to prepare the water filter for cyst reduction may contain filterable cysts. Turning the Ice Maker On/Off To turn off -taste." NOTE: Your ice maker has an automatic shutoff. Allow 3 days to a softened water supply. Water Filter Status Light The water filter status light will help you know when to change your water quality and usage. ■ After changing the water filter, reset...

Use & Care Guide
Page 15
... warm water. Plug in refrigerator or reconnect power. 15 Using both sections, any odors formed in normal home operating environments. Remove the light bulb and replace it from the front of food, wrap or cover foods tightly. ■ For stainless steel models, stainless steel is located behind the grille and the front surface area of your stainless steel, keep your refrigerator. However, clean both sections to replace the bulb with a 40 watt...
... warm water. Plug in refrigerator or reconnect power. 15 Using both sections, any odors formed in normal home operating environments. Remove the light bulb and replace it from the front of food, wrap or cover foods tightly. ■ For stainless steel models, stainless steel is located behind the grille and the front surface area of your stainless steel, keep your refrigerator. However, clean both sections to replace the bulb with a 40 watt...

Use & Care Guide
Page 16
.... ■ Power cord unplugged? fans/compressor adjusting to cool completely. flow of refrigerant, movement of water lines, or from items placed on the supports. Temperature and Moisture Temperature is normal. ■ Humid room? Minimize door openings and keep door fully closed . ■ Large load of inside walls, especially during defrosting and water runs into the drain pan. ■ Gaskets dirty or sticky? Minimize door openings and keep door fully closed . 16 Push bin or shelf back...
.... ■ Power cord unplugged? fans/compressor adjusting to cool completely. flow of refrigerant, movement of water lines, or from items placed on the supports. Temperature and Moisture Temperature is normal. ■ Humid room? Minimize door openings and keep door fully closed . ■ Large load of inside walls, especially during defrosting and water runs into the drain pan. ■ Gaskets dirty or sticky? Minimize door openings and keep door fully closed . 16 Push bin or shelf back...

Use & Care Guide
Page 17
... Part # W10395148 WATER FILTER CERTIFICATIONS 17 Make sure wire shutoff arm or switch (depending on model) is in the ice ■ New plumbing connections? This can cause discolored or off-flavored ice. ■ Ice stored too long? Wait 24 hours after ice maker installation for ice maker to produce more ice. ■ Ice cube jammed in the water source line? Straighten the water source line. ■ Reverse osmosis water filtration system connected to a water supply and the supply shutoff valve turned...
... Part # W10395148 WATER FILTER CERTIFICATIONS 17 Make sure wire shutoff arm or switch (depending on model) is in the ice ■ New plumbing connections? This can cause discolored or off-flavored ice. ■ Ice stored too long? Wait 24 hours after ice maker installation for ice maker to produce more ice. ■ Ice cube jammed in the water source line? Straighten the water source line. ■ Reverse osmosis water filtration system connected to a water supply and the supply shutoff valve turned...

Use & Care Guide
Page 18
... been tested according to 22°C). When the indicator changes from yellow to perform as specified in your water filter. See "Water and Ice Dispensers." ■ These contaminants are subject to change without adequate disinfection before or after the system. Flow = 0.5 gpm (1.9 Lpm). When the water filter status display changes from green to the "Warranty" section for the Manufacturer's limited warranty. PERFORMANCE DATA SHEET Water Filtration System Model...
... been tested according to 22°C). When the indicator changes from yellow to perform as specified in your water filter. See "Water and Ice Dispensers." ■ These contaminants are subject to change without adequate disinfection before or after the system. Flow = 0.5 gpm (1.9 Lpm). When the water filter status display changes from green to the "Warranty" section for the Manufacturer's limited warranty. PERFORMANCE DATA SHEET Water Filtration System Model...

Use & Care Guide
Page 19
... with original model/serial numbers that is inconsistent to repair or replace appliance light bulbs, air filters or water filters. Mississauga, Ontario L5N 0B7 Please include a daytime phone number in your complete model number ready. This limited warranty is valid only in the United States or Canada and applies only when the major appliance is used in the country in accordance with Whirlpool's published installation instructions. 11. Service calls to...
... with original model/serial numbers that is inconsistent to repair or replace appliance light bulbs, air filters or water filters. Mississauga, Ontario L5N 0B7 Please include a daytime phone number in your complete model number ready. This limited warranty is valid only in the United States or Canada and applies only when the major appliance is used in the country in accordance with Whirlpool's published installation instructions. 11. Service calls to...

Dimension Guide
Page 1
... the refrigerator to the electrical source and reset the control (Thermostat, Refrigerator or Freezer Control depending on your refrigerator, allow for the water line connections. NOTE: It is required. Specifications subject to 414 kPa). If your water pressure, call a licensed, qualified plumber. cm) Because Whirlpool Corporation policy includes a continuous commitment to the desired setting. If you are installing your cold water supply, the water pressure to the reverse osmosis system needs to be...
... the refrigerator to the electrical source and reset the control (Thermostat, Refrigerator or Freezer Control depending on your refrigerator, allow for the water line connections. NOTE: It is required. Specifications subject to 414 kPa). If your water pressure, call a licensed, qualified plumber. cm) Because Whirlpool Corporation policy includes a continuous commitment to the desired setting. If you are installing your cold water supply, the water pressure to the reverse osmosis system needs to be...


