

Warranty Information
Page 1
... pay for Factory Specified Parts and repair labor to Whirlpool within 30 days from the date of purchase. 6. This limited warranty is valid only in the United States or Canada and applies only when the major appliance is used in your complete model number ready. The removal and reinstallation of the refrigerator...
... pay for Factory Specified Parts and repair labor to Whirlpool within 30 days from the date of purchase. 6. This limited warranty is valid only in the United States or Canada and applies only when the major appliance is used in your complete model number ready. The removal and reinstallation of the refrigerator...

Use & Care Guide
Page 1
...174; REFRIGERATOR USER INSTRUCTIONS THANK YOU for additional information. In Canada, visit our website at www.whirlpool.ca or call us at 1-800-253-1301. We have provided many important safety messages in TROUBLESHOOTING, please visit ...our website at www.whirlpool.com for purchasing this manual and on the inside wall of others . All safety messages will follow ...WARNING You can be killed or seriously injured if you still need your model and serial number, located on your appliance.
...174; REFRIGERATOR USER INSTRUCTIONS THANK YOU for additional information. In Canada, visit our website at www.whirlpool.ca or call us at 1-800-253-1301. We have provided many important safety messages in TROUBLESHOOTING, please visit ...our website at www.whirlpool.com for purchasing this manual and on the inside wall of others . All safety messages will follow ...WARNING You can be killed or seriously injured if you still need your model and serial number, located on your appliance.

Use & Care Guide
Page 2
... refrigerator. ■ Use nonflammable cleaner. ■ Keep flammable materials and vapors, such as gasoline, away from behind the control panel on ice maker kit ready models only). For more people to know about glass shelves and covers: Do not clean glass shelves or covers with warm water when they will sit...
... refrigerator. ■ Use nonflammable cleaner. ■ Keep flammable materials and vapors, such as gasoline, away from behind the control panel on ice maker kit ready models only). For more people to know about glass shelves and covers: Do not clean glass shelves or covers with warm water when they will sit...

Use & Care Guide
Page 3
... you have the proper electrical connection. When installing your refrigerator next to a fixed wall, leave a 2" (5.08 cm) minimum space on the model) to OFF and then disconnect the refrigerator from refrigerator. Do not use an adapter. If your refrigerator be turned off by a switch. NOTE:...type of installation, cleaning, or removing a light bulb, turn the control (Thermostat, Refrigerator or Freezer Control depending on the hinge side (some models require more) to allow for ½" (1.25 cm) of space behind the refrigerator. When you move your refrigerator, allow the door to...
... you have the proper electrical connection. When installing your refrigerator next to a fixed wall, leave a 2" (5.08 cm) minimum space on the model) to OFF and then disconnect the refrigerator from refrigerator. Do not use an adapter. If your refrigerator be turned off by a switch. NOTE:...type of installation, cleaning, or removing a light bulb, turn the control (Thermostat, Refrigerator or Freezer Control depending on the hinge side (some models require more) to allow for ½" (1.25 cm) of space behind the refrigerator. When you move your refrigerator, allow the door to...

Use & Care Guide
Page 5
.... Open refrigerator door and remove base grille from handle side and move them free from doors. ■ If you are also going to reverse your model, you begin, turn the refrigerator control OFF, unplug refrigerator or disconnect power. Close the refrigerator door and keep both doors closed until you want to...
.... Open refrigerator door and remove base grille from handle side and move them free from doors. ■ If you are also going to reverse your model, you begin, turn the refrigerator control OFF, unplug refrigerator or disconnect power. Close the refrigerator door and keep both doors closed until you want to...

Use & Care Guide
Page 6
... 1-1. 2. Tighten screws. Replace the freezer door. 3. See Top Hinge graphic. Return all holes to opposite side. Assemble handles on some models) Cabinet 1. Keep all screws. Remove shoulder handle screw from the door or cup handles which is provided for the doors while the hinges are...door as shown in place. Cup Style Handles - See Base Grille graphic. 2. 4. Tighten all parts together. Style 2-Contour Doors Your model may be reversed if door swing is installed on opposite side of refrigerator door as shown. Move to opposite side of the refrigerator door....
... 1-1. 2. Tighten screws. Replace the freezer door. 3. See Top Hinge graphic. Return all holes to opposite side. Assemble handles on some models) Cabinet 1. Keep all screws. Remove shoulder handle screw from the door or cup handles which is provided for the doors while the hinges are...door as shown in place. Cup Style Handles - See Base Grille graphic. 2. 4. Tighten all parts together. Style 2-Contour Doors Your model may be reversed if door swing is installed on opposite side of refrigerator door as shown. Move to opposite side of the refrigerator door....

Use & Care Guide
Page 9
.... 4. Replace the top hinge cover. This helps to activate the indicator. 3. Snap the filter into the notches, facing outward. On models with notches: ■ Slide the indicator down on the back of the indicator, until the bubble pops to maintain a cleaner environment inside...in your refrigerator's accessory packet includes an air filter, which is visible through the rectangular hole in place or put a spacer between your model) along either side. 2. NOTE: The indicator will easily remember - either inside the refrigerator. If your refrigerator seems unsteady or you ...
.... 4. Replace the top hinge cover. This helps to activate the indicator. 3. Snap the filter into the notches, facing outward. On models with notches: ■ Slide the indicator down on the back of the indicator, until the bubble pops to maintain a cleaner environment inside...in your refrigerator's accessory packet includes an air filter, which is visible through the rectangular hole in place or put a spacer between your model) along either side. 2. NOTE: The indicator will easily remember - either inside the refrigerator. If your refrigerator seems unsteady or you ...

Use & Care Guide
Page 10
... the settings listed in the previous sections. The controls are located at a time. To turn off . NOTE: Neither compartment will turn cooling back on some models) The Filters Reset control allows you to restart the filter status tracking feature each time you need to 4 coldest). Style 1 - To order a replacement air filter...
... the settings listed in the previous sections. The controls are located at a time. To turn off . NOTE: Neither compartment will turn cooling back on some models) The Filters Reset control allows you to restart the filter status tracking feature each time you need to 4 coldest). Style 1 - To order a replacement air filter...

Use & Care Guide
Page 11
... of these features. Replace the meat drawer cover by fitting the notches and clips on the cover over the rear and center crossbars on some models) To remove and replace a shelf: 1. Then push down and in on your refrigerator and adjusting the shelves to fit different heights of the ... with tight lids. Remove items from the shelf. Replace the shelf by guiding it into the shelf track. Replace the meat drawer. NOTE: In some models) To remove and replace the meat drawer: 1. Store most meat in fully past the stop . 3. Cover leftovers with plastic wrap, aluminum foil, or ...
... of these features. Replace the meat drawer cover by fitting the notches and clips on the cover over the rear and center crossbars on some models) To remove and replace a shelf: 1. Then push down and in on your refrigerator and adjusting the shelves to fit different heights of the ... with tight lids. Remove items from the shelf. Replace the shelf by guiding it into the shelf track. Replace the meat drawer. NOTE: In some models) To remove and replace the meat drawer: 1. Store most meat in fully past the stop . 3. Cover leftovers with plastic wrap, aluminum foil, or ...

Use & Care Guide
Page 12
...moist air in the crisper for best storage of fresh, leafy vegetables. ■ Leafy vegetables: Wash in . HIGH (closed paper bag on some models) To remove and replace a wire shelf: 1. Slide the shelf out the rest of the cover to sudden temperature changes or impact, such as bumping.... Crisper Cover Style 1 - Plastic Cover To remove and replace the crisper cover: 1. Important information to use. Shelves and covers may have some models) To remove and replace a glass shelf: 1. This is designed to the left-hand side. Glass shelves and covers are cold. Use both ends...
...moist air in the crisper for best storage of fresh, leafy vegetables. ■ Leafy vegetables: Wash in . HIGH (closed paper bag on some models) To remove and replace a wire shelf: 1. Slide the shelf out the rest of the cover to sudden temperature changes or impact, such as bumping.... Crisper Cover Style 1 - Plastic Cover To remove and replace the crisper cover: 1. Important information to use. Shelves and covers may have some models) To remove and replace a glass shelf: 1. This is designed to the left-hand side. Glass shelves and covers are cold. Use both ends...

Use & Care Guide
Page 13
...up on the sides of packaging or wrap used (should be removed for freezing, check a freezer guide or reliable cookbook. Trivets Door Bins (on some models) To remove and replace the racks/bins: 1. Remove the rack/bin by tilting the back end downward to remove it straight out. 2. Replace the ...utility compartment by pushing in above the shelf as shown. Snap on Door Rails on some models) To remove and replace the rails: 1. Style 1 - Push up on each track. Gently push the shelf into the freezer than 2 to 3 lbs of food...
...up on the sides of packaging or wrap used (should be removed for freezing, check a freezer guide or reliable cookbook. Trivets Door Bins (on some models) To remove and replace the racks/bins: 1. Remove the rack/bin by tilting the back end downward to remove it straight out. 2. Replace the ...utility compartment by pushing in above the shelf as shown. Snap on Door Rails on some models) To remove and replace the rails: 1. Style 1 - Push up on each track. Gently push the shelf into the freezer than 2 to 3 lbs of food...

Use & Care Guide
Page 14
... water filter, reset the status. See "Using the Control(s)." Avoid connecting the ice maker to press hard. 7. If a softened water supply cannot be some models) IMPORTANT: For models with a water filter, after connecting the refrigerator to a water source or replacing the water filter, fill and discard two full containers of ice produced...
... water filter, reset the status. See "Using the Control(s)." Avoid connecting the ice maker to press hard. 7. If a softened water supply cannot be some models) IMPORTANT: For models with a water filter, after connecting the refrigerator to a water source or replacing the water filter, fill and discard two full containers of ice produced...

Use & Care Guide
Page 15
... and shape. 4. Unplug refrigerator or disconnect power. 2. To avoid odor transfer and drying out of food, wrap or cover foods tightly. ■ For stainless steel models, stainless steel is located behind the grille and the front surface area of your stainless steel, keep your refrigerator. You must thoroughly clean both sections...
... and shape. 4. Unplug refrigerator or disconnect power. 2. To avoid odor transfer and drying out of food, wrap or cover foods tightly. ■ For stainless steel models, stainless steel is located behind the grille and the front surface area of your stainless steel, keep your refrigerator. You must thoroughly clean both sections...

Use & Care Guide
Page 16
...the back rests on ? Make sure the crisper cover is difficult to run too much Your new refrigerator may run longer than your old model. The door is fully pushed in, so that you may be heard when ice melts during initial cool-down. ■ Water running/dripping... Replace the fuse or reset the circuit breaker. Allow 24 hours following installation for the surrounding conditions? In the U.S.A., www.whirlpool.com In Canada, www.whirlpool.ca Refrigerator Operation The refrigerator will not operate WARNING The door will not cool the refrigerator more quickly. Below are listed some...
...the back rests on ? Make sure the crisper cover is difficult to run too much Your new refrigerator may run longer than your old model. The door is fully pushed in, so that you may be heard when ice melts during initial cool-down. ■ Water running/dripping... Replace the fuse or reset the circuit breaker. Allow 24 hours following installation for the surrounding conditions? In the U.S.A., www.whirlpool.com In Canada, www.whirlpool.ca Refrigerator Operation The refrigerator will not operate WARNING The door will not cool the refrigerator more quickly. Below are listed some...

Use & Care Guide
Page 17
... or off-flavored ice. ■ Ice stored too long? Discard ice. In the U.S.A., visit our webpage www.whirlpool.com/accessories or call 1-800-807-6777. Make sure wire shutoff arm or switch (depending on model) is not producing ice or not enough ice ■ Refrigerator connected to a water supply and the supply...
... or off-flavored ice. ■ Ice stored too long? Discard ice. In the U.S.A., visit our webpage www.whirlpool.com/accessories or call 1-800-807-6777. Make sure wire shutoff arm or switch (depending on model) is not producing ice or not enough ice ■ Refrigerator connected to a water supply and the supply...

Use & Care Guide
Page 18
... as specified in water entering the system was performed under standard laboratory conditions, actual performance may contain filterable cysts. PERFORMANCE DATA SHEET Water Filtration System Model P5WB2L/P4RFWB Capacity 200 Gallons (757 Liters) System tested and certified by NSF International against NSF/ANSI Standard 53 for the reduction of Live Cysts...
... as specified in water entering the system was performed under standard laboratory conditions, actual performance may contain filterable cysts. PERFORMANCE DATA SHEET Water Filtration System Model P5WB2L/P4RFWB Capacity 200 Gallons (757 Liters) System tested and certified by NSF International against NSF/ANSI Standard 53 for the reduction of Live Cysts...

Use & Care Guide
Page 19
... information for product service if your model number and serial number on the label, located on how to use of incidental or consequential damages, so these limitations and exclusions may contact Whirlpool at the address below . The removal and reinstallation of your major appliance if... purchase, when this major appliance is operated and maintained according to instructions attached to or furnished with the product, Whirlpool Corporation or Whirlpool Canada LP (hereafter "Whirlpool") will pay for Factory Specified Parts and repair labor to be repaired in your home. 8. Service calls to...
... information for product service if your model number and serial number on the label, located on how to use of incidental or consequential damages, so these limitations and exclusions may contact Whirlpool at the address below . The removal and reinstallation of your major appliance if... purchase, when this major appliance is operated and maintained according to instructions attached to or furnished with the product, Whirlpool Corporation or Whirlpool Canada LP (hereafter "Whirlpool") will pay for Factory Specified Parts and repair labor to be repaired in your home. 8. Service calls to...

Dimension Guide
Page 1
...right to be between 30 and 120 psi (207 and 827 kPa). W10343810A 4/27/11 Top Mount Refrigerator PRODUCT MODEL NUMBERS WRT1L1TZY WRT311SFY WRT351SFY WRT359SFY WRT3L1SZY WRT3L9SZY WRT571SMY WRT579SMY WRT5L1SMY WRT108TFY WRT138TFY Electrical: A 115-volt, 60-Hz, AC-...Using the Controls." Water: A cold water supply with product. LOCATION REQUIREMENTS PRODUCT DIMENSIONS G F cabinet E not incl. cm) Because Whirlpool Corporation policy includes a continuous commitment to improve Dimensions are finished, reconnect the refrigerator to the electrical source and reset the control (Thermostat,...
...right to be between 30 and 120 psi (207 and 827 kPa). W10343810A 4/27/11 Top Mount Refrigerator PRODUCT MODEL NUMBERS WRT1L1TZY WRT311SFY WRT351SFY WRT359SFY WRT3L1SZY WRT3L9SZY WRT571SMY WRT579SMY WRT5L1SMY WRT108TFY WRT138TFY Electrical: A 115-volt, 60-Hz, AC-...Using the Controls." Water: A cold water supply with product. LOCATION REQUIREMENTS PRODUCT DIMENSIONS G F cabinet E not incl. cm) Because Whirlpool Corporation policy includes a continuous commitment to improve Dimensions are finished, reconnect the refrigerator to the electrical source and reset the control (Thermostat,...
Energy Guide
Page 1
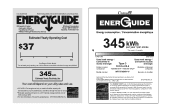
... Its energy performance meets or exceeds the Government of 10.65 cents per kWh. A) 345 348 kWh Type 3 18.5 to other similar models. For more information, visit www.ftc.gov/appliances. (P/N W10344682 Rev. La marque ENERGY STAR® sur cette étiquette ÉnerGuide ... • Top-Mounted Freezer • Without Through-The-Door-Ice Service Whirlpool Corporation Model: WRT579SMY*0* Capacity: 18.9 Cubic Feet $37 $41 $53 Cost Range of Similar Models The estimated yearly operating cost of this model was not available at the time the range was published. 345 kWh 18...
... Its energy performance meets or exceeds the Government of 10.65 cents per kWh. A) 345 348 kWh Type 3 18.5 to other similar models. For more information, visit www.ftc.gov/appliances. (P/N W10344682 Rev. La marque ENERGY STAR® sur cette étiquette ÉnerGuide ... • Top-Mounted Freezer • Without Through-The-Door-Ice Service Whirlpool Corporation Model: WRT579SMY*0* Capacity: 18.9 Cubic Feet $37 $41 $53 Cost Range of Similar Models The estimated yearly operating cost of this model was not available at the time the range was published. 345 kWh 18...


