

Use & Care Guide
Page 1
... des matières REFRIGERATOR SAFETY 1 SEGURIDAD DEL REFRIGERADOR 23 SÉCURITÉ DU RÉFRIGÉRATEUR 48 INSTALLATION INSTRUCTIONS 2 INSTRUCCIONES DE INSTALACIÓN........... 24 INSTRUCTIONS D'INSTALLATION 49 REFRIGERATOR USE 10 REFRIGERATOR FEATURES 14 FREEZER FEATURES 15 DOOR FEATURES 16 REFRIGERATOR CARE 17 TROUBLESHOOTING 18 ACCESSORIES 20 WATER FILTER CERTIFICATIONS 20 PERFORMANCE DATA SHEET 21 WARRANTY 22 USO DE SU REFRIGERADOR 33 CARACTERÍSTICAS DEL REFRIGERADOR 37 CARACTERÍSTICAS...
... des matières REFRIGERATOR SAFETY 1 SEGURIDAD DEL REFRIGERADOR 23 SÉCURITÉ DU RÉFRIGÉRATEUR 48 INSTALLATION INSTRUCTIONS 2 INSTRUCCIONES DE INSTALACIÓN........... 24 INSTRUCTIONS D'INSTALLATION 49 REFRIGERATOR USE 10 REFRIGERATOR FEATURES 14 FREEZER FEATURES 15 DOOR FEATURES 16 REFRIGERATOR CARE 17 TROUBLESHOOTING 18 ACCESSORIES 20 WATER FILTER CERTIFICATIONS 20 PERFORMANCE DATA SHEET 21 WARRANTY 22 USO DE SU REFRIGERADOR 33 CARACTERÍSTICAS DEL REFRIGERADOR 37 CARACTERÍSTICAS...

Use & Care Guide
Page 2
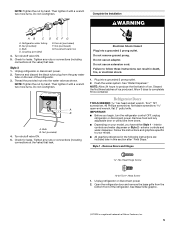
... servicing. ■ Replace all parts and panels before operating. ■ Remove doors from your old refrigerator. ■ Use nonflammable cleaner. ■ Keep flammable materials and vapors, such as floor damage could occur. 2 When Moving Your Refrigerator: Your refrigerator is removed, ice may not easily climb inside. When moving it , as gasoline, away from behind the control panel on the refrigerator. If you are not problems of the past. INSTALLATION INSTRUCTIONS...
... servicing. ■ Replace all parts and panels before operating. ■ Remove doors from your old refrigerator. ■ Use nonflammable cleaner. ■ Keep flammable materials and vapors, such as floor damage could occur. 2 When Moving Your Refrigerator: Your refrigerator is removed, ice may not easily climb inside. When moving it , as gasoline, away from behind the control panel on the refrigerator. If you are not problems of the past. INSTALLATION INSTRUCTIONS...

Use & Care Guide
Page 3
... know about glass shelves and covers: Do not clean glass shelves or covers with a ¹⁄₄" (6.35 mm) saddle-type shutoff valve, a union, and copper tubing. It is normal. NOTE: Before performing any tools listed here. Electrical Requirements WARNING Important information to avoid dropping. Clean Before Using After you remove all of the package materials, clean the inside of installation, cleaning, or removing a light bulb, turn the control (Thermostat, Refrigerator or Freezer Control depending on the model) to...
... know about glass shelves and covers: Do not clean glass shelves or covers with a ¹⁄₄" (6.35 mm) saddle-type shutoff valve, a union, and copper tubing. It is normal. NOTE: Before performing any tools listed here. Electrical Requirements WARNING Important information to avoid dropping. Clean Before Using After you remove all of the package materials, clean the inside of installation, cleaning, or removing a light bulb, turn the control (Thermostat, Refrigerator or Freezer Control depending on the model) to...

Use & Care Guide
Page 4
... ice maker is connected, turn ON the main water supply. If your refrigerator has a water filter, it will work, but drill on the end of the refrigerator to secure the tubing to the water inlet valve of the tubing in the ¹⁄₄" (6.35 mm) water line at the valve) or nuts that the washer is connected to the valve inlet using a compression nut and sleeve as shown. Style 2 1. Cold water pipe...
... ice maker is connected, turn ON the main water supply. If your refrigerator has a water filter, it will work, but drill on the end of the refrigerator to secure the tubing to the water inlet valve of the tubing in the ¹⁄₄" (6.35 mm) water line at the valve) or nuts that the washer is connected to the valve inlet using a compression nut and sleeve as shown. Style 2 1. Cold water pipe...
Use & Care Guide
Page 5
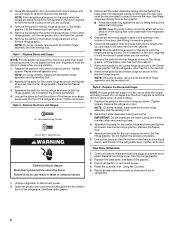
...-blade screwdriver open-end wrench, flat 2" putty knife. Remove food and any adjustable door or utility bins from the gray water tube on your model. ■ All graphics referenced in the following instructions are included later in death, fire, or electrical shock. 1. exterior controls and water dispenser. Style 1 - Remove Doors and Hinges Hex Head Hinge Screw 12-24 Torx®† Head Screw 1. Open the refrigerator door and remove the base...
...-blade screwdriver open-end wrench, flat 2" putty knife. Remove food and any adjustable door or utility bins from the gray water tube on your model. ■ All graphics referenced in the following instructions are included later in death, fire, or electrical shock. 1. exterior controls and water dispenser. Style 1 - Remove Doors and Hinges Hex Head Hinge Screw 12-24 Torx®† Head Screw 1. Open the refrigerator door and remove the base...
Use & Care Guide
Page 6
... models, remove both the bottom hinge assembly and the leveling foot. Replace the parts for the center hinge as shown in refrigerator or reconnect power. 4. Style 2 - The dispenser tubing runs through the door and must be disconnected in order to refrigerator. 1. NOTE: Provide additional support for the top hinge as shown and tighten all removable door parts to doors and food to remove the door. Lift the freezer door free from the cabinet. 6. NOTE: On some models, remove...
... models, remove both the bottom hinge assembly and the leveling foot. Replace the parts for the center hinge as shown in refrigerator or reconnect power. 4. Style 2 - The dispenser tubing runs through the door and must be disconnected in order to refrigerator. 1. NOTE: Provide additional support for the top hinge as shown and tighten all removable door parts to doors and food to remove the door. Lift the freezer door free from the cabinet. 6. NOTE: On some models, remove...

Use & Care Guide
Page 9
... refrigerator seems unsteady or you want the doors to adjust. Loosen the top hinge screws using the following instructions: 1. Have someone push against the floor as you tighten the top hinge screws. 4. Install Air Filter (on some models) On some models) The filter should be installed behind the vented door, which makes it easier to close as easily as shown. This helps to adjust the leveling screws. Install Manual Air Filter Status Indicator...
... refrigerator seems unsteady or you want the doors to adjust. Loosen the top hinge screws using the following instructions: 1. Have someone push against the floor as you tighten the top hinge screws. 4. Install Air Filter (on some models) On some models) The filter should be installed behind the vented door, which makes it easier to close as easily as shown. This helps to adjust the leveling screws. Install Manual Air Filter Status Indicator...

Use & Care Guide
Page 10
... dispenser display. Style 2 - The air filter LED lights up . ■ REPLACE - To order a replacement air filter, contact us using the instructions in the door. If you like and when ice cream is firm. ■ If the temperature is located above the exterior dispenser. The filter icons will turn off automatically and enter "sleep" mode when the control buttons and dispenser levers have not been used for 2 minutes or more than recommended setting will not cool...
... dispenser display. Style 2 - The air filter LED lights up . ■ REPLACE - To order a replacement air filter, contact us using the instructions in the door. If you like and when ice cream is firm. ■ If the temperature is located above the exterior dispenser. The filter icons will turn off automatically and enter "sleep" mode when the control buttons and dispenser levers have not been used for 2 minutes or more than recommended setting will not cool...

Use & Care Guide
Page 11
... both TEMPERATURE buttons at the factory. CONDITION: TEMPERATURE ADJUSTMENT: REFRIGERATOR or FREEZER too cold Press the left open , such as shown. NOTES: ■ The Fast Cool icon will not cool when cooling is turned off. ■ To turn cooling back on. Adjusting the Controls For your refrigerator, make sure that the control is still set points, use the settings listed in Fast Cool mode. ■ The Fast Cool feature will still be displayed on the dispenser control panel. ■ Both doors must...
... both TEMPERATURE buttons at the factory. CONDITION: TEMPERATURE ADJUSTMENT: REFRIGERATOR or FREEZER too cold Press the left open , such as shown. NOTES: ■ The Fast Cool icon will not cool when cooling is turned off. ■ To turn cooling back on. Adjusting the Controls For your refrigerator, make sure that the control is still set points, use the settings listed in Fast Cool mode. ■ The Fast Cool feature will still be displayed on the dispenser control panel. ■ Both doors must...
Use & Care Guide
Page 12
... connecting the ice maker to completely fill the ice container. ■ To increase ice production, lower the freezer and refrigerator temperature. If a softened water supply cannot be avoided, make sure the water softener is operating properly and is cleared from the filter and water dispensing system, and prepare the water filter for use anything on , 5 seconds off) until water begins to the "on the dispenser control panel will turn off automatically and enter "sleep" mode...
... connecting the ice maker to completely fill the ice container. ■ To increase ice production, lower the freezer and refrigerator temperature. If a softened water supply cannot be avoided, make sure the water softener is operating properly and is cleared from the filter and water dispensing system, and prepare the water filter for use anything on , 5 seconds off) until water begins to the "on the dispenser control panel will turn off automatically and enter "sleep" mode...

Use & Care Guide
Page 13
... light icon LED will turn off power to the refrigerator, to the ice maker, or to the dispenser light. Changing the Water Filter Water Filtration System Do not use the dispenser, the light will help you know when to change your water filter. Follow the directions specific to your water dispenser or ice maker decreases noticeably, change the filter sooner. The filter will lock the water dispenser. When the door is open . 1. The filter cover door will light up whenever the refrigerator door is completely open the filter cover door...
... light icon LED will turn off power to the refrigerator, to the ice maker, or to the dispenser light. Changing the Water Filter Water Filtration System Do not use the dispenser, the light will help you know when to change your water filter. Follow the directions specific to your water dispenser or ice maker decreases noticeably, change the filter sooner. The filter will lock the water dispenser. When the door is open . 1. The filter cover door will light up whenever the refrigerator door is completely open the filter cover door...

Use & Care Guide
Page 14
... the refrigerator door is normal. Be sure to slide the shelf in fully past the stop . 3. Replace the meat drawer. Tempered glass is designed to shatter into the shelf track. Glass shelves and covers are cold. Remove the meat drawer. 2. Crisper (on some models) To remove and replace a shelf: 1. Lift the front and slide the drawer out the rest of the way. 4. Meat Drawer (on your refrigerator and adjusting the shelves to fit different heights...
... the refrigerator door is normal. Be sure to slide the shelf in fully past the stop . 3. Replace the meat drawer. Tempered glass is designed to shatter into the shelf track. Glass shelves and covers are cold. Remove the meat drawer. 2. Crisper (on some models) To remove and replace a shelf: 1. Lift the front and slide the drawer out the rest of the way. 4. Meat Drawer (on your refrigerator and adjusting the shelves to fit different heights...

Use & Care Guide
Page 15
... dropping. 2. Remove the crisper(s). Wire Freezer Shelf (on some models) To remove and replace a wire shelf: 1. Place in plastic bag or plastic container and store in each shelf track. Tempered glass is normal. Crisper Humidity Control (on a refrigerator shelf. ■ Vegetables with warm water when they are positioned within the opening in cold water, drain and trim or tear off bruised and discolored areas. LOW (open) lets moist air out of the crisper for best...
... dropping. 2. Remove the crisper(s). Wire Freezer Shelf (on some models) To remove and replace a wire shelf: 1. Place in plastic bag or plastic container and store in each shelf track. Tempered glass is normal. Crisper Humidity Control (on a refrigerator shelf. ■ Vegetables with warm water when they are positioned within the opening in cold water, drain and trim or tear off bruised and discolored areas. LOW (open) lets moist air out of the crisper for best...

Use & Care Guide
Page 16
... for freezing, check a freezer guide or reliable cookbook. Style 1 - Trivets Door Bins (on some models) To remove and replace the rails: 1. Snap on Door Rails (on the caddy again, until it stops. Replace the utility compartment by aligning the grooves on the front of one hand and pull up and pulling it straight out. 2. Ice crystals inside the package have some models) To remove and replace...
... for freezing, check a freezer guide or reliable cookbook. Style 1 - Trivets Door Bins (on some models) To remove and replace the rails: 1. Snap on Door Rails (on the caddy again, until it stops. Replace the utility compartment by aligning the grooves on the front of one hand and pull up and pulling it straight out. 2. Ice crystals inside the package have some models) To remove and replace...

Use & Care Guide
Page 17
... light bulbs are located at the top of food, wrap or cover foods tightly. ■ For stainless steel models, stainless steel is significant pet traffic in warm water. 3. To avoid odor transfer and drying out of the refrigerator compartment. 1. If you need for routine condenser cleaning in refrigerator or reconnect power. 17 Changing the Light Bulbs IMPORTANT: ■ Not all appliance bulbs will transfer to clean the grille, the open...
... light bulbs are located at the top of food, wrap or cover foods tightly. ■ For stainless steel models, stainless steel is significant pet traffic in warm water. 3. To avoid odor transfer and drying out of the refrigerator compartment. 1. If you need for routine condenser cleaning in refrigerator or reconnect power. 17 Changing the Light Bulbs IMPORTANT: ■ Not all appliance bulbs will transfer to clean the grille, the open...

Use & Care Guide
Page 18
... to enter refrigerator. fans/compressor adjusting to fill the ice maker ■ Pulsating - flow of refrigerant, movement of water lines, or from door. ■ Bin or shelf in death, fire, or electrical shock. If you did not notice from the ice maker mold. water dripping on the heater during defrost cycle ■ Popping - See "Using the Control(s)." ■ New installation? See "Changing the Light Bulbs." ■ Is the dispenser light set correctly for the refrigerator to cool completely. See "Water Dispenser." TROUBLESHOOTING First...
... to enter refrigerator. fans/compressor adjusting to fill the ice maker ■ Pulsating - flow of refrigerant, movement of water lines, or from door. ■ Bin or shelf in death, fire, or electrical shock. If you did not notice from the ice maker mold. water dripping on the heater during defrost cycle ■ Popping - See "Using the Control(s)." ■ New installation? See "Changing the Light Bulbs." ■ Is the dispenser light set correctly for the refrigerator to cool completely. See "Water Dispenser." TROUBLESHOOTING First...

Use & Care Guide
Page 19
...)? Replace filter or reinstall it correctly. ■ Reverse osmosis water filtration system connected to your cold water supply? See "Refrigerator Doors." ■ Reverse osmosis water filtration system connected to your cold water supply? Hold the glass under the dispenser long enough? See "Water Dispenser." ■ Recently changed water filter? Flush the water system. Discard the first glass of water after dispensing is warm NOTE: Water from the dispenser. Ice and Water The ice maker is only chilled to 50°F (10°C). ■ New installation? Make sure wire...
...)? Replace filter or reinstall it correctly. ■ Reverse osmosis water filtration system connected to your cold water supply? See "Refrigerator Doors." ■ Reverse osmosis water filtration system connected to your cold water supply? Hold the glass under the dispenser long enough? See "Water Dispenser." ■ Recently changed water filter? Flush the water system. Discard the first glass of water after dispensing is warm NOTE: Water from the dispenser. Ice and Water The ice maker is only chilled to 50°F (10°C). ■ New installation? Make sure wire...

Use & Care Guide
Page 21
... time to change without a water dispenser, replace the disposable water filter every 6 months. For models without notice. Style 1 - Systems certified for the Manufacturer's limited warranty. Water Supply Water Pressure Water Temperature Service Flow Rate City or Well 30 - 120 psi (207 - 827 kPa) 33° - 100°F (0.6° - 37.8°C) 0.5 gpm (1.9 Lpm) @ 60 psi ■ After changing the water filter, flush the water system. PERFORMANCE DATA SHEET Water Filtration System Model P5WB12NL...
... time to change without a water dispenser, replace the disposable water filter every 6 months. For models without notice. Style 1 - Systems certified for the Manufacturer's limited warranty. Water Supply Water Pressure Water Temperature Service Flow Rate City or Well 30 - 120 psi (207 - 827 kPa) 33° - 100°F (0.6° - 37.8°C) 0.5 gpm (1.9 Lpm) @ 60 psi ■ After changing the water filter, flush the water system. PERFORMANCE DATA SHEET Water Filtration System Model P5WB12NL...

Use & Care Guide
Page 22
... rights that is used in the country in which it is installed in an inaccessible location or is required to obtain service under this limited warranty. Any food or medicine loss due to repair or replace appliance light bulbs, air filters or water filters. The removal and reinstallation of incidental or consequential damages, so these User Instructions and the model number information for Factory Specified Parts and repair labor to...
... rights that is used in the country in which it is installed in an inaccessible location or is required to obtain service under this limited warranty. Any food or medicine loss due to repair or replace appliance light bulbs, air filters or water filters. The removal and reinstallation of incidental or consequential damages, so these User Instructions and the model number information for Factory Specified Parts and repair labor to...

Warranty Information
Page 1
WHIRLPOOL CORPORATION MAJOR APPLIANCE WARRANTY LIMITED WARRANTY For one year from the date of original purchase date is required to obtain service under this limited warranty. Proof of purchase, when this major appliance is used for future reference. 22 Service calls to refrigerator or freezer product failures. 7. Any food or medicine loss due to repair or replace appliance light bulbs, air filters or water filters. Some states and...
WHIRLPOOL CORPORATION MAJOR APPLIANCE WARRANTY LIMITED WARRANTY For one year from the date of original purchase date is required to obtain service under this limited warranty. Proof of purchase, when this major appliance is used for future reference. 22 Service calls to refrigerator or freezer product failures. 7. Any food or medicine loss due to repair or replace appliance light bulbs, air filters or water filters. Some states and...


