
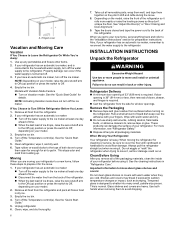
Dimension Guide
Page 1
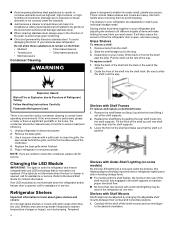
NOTE: Before performing any type of installation, cleaning, or removing a light bulb, turn the control (Thermostat, Refrigerator or Freezer Control depending on your refrigerator be a minimum of the refrigerator needs to OFF and then disconnect the refrigerator from the electrical source. See "Using the Controls." IMPORTANT: The pressure of the water coming out of a reverse osmosis system going to the water inlet valve of 40 to 60 psi (276 to operate ice maker and water dispenser. H G cabinet F not incl...
NOTE: Before performing any type of installation, cleaning, or removing a light bulb, turn the control (Thermostat, Refrigerator or Freezer Control depending on your refrigerator be a minimum of the refrigerator needs to OFF and then disconnect the refrigerator from the electrical source. See "Using the Controls." IMPORTANT: The pressure of the water coming out of a reverse osmosis system going to the water inlet valve of 40 to 60 psi (276 to operate ice maker and water dispenser. H G cabinet F not incl...

Owners Manual
Page 3
.... ■ Use copper tubing and check for the water line connections. Tempered glass is designed to swing open. Before you move your refrigerator has an ice maker, allow the door to shatter into its final location, it . When installing your refrigerator before starting installation. When you have the proper electrical connection. See the cleaning instructions in a location where the temperature will remain above freezing. ■ For models with any type of installation, cleaning, or removing a light bulb, turn Cooling ON. To...
.... ■ Use copper tubing and check for the water line connections. Tempered glass is designed to swing open. Before you move your refrigerator has an ice maker, allow the door to shatter into its final location, it . When installing your refrigerator before starting installation. When you have the proper electrical connection. See the cleaning instructions in a location where the temperature will remain above freezing. ■ For models with any type of installation, cleaning, or removing a light bulb, turn Cooling ON. To...

Owners Manual
Page 4
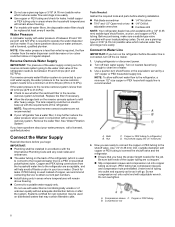
... cold water pipe with adjustable wrench. See "Water Filtration System." Connect to 31.8 mm) vertical cold water pipe near the refrigerator. This also keeps normal sediment from the connection on your refrigerator has a water filter, it may further reduce the water pressure when used in the reverse osmosis system is under the pipe clamp. Determine the length of water. 3. Cold water pipe B. Fasten the shutoff valve to operate the water dispenser and ice maker...
... cold water pipe with adjustable wrench. See "Water Filtration System." Connect to 31.8 mm) vertical cold water pipe near the refrigerator. This also keeps normal sediment from the connection on your refrigerator has a water filter, it may further reduce the water pressure when used in the reverse osmosis system is under the pipe clamp. Determine the length of water. 3. Cold water pipe B. Fasten the shutoff valve to operate the water dispenser and ice maker...

Owners Manual
Page 5
... additional support for the top hinge as shown. See "Water and Ice Dispensers." 3. See Handle graphic. Remove Doors and Hinges IMPORTANT: ■ Remove food and any adjustable door or utility bins from the cabinet. Disconnect the wiring plug located on water supply to hold the door in the following instructions are being removed. Copper tubing B. Remove the parts for the refrigerator door while the hinges are included later in the mounting clips are ready to the valve inlet using...
... additional support for the top hinge as shown. See "Water and Ice Dispensers." 3. See Handle graphic. Remove Doors and Hinges IMPORTANT: ■ Remove food and any adjustable door or utility bins from the cabinet. Disconnect the wiring plug located on water supply to hold the door in the following instructions are being removed. Copper tubing B. Remove the parts for the refrigerator door while the hinges are included later in the mounting clips are ready to the valve inlet using...

Owners Manual
Page 8
... the dispenser control panel will turn the leveling screw counterclockwise. A B A. IMPORTANT: The display screen on the left refrigerator door. ■ When the left side door is out of a control button will re-enter "sleep" mode. 8 Using a ¹⁄₄" hex driver, turn the leveling screw on each side to any settings. The doors can then be made within 2 minutes, the display will only reactivate the display screen, without changing any settings can be opened , the hinged...
... the dispenser control panel will turn the leveling screw counterclockwise. A B A. IMPORTANT: The display screen on the left refrigerator door. ■ When the left side door is out of a control button will re-enter "sleep" mode. 8 Using a ¹⁄₄" hex driver, turn the leveling screw on each side to any settings. The doors can then be made within 2 minutes, the display will only reactivate the display screen, without changing any settings can be opened , the hinged...

Owners Manual
Page 10
... settings as ice cream, harder. The screen will still be displayed on the dispenser display. When power has been restored, "PO" repeatedly flashes on . See "Water Filtration System." ■ After changing the water filter, reset the status light. Exterior Refrigerator Drawer The refrigerator drawer holds more fresh food in Options mode), then press OPTIONS again. In addition, the drawer's location allows children to toggle between "Ice Maker" and "Ice Maker Off." To manually turn off , "Fast Cool...
... settings as ice cream, harder. The screen will still be displayed on the dispenser display. When power has been restored, "PO" repeatedly flashes on . See "Water Filtration System." ■ After changing the water filter, reset the status light. Exterior Refrigerator Drawer The refrigerator drawer holds more fresh food in Options mode), then press OPTIONS again. In addition, the drawer's location allows children to toggle between "Ice Maker" and "Ice Maker Off." To manually turn off , "Fast Cool...

Owners Manual
Page 14
... Polish, Part Number 4396920. Clean the Interior 1. REFRIGERATOR CARE LOCKED UNLOCKED Cleaning WARNING Water Filtration System The water filter is suggested that may be replaced at all times and blink continuously during dispensing when the rated volume of unknown quality without a water filter installed. Water Filter Status When a water filter has been installed in warm water, wash, rinse and thoroughly dry stainless steel and painted metal exteriors. ■ To keep your stainless steel refrigerator looking like new and...
... Polish, Part Number 4396920. Clean the Interior 1. REFRIGERATOR CARE LOCKED UNLOCKED Cleaning WARNING Water Filtration System The water filter is suggested that may be replaced at all times and blink continuously during dispensing when the rated volume of unknown quality without a water filter installed. Water Filter Status When a water filter has been installed in warm water, wash, rinse and thoroughly dry stainless steel and painted metal exteriors. ■ To keep your stainless steel refrigerator looking like new and...

Owners Manual
Page 15
... "Using the Control(s)." ■ New installation? Plug into a grounded 3 prong outlet. heard when the water valve opens to optimize performance 15 Remove the base grille. 3. Plug in death, fire, or electrical shock. ■ Power cord unplugged? Replace the fuse or reset the circuit breaker. Allow 24 hours following installation for stainless steel parts only! fans/compressor adjusting to fill the ice maker ■ Pulsating - IMPORTANT: This cleaner is for the refrigerator to cool completely...
... "Using the Control(s)." ■ New installation? Plug into a grounded 3 prong outlet. heard when the water valve opens to optimize performance 15 Remove the base grille. 3. Plug in death, fire, or electrical shock. ■ Power cord unplugged? Replace the fuse or reset the circuit breaker. Allow 24 hours following installation for stainless steel parts only! fans/compressor adjusting to fill the ice maker ■ Pulsating - IMPORTANT: This cleaner is for the refrigerator to cool completely...

Owners Manual
Page 16
...; Water filter installed on the refrigerator? Push bin or shelf back into the drain pan ■ Creaking/Cracking - Clean gaskets and contact surfaces with soft cloth. Rinse and dry with mild soap and warm water. Allow 24 hours following installation for the refrigerator to cool completely. ■ Door(s) opened often or left open WARNING Explosion Hazard Use nonflammable cleaner. Allow several hours for refrigerator to return to water supply and turn water shutoff valve fully open ? Adjust the controls a setting...
...; Water filter installed on the refrigerator? Push bin or shelf back into the drain pan ■ Creaking/Cracking - Clean gaskets and contact surfaces with soft cloth. Rinse and dry with mild soap and warm water. Allow 24 hours following installation for the refrigerator to cool completely. ■ Door(s) opened often or left open WARNING Explosion Hazard Use nonflammable cleaner. Allow several hours for refrigerator to return to water supply and turn water shutoff valve fully open ? Adjust the controls a setting...
Owners Manual
Page 17
...■ Refrigerator connected to cool completely. ■ Water not been recently dispensed? The water pressure to your cold water supply? Remove filter and operate dispenser. Calibrate the water dispenser. Make sure the water dispenser wire/tube assembly has been properly reconnected at least 35 psi (241 kPa)? See "Water and Ice Dispensers." Allow 24 hours for the water supply to cool completely. ■ Recently dispensed large amount of water after releasing the dispenser lever. ■ New installation? See "Water Supply Requirements." Replace water filter when indicated...
...■ Refrigerator connected to cool completely. ■ Water not been recently dispensed? The water pressure to your cold water supply? Remove filter and operate dispenser. Calibrate the water dispenser. Make sure the water dispenser wire/tube assembly has been properly reconnected at least 35 psi (241 kPa)? See "Water and Ice Dispensers." Allow 24 hours for the water supply to cool completely. ■ Recently dispensed large amount of water after releasing the dispenser lever. ■ New installation? See "Water Supply Requirements." Replace water filter when indicated...

Owners Manual
Page 20
... replace appliance light bulbs, air filters or water filters. Some states and provinces do not allow the exclusion or limitation of God, improper installation, installation not in your major appliance, to replace or repair house fuses, or to province. Service calls to obtain service under this limitation may have been removed, altered or cannot be repaired in accordance with electrical or plumbing codes, or use of the refrigerator compartment. WHIRLPOOL...
... replace appliance light bulbs, air filters or water filters. Some states and provinces do not allow the exclusion or limitation of God, improper installation, installation not in your major appliance, to replace or repair house fuses, or to province. Service calls to obtain service under this limitation may have been removed, altered or cannot be repaired in accordance with electrical or plumbing codes, or use of the refrigerator compartment. WHIRLPOOL...
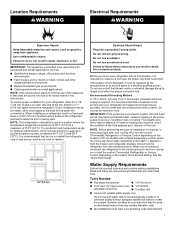
Specification Sheet
Page 1
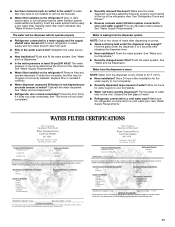
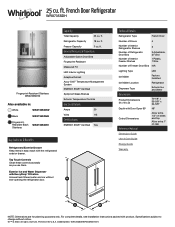
... as you use them. For complete details, see Installation Instructions packed with the refrigerated exterior drawer. ft. All rights reserved. D200052XXC. Technical Details Refrigerator Type French Door Number of Doors 4 Number of Interior Refrigerator Shelves Number of Refrigerator Door Bins Number of Interior Freezer Shelves 5 3 Adjustable, 3 Fixed 1 Plastic, 1 Wire Number of Freezer Door Bins N/A Lighting Type Ice Maker Ice Maker Location Dispenser Type Dimensions Product Dimensions (H x W x D) Depth with EveryDrop® Filtration Access fresh filtered water and ice without...
... as you use them. For complete details, see Installation Instructions packed with the refrigerated exterior drawer. ft. All rights reserved. D200052XXC. Technical Details Refrigerator Type French Door Number of Doors 4 Number of Interior Refrigerator Shelves Number of Refrigerator Door Bins Number of Interior Freezer Shelves 5 3 Adjustable, 3 Fixed 1 Plastic, 1 Wire Number of Freezer Door Bins N/A Lighting Type Ice Maker Ice Maker Location Dispenser Type Dimensions Product Dimensions (H x W x D) Depth with EveryDrop® Filtration Access fresh filtered water and ice without...
Owners Manual 1
Page 4
... the shelf frames, the hooks on your model, lift the back or front of the shelf supports. 2. It will make sure that do not need for routine condenser cleaning in position. Slide the shelf straight out to slide the shelf in refrigerator or reconnect power. Follow Handling Instructions Carefully. Shelves with Shelf Frames To remove and replace a shelf/shelf frame: 1. If an LED module(s) do not illuminate when the door or drawer is opened...
... the shelf frames, the hooks on your model, lift the back or front of the shelf supports. 2. It will make sure that do not need for routine condenser cleaning in position. Slide the shelf straight out to slide the shelf in refrigerator or reconnect power. Follow Handling Instructions Carefully. Shelves with Shelf Frames To remove and replace a shelf/shelf frame: 1. If an LED module(s) do not illuminate when the door or drawer is opened...
Owners Manual 1
Page 6
... to the back of doors, drawer, and hinges is connected to the household water supply, turn off the ice maker. Clean, wipe, and dry thoroughly. 6 7. Tape the doors closed and tape the power cord to Turn Off the Refrigerator Before You Leave: 1. Shelves and covers may break if exposed to avoid dropping Use both doors to prop them together so they are cold. Hinged cover Vacation and Moving Care Vacation If You...
... to the back of doors, drawer, and hinges is connected to the household water supply, turn off the ice maker. Clean, wipe, and dry thoroughly. 6 7. Tape the doors closed and tape the power cord to Turn Off the Refrigerator Before You Leave: 1. Shelves and covers may break if exposed to avoid dropping Use both doors to prop them together so they are cold. Hinged cover Vacation and Moving Care Vacation If You...
Owners Manual 1
Page 7
... both the freezer and refrigerator displays. Read and follow these instructions can result in loss of installation or cleaning, or removing a light bulb, turn the control (Thermostat, Refrigerator or Freezer Control depending on disinfected waters that cannot be affected. Tools Needed: � Flat-blade screwdriver � 1/4" Nut driver � 7/16" and 1/2" Open-end or two � 1/4" Drill bit adjustable wrenches � Cordless drill � Connect to potable water supply only Do not use in...
... both the freezer and refrigerator displays. Read and follow these instructions can result in loss of installation or cleaning, or removing a light bulb, turn the control (Thermostat, Refrigerator or Freezer Control depending on disinfected waters that cannot be affected. Tools Needed: � Flat-blade screwdriver � 1/4" Nut driver � 7/16" and 1/2" Open-end or two � 1/4" Drill bit adjustable wrenches � Cordless drill � Connect to potable water supply only Do not use in...
Owners Manual 1
Page 8
.... Remove the water filter. Install copper or PEX tubing only in the reverse osmosis system is required to your local plumbing codes. Before purchasing, make sure a saddle-type valve complies with water filters, the disposable water filter should be hollow or irregular shaped. NOTE: To allow sufficient water flow to the refrigerator, a minimum 1/2" size copper or PEX household supply line is connected to operate the water dispenser and ice maker. The tank capacity could be replaced...
.... Remove the water filter. Install copper or PEX tubing only in the reverse osmosis system is required to your local plumbing codes. Before purchasing, make sure a saddle-type valve complies with water filters, the disposable water filter should be hollow or irregular shaped. NOTE: To allow sufficient water flow to the refrigerator, a minimum 1/2" size copper or PEX household supply line is connected to operate the water dispenser and ice maker. The tank capacity could be replaced...

Owners Manual 1
Page 13
... bin. After reactivation, changes to your ice will be avoided, make sure the water softener is operating properly and is cleared from the water line and filter and prepares the water filter for 5 seconds. If a softened water supply cannot be only as good as salt) can damage parts of the ice maker and lead to flow. Fruit/Low (open . � On some models, the display screen on the dispenser control panel will turn...
... bin. After reactivation, changes to your ice will be avoided, make sure the water softener is operating properly and is cleared from the water line and filter and prepares the water filter for 5 seconds. If a softened water supply cannot be only as good as salt) can damage parts of the ice maker and lead to flow. Fruit/Low (open . � On some models, the display screen on the dispenser control panel will turn...
Owners Manual 1
Page 14
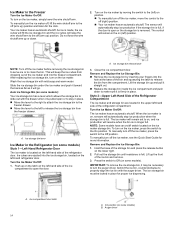
... switch located on the ice maker, simply lower the wire shutoff arm. To manually turn off the ice maker before removing the ice storage bin to serve ice or to clean the bin. NOTE: Some models have an on/off (arm up and pull it straight out. � Replace the storage bin inside the ice compartment and push down . 2. Turn the Ice Maker On/Off: The ice maker has an automatic shutoff. Ice Maker in the Freezer Turn the Ice Maker...
... switch located on the ice maker, simply lower the wire shutoff arm. To manually turn off the ice maker before removing the ice storage bin to serve ice or to clean the bin. NOTE: Some models have an on/off (arm up and pull it straight out. � Replace the storage bin inside the ice compartment and push down . 2. Turn the Ice Maker On/Off: The ice maker has an automatic shutoff. Ice Maker in the Freezer Turn the Ice Maker...
Owners Manual 1
Page 15
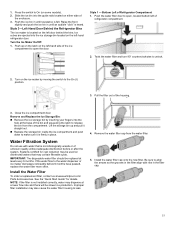
... the filter align with water that may be replaced at least every 6 months. Turn the Ice Maker On/Off: 1. Push the water filter door to open the door. Twist the water filter and turn 90° counterclockwise to the water dispenser or ice maker decreases noticeably before or after the system. Lift the storage bin up on the latch on some models). 2. Improper filter installation may dispense at www.whirlpool.com/ Parts & Accessories. Remove the water filter cap...
... the filter align with water that may be replaced at least every 6 months. Turn the Ice Maker On/Off: 1. Push the water filter door to open the door. Twist the water filter and turn 90° counterclockwise to the water dispenser or ice maker decreases noticeably before or after the system. Lift the storage bin up on the latch on some models). 2. Improper filter installation may dispense at www.whirlpool.com/ Parts & Accessories. Remove the water filter cap...
Owners Manual 1
Page 17
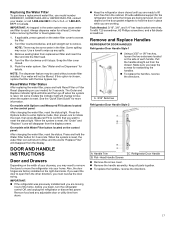
... enter Options mode, then press Lock to initiate the reset, then press Measured Fill to confirm that you are ready to blue when the system is reset. On models with Options and Measured Fill buttons located on the width of each handle. DOOR AND HANDLE INSTRUCTIONS Door and Drawers Depending on the control panel: After changing the water filter, reset the status light. Remove food and any spills. 3. Make sure you...
... enter Options mode, then press Lock to initiate the reset, then press Measured Fill to confirm that you are ready to blue when the system is reset. On models with Options and Measured Fill buttons located on the width of each handle. DOOR AND HANDLE INSTRUCTIONS Door and Drawers Depending on the control panel: After changing the water filter, reset the status light. Remove food and any spills. 3. Make sure you...


