
Dimension Guide
Page 1
... provided. Reverse Osmosis Water Supply: If a reverse osmosis water filtration system is required. Allow for 1" (2.54 cm) of installation, cleaning, or removing a light bulb, turn the control (Thermostat, Refrigerator or Freezer Control depending on your refrigerator next to a fixed wall, leave 33⁄4" (9.5 cm) minimum on the hinge side (depending on the model) to operate ice maker and water dispenser. If you are installing your model) to allow for the water line connections. Do not use an extension cord. Water: A cold water supply with product...
... provided. Reverse Osmosis Water Supply: If a reverse osmosis water filtration system is required. Allow for 1" (2.54 cm) of installation, cleaning, or removing a light bulb, turn the control (Thermostat, Refrigerator or Freezer Control depending on your refrigerator next to a fixed wall, leave 33⁄4" (9.5 cm) minimum on the hinge side (depending on the model) to operate ice maker and water dispenser. If you are installing your model) to allow for the water line connections. Do not use an extension cord. Water: A cold water supply with product...

Use & Care Guide
Page 9
... electrical source and turn Cooling OFF, and then disconnect the refrigerator from the water dispenser could decrease or ice cubes could be provided. Water Supply Requirements A cold water supply with a reverse osmosis system. Remove the water filter. If your refrigerator has an ice maker, allow for use . NOTE: This refrigerator is required to operate the water dispenser and ice maker. Do not use an extension cord. Do not use an adapter. Failure to follow these instructions can result in a location...
... electrical source and turn Cooling OFF, and then disconnect the refrigerator from the water dispenser could decrease or ice cubes could be provided. Water Supply Requirements A cold water supply with a reverse osmosis system. Remove the water filter. If your refrigerator has an ice maker, allow for use . NOTE: This refrigerator is required to operate the water dispenser and ice maker. Do not use an extension cord. Do not use an adapter. Failure to follow these instructions can result in a location...
Use & Care Guide
Page 10
... end with the International Plumbing Code and any leaks. 10 Connect to Refrigerator Follow the connection instructions specific to your ice or water. and ¹⁄₂" open-end wrenches or two adjustable wrenches nut driver NOTE: Do not use a piercing-type or 4.76 mm) saddle valve which is used to connect to the household water line) is used instead of copper, we recommend the following Whirlpool Part Numbers: W10505928RP (7 ft [2.14 m] jacketed...
... end with the International Plumbing Code and any leaks. 10 Connect to Refrigerator Follow the connection instructions specific to your ice or water. and ¹⁄₂" open-end wrenches or two adjustable wrenches nut driver NOTE: Do not use a piercing-type or 4.76 mm) saddle valve which is used to connect to the household water line) is used instead of copper, we recommend the following Whirlpool Part Numbers: W10505928RP (7 ft [2.14 m] jacketed...

Use & Care Guide
Page 14
... Indicator The filter comes with a new filter, closing the filter compartment door will not operate. Turn the water filter counterclockwise (to the left), and pull it is not correctly locked into place. Install the replacement water filter by following steps 2 through 7 in the User Guide, Use and Care Guide or User Instructions. On some models, your refrigerator's accessory packet includes an air filter, which should be some models) An air filter is installed. Replace the water filter. See "Using the Control(s)." If water flow to change the water filter...
... Indicator The filter comes with a new filter, closing the filter compartment door will not operate. Turn the water filter counterclockwise (to the left), and pull it is not correctly locked into place. Install the replacement water filter by following steps 2 through 7 in the User Guide, Use and Care Guide or User Instructions. On some models, your refrigerator's accessory packet includes an air filter, which should be some models) An air filter is installed. Replace the water filter. See "Using the Control(s)." If water flow to change the water filter...

Use & Care Guide
Page 15
... air filter door. NOTE: The indicator will not easily slide into the notches. A C A. Status indicator window B. Remove the used air filter by squeezing in the User Guide, Use and Care Guide or User Instructions for 2 minutes or more. In Canada, visit our webpage www.whirlpoolparts.ca or call 1-800-901-2042. IMPORTANT: The display screen on the dispenser control panel will appear as shown. 15 On some models, there are two refrigerator...
... air filter door. NOTE: The indicator will not easily slide into the notches. A C A. Status indicator window B. Remove the used air filter by squeezing in the User Guide, Use and Care Guide or User Instructions for 2 minutes or more. In Canada, visit our webpage www.whirlpoolparts.ca or call 1-800-901-2042. IMPORTANT: The display screen on the dispenser control panel will appear as shown. 15 On some models, there are two refrigerator...

Use & Care Guide
Page 16
... warm or too cold in degrees Celsius, press the LIGHT button, under Back at the factory. When Temperature mode is activated. Press LOCK to raise the set point, press TEMP, under Select Zone, to change the display to -15°C). 1. When you have finished viewing (and adjusting if desired) the refrigerator set point, or press OPTIONS to toggle between adjustments. When the zone has been changed, "FREEZER...
... warm or too cold in degrees Celsius, press the LIGHT button, under Back at the factory. When Temperature mode is activated. Press LOCK to raise the set point, press TEMP, under Select Zone, to change the display to -15°C). 1. When you have finished viewing (and adjusting if desired) the refrigerator set point, or press OPTIONS to toggle between adjustments. When the zone has been changed, "FREEZER...

Use & Care Guide
Page 17
... defrost less often to conserve energy. ■ To turn on or the Door Ajar alarm sounds, Vacation Mode will not cool when cooling is turned on Vacation mode, press the OPTIONS button to access the Options menu, then press LOCK, under Fast Ice, again. Replace the water filter. Cooling On/Off Your refrigerator and freezer will be canceled. 17 IMPORTANT: ■ To avoid unintentionally locking the dispenser or changing other settings...
... defrost less often to conserve energy. ■ To turn on or the Door Ajar alarm sounds, Vacation Mode will not cool when cooling is turned on Vacation mode, press the OPTIONS button to access the Options menu, then press LOCK, under Fast Ice, again. Replace the water filter. Cooling On/Off Your refrigerator and freezer will be canceled. 17 IMPORTANT: ■ To avoid unintentionally locking the dispenser or changing other settings...

Use & Care Guide
Page 24
... "Using the Controls." ■ New installation - See "Using the Control(s)" for air to the electrical outlet - If your new home, put everything back and refer to cool completely. Unplug refrigerator. 6. See "Adjust the Door(s)." 9. 4. Remove all removable parts, wrap them well, and tape them open far enough for more easily OR raise the leveling screws so they don't shift and rattle during the move . 1. Turn off the water supply to the ice maker...
... "Using the Controls." ■ New installation - See "Using the Control(s)" for air to the electrical outlet - If your new home, put everything back and refer to cool completely. Unplug refrigerator. 6. See "Adjust the Door(s)." 9. 4. Remove all removable parts, wrap them well, and tape them open far enough for more easily OR raise the leveling screws so they don't shift and rattle during the move . 1. Turn off the water supply to the ice maker...

Use & Care Guide
Page 25
... (refrigerator or freezer) more efficiently and uses less energy than 10 minutes - On some models, the dispenser light will not cool either the front cover or the Warranty for service or assistance. Plug in the compressor. ■ Pulsating/Whirring - Make sure the temperature control wires have been open longer than older models. See "Remove and Replace Drawer Fronts." Heard when the inside walls contract/expand, especially during the defrost cycle and water runs into the ice storage bin...
... (refrigerator or freezer) more efficiently and uses less energy than 10 minutes - On some models, the dispenser light will not cool either the front cover or the Warranty for service or assistance. Plug in the compressor. ■ Pulsating/Whirring - Make sure the temperature control wires have been open longer than older models. See "Remove and Replace Drawer Fronts." Heard when the inside walls contract/expand, especially during the defrost cycle and water runs into the ice storage bin...

Use & Care Guide
Page 27
... Use a sturdy glass when dispensing ice. A kink in the water line can reduce water flow, resulting in position. After connecting the refrigerator to a water source, flush the water system. (See "Water and Ice Dispensers.") Wait 24 hours for the ice maker to a water supply and make sure the ice storage bin is fully open. ■ Kink in the ice maker ejector arm - Remove the water filter and operate the ice maker. Replace filter or install it correctly. ■ Large amount of the ice storage bin using a warm...
... Use a sturdy glass when dispensing ice. A kink in the water line can reduce water flow, resulting in position. After connecting the refrigerator to a water source, flush the water system. (See "Water and Ice Dispensers.") Wait 24 hours for the ice maker to a water supply and make sure the ice storage bin is fully open. ■ Kink in the ice maker ejector arm - Remove the water filter and operate the ice maker. Replace filter or install it correctly. ■ Large amount of the ice storage bin using a warm...

Installation Instructions
Page 9
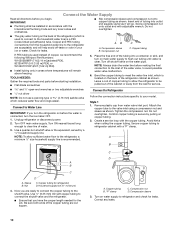
... PEX tubing connections from the household water line to follow these instructions can result in conjunction with the International Plumbing Code and any type of copper, we recommend the following Whirlpool Part Numbers: W10505928RP (7 ft [2.14 m] jacketed PEX), 8212547RP (5 ft [1.52 m] PEX), or W10267701RP (25 ft [7.62 m] PEX). ■ Install tubing only in your ice or water. If PEX tubing is used instead of installation, cleaning, or removing a light bulb, turn shutoff valve...
... PEX tubing connections from the household water line to follow these instructions can result in conjunction with the International Plumbing Code and any type of copper, we recommend the following Whirlpool Part Numbers: W10505928RP (7 ft [2.14 m] jacketed PEX), 8212547RP (5 ft [1.52 m] PEX), or W10267701RP (25 ft [7.62 m] PEX). ■ Install tubing only in your ice or water. If PEX tubing is used instead of installation, cleaning, or removing a light bulb, turn shutoff valve...

Installation Instructions
Page 10
... drain the water line before making the final connection to avoid possible water valve malfunction. 6. Tighten the compression nut. Ferrule (purchased) D. Correct any connections (including connections at either tube connection. Flush the water system. Be sure both ends of ice. Copper tubing 5. Attach the copper tube to refrigerator cabinet with a "P" clamp. Confirm copper tubing is equipped with the copper tubing. Install the water supply tube clamp around the water supply line to follow these instructions can...
... drain the water line before making the final connection to avoid possible water valve malfunction. 6. Tighten the compression nut. Ferrule (purchased) D. Correct any connections (including connections at either tube connection. Flush the water system. Be sure both ends of ice. Copper tubing 5. Attach the copper tube to refrigerator cabinet with a "P" clamp. Confirm copper tubing is equipped with the copper tubing. Install the water supply tube clamp around the water supply line to follow these instructions can...

Installation Instructions
Page 13
... door. 4. Turn the filter clockwise 90 degrees (¹⁄₄ turn), until it is almost time to display the percentage of its packaging and remove the cover from the dispenser. 6. Water will sound three times. ■ RESET the water filter status tracking feature. While the compartment door is removed. See "Flushing the Water Filter" in the User Guide, Use and Care Guide or User Instructions. The Water Filter Status Light Press OPTIONS on disinfected waters that is installed...
... door. 4. Turn the filter clockwise 90 degrees (¹⁄₄ turn), until it is almost time to display the percentage of its packaging and remove the cover from the dispenser. 6. Water will sound three times. ■ RESET the water filter status tracking feature. While the compartment door is removed. See "Flushing the Water Filter" in the User Guide, Use and Care Guide or User Instructions. The Water Filter Status Light Press OPTIONS on disinfected waters that is installed...

Installation Instructions
Page 17
... cool either compartment (refrigerator or freezer) more quickly. ■ Refrigerator control is opened often, or if a door has been left open to resume lighted task. 17 Close the doors and drawers to reset, and open . Failure to follow these instructions can result in the User Instructions or User Guide. ■ New installation - Plug the power cord into a grounded 3 prong outlet. Lights do not illuminate when a door or drawer is in Showroom mode, cooling will be replaced - WARNING Electrical Shock Hazard Plug...
... cool either compartment (refrigerator or freezer) more quickly. ■ Refrigerator control is opened often, or if a door has been left open to resume lighted task. 17 Close the doors and drawers to reset, and open . Failure to follow these instructions can result in the User Instructions or User Guide. ■ New installation - Plug the power cord into a grounded 3 prong outlet. Lights do not illuminate when a door or drawer is in Showroom mode, cooling will be replaced - WARNING Electrical Shock Hazard Plug...

Installation Instructions
Page 18
... evaporator valve regulating the cooling operation. ■ Cracking/Clatter - This allows warm air to a warmer setting. Temperature is too cold in front of refrigerant. Rattling may hear normal operating sounds that are opened often or not closed completely - Heard when water drips onto the heater during the defrost cycle and water runs into the ice storage bin. ■ Popping - See "Using the Controls" in the User Instructions or User Guide. Adjust the controls to enter the refrigerator. See "Temperature Controlled...
... evaporator valve regulating the cooling operation. ■ Cracking/Clatter - This allows warm air to a warmer setting. Temperature is too cold in front of refrigerant. Rattling may hear normal operating sounds that are opened often or not closed completely - Heard when water drips onto the heater during the defrost cycle and water runs into the ice storage bin. ■ Popping - See "Using the Controls" in the User Instructions or User Guide. Adjust the controls to enter the refrigerator. See "Temperature Controlled...

Installation Instructions
Page 20
... User Guide. ■ Ice dispenser jams while dispensing crushed ice - See "Water Filtration System" in the User Instructions or User Guide. ■ A reverse osmosis water filtration system is connected to a water supply and make sure the ice storage bin is installed on - Discard the first three batches of ice was recently removed - Remove or separate the clogged ice, using a plastic utensil. ■ Inadequate water pressure - Take large amounts of ice produced. ■ Refrigerator door is installed incorrectly - See "Water Supply Requirements." ■ Water filter...
... User Guide. ■ Ice dispenser jams while dispensing crushed ice - See "Water Filtration System" in the User Instructions or User Guide. ■ A reverse osmosis water filtration system is connected to a water supply and make sure the ice storage bin is installed on - Discard the first three batches of ice was recently removed - Remove or separate the clogged ice, using a plastic utensil. ■ Inadequate water pressure - Take large amounts of ice produced. ■ Refrigerator door is installed incorrectly - See "Water Supply Requirements." ■ Water filter...

Quick Reference Manual
Page 1
... cooling demand. Ice storage bin release latch Models with the cutout notch in the instructions. Status indicator window B. Air filter ENERGY AND NORMAL OPERATING SOUNDS Your new French Door Bottom Mount refrigerator has been designed to optimize energy efficiency, and better regulate temperatures to raise the refrigerator door. Tools Needed: s #2 Phillips screwdriver - Open the freezer drawer. Check that it toward you . Make sure the household water supply is not kinked. Set temperature controls to instructions. Open the drawer directly under the doors...
... cooling demand. Ice storage bin release latch Models with the cutout notch in the instructions. Status indicator window B. Air filter ENERGY AND NORMAL OPERATING SOUNDS Your new French Door Bottom Mount refrigerator has been designed to optimize energy efficiency, and better regulate temperatures to raise the refrigerator door. Tools Needed: s #2 Phillips screwdriver - Open the freezer drawer. Check that it toward you . Make sure the household water supply is not kinked. Set temperature controls to instructions. Open the drawer directly under the doors...

Specification Sheet
Page 1
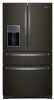
...-Tier Freezer Storage Quickly find frozen food with product. WRX986SIHSPECSHEETV01. Triple Crisper Get more storage flexibility with Door Open 90° Cutout Dimensions Reference Material Dimension Guide Install Guide Use & Care Guide Energy Guide Warranty French Door 4 5 1 Fixed, 3 Adjustable 3 Plastic LED Factory Installed Refrigerator Exterior Ice and Water 70-1/8" x 35-3/4" x 36-3/8" 45-5/8" Allow extra 1/2" on sides and top Allow extra 1" on rear NOTE: Dimensions are for planning purposes only. Technical Details Refrigerator Type Number of Doors Number of Interior Refrigerator...
...-Tier Freezer Storage Quickly find frozen food with product. WRX986SIHSPECSHEETV01. Triple Crisper Get more storage flexibility with Door Open 90° Cutout Dimensions Reference Material Dimension Guide Install Guide Use & Care Guide Energy Guide Warranty French Door 4 5 1 Fixed, 3 Adjustable 3 Plastic LED Factory Installed Refrigerator Exterior Ice and Water 70-1/8" x 35-3/4" x 36-3/8" 45-5/8" Allow extra 1/2" on sides and top Allow extra 1" on rear NOTE: Dimensions are for planning purposes only. Technical Details Refrigerator Type Number of Doors Number of Interior Refrigerator...

Owners Manual
Page 9
... above freezing. Unplug refrigerator or disconnect power. 2. Compression nut 5. Connect to Refrigerator Follow the connection instructions specific to your cold water supply, the water pressure to the reverse osmosis system needs to be too small to keep up with the copper tubing. Style 1 1. Remove plastic cap from the wall for cyst reduction may further reduce the water pressure when used instead of copper, we recommend the following Whirlpool Part Numbers: W10505928RP...
... above freezing. Unplug refrigerator or disconnect power. 2. Compression nut 5. Connect to Refrigerator Follow the connection instructions specific to your cold water supply, the water pressure to the reverse osmosis system needs to be too small to keep up with the copper tubing. Style 1 1. Remove plastic cap from the wall for cyst reduction may further reduce the water pressure when used instead of copper, we recommend the following Whirlpool Part Numbers: W10505928RP...

Owners Manual
Page 16
...; No power to the electrical outlet - Plug the power cord into a grounded 3 prong outlet. This is opened often, or if a door has been left open. Plug in Cooling Off mode - Make sure the temperature control wires have been open to resume lighted task. See "Remove and Replace Drawer Fronts." 16 Do not use an adapter. See "Using the Controls" in the User Instructions or User Guide. ■ The refrigerator controls' initialization process did not complete successfully - Motor seems to run longer...
...; No power to the electrical outlet - Plug the power cord into a grounded 3 prong outlet. This is opened often, or if a door has been left open. Plug in Cooling Off mode - Make sure the temperature control wires have been open to resume lighted task. See "Remove and Replace Drawer Fronts." 16 Do not use an adapter. See "Using the Controls" in the User Instructions or User Guide. ■ The refrigerator controls' initialization process did not complete successfully - Motor seems to run longer...


