
Instruction Sheet
Page 2
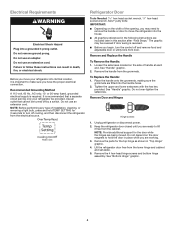
... buzzer behind the glider rail using the screw removed in death, fire, or electrical shock. 20. Make the connections to the panel mount connector. 8. Replace with the new Electronic Control, connect the two connectors and install taco clip on the heat shield. 18. you will need a Phillips screw driver. 13. Do not remove ground prong. Plug in refrigerator or reconnect power. © Whirlpool Corporation 2014 ( All Rights Reserved...
... buzzer behind the glider rail using the screw removed in death, fire, or electrical shock. 20. Make the connections to the panel mount connector. 8. Replace with the new Electronic Control, connect the two connectors and install taco clip on the heat shield. 18. you will need a Phillips screw driver. 13. Do not remove ground prong. Plug in refrigerator or reconnect power. © Whirlpool Corporation 2014 ( All Rights Reserved...

Dimension Guide
Page 1
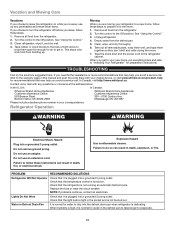
... setting. All Refrigerator PRODUCT MODEL NUMBERS WRF57R18D WRR56X18F WSR57R18D Recommended grounding method A 115 Volt, 60 Hz., AC only, 15- Dimensions are finished, reconnect the refrigerator to the electrical source and reset the control (Thermostat, Refrigerator or Freezer Control depending on the model) to change materials and specifications without notice. Depth - Allow at least 1" (2.54 cm) between back of Door Open With Without Cabinet Cabinet Number Model Size Swing Overall "A" Cabinet "B" 90° "C" Handles "D" Handles...
... setting. All Refrigerator PRODUCT MODEL NUMBERS WRF57R18D WRR56X18F WSR57R18D Recommended grounding method A 115 Volt, 60 Hz., AC only, 15- Dimensions are finished, reconnect the refrigerator to the electrical source and reset the control (Thermostat, Refrigerator or Freezer Control depending on the model) to change materials and specifications without notice. Depth - Allow at least 1" (2.54 cm) between back of Door Open With Without Cabinet Cabinet Number Model Size Swing Overall "A" Cabinet "B" 90° "C" Handles "D" Handles...
Quick Reference Sheet
Page 1
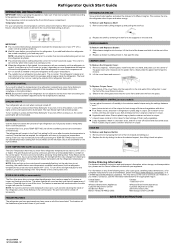
... need to adjust the temperature in the refrigerator compartment, press Temp Setting to display the desired temperature setting from the snowflake on the left (least cold) to the snowflake on some models) The Door Ajar alarm lets you need to contact us, use and installation, please visit https://www.whirlpool.com/owners, or in the crisper for the temperature to the snowflake on the side wall. SP Refrigerator Quick Start Guide OPERATING INSTRUCTIONS IMPORTANT: Before operating...
... need to adjust the temperature in the refrigerator compartment, press Temp Setting to display the desired temperature setting from the snowflake on the left (least cold) to the snowflake on some models) The Door Ajar alarm lets you need to contact us, use and installation, please visit https://www.whirlpool.com/owners, or in the crisper for the temperature to the snowflake on the side wall. SP Refrigerator Quick Start Guide OPERATING INSTRUCTIONS IMPORTANT: Before operating...
Owners Manual
Page 1
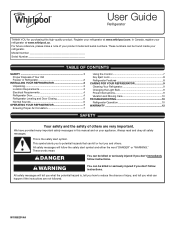
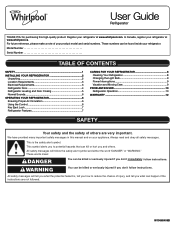
... 1 Proper Disposal of Your Old Freezer or Refrigerator 2 INSTALLING YOUR REFRIGERATOR 3 Unpacking 3 Location Requirements 3 Electrical Requirements 4 Refrigerator Door 4 Refrigerator Leveling and Door Closing 6 Normal Sounds 6 OPERATING YOUR REFRIGERATOR 7 Ensuring Proper Air Circulation 7 Using the Control 7 Key Eject Lock 8 Refrigerator Features 8 CARING FOR YOUR REFRIGERATOR 9 Cleaning Your Refrigerator 9 Changing the Light Bulb 9 Power Interruptions 9 Vacation and Moving Care 10 TROUBLESHOOTING 10 Refrigerator Operation 10 WARRANTY 12 SAFETY Your safety and the...
... 1 Proper Disposal of Your Old Freezer or Refrigerator 2 INSTALLING YOUR REFRIGERATOR 3 Unpacking 3 Location Requirements 3 Electrical Requirements 4 Refrigerator Door 4 Refrigerator Leveling and Door Closing 6 Normal Sounds 6 OPERATING YOUR REFRIGERATOR 7 Ensuring Proper Air Circulation 7 Using the Control 7 Key Eject Lock 8 Refrigerator Features 8 CARING FOR YOUR REFRIGERATOR 9 Cleaning Your Refrigerator 9 Changing the Light Bulb 9 Power Interruptions 9 Vacation and Moving Care 10 TROUBLESHOOTING 10 Refrigerator Operation 10 WARRANTY 12 SAFETY Your safety and the...
Owners Manual
Page 3
... refrigerator. ■■ Do not cover the refrigerator with your refrigerator in the "Caring For Your Refrigerator" section. Clean Before Using After you remove all of the packaging materials, clean the inside of your refrigerator before turning on the hinge side so the door can result in death, explosion, or fire. If the refrigerator is designed to know about glass shelves and covers: Do not clean glass shelves or covers with another freezer or refrigerator...
... refrigerator. ■■ Do not cover the refrigerator with your refrigerator in the "Caring For Your Refrigerator" section. Clean Before Using After you remove all of the packaging materials, clean the inside of your refrigerator before turning on the hinge side so the door can result in death, explosion, or fire. If the refrigerator is designed to know about glass shelves and covers: Do not clean glass shelves or covers with another freezer or refrigerator...
Owners Manual
Page 4
... not use an adapter. The graphic may need to remove the handle or door to make sure you move the refrigerator into its final location, it free from the cabinet. Before you have the proper electrical connection. It is important to move your refrigerator be turned off and remove food and adjustable door or utility bins from the grommets. Do not over-tighten the setscrews. Refrigerator Door Tools Needed: 5/16...
... not use an adapter. The graphic may need to remove the handle or door to make sure you move the refrigerator into its final location, it free from the cabinet. Before you have the proper electrical connection. It is important to move your refrigerator be turned off and remove food and adjustable door or utility bins from the grommets. Do not over-tighten the setscrews. Refrigerator Door Tools Needed: 5/16...
Owners Manual
Page 5
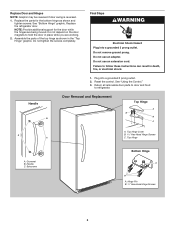
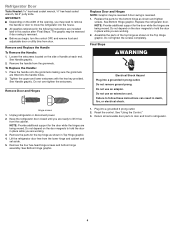
.... 2. Do not remove ground prong. See "Using the Control." 3. Top Hinge A. Handle C. Handle B Door Removal and Replacement Top Hinge A B B C A C A. Setscrews Bottom Hinge A B A. Reset the control. Return all removable door parts to door and food to hold the door in place while you are being moved. Hinge Pin B. 3/8" Hex-Head Hinge Screws 5 NOTE: Provide additional support for the bottom hinge as shown in death, fire, or electrical shock. 1. Failure to follow these instructions can result...
.... 2. Do not remove ground prong. See "Using the Control." 3. Top Hinge A. Handle C. Handle B Door Removal and Replacement Top Hinge A B B C A C A. Setscrews Bottom Hinge A B A. Reset the control. Return all removable door parts to door and food to hold the door in place while you are being moved. Hinge Pin B. 3/8" Hex-Head Hinge Screws 5 NOTE: Provide additional support for the bottom hinge as shown in death, fire, or electrical shock. 1. Failure to follow these instructions can result...
Owners Manual
Page 6
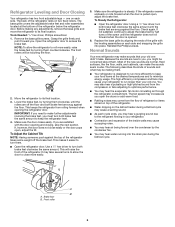
... assemblies located at the desired temperatures and to minimize energy usage. Tools Needed: 1/4" hex driver, Phillips screwdriver 1. Open the refrigerator door to roll more easily, raise the brake feet by turning them counterclockwise. IMPORTANT: If you need to make sounds that your refrigerator. ■■ Contraction and expansion of the refrigerator rests on each side and snapping the grille into the drain pan during a Defrost cycle may hear water running...
... assemblies located at the desired temperatures and to minimize energy usage. Tools Needed: 1/4" hex driver, Phillips screwdriver 1. Open the refrigerator door to roll more easily, raise the brake feet by turning them counterclockwise. IMPORTANT: If you need to make sounds that your refrigerator. ■■ Contraction and expansion of the refrigerator rests on each side and snapping the grille into the drain pan during a Defrost cycle may hear water running...
Owners Manual
Page 7
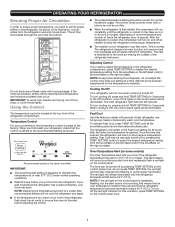
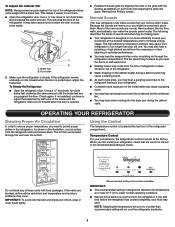
... the TEMP SETTING button to select the desired temperature setting from the snowflake on the left (least cold) to the snowflake on the right (coldest). Fast Cool Use this condition, press TEMP SETTING on the control panel once. 7 If the vents are illuminated simultaneously. OPERATING YOUR REFRIGERATOR Ensuring Proper Air Circulation In order to ensure proper temperature, you need to adjust the temperature in the refrigerator compartment, press TEMP SETTING to display the desired temperature setting...
... the TEMP SETTING button to select the desired temperature setting from the snowflake on the left (least cold) to the snowflake on the right (coldest). Fast Cool Use this condition, press TEMP SETTING on the control panel once. 7 If the vents are illuminated simultaneously. OPERATING YOUR REFRIGERATOR Ensuring Proper Air Circulation In order to ensure proper temperature, you need to adjust the temperature in the refrigerator compartment, press TEMP SETTING to display the desired temperature setting...
Owners Manual
Page 8
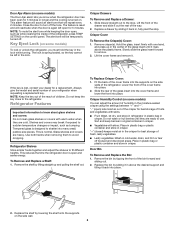
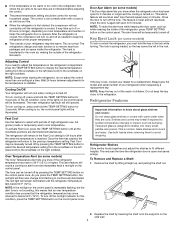
Replace a drawer by sliding it back in, fully past the stop . Crisper Cover To Remove the Crisper(s) Cover: 1. Slowly slide the glass insert forward to sudden temperature changes or impact, such as while cleaning the inside of the refrigerator, press TEMP SETTING on the control panel. Shelves and covers may break if exposed to remove. 2. Glass shelves and covers are ready to know when the refrigerator door has been open and saves energy. Refrigerator Shelves Store similar foods together and adjust the...
Replace a drawer by sliding it back in, fully past the stop . Crisper Cover To Remove the Crisper(s) Cover: 1. Slowly slide the glass insert forward to sudden temperature changes or impact, such as while cleaning the inside of the refrigerator, press TEMP SETTING on the control panel. Shelves and covers may break if exposed to remove. 2. Glass shelves and covers are ready to know when the refrigerator door has been open and saves energy. Refrigerator Shelves Store similar foods together and adjust the...
Owners Manual
Page 9
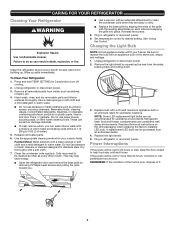
.... Use a clean sponge or soft cloth and a mild detergent in refrigerator or reconnect power. 9. Do not use abrasive or harsh cleaners or cleaners designed for wet/damp locations. Coils may help save energy. ■■ Open the refrigerator door and remove the base grille by aligning the ends of the same size, shape, and wattage. 1. This may need to desired setting. Replace bulb with a 40-watt maximum appliance bulb...
.... Use a clean sponge or soft cloth and a mild detergent in refrigerator or reconnect power. 9. Do not use abrasive or harsh cleaners or cleaners designed for wet/damp locations. Coils may help save energy. ■■ Open the refrigerator door and remove the base grille by aligning the ends of the same size, shape, and wattage. 1. This may need to desired setting. Replace bulb with a 40-watt maximum appliance bulb...
Owners Manual
Page 10
... Not Operate Lights Do Not Work Water in death, explosion, or fire. Replace the fuse or reset the circuit breaker. NOTE: If problems continue, contact an electrician. Check that it for the move . 7. Check that the temperature control is plugged into a grounded 3 prong outlet. See "Using the Control." 3. Unplug refrigerator. 4. Contact us by mail with your refrigerator to a new home, follow these instructions can result in Defrost Drain Pan...
... Not Operate Lights Do Not Work Water in death, explosion, or fire. Replace the fuse or reset the circuit breaker. NOTE: If problems continue, contact an electrician. Check that it for the move . 7. Check that the temperature control is plugged into a grounded 3 prong outlet. See "Using the Control." 3. Unplug refrigerator. 4. Contact us by mail with your refrigerator to a new home, follow these instructions can result in Defrost Drain Pan...
Owners Manual
Page 12
... to review the Troubleshooting or Problem Solver section of the Use and Care Guide, scan the QR code on the duration of implied warranties of repair or replacement under this major appliance was purchased. instructions attached to correct improper product maintenance or installation, installation not in -home repair. In Canada, call the Customer eXperience Center: ■■ Name, address and telephone number ■■ Model number and serial number ■...
... to review the Troubleshooting or Problem Solver section of the Use and Care Guide, scan the QR code on the duration of implied warranties of repair or replacement under this major appliance was purchased. instructions attached to correct improper product maintenance or installation, installation not in -home repair. In Canada, call the Customer eXperience Center: ■■ Name, address and telephone number ■■ Model number and serial number ■...
Owners Manual 1
Page 1
...at www.whirlpool.com. Model Number Serial Number TABLE OF CONTENTS SAFETY 1 INSTALLING YOUR REFRIGERATOR 2 Unpacking 2 Location Requirements 3 Electrical Requirements 3 Refrigerator Door 4 Refrigerator Leveling and Door Closing 5 Normal Sounds 6 OPERATING YOUR REFRIGERATOR 6 Ensuring Proper Air Circulation 6 Using the Control 6 Key Eject Lock 7 Refrigerator Features 7 CARING FOR YOUR REFRIGERATOR 8 Cleaning Your Refrigerator 8 Changing the Light Bulb 9 Power Interruptions 9 Vacation and Moving Care 9 PROBLEM SOLVER 10 Refrigerator Operation 10 WARRANTY 12 SAFETY...
...at www.whirlpool.com. Model Number Serial Number TABLE OF CONTENTS SAFETY 1 INSTALLING YOUR REFRIGERATOR 2 Unpacking 2 Location Requirements 3 Electrical Requirements 3 Refrigerator Door 4 Refrigerator Leveling and Door Closing 5 Normal Sounds 6 OPERATING YOUR REFRIGERATOR 6 Ensuring Proper Air Circulation 6 Using the Control 6 Key Eject Lock 7 Refrigerator Features 7 CARING FOR YOUR REFRIGERATOR 8 Cleaning Your Refrigerator 8 Changing the Light Bulb 9 Power Interruptions 9 Vacation and Moving Care 9 PROBLEM SOLVER 10 Refrigerator Operation 10 WARRANTY 12 SAFETY...

Owners Manual 1
Page 3
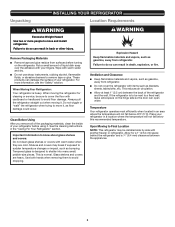
... electrical shock. Glass shelves and covers are cold. Use both hands when removing them to make sure you remove all of the packaging materials, clean the inside of your refrigerator in a location where the temperature will not fall below 40°F (5°C). Electrical Shock Hazard Plug into many small, pebble-size pieces. It is designed to a fixed wall, leave extra space on the hinge side so the door can open wider. Location...
... electrical shock. Glass shelves and covers are cold. Use both hands when removing them to make sure you remove all of the packaging materials, clean the inside of your refrigerator in a location where the temperature will not fall below 40°F (5°C). Electrical Shock Hazard Plug into many small, pebble-size pieces. It is designed to a fixed wall, leave extra space on the hinge side so the door can open wider. Location...
Owners Manual 1
Page 4
.... Replace the parts for the door while the hinges are being moved. Final Steps WARNING Electrical Shock Hazard Plug into a grounded 3 prong outlet. 2. Failure to refrigerator. 4 Unplug refrigerator or disconnect power. 2. See "Using the Control." 3. Return all removable door parts to door and food to follow these instructions can result in place while you may need to remove the handle or door to hold the door in death, fire, or electrical shock. Refrigerator Door...
.... Replace the parts for the door while the hinges are being moved. Final Steps WARNING Electrical Shock Hazard Plug into a grounded 3 prong outlet. 2. Failure to refrigerator. 4 Unplug refrigerator or disconnect power. 2. See "Using the Control." 3. Return all removable door parts to door and food to follow these instructions can result in place while you may need to remove the handle or door to hold the door in death, fire, or electrical shock. Refrigerator Door...
Owners Manual 1
Page 6
... pulled open the doors or add warm food. ■ Rattling noises may come from the compressor or fans adjusting to optimize performance. ■ You may cause your convenience, the temperature control is designed to turn both brake feet clockwise the same amount. Use a ¹⁄₄" hex driver to run longer than recommended setting will raise the front of these vents with the leveling assemblies on the defrost...
... pulled open the doors or add warm food. ■ Rattling noises may come from the compressor or fans adjusting to optimize performance. ■ You may cause your convenience, the temperature control is designed to turn both brake feet clockwise the same amount. Use a ¹⁄₄" hex driver to run longer than recommended setting will raise the front of these vents with the leveling assemblies on the defrost...
Owners Manual 1
Page 7
... opened. Shelves and covers may be manually turned off . To Remove and Replace a Shelf: 1. ■ If the temperature is too warm or too cold in the refrigerator, first check the air vents to be sure they are cold. The control is set correctly when milk or juice is as cold as needed to keep the key close to the snowflake on the control panel is cooled. When cooling is first started, the compressor...
... opened. Shelves and covers may be manually turned off . To Remove and Replace a Shelf: 1. ■ If the temperature is too warm or too cold in the refrigerator, first check the air vents to be sure they are cold. The control is set correctly when milk or juice is as cold as needed to keep the key close to the snowflake on the control panel is cooled. When cooling is first started, the compressor...
Owners Manual 1
Page 9
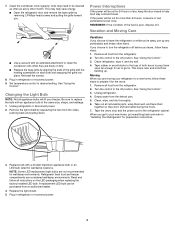
... get to your new home, put everything back and refer to replace the bulb with the leveling assemblies on while you leave, follow these steps. 1. Set temperature control to the off position. Unplug refrigerator or disconnect power. 2. See "Using the Control." 3. Moving When you get in. See "Using the Control." 3. NOTE: Some LED replacement light bulbs are considered wet/damp environments. A replacement LED bulb can perishable food at once. Open the refrigerator door and remove...
... get to your new home, put everything back and refer to replace the bulb with the leveling assemblies on while you leave, follow these steps. 1. Set temperature control to the off position. Unplug refrigerator or disconnect power. 2. See "Using the Control." 3. Moving When you get in. See "Using the Control." 3. NOTE: Some LED replacement light bulbs are considered wet/damp environments. A replacement LED bulb can perishable food at once. Open the refrigerator door and remove...
Owners Manual 1
Page 12
... Replacement Parts and repair labor to correct product damage or defects caused by unauthorized service, alteration or modification of original purchase date is installed, operated and maintained according to instructions attached to or furnished with products not approved by the customer. Some states and provinces do not allow the exclusion or limitation of the Use and Care Guide, scan the QR code...
... Replacement Parts and repair labor to correct product damage or defects caused by unauthorized service, alteration or modification of original purchase date is installed, operated and maintained according to instructions attached to or furnished with products not approved by the customer. Some states and provinces do not allow the exclusion or limitation of the Use and Care Guide, scan the QR code...


