Installation Guide
Page 2
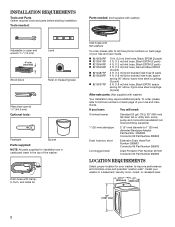
... toll-free phone numbers on back page of your Use and Care Guide. Drain hose with clamp, U-form, and cable tie Inlet hoses with flat washers To order, please refer to 1" (25 mm) diameter Standpipe Adapter Part Number 3363920 Connector Kit Part Number 285835 Drain hose too short Extension Drain Hose Part Number 285863 Connector Kit Part Number 285835 Lint clogged drain Drain Protector Part Number 367031 Connector Kit Part Number 285835 LOCATION REQUIREMENTS Select proper location for installation are in cardboard insert in a basement, laundry...
... toll-free phone numbers on back page of your Use and Care Guide. Drain hose with clamp, U-form, and cable tie Inlet hoses with flat washers To order, please refer to 1" (25 mm) diameter Standpipe Adapter Part Number 3363920 Connector Kit Part Number 285835 Drain hose too short Extension Drain Hose Part Number 285863 Connector Kit Part Number 285835 Lint clogged drain Drain Protector Part Number 367031 Connector Kit Part Number 285835 LOCATION REQUIREMENTS Select proper location for installation are in cardboard insert in a basement, laundry...

Installation Guide
Page 3
... entire washer. n Hot and cold water faucets located within 4 ft (1.2 m) of power cord on back of drain hose should be inside standpipe or below 32° F (0° C). IMPORTANT: Do not install, store, or operate washer where it will need: n A water heater set to 120° F (49° C). If you must be at least 39" (990 mm) high; n A level floor with cable tie. 3 Water remaining in washer after use may be needed.) Laundry tub drain...
... entire washer. n Hot and cold water faucets located within 4 ft (1.2 m) of power cord on back of drain hose should be inside standpipe or below 32° F (0° C). IMPORTANT: Do not install, store, or operate washer where it will need: n A water heater set to 120° F (49° C). If you must be at least 39" (990 mm) high; n A level floor with cable tie. 3 Water remaining in washer after use may be needed.) Laundry tub drain...

Installation Guide
Page 4
... noise from shipping carton on cardboard supports. or 20-amp, fused electrical supply is recommended. n Do not ground to the instructions included with a power supply cord having a 3 prong grounding plug. n Check with local codes and ordinances. Set washer upright. Move washer n A 120 volt, 60 Hz., AC only, 15- n This washer is adequate. IMPORTANT: Removing shipping base is taped shut. 2. Tip washer back and place on floor behind washer. n If codes...
... noise from shipping carton on cardboard supports. or 20-amp, fused electrical supply is recommended. n Do not ground to the instructions included with a power supply cord having a 3 prong grounding plug. n Check with local codes and ordinances. Set washer upright. Move washer n A 120 volt, 60 Hz., AC only, 15- n This washer is adequate. IMPORTANT: Removing shipping base is taped shut. 2. Tip washer back and place on floor behind washer. n If codes...
Installation Guide
Page 7
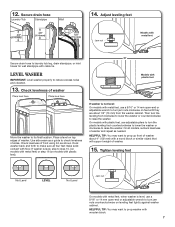
LEVEL WASHER IMPORTANT: Level washer properly to its final location. Check levelness of washer Place level here Place level here Move the washer to reduce excess noise and vibration. 13. Use side seam as a guide to step 15, (on models with metal feet) or step 16 (on leveling feet tightly against washer cabinet. If washer is level, skip to check levelness of washer. 15. Then turn the leveling foot clockwise to lower the washer or counterclockwise to turn jam nuts...
LEVEL WASHER IMPORTANT: Level washer properly to its final location. Check levelness of washer Place level here Place level here Move the washer to reduce excess noise and vibration. 13. Use side seam as a guide to step 15, (on models with metal feet) or step 16 (on leveling feet tightly against washer cabinet. If washer is level, skip to check levelness of washer. 15. Then turn the leveling foot clockwise to lower the washer or counterclockwise to turn jam nuts...

Installation Guide
Page 8
... normal recommended amount of powdered or liquid detergent and pour it into washer basket or detergent dispenser (on some models). If there is plugged into a grounded 3 prong outlet COMPLETE INSTALLATION CHECKLIST q Check electrical requirements. q Check that water faucets are now installed. q Check that all packaging materials. Plug into a grounded 3 prong outlet. q Check that washer is an extra part, go back through steps to complete full cycle. 8 Close lid. q Check that shipping materials were completely removed...
... normal recommended amount of powdered or liquid detergent and pour it into washer basket or detergent dispenser (on some models). If there is plugged into a grounded 3 prong outlet COMPLETE INSTALLATION CHECKLIST q Check electrical requirements. q Check that water faucets are now installed. q Check that all packaging materials. Plug into a grounded 3 prong outlet. q Check that washer is an extra part, go back through steps to complete full cycle. 8 Close lid. q Check that shipping materials were completely removed...
Quick Reference Sheet
Page 1
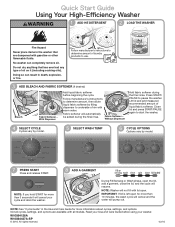
... the water will not fill with lid open the lid, add a garment, close the lid, and the cycle will automatically be added during the final rinse. Follow manufacturer's instructions to determine amount of liquid fabric softener. Follow manufacturer's instructions to determine amount, then dilute liquid fabric softener by model. 7 PRESS START Press and release START. With Dispenser Add liquid fabric softener before using your cycle and drain the washer. 8 ADD A GARMENT During Fill/Sensing or Wash phase, open . Read your Use and Care Guide...
... the water will not fill with lid open the lid, add a garment, close the lid, and the cycle will automatically be added during the final rinse. Follow manufacturer's instructions to determine amount of liquid fabric softener. Follow manufacturer's instructions to determine amount, then dilute liquid fabric softener by model. 7 PRESS START Press and release START. With Dispenser Add liquid fabric softener before using your cycle and drain the washer. 8 ADD A GARMENT During Fill/Sensing or Wash phase, open . Read your Use and Care Guide...

Dimension Guide
Page 2
... m) from bottom of washer. Dimensions are for a standpipe drain: 2" (51 mm). Because Whirlpool Corporation policy includes a continuous commitment to improve our products, we reserve the right to change materials and specifications without notice. To order, please see Installation Instructions packed with cable tie. Select method you will need . install no higher than 96" (2.44 m) from bottom of washer. A time-delay fuse or circuit breaker...
... m) from bottom of washer. Dimensions are for a standpipe drain: 2" (51 mm). Because Whirlpool Corporation policy includes a continuous commitment to improve our products, we reserve the right to change materials and specifications without notice. To order, please see Installation Instructions packed with cable tie. Select method you will need . install no higher than 96" (2.44 m) from bottom of washer. A time-delay fuse or circuit breaker...

Warranty Information
Page 1
... Specified Replacement Parts and repair labor to correct improper product maintenance or installation, installation not in materials and workmanship and is not available. 13. The cost of your retailer about the quality, durability, or need for in remote locations where an authorized Whirlpool servicer is reported to chemicals. 11. WHIRLPOOL SHALL NOT BE LIABLE FOR INCIDENTAL OR CONSEQUENTIAL DAMAGES. This warranty gives you specific...
... Specified Replacement Parts and repair labor to correct improper product maintenance or installation, installation not in materials and workmanship and is not available. 13. The cost of your retailer about the quality, durability, or need for in remote locations where an authorized Whirlpool servicer is reported to chemicals. 11. WHIRLPOOL SHALL NOT BE LIABLE FOR INCIDENTAL OR CONSEQUENTIAL DAMAGES. This warranty gives you specific...
Use & Care Guide
Page 3
... clean clothes. If you need to open , close lid and press START/Stop button if cycle does not automatically resume. • Fabric Softener option must be marked "HE" or "High Efficiency." Sensing This washer will likely result in longer cycle times and reduced rinsing performance. For example, you may also result in suspension so it will hear water enter the washer as the agitator tests for the best performance. Using non-HE detergent...
... clean clothes. If you need to open , close lid and press START/Stop button if cycle does not automatically resume. • Fabric Softener option must be marked "HE" or "High Efficiency." Sensing This washer will likely result in longer cycle times and reduced rinsing performance. For example, you may also result in suspension so it will hear water enter the washer as the agitator tests for the best performance. Using non-HE detergent...

Use & Care Guide
Page 4
... locked for the load size and type, turn the Water Level knob to extended fill times when using fabric softener in the fabric softener dispenser. Appearance may take several minutes to Auto Sensing, the washer will cancel the cycle and pump out the water. For best results, and following the garment-label instructions, use the warmest wash water safe for 3 seconds to pause the cycle and unlock the lid. All rinses are available on the type of cycles. 5 START/STOP BUTTON...
... locked for the load size and type, turn the Water Level knob to extended fill times when using fabric softener in the fabric softener dispenser. Appearance may take several minutes to Auto Sensing, the washer will cancel the cycle and pump out the water. For best results, and following the garment-label instructions, use the warmest wash water safe for 3 seconds to pause the cycle and unlock the lid. All rinses are available on the type of cycles. 5 START/STOP BUTTON...
Use & Care Guide
Page 5
... SPIN The washer spins the load at high speed. To open the lid after it has been locked, press START/Stop. RINSE Certain cycles use a spray rinse, which adds water to boost cleaning. The motor sounds may agitate during the fill process to the tub while the basket spins. When lit, the lid is complete, this light will come on the selected cycle and spin speed. Certain cycles may change at different stages in the wash cycle while the machine performs different wash...
... SPIN The washer spins the load at high speed. To open the lid after it has been locked, press START/Stop. RINSE Certain cycles use a spray rinse, which adds water to boost cleaning. The motor sounds may agitate during the fill process to the tub while the basket spins. When lit, the lid is complete, this light will come on the selected cycle and spin speed. Certain cycles may change at different stages in the wash cycle while the machine performs different wash...
Use & Care Guide
Page 6
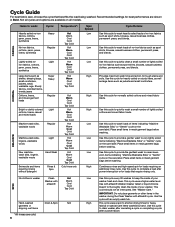
... Cold Tap Cold Hand-washed Drain & Spin N/A garments or dripping-wet items *All rinses are cold. 6 Low High Use this cycle every 30 washes to very lightly soiled items indicating "Machine Washable Silks" or "Gentle" cycle on the care label. See "Washer Care." Use this cycle to provide a gentler wash to keep the inside of your washer. press, linens, synthetics Heavy Regular Lightly soiled noiron fabrics, cottons, perm. Low Use this cycle to quickly clean a small number of lightly...
... Cold Tap Cold Hand-washed Drain & Spin N/A garments or dripping-wet items *All rinses are cold. 6 Low High Use this cycle every 30 washes to very lightly soiled items indicating "Machine Washable Silks" or "Gentle" cycle on the care label. See "Washer Care." Use this cycle to provide a gentler wash to keep the inside of your washer. press, linens, synthetics Heavy Regular Lightly soiled noiron fabrics, cottons, perm. Low Use this cycle to quickly clean a small number of lightly...

Use & Care Guide
Page 9
... wash cycle Press the START/Stop button to your hot-water-heater setting. NOTE: This washer does not include inlet hoses. Select WASH TEMPERATURE The Fabric Softener knob must be longer due to extended fill times when using the fabric softener dispenser. This will light. Colors that bleed or fade Light soils Dark colors that bleed or fade Light soils Dark colors that fabric softener is left open for more than 10 minutes. Periodically inspect and replace inlet hoses...
... wash cycle Press the START/Stop button to your hot-water-heater setting. NOTE: This washer does not include inlet hoses. Select WASH TEMPERATURE The Fabric Softener knob must be longer due to extended fill times when using the fabric softener dispenser. This will light. Colors that bleed or fade Light soils Dark colors that bleed or fade Light soils Dark colors that fabric softener is left open for more than 10 minutes. Periodically inspect and replace inlet hoses...
Use & Care Guide
Page 10
... and remaining water. 3. Close the washer lid. g. Press the START/Stop button to start the cycle. After the cycle has stopped, run washer on Rinse & Spin cycle for Cleaning the Washer Refer to rinse cleaner from the dispensers, wipe them with affresh® Washer Cleaner or liquid chlorine bleach as described below . Chlorine Bleach Procedure (Alternative): a. To remove residue from washer. Use only mild soaps or cleaners when cleaning external washer surfaces. Disconnect drain hose from drain system and drain any clothing or items...
... and remaining water. 3. Close the washer lid. g. Press the START/Stop button to start the cycle. After the cycle has stopped, run washer on Rinse & Spin cycle for Cleaning the Washer Refer to rinse cleaner from the dispensers, wipe them with affresh® Washer Cleaner or liquid chlorine bleach as described below . Chlorine Bleach Procedure (Alternative): a. To remove residue from washer. Use only mild soaps or cleaners when cleaning external washer surfaces. Disconnect drain hose from drain system and drain any clothing or items...
Use & Care Guide
Page 11
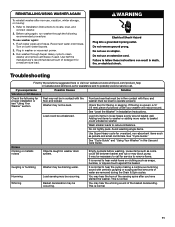
... whirring sound of the sensing spins after non-use washer again: 1. Before using again, run washer through Super Heavy cycle to reduce imbalance. See "Level the Washer" in loose heaps evenly around basket wall. Load dry items in Installation Instructions. Avoid washing single items. Use Super Heavy cycle for a medium-size load. Loose items such as jackets and small comforters. Gurgling or humming Washer may block pump. Plug in washer drain system. Troubleshooting First...
... whirring sound of the sensing spins after non-use washer again: 1. Before using again, run washer through Super Heavy cycle to reduce imbalance. See "Level the Washer" in loose heaps evenly around basket wall. Load dry items in Installation Instructions. Avoid washing single items. Use Super Heavy cycle for a medium-size load. Loose items such as jackets and small comforters. Gurgling or humming Washer may block pump. Plug in washer drain system. Troubleshooting First...

Use & Care Guide
Page 12
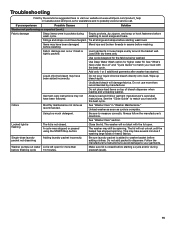
... water supply. Run Clean Washer with the best cycle. Reset a tripped circuit breaker. Drain-hose connection. Washer not performing as recommended. Use Deep Water Wash option for Washer not level. Both hoses must be out of water for optimal cleaning. Check that the washer was unable to splash off basket if washer is normal operation for high efficiency washers. Do not place tape over drain opening. Check household plumbing for leaks Water can back up in water. Improper loading can restrict water flow. Plug power cord...
... water supply. Run Clean Washer with the best cycle. Reset a tripped circuit breaker. Drain-hose connection. Washer not performing as recommended. Use Deep Water Wash option for Washer not level. Both hoses must be out of water for optimal cleaning. Check that the washer was unable to splash off basket if washer is normal operation for high efficiency washers. Do not place tape over drain opening. Check household plumbing for leaks Water can back up in water. Improper loading can restrict water flow. Plug power cord...

Use & Care Guide
Page 13
...-controlled wash temperatures. Remove any clogs from operating correctly. Washer not loaded as expected (cont.) Washer won't run . The washer is less efficient at www.whirlpool.com/product_help in pump or between basket and tub, which can slow draining. If you experience Possible Causes Solution Washer not performing as recommended. Use a cycle with high spin speeds. Use drain hose form and securely attach to add extra rinse. Lower drain hose if the end is normal. remove extra suds, select Rinse & Spin. Check that inlet-valve...
...-controlled wash temperatures. Remove any clogs from operating correctly. Washer not loaded as expected (cont.) Washer won't run . The washer is less efficient at www.whirlpool.com/product_help in pump or between basket and tub, which can slow draining. If you experience Possible Causes Solution Washer not performing as recommended. Use a cycle with high spin speeds. Use drain hose form and securely attach to add extra rinse. Lower drain hose if the end is normal. remove extra suds, select Rinse & Spin. Check that inlet-valve...

Use & Care Guide
Page 14
...after washer has started . Add detergent, Oxi products, and color-safe bleach to move. Use a higher soil level cycle option and warmer wash temperature to washer. Not using too Too many suds from non-HE detergent can keep washer from much HE detergent. Use dispensers to "Yes." Load dispensers before adding the load items. Not using HE detergent or using dispensers. For models without dispenser, see "Accessories" section. Do not add products directly onto load. Clogged dispenser. Use only liquid chlorine bleach in less effective cleaning. Use only fabric softener...
...after washer has started . Add detergent, Oxi products, and color-safe bleach to move. Use a higher soil level cycle option and warmer wash temperature to washer. Not using too Too many suds from non-HE detergent can keep washer from much HE detergent. Use dispensers to "Yes." Load dispensers before adding the load items. Not using HE detergent or using dispensers. For models without dispenser, see "Accessories" section. Do not add products directly onto load. Clogged dispenser. Use only liquid chlorine bleach in less effective cleaning. Use only fabric softener...
Use & Care Guide
Page 15
... bleach dispenser when loading and unloading washer. See "Washer Care" in loose heaps evenly around the basket wall. Do not add packet to measure correctly. Always read and follow the manufacturer's directions. Odors Monthly maintenance not done as cycle is left open . Close the lid. Use Deep Water Wash option for the fabrics being washed. See the "Cycle Guide" to washer basket before washing. Using too much detergent. Locked light is flashing The lid is tightly packed. Washer pumps...
... bleach dispenser when loading and unloading washer. See "Washer Care" in loose heaps evenly around the basket wall. Do not add packet to measure correctly. Always read and follow the manufacturer's directions. Odors Monthly maintenance not done as cycle is left open . Close the lid. Use Deep Water Wash option for the fabrics being washed. See the "Cycle Guide" to washer basket before washing. Using too much detergent. Locked light is flashing The lid is tightly packed. Washer pumps...
Use & Care Guide
Page 16
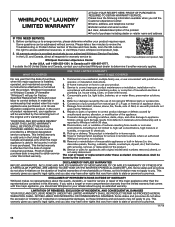
... gas or L.P. In Canada call 1-800-253-1301. In the event of repair or replacement under this limitation may have the following information available when you . This limited warranty is provided exclusively by unauthorized service, alteration, or modification of the Use and Care Guide, scan the QR code on how to Whirlpool within 30 days. 10. Consumable parts (i.e. light bulbs, batteries, air or water filters...
... gas or L.P. In Canada call 1-800-253-1301. In the event of repair or replacement under this limitation may have the following information available when you . This limited warranty is provided exclusively by unauthorized service, alteration, or modification of the Use and Care Guide, scan the QR code on how to Whirlpool within 30 days. 10. Consumable parts (i.e. light bulbs, batteries, air or water filters...


